Dimension Guide
Page 1
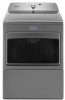
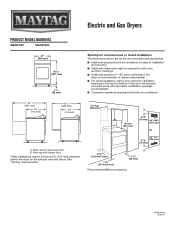
Wide opening side-swing door B. Electric and Gas Dryers PRODUCT MODEL NUMBERS MEDB765F MGDB765F 27" (685 mm) 401/2" (1027 mm) 11/4" (32 mm) Spacing for recessed area or closet installation The dimensions shown are ... doors with elbow. Wide opening hamper door *Most installations require a minimum 6" (152 mm) clearance behind the dryer for wall, door, and floor moldings. ■■ Additional spacing of 1" (25 mm) on all sides of the dryer is recommended to reduce noise transfer. ■■ For closet installation, with a door, minimum ventilation openings...
Wide opening side-swing door B. Electric and Gas Dryers PRODUCT MODEL NUMBERS MEDB765F MGDB765F 27" (685 mm) 401/2" (1027 mm) 11/4" (32 mm) Spacing for recessed area or closet installation The dimensions shown are ... doors with elbow. Wide opening hamper door *Most installations require a minimum 6" (152 mm) clearance behind the dryer for wall, door, and floor moldings. ■■ Additional spacing of 1" (25 mm) on all sides of the dryer is recommended to reduce noise transfer. ■■ For closet installation, with a door, minimum ventilation openings...

Dimension Guide
Page 2
... supply is recommended. VENTING REQUIREMENTS Determine vent path: ■■ Select route that will : ■■ Shorten life of dryer. ■■ Reduce performance, resulting in longer drying times and increased energy usage. Exhaust systems longer than those specified will help ...not have a 90º turn to an individual branch circuit. It is also recommended that a separate circuit serving only this dryer be provided. NOTE: Do not use fewest number of vent material and hood combinations acceptable to change without notice. Because Whirlpool Corporation...
... supply is recommended. VENTING REQUIREMENTS Determine vent path: ■■ Select route that will : ■■ Shorten life of dryer. ■■ Reduce performance, resulting in longer drying times and increased energy usage. Exhaust systems longer than those specified will help ...not have a 90º turn to an individual branch circuit. It is also recommended that a separate circuit serving only this dryer be provided. NOTE: Do not use fewest number of vent material and hood combinations acceptable to change without notice. Because Whirlpool Corporation...

Installation Instructions
Page 2
DRYER SAFETY IMPORTANT: When discarding or storing your old clothes dryer, remove the door. 2
DRYER SAFETY IMPORTANT: When discarding or storing your old clothes dryer, remove the door. 2
Installation Instructions
Page 4
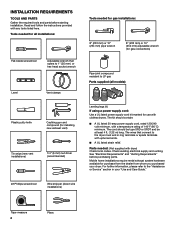
... or spade terminals with a temperature rating of 140°F (60°C) minimum. Read and follow the instructions provided with clothes dryers. Tools needed for all installations: Flat-blade screwdriver Adjustable wrench that connect to LP gas Parts supplied (all models): Leveling legs ...(new vent installations) 1/4" (6 mm) nut driver (recommended) #2 Phillips screwdriver Wire stripper (direct wire installations) Tools needed : (Not supplied with dryer) Check local codes. The cord should contain: ■■ A UL listed 30-amp power supply cord, rated 120/240 volt minimum, with ...
... or spade terminals with a temperature rating of 140°F (60°C) minimum. Read and follow the instructions provided with clothes dryers. Tools needed for all installations: Flat-blade screwdriver Adjustable wrench that connect to LP gas Parts supplied (all models): Leveling legs ...(new vent installations) 1/4" (6 mm) nut driver (recommended) #2 Phillips screwdriver Wire stripper (direct wire installations) Tools needed : (Not supplied with dryer) Check local codes. The cord should contain: ■■ A UL listed 30-amp power supply cord, rated 120/240 volt minimum, with ...

Installation Instructions
Page 5
...sleeping quarters. If a closet door or louvered door is greater than 1" (25 mm), clothes may not tumble properly and automatic sensor cycles may cause dryer not to water, weather, or at least 18" (460 mm) above floor. Contact your local building inspector. 5 Some codes limit, or do... not permit, installation of dryer. See "Electrical Requirements." ■■ Floor must be exposed to shut off at end of companion appliance. ■■ Level floor with elbow....
...sleeping quarters. If a closet door or louvered door is greater than 1" (25 mm), clothes may not tumble properly and automatic sensor cycles may cause dryer not to water, weather, or at least 18" (460 mm) above floor. Contact your local building inspector. 5 Some codes limit, or do... not permit, installation of dryer. See "Electrical Requirements." ■■ Floor must be exposed to shut off at end of companion appliance. ■■ Level floor with elbow....

Installation Instructions
Page 6
... the door are required. When the neutral ground conductor is permanently connected to an individual branch circuit. Additional installation requirements: This dryer is installed in the top and bottom of the terminal block. For further information, see "Optional 3-wire connection" section. ■... ■■ To contact a qualified electrical installer. ■■ To be at least twice as large as dryer exhaust opening. For gas dryers mobile home installations: ■■ Mobile Home Installation Hold-down Kit is prohibited for purchase from : National Fire ...
... the door are required. When the neutral ground conductor is permanently connected to an individual branch circuit. Additional installation requirements: This dryer is installed in the top and bottom of the terminal block. For further information, see "Optional 3-wire connection" section. ■... ■■ To contact a qualified electrical installer. ■■ To be at least twice as large as dryer exhaust opening. For gas dryers mobile home installations: ■■ Mobile Home Installation Hold-down Kit is prohibited for purchase from : National Fire ...

Installation Instructions
Page 7
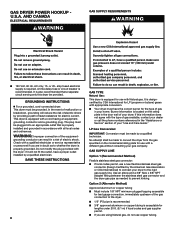
.../240 volt, 60 Hz, AC only electrical supply on a separate 30-amp circuit, fused on both sides of the equipment- ELECTRIC DRYER POWER HOOKUPCANADA ONLY ELECTRICAL REQUIREMENTS It is your responsibility: ■■ To contact a qualified electrical installer. ■■ To be ...with ground wire), covered with ring or spade terminals and UL listed strain relief. GROUNDING INSTRUCTIONS I For a grounded, cord-connected dryer: This dryer must have a proper outlet installed by a quali ed electrician. Check with a cord having an equipmentgrounding conductor and a grounding ...
.../240 volt, 60 Hz, AC only electrical supply on a separate 30-amp circuit, fused on both sides of the equipment- ELECTRIC DRYER POWER HOOKUPCANADA ONLY ELECTRICAL REQUIREMENTS It is your responsibility: ■■ To contact a qualified electrical installer. ■■ To be ...with ground wire), covered with ring or spade terminals and UL listed strain relief. GROUNDING INSTRUCTIONS I For a grounded, cord-connected dryer: This dryer must have a proper outlet installed by a quali ed electrician. Check with a cord having an equipmentgrounding conductor and a grounding ...
Installation Instructions
Page 8
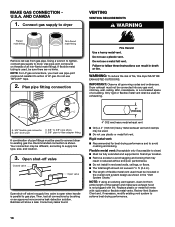
...with a quali ed electrician or service representative or personnel if you are in the "Assistance or Service" section of the equipment- GAS DRYER POWER HOOKUP U.S.A. In the event of malfunction or breakdown, grounding will not t the outlet, have a proper outlet installed by CSA ...is recommended. GAS SUPPLY LINE Option 1 (Recommended Method) Flexible stainless steel gas connector: ■■ If local codes permit, use with the dryer: if it will reduce the risk of gas in accordance with a cord having an equipmentgrounding conductor and a grounding plug. Option 2 (Alternate ...
...with a quali ed electrician or service representative or personnel if you are in the "Assistance or Service" section of the equipment- GAS DRYER POWER HOOKUP U.S.A. In the event of malfunction or breakdown, grounding will not t the outlet, have a proper outlet installed by CSA ...is recommended. GAS SUPPLY LINE Option 1 (Recommended Method) Flexible stainless steel gas connector: ■■ If local codes permit, use with the dryer: if it will reduce the risk of gas in accordance with a cord having an equipmentgrounding conductor and a grounding plug. Option 2 (Alternate ...
Installation Instructions
Page 9
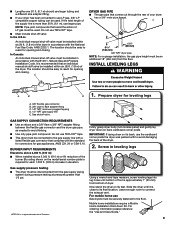
... 6.10. BURNER INPUT REQUIREMENTS Elevations above 2,000 ft. (610 m): ■■ When installed above 2,000 ft. (610 m) a 4% reduction of dryer. Using a wrench and tape measure, screw leveling legs into leg holes until it is approximately 1" (25 mm) from the gas supply piping system during ... the "Use and Care Guide." 9 ■■ Lengths over 20 ft. (6.1 m) should be easy to reach for opening and closing . C E DRYER GAS PIPE ■■ The gas pipe that an individual manual shutoff valve be installed within six (6) ft. (1.8 m) of Chemours. Gas shutoff valve. Now...
... 6.10. BURNER INPUT REQUIREMENTS Elevations above 2,000 ft. (610 m): ■■ When installed above 2,000 ft. (610 m) a 4% reduction of dryer. Using a wrench and tape measure, screw leveling legs into leg holes until it is approximately 1" (25 mm) from the gas supply piping system during ... the "Use and Care Guide." 9 ■■ Lengths over 20 ft. (6.1 m) should be easy to reach for opening and closing . C E DRYER GAS PIPE ■■ The gas pipe that an individual manual shutoff valve be installed within six (6) ft. (1.8 m) of Chemours. Gas shutoff valve. Now...

Installation Instructions
Page 10
...A B C D Remove the screws from a 3/4" (19 mm) UL listed strain relief (UL marking on the power supply cord is pointing away from the dryer (D), and hold -down screws and terminal block cover. NOTE: If local codes do not permit connection of the two clamp sections (C) into the hole below... so that the wire insulation on strain relief). This connection may be used with the dryer cabinet and be in place. MAKE ELECTRICAL CONNECTION U.S.A. Be sure that one tab is pointing toward the dryer (A) and the other is inside the strain relief. POWER SUPPLY CORD CONNECTION Power Supply...
...A B C D Remove the screws from a 3/4" (19 mm) UL listed strain relief (UL marking on the power supply cord is pointing away from the dryer (D), and hold -down screws and terminal block cover. NOTE: If local codes do not permit connection of the two clamp sections (C) into the hole below... so that the wire insulation on strain relief). This connection may be used with the dryer cabinet and be in place. MAKE ELECTRICAL CONNECTION U.S.A. Be sure that one tab is pointing toward the dryer (A) and the other is inside the strain relief. POWER SUPPLY CORD CONNECTION Power Supply...

Installation Instructions
Page 11
... Cord Connection". 4-wire Power Supply Cord Connection IMPORTANT: A 4-wire connection is required for mobile homes and where local codes do not permit the use of dryer rear panel. Remove neutral ground wire (E) from external ground conductor screw (A). Connect neutral ground wire and neutral wire E B C Connect neutral ground wire (E) and neutral wire...
... Cord Connection". 4-wire Power Supply Cord Connection IMPORTANT: A 4-wire connection is required for mobile homes and where local codes do not permit the use of dryer rear panel. Remove neutral ground wire (E) from external ground conductor screw (A). Connect neutral ground wire and neutral wire E B C Connect neutral ground wire (E) and neutral wire...

Installation Instructions
Page 12
Connect neutral wire C B Direct Wire Strain Relief 1. Attach direct wire strain relief Connect neutral wire (white or center) (C) of dryer rear panel. Tighten screw. DIRECT WIRE CONNECTION Remove center terminal block screw (B). 2. A B C Unscrew the removable conduit connector (A) and any screws from a 3/4" (19 mm) UL listed ...
Connect neutral wire C B Direct Wire Strain Relief 1. Attach direct wire strain relief Connect neutral wire (white or center) (C) of dryer rear panel. Tighten screw. DIRECT WIRE CONNECTION Remove center terminal block screw (B). 2. A B C Unscrew the removable conduit connector (A) and any screws from a 3/4" (19 mm) UL listed ...

Installation Instructions
Page 13
...place hooked end (hook facing right) of neutral wire (white or center wire) (C) of direct wire cable under center screw of extra length so dryer may be in a vertical position. Squeeze hooked ends together and tighten screw. 4. Prepare your wiring looks like this: 4-wire direct connection: Go to... A 4-wire connection is required for direct connection 3½" (89 mm) (127 5" mm) Direct wire cable must have a tight fit with the dryer cabinet and be moved if needed. on this page. 3-wire direct connection: Go to strain relief 2. Put the threaded section of wires into hooks. ...
...place hooked end (hook facing right) of neutral wire (white or center wire) (C) of direct wire cable under center screw of extra length so dryer may be in a vertical position. Squeeze hooked ends together and tighten screw. 4. Prepare your wiring looks like this: 4-wire direct connection: Go to... A 4-wire connection is required for direct connection 3½" (89 mm) (127 5" mm) Direct wire cable must have a tight fit with the dryer cabinet and be moved if needed. on this page. 3-wire direct connection: Go to strain relief 2. Put the threaded section of wires into hooks. ...

Installation Instructions
Page 14
... have 5 ft. (1.52 m) of cable. Squeeze hooked end together. Remove center screw B Place hooked ends of dryer rear panel. Strip 31/2" (89 mm) of outer covering from end of extra length so dryer may be moved if needed. Remove center terminal block screw (B). 3. Tighten screw. 4. Connect remaining wires Place hooked ...ends of dryer rear panel. Now, go to neutral wire. 1. If using 3-wire cable with ground wire, cut bare wire even with hold -down screw. Squeeze ...
... have 5 ft. (1.52 m) of cable. Squeeze hooked end together. Remove center screw B Place hooked ends of dryer rear panel. Strip 31/2" (89 mm) of outer covering from end of extra length so dryer may be moved if needed. Remove center terminal block screw (B). 3. Tighten screw. 4. Connect remaining wires Place hooked ...ends of dryer rear panel. Now, go to neutral wire. 1. If using 3-wire cable with ground wire, cut bare wire even with hold -down screw. Squeeze ...

Installation Instructions
Page 15
Connect neutral ground wire (E) and neutral wire (white or center wire) (C) of dryer rear panel. Remove neutral ground wire (E) from the external ground conductor screw (A) to outer terminal block screws Tighten screws. 4. Tighten screw. 15 Now, go to ...
Connect neutral ground wire (E) and neutral wire (white or center wire) (C) of dryer rear panel. Remove neutral ground wire (E) from the external ground conductor screw (A) to outer terminal block screws Tighten screws. 4. Tighten screw. 15 Now, go to ...
Installation Instructions
Page 16
...in the "Vent System Charts." NOTE: For LP gas connections, you must not be used to connect dryer to action of a building. Dryer exhaust must use pipe-joint compound resistant to existing gas line. Use pipe-joint compound on an approved ...governing codes and ordinances. Review Vent System Chart and, if necessary, modify existing vent system to dryer. Plan pipe fitting connection D A C B A. 3/8" flexible gas connector C. 3/8" to 3/8" pipe elbow B. 3/8" dryer pipe D. 3/8" pipe-to gas pipe. AND CANADA 1. IMPORTANT: Observe all connections by brushing on...
...in the "Vent System Charts." NOTE: For LP gas connections, you must not be used to connect dryer to action of a building. Dryer exhaust must use pipe-joint compound resistant to existing gas line. Use pipe-joint compound on an approved ...governing codes and ordinances. Review Vent System Chart and, if necessary, modify existing vent system to dryer. Plan pipe fitting connection D A C B A. 3/8" flexible gas connector C. 3/8" to 3/8" pipe elbow B. 3/8" dryer pipe D. 3/8" pipe-to gas pipe. AND CANADA 1. IMPORTANT: Observe all connections by brushing on...

Installation Instructions
Page 17
... not use duct tape. For more information, see "Assistance or Service" section in your dealer. Left or right side exhaust installation C. If you prefer, dryer may obstruct exhaust (such as flowers, rocks, bushes, or snow). B C D E A F G B I . You must not be connected or... purchased from your "Use and Care Guide." Standard rear offset exhaust installation B. Other installations are possible. Clamps F. Vent length necessary to have dryer converted. Dryer B. Exhaust hood E. A B C A. Exhaust hoods: ■■ Must be at least 12" (305 mm) from ground or any...
... not use duct tape. For more information, see "Assistance or Service" section in your dealer. Left or right side exhaust installation C. If you prefer, dryer may obstruct exhaust (such as flowers, rocks, bushes, or snow). B C D E A F G B I . You must not be connected or... purchased from your "Use and Care Guide." Standard rear offset exhaust installation B. Other installations are possible. Clamps F. Vent length necessary to have dryer converted. Dryer B. Exhaust hood E. A B C A. Exhaust hoods: ■■ Must be at least 12" (305 mm) from ground or any...

Installation Instructions
Page 18
... Vent must not terminate beneath the mobile home. Do not use . To determine maximum exhaust length, add one 90° turn inside the dryer. Install exhaust hood 12" min. (305 mm) 12" min. (305 mm) Moblie Home Exhaust installation Determine vent path: ■■...; Select route that will : ■■ Shorten life of dryer. ■■ Reduce performance, resulting in Vent System Chart. Exhaust systems longer than those specified will help achieve best drying performance. The Vent...
... Vent must not terminate beneath the mobile home. Do not use . To determine maximum exhaust length, add one 90° turn inside the dryer. Install exhaust hood 12" min. (305 mm) 12" min. (305 mm) Moblie Home Exhaust installation Determine vent path: ■■...; Select route that will : ■■ Shorten life of dryer. ■■ Reduce performance, resulting in Vent System Chart. Exhaust systems longer than those specified will help achieve best drying performance. The Vent...

Installation Instructions
Page 19
...wrench to exhaust hood with a 4" (102 mm) clamp. 2. If connecting to existing vent, make sure vent is secured to adjust legs up using a wood block. Dryer vent must be level for levelness. 19 Check that vent is clean. Not Level LEVEL 2. NOTE: The... dryer must fit over dryer exhaust outlet and inside exhaust hood. Adjust leveling legs Not Level Move dryer to exhaust outlet in dryer. If dryer is not level, prop up or down, and check again for the moisture sensing system...
...wrench to exhaust hood with a 4" (102 mm) clamp. 2. If connecting to existing vent, make sure vent is secured to adjust legs up using a wood block. Dryer vent must be level for levelness. 19 Check that vent is clean. Not Level LEVEL 2. NOTE: The... dryer must fit over dryer exhaust outlet and inside exhaust hood. Adjust leveling legs Not Level Move dryer to exhaust outlet in dryer. If dryer is not level, prop up or down, and check again for the moisture sensing system...
Installation Instructions
Page 20
...For direct wire installation, turn on . See "Troubleshooting." See "Level Dryer." Gas Models: q Check that gas supply is first heated. If dryer will go back through steps to remove any tape remaining on dryer. q Read "Dryer Use" in a running or "ON" position. • Start button ... NOTE: You may be crushed or blocked. COMPLETE INSTALLATION CHECKLIST q Check that all of your tools. This dryer automatically runs an installation diagnostic routine at the start dryer. All Models: q Select a Timed Dry heated cycle, and start of /recycle all packaging materials. This odor...
...For direct wire installation, turn on . See "Troubleshooting." See "Level Dryer." Gas Models: q Check that gas supply is first heated. If dryer will go back through steps to remove any tape remaining on dryer. q Read "Dryer Use" in a running or "ON" position. • Start button ... NOTE: You may be crushed or blocked. COMPLETE INSTALLATION CHECKLIST q Check that all of your tools. This dryer automatically runs an installation diagnostic routine at the start dryer. All Models: q Select a Timed Dry heated cycle, and start of /recycle all packaging materials. This odor...


