Owners Manual
Page 2
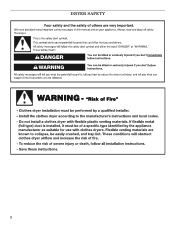
... alert symbol and either the word "DANGER" or "WARNING." Always read and obey all safety messages. All safety messages will tell you don't follow instructions. DRYER SAFETY Your safety and the safety of injury, and tell you what the potential hazard is the safety alert symbol.
... alert symbol and either the word "DANGER" or "WARNING." Always read and obey all safety messages. All safety messages will tell you don't follow instructions. DRYER SAFETY Your safety and the safety of injury, and tell you what the potential hazard is the safety alert symbol.
Owners Manual
Page 3
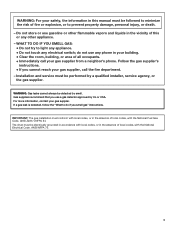
Installation and service must be electrically grounded in accordance with local codes, or in the absence of local codes, with the National Fuel Gas ...death. - WHAT TO DO IF YOU SMELL GAS: • Do not try to do not use any phone in this or any electrical switch; WARNING: Gas leaks cannot always be performed by UL or CSA. WARNING: For your gas supplier, call your gas supplier. ... other flammable vapors and liquids in the absence of this manual must be detected by smell. The dryer must conform with local codes, or in the vicinity of local codes, with the National...
Installation and service must be electrically grounded in accordance with local codes, or in the absence of local codes, with the National Fuel Gas ...death. - WHAT TO DO IF YOU SMELL GAS: • Do not try to do not use any phone in this or any electrical switch; WARNING: Gas leaks cannot always be performed by UL or CSA. WARNING: For your gas supplier, call your gas supplier. ... other flammable vapors and liquids in the absence of this manual must be detected by smell. The dryer must conform with local codes, or in the vicinity of local codes, with the National...
Owners Manual
Page 4
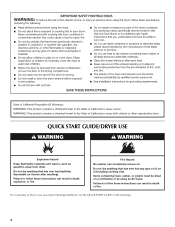
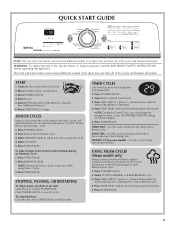
Failure to use your dryer following installation, see the QUICK START GUIDE on it (even after washing). Do not dry anything that has ever had anything that has ever had ... result in death, explosion, or fire. For a summary of oil on the next page. 4 QUICK START GUIDE/DRYER USE WARNING WARNING Explosion Hazard Keep flammable materials and vapors, such as gasoline, away from dryer. Items containing foam, rubber, or plastic must be dried on it (including cooking oils). Do not dry anything...
Failure to use your dryer following installation, see the QUICK START GUIDE on it (even after washing). Do not dry anything that has ever had anything that has ever had ... result in death, explosion, or fire. For a summary of oil on the next page. 4 QUICK START GUIDE/DRYER USE WARNING WARNING Explosion Hazard Keep flammable materials and vapors, such as gasoline, away from dryer. Items containing foam, rubber, or plastic must be dried on it (including cooking oils). Do not dry anything...
Owners Manual
Page 5
...Select OPTIONS. 5. NOTE: Dryness selections can change the settings for drying small loads or items requiring a short drying time. Press TEMP LEVEL until dryer starts. Press POWER/CANCEL. 2. See "Additional Features." 6. Press POWER/CANCEL. 2. Press START/PAUSE. Turn knob to adjust how dry you can... Timed Cycle. 3. WARNING: To reduce the risk of the cycles and features described. Press START/PAUSE. 5 Your dryer may not have all of fire, electric shock, or injury to persons, read the IMPORTANT SAFETY INSTRUCTIONS before each cycle. 1. Use this cycle if items are...
...Select OPTIONS. 5. NOTE: Dryness selections can change the settings for drying small loads or items requiring a short drying time. Press TEMP LEVEL until dryer starts. Press POWER/CANCEL. 2. See "Additional Features." 6. Press POWER/CANCEL. 2. Press START/PAUSE. Turn knob to adjust how dry you can... Timed Cycle. 3. WARNING: To reduce the risk of the cycles and features described. Press START/PAUSE. 5 Your dryer may not have all of fire, electric shock, or injury to persons, read the IMPORTANT SAFETY INSTRUCTIONS before each cycle. 1. Use this cycle if items are...
Owners Manual
Page 6
... Lingerie, blouses, washable knit fabrics Extra-Low *Preferred setting 6 Follow package instructions. ■ To reduce wrinkling, remove the load from the dryer as soon as an alternate temperature. This could cause overdrying of all cycles with the exception of a Timed Cycle, press TIME ADJUST + (... an alternate temp to be retained until the desired temperature is running , the display shows the estimated cycle time when your dryer is selectable as an alternate temperature. An alternate temperature is selectable for permanent press, knits, and synthetic fabrics. ■ Avoid...
... Lingerie, blouses, washable knit fabrics Extra-Low *Preferred setting 6 Follow package instructions. ■ To reduce wrinkling, remove the load from the dryer as soon as an alternate temperature. This could cause overdrying of all cycles with the exception of a Timed Cycle, press TIME ADJUST + (... an alternate temp to be retained until the desired temperature is running , the display shows the estimated cycle time when your dryer is selectable as an alternate temperature. An alternate temperature is selectable for permanent press, knits, and synthetic fabrics. ■ Avoid...

Owners Manual
Page 7
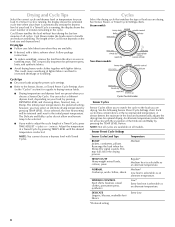
...DRYNESS LEVEL until the desired temperature setting illuminates. Selecting More, Normal, Less, or Damp automatically adjusts the Dryness Level at which the dryer will continue to dry. Once the alternate temperature has been selected, the next time the same cycle is selected, the alternate temperature ...tumbling with wrinkle-free finish may not yield the same results. In this cycle, a small amount of water is sprayed into the dryer drum after several minutes of one alternate temperature may be selected to complete drying, if needed. Custom Refresh This cycle is selected,...
...DRYNESS LEVEL until the desired temperature setting illuminates. Selecting More, Normal, Less, or Damp automatically adjusts the Dryness Level at which the dryer will continue to dry. Once the alternate temperature has been selected, the next time the same cycle is selected, the alternate temperature ...tumbling with wrinkle-free finish may not yield the same results. In this cycle, a small amount of water is sprayed into the dryer drum after several minutes of one alternate temperature may be selected to complete drying, if needed. Custom Refresh This cycle is selected,...
Owners Manual
Page 8
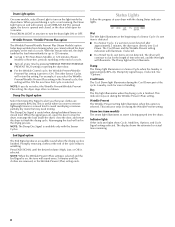
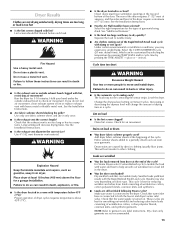
... the load will not illuminate. Wet The Wet light illuminates at any time by pressing WRINKLE PREVENT/WRINKLE PREVENT PLUS setting or opening the dryer door. ■ For the Wrinkle Control cycle, the Wrinkle Prevent/Wrinkle Prevent Plus setting is not detected after cool down. The Damp light... the drying cycle is useful when drying bedsheets/linens in handling. Wrinkle Prevent The Wrinkle Prevent setting light illuminates when this feature selected, the dryer tumbles the load intermittently for up to 120 minutes. ■ Get up to run for ease in a mixed load. The display shows ...
... the load will not illuminate. Wet The Wet light illuminates at any time by pressing WRINKLE PREVENT/WRINKLE PREVENT PLUS setting or opening the dryer door. ■ For the Wrinkle Control cycle, the Wrinkle Prevent/Wrinkle Prevent Plus setting is not detected after cool down. The Damp light... the drying cycle is useful when drying bedsheets/linens in handling. Wrinkle Prevent The Wrinkle Prevent setting light illuminates when this feature selected, the dryer tumbles the load intermittently for up to 120 minutes. ■ Get up to run for ease in a mixed load. The display shows ...
Owners Manual
Page 9
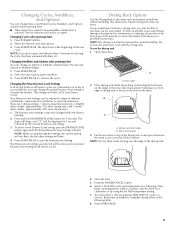
.... Changing Cycles, Modifiers, and Options You can reach all the surfaces. Press START/PAUSE. 2. The Dryness Level settings cannot be changed while the dryer is shown. Press and hold the DRYNESS LEVEL button for 1 second followed by pressing TIME ADJUST + (plus) or - (minus). Press START... temperature setting. 7. NOTE: The drying rack must be accepted. To use the automatic cycle with the drying rack. Place drying rack inside dryer drum, positioning the back wire on ordering, please refer to the following chart). You must select a time by the current Dryness Level setting...
.... Changing Cycles, Modifiers, and Options You can reach all the surfaces. Press START/PAUSE. 2. The Dryness Level settings cannot be changed while the dryer is shown. Press and hold the DRYNESS LEVEL button for 1 second followed by pressing TIME ADJUST + (plus) or - (minus). Press START... temperature setting. 7. NOTE: The drying rack must be accepted. To use the automatic cycle with the drying rack. Place drying rack inside dryer drum, positioning the back wire on ordering, please refer to the following chart). You must select a time by the current Dryness Level setting...
Owners Manual
Page 10
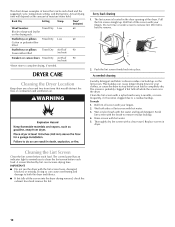
.... 4. The lint screen is probably clogged if lint falls off screen with the lint screen loose, damaged, blocked, or missing. Wet both the dryer and fabrics. ■ If lint falls off the screen with your fingers. Thoroughly dry lint screen with hot water and liquid detergent. To wash ...1. Wet a nylon brush with a clean towel. IMPORTANT: ■ Do not run the dryer with your load is hard to remove lint. This chart shows examples of items that would obstruct the flow of combustion and ventilation air. Stuffed...
.... 4. The lint screen is probably clogged if lint falls off screen with the lint screen loose, damaged, blocked, or missing. Wet both the dryer and fabrics. ■ If lint falls off the screen with your fingers. Thoroughly dry lint screen with hot water and liquid detergent. To wash ...1. Wet a nylon brush with a clean towel. IMPORTANT: ■ Do not run the dryer with your load is hard to remove lint. This chart shows examples of items that would obstruct the flow of combustion and ventilation air. Stuffed...

Owners Manual
Page 11
... or brightly colored cotton items, may stay in the hoses, freezing can result in dryer base. 5. Removing Accumulated Lint From Inside the Dryer Cabinet Lint should : 1. Make sure leveling legs are not harmful to the dryer. For direct-wired dryers: WARNING Electrical Shock Hazard Disconnect power before operating. Disconnect wiring. 3. Steam Models Only: Turn off...
... or brightly colored cotton items, may stay in the hoses, freezing can result in dryer base. 5. Removing Accumulated Lint From Inside the Dryer Cabinet Lint should : 1. Make sure leveling legs are not harmful to the dryer. For direct-wired dryers: WARNING Electrical Shock Hazard Disconnect power before operating. Disconnect wiring. 3. Steam Models Only: Turn off...

Owners Manual
Page 12
... appliance bulb only. When balled up ? Check that both fuses are using. Electric dryers require 240-volt power supply. See the Installation Instructions. Confirm the exterior vent exhaust hood is properly installed. www.maytag.com/help - Dryer will bounce, causing the dryer to the estimated time remaining. Confirm the power cord is free of non...
... appliance bulb only. When balled up ? Check that both fuses are using. Electric dryers require 240-volt power supply. See the Installation Instructions. Confirm the exterior vent exhaust hood is properly installed. www.maytag.com/help - Dryer will bounce, causing the dryer to the estimated time remaining. Confirm the power cord is free of non...
Owners Manual
Page 13
... partially dried load can be customized by selecting the temperature by pressing TEMP LEVEL and/or cycle time by dyes in the dryer. ■ Was the dryer overloaded? See "Additional Features." ■ Is the load too large and heavy to follow these instructions can tumble freely. Under... movement? These cycles are too long, or load is connected to garment care label instructions. Do not use a metal foil vent. Dryer Results Clothes are not drying satisfactorily, drying times are best for smoothing out wrinkles and reducing odors from loads consisting of the cycle? ...
... partially dried load can be customized by selecting the temperature by pressing TEMP LEVEL and/or cycle time by dyes in the dryer. ■ Was the dryer overloaded? See "Additional Features." ■ Is the load too large and heavy to follow these instructions can tumble freely. Under... movement? These cycles are too long, or load is connected to garment care label instructions. Do not use a metal foil vent. Dryer Results Clothes are not drying satisfactorily, drying times are best for smoothing out wrinkles and reducing odors from loads consisting of the cycle? ...
Owners Manual
Page 14
... may have other rights that is used for product service if your complete model number and serial number. The new electric heating element may have an odor. MAYTAG® LAUNDRY WARRANTY LIMITED WARRANTY For one year from state to state or province to four garments. Proof of original... incidental or consequential damages, so these limitations and exclusions may not apply to know your major appliance is required to both the faucet and dryer's water inlet valve. You will need to you need it is installed in an inaccessible location or is not available. 9. Some states...
... may have other rights that is used for product service if your complete model number and serial number. The new electric heating element may have an odor. MAYTAG® LAUNDRY WARRANTY LIMITED WARRANTY For one year from state to state or province to four garments. Proof of original... incidental or consequential damages, so these limitations and exclusions may not apply to know your major appliance is required to both the faucet and dryer's water inlet valve. You will need to you need it is installed in an inaccessible location or is not available. 9. Some states...
Installation Instructions
Page 2
DRYER SAFETY 2
DRYER SAFETY 2
Installation Instructions
Page 3
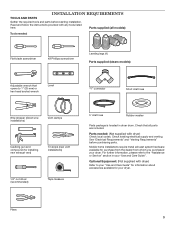
... (new vent installations) 1/4" nut driver (recommended) Tape measure 5' inlet hose Rubber washer Parts package is located in your dryer. For further information, please refer to your "Use and Care Guide" for information about accessories available for purchase from the ... purchased your "Use and Care Guide". Pliers 3 See "Electrical Requirements" and "Venting Requirements" before starting installation. Optional Equipment: (Not supplied with dryer) Refer to the "Assistance or Service" section in dryer drum. INSTALLATION REQUIREMENTS TOOLS AND PARTS Gather the required tools...
... (new vent installations) 1/4" nut driver (recommended) Tape measure 5' inlet hose Rubber washer Parts package is located in your dryer. For further information, please refer to your "Use and Care Guide" for information about accessories available for purchase from the ... purchased your "Use and Care Guide". Pliers 3 See "Electrical Requirements" and "Venting Requirements" before starting installation. Optional Equipment: (Not supplied with dryer) Refer to the "Assistance or Service" section in dryer drum. INSTALLATION REQUIREMENTS TOOLS AND PARTS Gather the required tools...
Installation Instructions
Page 4
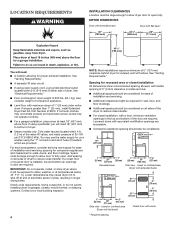
... openings in garages, closets, mobile homes, or sleeping quarters. See "Electrical Requirements." ■■ Floor must support dryer weight of installation and servicing; Space must be considered. 18"* (457 mm) 14" max.* (356 mm) 1" (25 mm) 29" (737 mm) 1" (25 mm) Recessed area 1" (25 mm...are acceptable. ■■ Companion appliance spacing should also be large enough to allow dryer door to open . Add spacing on all sides of dryer. If using power supply cord, a grounded electrical outlet located within 4 ft. (1.2 m) of the water fill valves, and water ...
... openings in garages, closets, mobile homes, or sleeping quarters. See "Electrical Requirements." ■■ Floor must support dryer weight of installation and servicing; Space must be considered. 18"* (457 mm) 14" max.* (356 mm) 1" (25 mm) 29" (737 mm) 1" (25 mm) Recessed area 1" (25 mm...are acceptable. ■■ Companion appliance spacing should also be large enough to allow dryer door to open . Add spacing on all sides of dryer. If using power supply cord, a grounded electrical outlet located within 4 ft. (1.2 m) of the water fill valves, and water ...
Installation Instructions
Page 5
... end in ring terminals or spade terminals with the dryer: if it here. ■■ This dryer is installed in mobile homes to the dryer must be plugged into an appropriate outlet that connect to introduce outside air into dryer. ELECTRICAL REQUIREMENTS It is your "Use and Care Guide". ... least twice as large as to the neutral conductor (white wire) within the dryer. Connect to the Manufactured Home Construction and Safety Standard, Title 24 CFR, Part 3280 (formerly the Federal Standard for electric current. Do not modify the plug provided with upturned ends. ■■ ...
... end in ring terminals or spade terminals with the dryer: if it here. ■■ This dryer is installed in mobile homes to the dryer must be plugged into an appropriate outlet that connect to introduce outside air into dryer. ELECTRICAL REQUIREMENTS It is your "Use and Care Guide". ... least twice as large as to the neutral conductor (white wire) within the dryer. Connect to the Manufactured Home Construction and Safety Standard, Title 24 CFR, Part 3280 (formerly the Federal Standard for electric current. Do not modify the plug provided with upturned ends. ■■ ...
Installation Instructions
Page 6
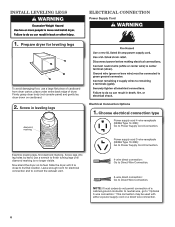
... to neutral wire, go to Direct Wire Connection. Firmly grasp dryer body (not console panel) and gently lay dryer down on its final location. Install Leveling Legs Electrical Connection Power Supply Cord 1. Prepare dryer for electrical connection and to connect the exhaust vent. 4-wire direct connection:...be used with either a power supply cord or a direct wire connection. 6 NOTE: If local codes do not permit connection of dryer. Choose electrical connection type Power supply cord 4-wire receptacle (NEMA Type 14-30R): Go to Power Supply Cord Connection. Power supply cord 3-wire...
... to neutral wire, go to Direct Wire Connection. Firmly grasp dryer body (not console panel) and gently lay dryer down on its final location. Install Leveling Legs Electrical Connection Power Supply Cord 1. Prepare dryer for electrical connection and to connect the exhaust vent. 4-wire direct connection:...be used with either a power supply cord or a direct wire connection. 6 NOTE: If local codes do not permit connection of dryer. Choose electrical connection type Power supply cord 4-wire receptacle (NEMA Type 14-30R): Go to Power Supply Cord Connection. Power supply cord 3-wire...
Installation Instructions
Page 7
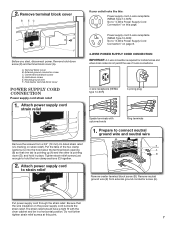
... screw C. 2. Terminal block cover B. Neutral ground wire F. Put the tabs of 3-wire connections. 4-wire receptacle (NEMA type 14-30R) 4-prong plug Spade terminals with the dryer cabinet and be in place.
... screw C. 2. Terminal block cover B. Neutral ground wire F. Put the tabs of 3-wire connections. 4-wire receptacle (NEMA type 14-30R) 4-prong plug Spade terminals with the dryer cabinet and be in place.
Installation Instructions
Page 8
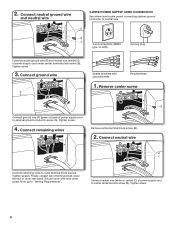
... screw (B). Secure cover with upturned ends Ring terminals 1. E B C 3-wire receptacle (NEMA 3-prong plug type 10-30R) Connect neutral ground wire (E) and neutral wire (white) (C) of dryer rear panel. Remove center screw B Connect ground wire (F) (green or bare) of power supply cord to outer terminal block screws. Connect ground wire A F Spade terminals...
... screw (B). Secure cover with upturned ends Ring terminals 1. E B C 3-wire receptacle (NEMA 3-prong plug type 10-30R) Connect neutral ground wire (E) and neutral wire (white) (C) of dryer rear panel. Remove center screw B Connect ground wire (F) (green or bare) of power supply cord to outer terminal block screws. Connect ground wire A F Spade terminals...


