Use and Care Guide
Page 3
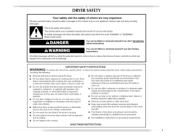
... read and obey all instructions before or after each load. [] Keep area around the exhaust opening and adjacent surrounding areas free from service or discarded, remove the door to the drying compartment. [] Do not reach into the dryer if the drum is , tell you how to reduce the chance of fire, electric shock, or injury to persons when using the dryer. [] Do not place...
... read and obey all instructions before or after each load. [] Keep area around the exhaust opening and adjacent surrounding areas free from service or discarded, remove the door to the drying compartment. [] Do not reach into the dryer if the drum is , tell you how to reduce the chance of fire, electric shock, or injury to persons when using the dryer. [] Do not place...
Use and Care Guide
Page 4
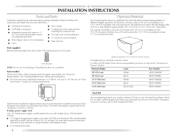
... your dryer. Optlonal pedestal f 1_._ /39.4 cm] model shown) The pedestals are included. If using a power supply cord: Use a U[. listed power supply cord kit marked for Part Number 8212640. Parts needed Check local codes. For further information, please refer to stack your dryer or refer to 1" (2.5 cm) or hex-head socket wrench (for adjusting dryer feet) • Wire stripper (direct wire installations) • I.evel • Caulking gun and compound (for this dryer. listed 30-amp power supply cord, rated 120...
... your dryer. Optlonal pedestal f 1_._ /39.4 cm] model shown) The pedestals are included. If using a power supply cord: Use a U[. listed power supply cord kit marked for Part Number 8212640. Parts needed Check local codes. For further information, please refer to stack your dryer or refer to 1" (2.5 cm) or hex-head socket wrench (for adjusting dryer feet) • Wire stripper (direct wire installations) • I.evel • Caulking gun and compound (for this dryer. listed 30-amp power supply cord, rated 120...
Use and Care Guide
Page 5
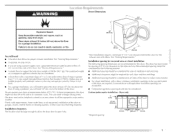
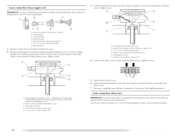
... a garage installation. Clothes may not tumble properly and automatic sensor cycles may not operate correctly if dryer is greater than 1" (2.5 cm), install Extended [Dryer Feet Kit, Part Number 279810. Yon will be considered. Place dryer at temperatures below 45°F (7°C). L( (._ {I( II l'ill;;"_,lli, II= .[ I,_ I "* 2.8cm n {68.6cm) 2.8cm See "Electrical Requirements." • A sturdy floor to reduce noise transfer. • For closet installation, with a door, minimum ventilation openings in...
... a garage installation. Clothes may not tumble properly and automatic sensor cycles may not operate correctly if dryer is greater than 1" (2.5 cm), install Extended [Dryer Feet Kit, Part Number 279810. Yon will be considered. Place dryer at temperatures below 45°F (7°C). L( (._ {I( II l'ill;;"_,lli, II= .[ I,_ I "* 2.8cm n {68.6cm) 2.8cm See "Electrical Requirements." • A sturdy floor to reduce noise transfer. • For closet installation, with a door, minimum ventilation openings in...

Use and Care Guide
Page 7
... or white wire) of the terminal block, the dryer cabinet is installed with a C-wire electrical supply connection. A time-delay fuse or circuit breaker is suitable for homes built after 1996, and all local codes and ordinances. Connect to the neutral wire, see "Optional 3-wire connection" section. If codes permit and a separate ground wire is used when the appliance is manufactured ready to introduce outside air into the dryer. Additional installation requirements This dryer is recommended...
... or white wire) of the terminal block, the dryer cabinet is installed with a C-wire electrical supply connection. A time-delay fuse or circuit breaker is suitable for homes built after 1996, and all local codes and ordinances. Connect to the neutral wire, see "Optional 3-wire connection" section. If codes permit and a separate ground wire is used when the appliance is manufactured ready to introduce outside air into the dryer. Additional installation requirements This dryer is recommended...
Use and Care Guide
Page 8
... are in ring terminals or spade terminals with clothes dryers. listed power supply cord kit marked for electric current. The wires that is properly installed and grounded in a risk of electric shock by direct wire: Power supply cable must be plugged into an appropriate outlet that connect to whether the dryer is properly grounded. The plug must be run with flexible metallic conduit. SAVE THESE INSTRUCTIONS 8 listed strain relief. This dryer uses a cord having an equipment...
... are in ring terminals or spade terminals with clothes dryers. listed power supply cord kit marked for electric current. The wires that is properly installed and grounded in a risk of electric shock by direct wire: Power supply cable must be plugged into an appropriate outlet that connect to whether the dryer is properly grounded. The plug must be run with flexible metallic conduit. SAVE THESE INSTRUCTIONS 8 listed strain relief. This dryer uses a cord having an equipment...
Use and Care Guide
Page 9
...;_ 51 Electrical Shock Hazard Plug into a standard 14-%0R wall receptacle. A time-delay fuse or circuit breaker is 5 ft (1.52 m) in death or electrical shock. Be sure wall receptacle is within reach of the above codes standard may be sure that the electrical connection is equipped with the Canadian Electrical Code, C22.1 -latest edition and all local codes. Failure to be plugged into a grounded 4 prong outlet.
...;_ 51 Electrical Shock Hazard Plug into a standard 14-%0R wall receptacle. A time-delay fuse or circuit breaker is 5 ft (1.52 m) in death or electrical shock. Be sure wall receptacle is within reach of the above codes standard may be sure that the electrical connection is equipped with the Canadian Electrical Code, C22.1 -latest edition and all local codes. Failure to be plugged into a grounded 4 prong outlet.
Use and Care Guide
Page 12
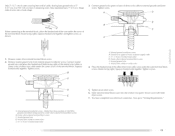
... extra length so dryer can be moved if needed. 12 Y+" ( 1.9 cn'l) Ut listed strain relief G. Y+" ( 1.9 cm) UI listed strain relief D. Center silver-colored terminal block screw E. Neutral ground wire" I. Fxternal ground conductor screw - Neutral wire (white or center wire') E. 4-wire connection: Power supply cord IMPORTANT: A 4-wire connection is required for mobile homes and where local codes do not permit the use of dryer rear paneh Secure cover with upturned ends F. Neutral prong E. Spade...
... extra length so dryer can be moved if needed. 12 Y+" ( 1.9 cn'l) Ut listed strain relief G. Y+" ( 1.9 cm) UI listed strain relief D. Center silver-colored terminal block screw E. Neutral ground wire" I. Fxternal ground conductor screw - Neutral wire (white or center wire') E. 4-wire connection: Power supply cord IMPORTANT: A 4-wire connection is required for mobile homes and where local codes do not permit the use of dryer rear paneh Secure cover with upturned ends F. Neutral prong E. Spade...
Use and Care Guide
Page 13
... wires into slot of terminal block cover into a hook shape. Neutral groutld wire" f. Y#" (1.9 cm) UL listed strain reqief 5. Connect neutral ground wire and place the hooked end (hook facing right) of the neutral wire (white or center wire) of direct wire cable under the center screw of power supply C. _" ( 1.9 cm) UL li_ted strain relie'f D. Neutral wire' (white or center wire') E. Yxternal ground conductor scre'w - insert tab of dryer rear panel. of outer covering...
... wires into slot of terminal block cover into a hook shape. Neutral groutld wire" f. Y#" (1.9 cm) UL listed strain reqief 5. Connect neutral ground wire and place the hooked end (hook facing right) of the neutral wire (white or center wire) of direct wire cable under the center screw of power supply C. _" ( 1.9 cm) UL li_ted strain relie'f D. Neutral wire' (white or center wire') E. Yxternal ground conductor scre'w - insert tab of dryer rear panel. of outer covering...

Use and Care Guide
Page 16
... vent. • Review Vent system chart. Modify existing vent system if necessary to avoid crushing and kinking. B 4" ( 10.2 cm) heavy metal exhaust vent Vent products can result in its final location. • Remove excess flexible metal vent to follow these instructions or fire. Do not use a metal foil vent. Do not use duct tape. Exhaust Recommended Clamp hood styles are recommended. • Rigid metal vent is not plugged...
... vent. • Review Vent system chart. Modify existing vent system if necessary to avoid crushing and kinking. B 4" ( 10.2 cm) heavy metal exhaust vent Vent products can result in its final location. • Remove excess flexible metal vent to follow these instructions or fire. Do not use a metal foil vent. Do not use duct tape. Exhaust Recommended Clamp hood styles are recommended. • Rigid metal vent is not plugged...

Use and Care Guide
Page 19
... Hazard Use two or more people to connect the exhaust vent. See illustration. 1. Using a 4' (10.2 cm) clamp, connect vent to dryer location. Check that the vent is clean. Run vent to exhaust outlet in back or other fastening devices that there are no longer visible. 5. See "Determine vent path" in the flexible gas line. 4-. Connect vent to back. Vent must fit over the dryer exhaust outlet and inside exhaust hood. Avoid 90 ° turns. Use a wrench to exhaust hood...
... Hazard Use two or more people to connect the exhaust vent. See illustration. 1. Using a 4' (10.2 cm) clamp, connect vent to dryer location. Check that the vent is clean. Run vent to exhaust outlet in back or other fastening devices that there are no longer visible. 5. See "Determine vent path" in the flexible gas line. 4-. Connect vent to back. Vent must fit over the dryer exhaust outlet and inside exhaust hood. Avoid 90 ° turns. Use a wrench to exhaust hood...

Use and Care Guide
Page 22
...; For power supply cord installation, installation, turn on a full heat cycle (not an air cycle) for heat. [f you do not feel heat, cancel cycle and close the door. Check that both circuit breakers have all of /recycle all parts are now installed. See "level Dryer." 6. In Canada plug into a grounded 4 prong outlet. Read "Dryer Use." 9. Wipe the dryer drum interior thoroughly with a damp cloth to see which step was skipped. 2. The odor will not start the dryer. If there...
...; For power supply cord installation, installation, turn on a full heat cycle (not an air cycle) for heat. [f you do not feel heat, cancel cycle and close the door. Check that both circuit breakers have all of /recycle all parts are now installed. See "level Dryer." 6. In Canada plug into a grounded 4 prong outlet. Read "Dryer Use." 9. Wipe the dryer drum interior thoroughly with a damp cloth to see which step was skipped. 2. The odor will not start the dryer. If there...
Use and Care Guide
Page 23
... to start your dryer. Failure to follow these basic steps to follow these instructions can completely remove oil. O Medium I .EVE[ to adjust how dry you want the load to specific sections of the load and adjusts the time automatically for the cycle chosen will be . This manual covers several different models. Fire Hazard No washer can result in dryer and shut door. The preset settings and drying time for the...
... to start your dryer. Failure to follow these basic steps to follow these instructions can completely remove oil. O Medium I .EVE[ to adjust how dry you want the load to specific sections of the load and adjusts the time automatically for the cycle chosen will be . This manual covers several different models. Fire Hazard No washer can result in dryer and shut door. The preset settings and drying time for the...
Use and Care Guide
Page 24
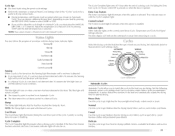
... Control Locked is running , the display shows exact number of minutes remaining in the clothes as they are available. • If desired, add a fabric softener sheet. Cycle the Cool Down tumbles the load without heat during dryer operation. or +) buttons will cause the triple beep indicating that the time cannot be changed. • Press the EXTRA CARE feature button if this option is unlocked. An electronic control determines the load type...
... Control Locked is running , the display shows exact number of minutes remaining in the clothes as they are available. • If desired, add a fabric softener sheet. Cycle the Cool Down tumbles the load without heat during dryer operation. or +) buttons will cause the triple beep indicating that the time cannot be changed. • Press the EXTRA CARE feature button if this option is unlocked. An electronic control determines the load type...
Use and Care Guide
Page 25
... heat for drying sturdy fabrics such as sport shirts, casual business clothes and permanent press blends. The Wet light will also be on the control panel show Cycle, [_mperature settings selected. and Cycle End Signal [he dryer enters the cool down [)art of a Manual Cycle by pressing the DRYNESS [.EVE[. Delicate Use this cycle to get Medium heat for heavyweight mixed loads, cotton towels or jeans. or +) buttons...
... heat for drying sturdy fabrics such as sport shirts, casual business clothes and permanent press blends. The Wet light will also be on the control panel show Cycle, [_mperature settings selected. and Cycle End Signal [he dryer enters the cool down [)art of a Manual Cycle by pressing the DRYNESS [.EVE[. Delicate Use this cycle to get Medium heat for heavyweight mixed loads, cotton towels or jeans. or +) buttons...

Use and Care Guide
Page 28
... can build up . Scrub lint screen with the lint screen loose, darnaged, blocked, or missing. A screen blocked by lint can result in the dryer. Roll lint off the screen with your dryer and will not stain future loads of lint screen with a soft cloth until all excess dye and stains are not harmful to remove residue buildup. ....... (S ........... Wet lint is located increase drying time. Replace screen in the door opening of dye. 28 Apply a liquid...
... can build up . Scrub lint screen with the lint screen loose, darnaged, blocked, or missing. A screen blocked by lint can result in the dryer. Roll lint off the screen with your dryer and will not stain future loads of lint screen with a soft cloth until all excess dye and stains are not harmful to remove residue buildup. ....... (S ........... Wet lint is located increase drying time. Replace screen in the door opening of dye. 28 Apply a liquid...

Use and Care Guide
Page 29
... bulb only. on inside the dryer drum when you open the door. See "Cleaning the lint Screen." Use masking tape to secure dryer door. Replace all parts and panels before servicing. Turn bulb counterclockwise. Cleaning From the Exhaust Vent Hint should be removed every 2 years, or more often, depending should : 1. Clean lint screen. Moving care For power supply cord-connected dryers: 1. Disconnect wiring. 3. To change the drum light 1. Open the dryer door. Unplug the power supply cord. 2. For direct-wired dryers: From Inside the Dryer Cabinet lint should be removed...
... bulb only. on inside the dryer drum when you open the door. See "Cleaning the lint Screen." Use masking tape to secure dryer door. Replace all parts and panels before servicing. Turn bulb counterclockwise. Cleaning From the Exhaust Vent Hint should be removed every 2 years, or more often, depending should : 1. Clean lint screen. Moving care For power supply cord-connected dryers: 1. Disconnect wiring. 3. To change the drum light 1. Open the dryer door. Unplug the power supply cord. 2. For direct-wired dryers: From Inside the Dryer Cabinet lint should be removed...
Use and Care Guide
Page 30
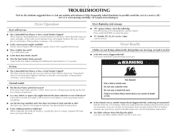
...vent. In U.S.A. Check that both circuit breakers have heat. Electric dryers require 240-volt power supply. Replace the fuse or reset the circuit breaker. Press and hold START to follow these instructions or fire. See the Installation Instructions. If the problem continues, call an electrician. karge loads may not have not tripped. Electric dryers fuses or circuit breakers. Run the dryer for 2-5 seconds. www.maytag.com/help - lint screen should be turning, but you do not feel air movement, clean exhaust system of lint or replace exhaust vent...
...vent. In U.S.A. Check that both circuit breakers have heat. Electric dryers require 240-volt power supply. Replace the fuse or reset the circuit breaker. Press and hold START to follow these instructions or fire. See the Installation Instructions. If the problem continues, call an electrician. karge loads may not have not tripped. Electric dryers fuses or circuit breakers. Run the dryer for 2-5 seconds. www.maytag.com/help - lint screen should be turning, but you do not feel air movement, clean exhaust system of lint or replace exhaust vent...

Use and Care Guide
Page 31
... level will increase drying times. Dry smaller loads that the exhaust vent is located? Lint on load • Is the lint screen clogged? Check for the first time? Proper operation of the dryer requires 5" (12.7 cm). Failure to other injury. When the odors or fumes are wrinkled • Was the load removed from dryer. The new electric heating element may not be gone after the first cycle. Closet doors must have an odor. Clean lint screen. The odor...
... level will increase drying times. Dry smaller loads that the exhaust vent is located? Lint on load • Is the lint screen clogged? Check for the first time? Proper operation of the dryer requires 5" (12.7 cm). Failure to other injury. When the odors or fumes are wrinkled • Was the load removed from dryer. The new electric heating element may not be gone after the first cycle. Closet doors must have an odor. Clean lint screen. The odor...

Use and Care Guide
Page 32
...accessories. Part Number Accesso 20-48KITRC PT220L PT400I PT6001 4210463 31682 1903WH 8576846A 4 ff (1.2 m) gas line dryer connector installation kit 4 ft (1.2 m) dryer cord, 3-wire, 30 amp 4 ft (1.2 m) dryer cord, 4-wire, 30 amp 6 ft (1.8 m) dryer cord, 4-wire, 30 amp Dryer vent lint brush All-purpose appliance cleaner [aundry supply storage cart [P Gas conversion kit 8579666A Door reversal kit (all colors) W10121663 8212640 Drying rack Stack kit 32 ASSISTANCE OR SERVICE Before calling for assistance or service, please check "lroubleshooting." lb locate the Maytag* appliances...
...accessories. Part Number Accesso 20-48KITRC PT220L PT400I PT6001 4210463 31682 1903WH 8576846A 4 ff (1.2 m) gas line dryer connector installation kit 4 ft (1.2 m) dryer cord, 3-wire, 30 amp 4 ft (1.2 m) dryer cord, 4-wire, 30 amp 6 ft (1.8 m) dryer cord, 4-wire, 30 amp Dryer vent lint brush All-purpose appliance cleaner [aundry supply storage cart [P Gas conversion kit 8579666A Door reversal kit (all colors) W10121663 8212640 Drying rack Stack kit 32 ASSISTANCE OR SERVICE Before calling for assistance or service, please check "lroubleshooting." lb locate the Maytag* appliances...

Use and Care Guide
Page 33
... your complete model number and serial number. Contact your major appliance, to replace or repair house fuses or to or furnished with electrical or plumbing codes, or use of products not approved by a Maytag designated service company. In Canada, call 1-800-688-9900. Write down the following information about your major appliance is operated and maintained according to instructions attached to correct house wiring or...
... your complete model number and serial number. Contact your major appliance, to replace or repair house fuses or to or furnished with electrical or plumbing codes, or use of products not approved by a Maytag designated service company. In Canada, call 1-800-688-9900. Write down the following information about your major appliance is operated and maintained according to instructions attached to correct house wiring or...


