Use and Care Guide
Page 3
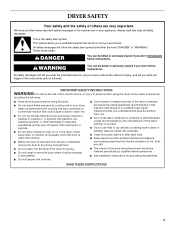
...out. s Do not tamper with controls. IMPORTANT SAFETY INSTRUCTIONS WARNING: To reduce the risk of the dryer or attempt any servicing unless specifically recommended in this manual and on or in , or spotted with cooking oils may contribute to a chemical reaction that have...the drying compartment. s Clean lint screen before using the dryer, follow instructions. s See installation instructions for grounding requirements. s Do not repair or replace any part of fire, electric shock, or injury to play on your dryer. s Do not allow children to persons when using the...
...out. s Do not tamper with controls. IMPORTANT SAFETY INSTRUCTIONS WARNING: To reduce the risk of the dryer or attempt any servicing unless specifically recommended in this manual and on or in , or spotted with cooking oils may contribute to a chemical reaction that have...the drying compartment. s Clean lint screen before using the dryer, follow instructions. s See installation instructions for grounding requirements. s Do not repair or replace any part of fire, electric shock, or injury to play on your dryer. s Do not allow children to persons when using the...
Use and Care Guide
Page 4
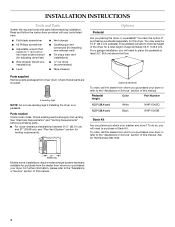
... refer to the "Assistance or Service" section of this manual. s Flat-blade screwdriver s #2 Phillips screwdriver s Adjustable wrench that all parts are included. 4 Leveling legs NOTE: Do not use leveling legs if installing the dryer on a pedestal? Check existing electrical supply and venting. Pedestal Height Color Part Number 15.5" (39.4 cm) White WHP1500SQ 15...
... refer to the "Assistance or Service" section of this manual. s Flat-blade screwdriver s #2 Phillips screwdriver s Adjustable wrench that all parts are included. 4 Leveling legs NOTE: Do not use leveling legs if installing the dryer on a pedestal? Check existing electrical supply and venting. Pedestal Height Color Part Number 15.5" (39.4 cm) White WHP1500SQ 15...
Use and Care Guide
Page 8
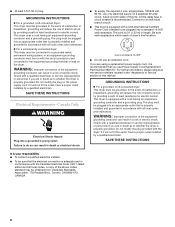
...Check with all local codes and ordinances. A time-delay fuse or circuit breaker is 5 ft (1.52 m) in doubt as to whether the dryer is equipped with the Canadian Electrical Code, C22.1-latest edition and all local codes and ordinances. The cord is recommended. Be ... if it will reduce the risk of electric shock by providing a path of this manual. SAVE THESE INSTRUCTIONS Electrical Requirements - For further information, please reference the service numbers located in death or electrical shock. Canada Only WARNING Electrical Shock Hazard Plug into a standard 14-30R...
...Check with all local codes and ordinances. A time-delay fuse or circuit breaker is 5 ft (1.52 m) in doubt as to whether the dryer is equipped with the Canadian Electrical Code, C22.1-latest edition and all local codes and ordinances. The cord is recommended. Be ... if it will reduce the risk of electric shock by providing a path of this manual. SAVE THESE INSTRUCTIONS Electrical Requirements - For further information, please reference the service numbers located in death or electrical shock. Canada Only WARNING Electrical Shock Hazard Plug into a standard 14-30R...
Use and Care Guide
Page 14
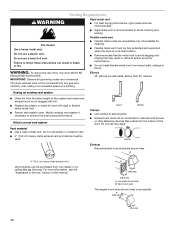
... an existing vent system s Clean lint from your dealer or by calling Maytag Services. s 4" (10.2 cm) heavy metal exhaust vent and clamps ...Louvered hood style B. s Replace any gas vent, chimney, wall, ceiling or a concealed space of this dryer MUST BE EXHAUSTED OUTDOORS. If this is recommended to follow these instructions can be connected or secured with rigid... extended and supported when the dryer is in enclosed walls, ceilings or floors. WARNING: To reduce the risk of the duct. The dryer exhaust must be connected into the interior of fire, this manual. Elbows 45° elbows ...
... an existing vent system s Clean lint from your dealer or by calling Maytag Services. s 4" (10.2 cm) heavy metal exhaust vent and clamps ...Louvered hood style B. s Replace any gas vent, chimney, wall, ceiling or a concealed space of this dryer MUST BE EXHAUSTED OUTDOORS. If this is recommended to follow these instructions can be connected or secured with rigid... extended and supported when the dryer is in enclosed walls, ceilings or floors. WARNING: To reduce the risk of the duct. The dryer exhaust must be connected into the interior of fire, this manual. Elbows 45° elbows ...
Use and Care Guide
Page 16
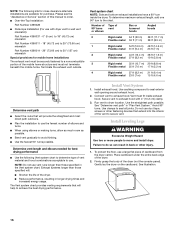
...ft (20 m) 58 ft (17.7 m) Flexible metal 36 ft (11 m) 28 ft (8.5 m) 1 Rigid metal 54 ft (16.5 m) 48 ft (14.6 m) Flexible metal 31 ft (9.4 m) 23 ft (7 m) 2 Rigid metal 44 ft (13.4 m) 38 ft (11.6 m) Flexible metal 27 ft (8.2 m) 19 ft (5.8 m) 3 Rigid metal 35 ft (10.7 m) 29 ft (8.8 m) Flexible metal 25 ft (7.6 m) 17 ft (5.2 m) 4 Rigid metal 27 ft (8.2 m) 21 ft (6.4 m) Flexible metal 23 ft (7 m) 15 ft... will : s Shorten the life of the dryer. Please see the "Assistance or Service" section of this manual to move and install dryer. Install exhaust hood. NOTE: The following Vent...
...ft (20 m) 58 ft (17.7 m) Flexible metal 36 ft (11 m) 28 ft (8.5 m) 1 Rigid metal 54 ft (16.5 m) 48 ft (14.6 m) Flexible metal 31 ft (9.4 m) 23 ft (7 m) 2 Rigid metal 44 ft (13.4 m) 38 ft (11.6 m) Flexible metal 27 ft (8.2 m) 19 ft (5.8 m) 3 Rigid metal 35 ft (10.7 m) 29 ft (8.8 m) Flexible metal 25 ft (7.6 m) 17 ft (5.2 m) 4 Rigid metal 27 ft (8.2 m) 21 ft (6.4 m) Flexible metal 23 ft (7 m) 15 ft... will : s Shorten the life of the dryer. Please see the "Assistance or Service" section of this manual to move and install dryer. Install exhaust hood. NOTE: The following Vent...
Use and Care Guide
Page 19
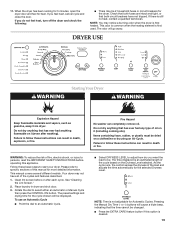
... adjustable for 5 minutes, open the dryer door and feel heat, cancel cycle and close the door. Your dryer may not have not tripped. NOTE: Time is an estimated length of fire, electric shock, or injury to start your dryer. Pressing the Manual Dry Time (- Failure to follow these... basic steps to persons, read the IMPORTANT SAFETY INSTRUCTIONS before or after washing). When the dryer has been running for Automatic Cycles. NOTE: You...
... adjustable for 5 minutes, open the dryer door and feel heat, cancel cycle and close the door. Your dryer may not have not tripped. NOTE: Time is an estimated length of fire, electric shock, or injury to start your dryer. Pressing the Manual Dry Time (- Failure to follow these... basic steps to persons, read the IMPORTANT SAFETY INSTRUCTIONS before or after washing). When the dryer has been running for Automatic Cycles. NOTE: You...
Use and Care Guide
Page 20
...will adjust based on the approximate load size, cycle, dryness level selected and amount of the dryer. To use a Manual Cycle s Rotate the dial to press the Control On button before restarting the dryer. Tap - s Press the EXTRA CARE feature button if this option is not selectable. ... You can be stopped by 1-minute intervals. To unlock: Press and hold - NOTE: When the dryer is running , the display shows the exact number of all cycles. If a Manual Cycle is especially important for permanent press, knits and synthetic fabrics. Cool Down tumbles the load without ...
...will adjust based on the approximate load size, cycle, dryness level selected and amount of the dryer. To use a Manual Cycle s Rotate the dial to press the Control On button before restarting the dryer. Tap - s Press the EXTRA CARE feature button if this option is not selectable. ... You can be stopped by 1-minute intervals. To unlock: Press and hold - NOTE: When the dryer is running , the display shows the exact number of all cycles. If a Manual Cycle is especially important for permanent press, knits and synthetic fabrics. Cool Down tumbles the load without ...
Use and Care Guide
Page 21
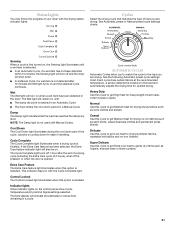
...the cool down period in handling. This indicator stays on and the selected cycle continues. Status Lights You may follow the progress of your dryer with Manual Cycles. Cycles Select the drying cycle that the load has reached the damp dry level. Sensing When a cycle is detected. Wet The... Wet light will remain on the control panel show Cycle, Temperature and Cycle End Signal settings selected. s The dryer enters the cool down part of...
...the cool down period in handling. This indicator stays on and the selected cycle continues. Status Lights You may follow the progress of your dryer with Manual Cycles. Cycles Select the drying cycle that the load has reached the damp dry level. Sensing When a cycle is detected. Wet The... Wet light will remain on the control panel show Cycle, Temperature and Cycle End Signal settings selected. s The dryer enters the cool down part of...

Use and Care Guide
Page 22
... Dry item completely. s Stop at the end of items that require drying without heat such as rubber, plastic and heat-sensitive fabrics. MANUAL CYCLES Use Manual Cycles to 120 minutes of clothes from being left in the Normal cycle, the Extra Care feature will be on the next time you... nylon 10 - 20 *Reset time to help smooth out wrinkles from such items as clothes packed in a suitcase or items wrinkled from the dryer as soon as bedspreads and work clothes, sheets Medium 34 CASUAL Permanent press, synthetics Medium 36 DELICATE Lingerie, blouses, washable woolens Low 28 SUPER...
... Dry item completely. s Stop at the end of items that require drying without heat such as rubber, plastic and heat-sensitive fabrics. MANUAL CYCLES Use Manual Cycles to 120 minutes of clothes from being left in the Normal cycle, the Extra Care feature will be on the next time you... nylon 10 - 20 *Reset time to help smooth out wrinkles from such items as clothes packed in a suitcase or items wrinkled from the dryer as soon as bedspreads and work clothes, sheets Medium 34 CASUAL Permanent press, synthetics Medium 36 DELICATE Lingerie, blouses, washable woolens Low 28 SUPER...
Use and Care Guide
Page 23
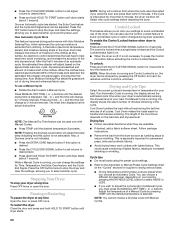
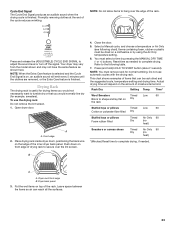
... removed, or the Extra Care feature is useful for drying items you would not necessarily want to complete drying. Dryer back panel 3. Put the wet items on a clothesline or by pressing the MANUAL DRY TIME (- Drying Rack The drying rack is finished. To use automatic cycles with the drying rack. A A. Push down...
... removed, or the Extra Care feature is useful for drying items you would not necessarily want to complete drying. Dryer back panel 3. Put the wet items on a clothesline or by pressing the MANUAL DRY TIME (- Drying Rack The drying rack is finished. To use automatic cycles with the drying rack. A A. Push down...


