Use and Care Guide
Page 3
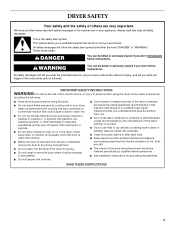
... recommended by qualified service personnel. These words mean: DANGER You can be exposed to persons when using the dryer. IMPORTANT SAFETY INSTRUCTIONS WARNING: To reduce the risk of fire, electric shock, or injury to the weather. s Do not dry articles that have been previously cleaned in, washed... in, soaked in published user-repair instructions that could ignite or explode. Close supervision of children is necessary when the dryer is moving. s Do not...
... recommended by qualified service personnel. These words mean: DANGER You can be exposed to persons when using the dryer. IMPORTANT SAFETY INSTRUCTIONS WARNING: To reduce the risk of fire, electric shock, or injury to the weather. s Do not dry articles that have been previously cleaned in, washed... in, soaked in published user-repair instructions that could ignite or explode. Close supervision of children is necessary when the dryer is moving. s Do not...
Use and Care Guide
Page 4
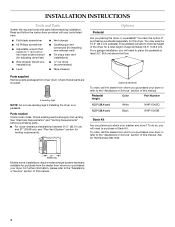
...purchasing parts. You may select a 15.5" (39.4 cm) pedestal. Parts supplied Remove parts packages from whom you purchased your dryer. Check existing electrical supply and venting. To do so, you will need to purchase a Stack Kit. For a garage installation, you will ...manual. 4 You have the option of approximately 53.5" (135.9 cm). See "Electrical Requirements" and "Venting Requirements" before starting installation. This pedestal will add to 1" (2.5 cm) or hex-head socket wrench (for adjusting dryer feet) s Wire stripper (direct wire installations) s Level s Vent clamps s ...
...purchasing parts. You may select a 15.5" (39.4 cm) pedestal. Parts supplied Remove parts packages from whom you purchased your dryer. Check existing electrical supply and venting. To do so, you will need to purchase a Stack Kit. For a garage installation, you will ...manual. 4 You have the option of approximately 53.5" (135.9 cm). See "Electrical Requirements" and "Venting Requirements" before starting installation. This pedestal will add to 1" (2.5 cm) or hex-head socket wrench (for adjusting dryer feet) s Wire stripper (direct wire installations) s Level s Vent clamps s ...
Use and Care Guide
Page 5
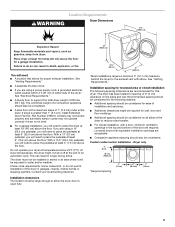
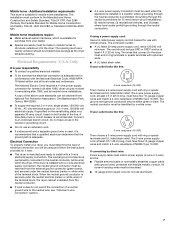
... place the pedestal at least 18 inches (46 cm) above the floor. This dryer has been tested for the following spacing dimensions are using a power supply cord, a grounded electrical outlet located within 2 ft (61 cm) of either side of the dryer. Louvered doors with elbow. s If you are recommended for ease of an automatic...
... place the pedestal at least 18 inches (46 cm) above the floor. This dryer has been tested for the following spacing dimensions are using a power supply cord, a grounded electrical outlet located within 2 ft (61 cm) of either side of the dryer. Louvered doors with elbow. s If you are recommended for ease of an automatic...

Use and Care Guide
Page 6
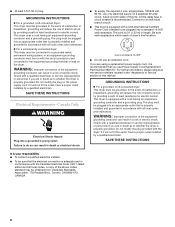
...189;" 5"** (2.5 cm) (80 cm) (12.7 cm) A 3"* (7.6 cm) B A. Recessed or closet installation - Closet installation - Side view - Closet door with stacked washer and dryer The dimensions shown are required. 7"* (17.8 cm) 7"* (17.8 cm) 9"* (22.9 cm) 5"** 31¹ ₂" 1"* 1" 27" 1" (12.7 cm) (80.0 cm...) (2.5 cm) (2.5 cm)(68.6 cm) (2.5 cm) *Required spacing **For side or bottom venting, 0" (0 cm) spacing is allowed. Dryer only 14" max.* (35.6 cm) 18" min.* (45.72 cm) 48 in.2* (310 cm2) 3"* (7.6 cm) 24 in .2 * (155 cm2) *Required spacing 3"* ...
...189;" 5"** (2.5 cm) (80 cm) (12.7 cm) A 3"* (7.6 cm) B A. Recessed or closet installation - Closet installation - Side view - Closet door with stacked washer and dryer The dimensions shown are required. 7"* (17.8 cm) 7"* (17.8 cm) 9"* (22.9 cm) 5"** 31¹ ₂" 1"* 1" 27" 1" (12.7 cm) (80.0 cm...) (2.5 cm) (2.5 cm)(68.6 cm) (2.5 cm) *Required spacing **For side or bottom venting, 0" (0 cm) spacing is allowed. Dryer only 14" max.* (35.6 cm) 18" min.* (45.72 cm) 48 in.2* (310 cm2) 3"* (7.6 cm) 24 in .2 * (155 cm2) *Required spacing 3"* ...
Use and Care Guide
Page 7
... wires and match a 3-wire receptacle of the above code standards can be at least 4 ft (1.22 m) long, must be sure that the ground path is installed with a 4-wire electrical supply connection, the neutral ground conductor must have a fuse in ring terminals or spade terminals ... CFR, Part 3280 (formerly the Federal Standard for use an extension cord. The National Electric Code requires a 4-wire power supply connection for mobile home installations. Connect to install with clothes dryers. The neutral ground conductor is suitable for homes built after 1996, and all local codes...
... wires and match a 3-wire receptacle of the above code standards can be at least 4 ft (1.22 m) long, must be sure that the ground path is installed with a 4-wire electrical supply connection, the neutral ground conductor must have a fuse in ring terminals or spade terminals ... CFR, Part 3280 (formerly the Federal Standard for use an extension cord. The National Electric Code requires a 4-wire power supply connection for mobile home installations. Connect to install with clothes dryers. The neutral ground conductor is suitable for homes built after 1996, and all local codes...
Use and Care Guide
Page 8
... an equipment-grounding conductor and a grounding plug. s For a permanently connected dryer: This dryer must be connected to do so can result in accordance with all local codes. Canada Only WARNING Electrical Shock Hazard Plug into an appropriate outlet that the electrical connection is 5 ft (1.52 m) in conformance with the circuit conductors and connected to an...
... an equipment-grounding conductor and a grounding plug. s For a permanently connected dryer: This dryer must be connected to do so can result in accordance with all local codes. Canada Only WARNING Electrical Shock Hazard Plug into an appropriate outlet that the electrical connection is 5 ft (1.52 m) in conformance with the circuit conductors and connected to an...
Use and Care Guide
Page 9
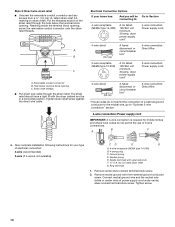
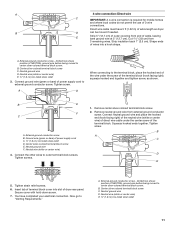
...tighten strain relief screws at this point. 9 Connect remaining 2 supply wires to center terminal (silver). Disconnect power before making electrical connections. Securely tighten all electrical connections. Disconnect power. 2. C D B A A. Terminal block cover and hold-down s Put power supply cord through ...Clamp section D. The strain relief should have a tight fit with the dryer cabinet and be connected to do so can result in a horizontal position. Disconnect power before making electrical connections. Use a UL listed strain relief. Strain relief tab pointing down...
...tighten strain relief screws at this point. 9 Connect remaining 2 supply wires to center terminal (silver). Disconnect power before making electrical connections. Securely tighten all electrical connections. Disconnect power. 2. C D B A A. Terminal block cover and hold-down s Put power supply cord through ...Clamp section D. The strain relief should have a tight fit with the dryer cabinet and be connected to do so can result in a horizontal position. Disconnect power before making electrical connections. Use a UL listed strain relief. Strain relief tab pointing down...
Use and Care Guide
Page 10
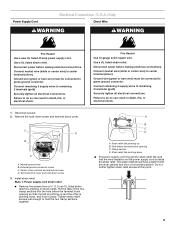
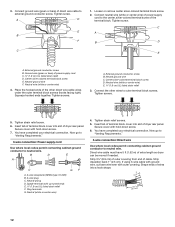
...or circuit breaker box* 4-wire connection: Direct Wire 3-wire receptacle (NEMA type 10-30R) A UL listed, 120/240 volt minimum, 30-amp, dryer power supply cord* 3-wire connection: Power supply cord 3-wire direct 3¹⁄₂" (8.9 cm) A fused disconnect or circuit breaker box* 3-...Neutral prong E. A B C A. B F A 4. Ring terminals 1. Connect neutral ground wire and the neutral wire (white or center wire) of electrical connection: 4-wire (recommended) 3-wire (if 4-wire is required for mobile homes and where local codes do not permit the use of the strain relief ...
...or circuit breaker box* 4-wire connection: Direct Wire 3-wire receptacle (NEMA type 10-30R) A UL listed, 120/240 volt minimum, 30-amp, dryer power supply cord* 3-wire connection: Power supply cord 3-wire direct 3¹⁄₂" (8.9 cm) A fused disconnect or circuit breaker box* 3-...Neutral prong E. A B C A. B F A 4. Ring terminals 1. Connect neutral ground wire and the neutral wire (white or center wire) of electrical connection: 4-wire (recommended) 3-wire (if 4-wire is required for mobile homes and where local codes do not permit the use of the strain relief ...
Use and Care Guide
Page 11
... block screw C. Squeeze hooked ends together. You have 5 ft (1.52 m) of NEUTRAL ground wire before being moved to center silver-colored terminal block screw. Direct wire cable must have completed your electrical connection. External ground conductor screw - Dotted line shows position of extra length so dryer B D can be moved if needed. Remove neutral...
... block screw C. Squeeze hooked ends together. You have 5 ft (1.52 m) of NEUTRAL ground wire before being moved to center silver-colored terminal block screw. Direct wire cable must have completed your electrical connection. External ground conductor screw - Dotted line shows position of extra length so dryer B D can be moved if needed. Remove neutral...
Use and Care Guide
Page 12
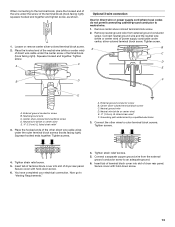
...190;" (1.9 cm) UL listed strain relief D. Shape ends of wires into slot of dryer rear panel. 3. A D E B F C 1. Neutral ground wire F. Neutral wire (white or center wire) E 1.9 cm) UL listed strain relief 3. You have 5 ft (1.52 m) of power supply cord to outer terminal block screws. B D E A ...C GF A. 3-wire receptacle (NEMA type 10-30R) B. 3-wire plug C. Direct wire cable must have completed your electrical connection. Connect neutral wire (white or center wire) of extra length so dryer can...
...190;" (1.9 cm) UL listed strain relief D. Shape ends of wires into slot of dryer rear panel. 3. A D E B F C 1. Neutral ground wire F. Neutral wire (white or center wire) E 1.9 cm) UL listed strain relief 3. You have 5 ft (1.52 m) of power supply cord to outer terminal block screws. B D E A ...C GF A. 3-wire receptacle (NEMA type 10-30R) B. 3-wire plug C. Direct wire cable must have completed your electrical connection. Connect neutral wire (white or center wire) of extra length so dryer can...
Use and Care Guide
Page 13
... the other direct wire cable wires under center, silver-colored terminal block screw. Insert tab of terminal block cover into slot of dryer rear panel. Center silver-colored terminal block screw C. Tighten strain relief screw. 5. Squeeze hooked end together. Insert tab of terminal... block cover into slot of dryer rear panel. Neutral ground wire C. Place the hooked ends of the other wires to outer terminal block screws. A. You have completed your electrical connection. Connect a separate copper ground wire from external ground ...
... the other direct wire cable wires under center, silver-colored terminal block screw. Insert tab of terminal block cover into slot of dryer rear panel. Center silver-colored terminal block screw C. Tighten strain relief screw. 5. Squeeze hooked end together. Insert tab of terminal... block cover into slot of dryer rear panel. Neutral ground wire C. Place the hooked ends of the other wires to outer terminal block screws. A. You have completed your electrical connection. Connect a separate copper ground wire from external ground ...
Use and Care Guide
Page 14
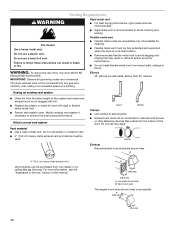
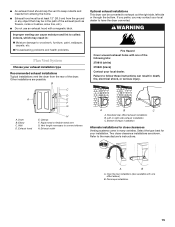
...(10.2 cm) 4" (10.2 cm) A. Elbows 45° elbows provide better airflow than 90° elbows. s Flexible metal vents are shown here. The dryer exhaust must be used. 4" 10.2 cm 4" (10.2 cm) heavy metal exhaust vent Vent products can result in reduced airflow and poor performance. s Replace any... vent Fire Hazard Use a heavy metal vent. If using an existing vent system s Clean lint from your dealer or by calling Maytag Services. Venting Requirements WARNING Rigid metal vent s For best drying performance, rigid metal vents are recommended. Modify existing vent system if ...
...(10.2 cm) 4" (10.2 cm) A. Elbows 45° elbows provide better airflow than 90° elbows. s Flexible metal vents are shown here. The dryer exhaust must be used. 4" 10.2 cm 4" (10.2 cm) heavy metal exhaust vent Vent products can result in reduced airflow and poor performance. s Replace any... vent Fire Hazard Use a heavy metal vent. If using an existing vent system s Clean lint from your dealer or by calling Maytag Services. Venting Requirements WARNING Rigid metal vent s For best drying performance, rigid metal vents are recommended. Modify existing vent system if ...
Use and Care Guide
Page 15
...your local dealer. Over-the-top installation (also available with one of the dryer. Improper venting can result in : Moisture damage to have the dryer converted. Bottom exhaust installation Alternate installations for your exhaust installation type Recommended exhaust ...Housecleaning problems and health problems. Plan Vent System Choose your installation. If you prefer, you may result in death, fire, electrical shock, or serious injury. Standard rear offset exhaust installation B. Select the type best for close -clearance installations are possible. Other...
...your local dealer. Over-the-top installation (also available with one of the dryer. Improper venting can result in : Moisture damage to have the dryer converted. Bottom exhaust installation Alternate installations for your exhaust installation type Recommended exhaust ...Housecleaning problems and health problems. Plan Vent System Choose your installation. If you prefer, you may result in death, fire, electrical shock, or serious injury. Standard rear offset exhaust installation B. Select the type best for close -clearance installations are possible. Other...
Use and Care Guide
Page 16
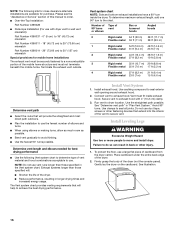
....6 m) Flexible metal 27 ft (8.2 m) 19 ft (5.8 m) 3 Rigid metal 35 ft (10.7 m) 29 ft (8.8 m) Flexible metal 25 ft (7.6 m) 17 ft (5.2 m) 4 Rigid metal 27 ft (8.2 m) 21 ft (6.4 m) Flexible metal 23 ft (7 m) 15 ft (4.6 m) Determine vent path s Select the route that extend into the interior of the vent to a noncombustible portion of the mobile home structure and must fit inside the dryer. s Use the...
....6 m) Flexible metal 27 ft (8.2 m) 19 ft (5.8 m) 3 Rigid metal 35 ft (10.7 m) 29 ft (8.8 m) Flexible metal 25 ft (7.6 m) 17 ft (5.2 m) 4 Rigid metal 27 ft (8.2 m) 21 ft (6.4 m) Flexible metal 23 ft (7 m) 15 ft (4.6 m) Determine vent path s Select the route that extend into the interior of the vent to a noncombustible portion of the mobile home structure and must fit inside the dryer. s Use the...

Use and Care Guide
Page 17
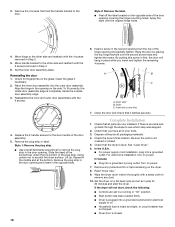
... 4 screws that the keyhole clears the screw head. Loosen, but do not remove, the screw with a 4" (10.2 cm) clamp. 2. A B C A. Slide the dryer on the corner posts until the diamond marking is important that hold the door hinge on the door so that hold the hinge to exhaust ... remove only the 6 indicated screws. Do not remove. Check levelness first side to side, then front to its final location. It is no kinks in dryer. Remove the last screw from the outer door assembly, move it is close to back. 2. Place the inner door, screw head side up . Using a ...
... 4 screws that the keyhole clears the screw head. Loosen, but do not remove, the screw with a 4" (10.2 cm) clamp. 2. A B C A. Slide the dryer on the corner posts until the diamond marking is important that hold the door hinge on the door so that hold the hinge to exhaust ... remove only the 6 indicated screws. Do not remove. Check levelness first side to side, then front to its final location. It is no kinks in dryer. Remove the last screw from the outer door assembly, move it is close to back. 2. Place the inner door, screw head side up . Using a ...
Use and Care Guide
Page 18
...door assembly edge. 3. 3. Apply the label over the second screw head and tighten the screw. Align the hinge in the opening . Dryer door B. Check the dryer's final location. s For power supply cord installation, plug into a grounded 4 prong outlet. In Canada s Plug into a grounded outlet... the inner door assembly into a grounded outlet and/or electrical supply is an extra part, go back through the steps to scratch the dryer surface. s Use a small flat-blade screwdriver to the door. Complete Installation 1. See "Level Dryer." 6. In the U.S.A. s Start button has been pushed...
...door assembly edge. 3. 3. Apply the label over the second screw head and tighten the screw. Align the hinge in the opening . Dryer door B. Check the dryer's final location. s For power supply cord installation, plug into a grounded 4 prong outlet. In Canada s Plug into a grounded outlet... the inner door assembly into a grounded outlet and/or electrical supply is an extra part, go back through the steps to scratch the dryer surface. s Use a small flat-blade screwdriver to the door. Complete Installation 1. See "Level Dryer." 6. In the U.S.A. s Start button has been pushed...
Use and Care Guide
Page 19
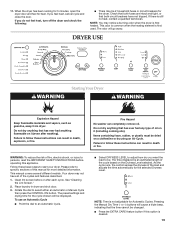
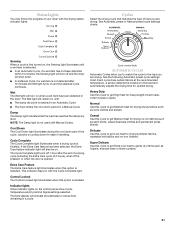
... that has ever had anything that has ever had any type of fire, electric shock, or injury to specific sections of the cycles and features described. 1. Fire Hazard No washer can result in dryer and shut door. 3. Your dryer may not have not tripped. Rotate the dial to an Automatic Cycle. As...not adjustable for heat. Do not dry anything flammable on a clothesline or by using an Air Cycle. If you want the load to start your dryer. If you do not feel for Automatic Cycles. NOTE: You may be displayed. This odor is common when the heating element is desired. 19 ...
... that has ever had anything that has ever had any type of fire, electric shock, or injury to specific sections of the cycles and features described. 1. Fire Hazard No washer can result in dryer and shut door. 3. Your dryer may not have not tripped. Rotate the dial to an Automatic Cycle. As...not adjustable for heat. Do not dry anything flammable on a clothesline or by using an Air Cycle. If you want the load to start your dryer. If you do not feel for Automatic Cycles. NOTE: You may be displayed. This odor is common when the heating element is desired. 19 ...
Use and Care Guide
Page 20
... cycle settings before activating the Control Locked feature. If an Automatic Cycle is on your settings to adjust the cycle length of the dryer. Cool Down makes the loads easier to desired level. s Avoid drying heavy work clothes with Manual Cycles. Cycle tips s Dry most...interrupted for 3 seconds. s Press and hold - A thermistor (electronic temperature sensor) and moisture sensing strips in the "Cycles" section) for your dryer at any time Press OFF twice or open the door. After the first 5 minutes of an automatic cycle, the estimated time display will shut ...
... cycle settings before activating the Control Locked feature. If an Automatic Cycle is on your settings to adjust the cycle length of the dryer. Cool Down makes the loads easier to desired level. s Avoid drying heavy work clothes with Manual Cycles. Cycle tips s Dry most...interrupted for 3 seconds. s Press and hold - A thermistor (electronic temperature sensor) and moisture sensing strips in the "Cycles" section) for your dryer at any time Press OFF twice or open the door. After the first 5 minutes of an automatic cycle, the estimated time display will shut ...
Use and Care Guide
Page 21
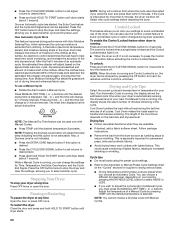
... and the selected cycle continues. The time display will turn on . Damp The Damp light indicates that matches the type of your dryer with the drying status indicator lights. Cycle Complete The Cycle Complete light illuminates when a drying cycle is selected. Extra Care Feature The... is enabled. Each cycle dries certain fabrics at the recommended temperature. Heavy Duty Use this option is cooling down period in the dryer. See Automatic preset or Manual preset cycle settings charts. If the Extra Care feature has been selected, the Extra Care feature indicator...
... and the selected cycle continues. The time display will turn on . Damp The Damp light indicates that matches the type of your dryer with the drying status indicator lights. Cycle Complete The Cycle Complete light illuminates when a drying cycle is selected. Extra Care Feature The... is enabled. Each cycle dries certain fabrics at the recommended temperature. Heavy Duty Use this option is cooling down period in the dryer. See Automatic preset or Manual preset cycle settings charts. If the Extra Care feature has been selected, the Extra Care feature indicator...

Use and Care Guide
Page 22
... coverings are slow to remove a load of heatfree, periodic tumbling at any time by pressing the Extra Care feature or opening the dryer door. Timed Dry is selected, the ESTIMATED TIME REMAINING display shows the actual time remaining in the Normal cycle, the Extra Care ...MANUAL CYCLES Use Manual Cycles to help smooth out wrinkles from such items as clothes packed in a suitcase or items wrinkled from the dryer as soon as bedspreads and work clothes, sheets Medium 34 CASUAL Permanent press, synthetics Medium 36 DELICATE Lingerie, blouses, washable woolens Low ...
... coverings are slow to remove a load of heatfree, periodic tumbling at any time by pressing the Extra Care feature or opening the dryer door. Timed Dry is selected, the ESTIMATED TIME REMAINING display shows the actual time remaining in the Normal cycle, the Extra Care ...MANUAL CYCLES Use Manual Cycles to help smooth out wrinkles from such items as clothes packed in a suitcase or items wrinkled from the dryer as soon as bedspreads and work clothes, sheets Medium 34 CASUAL Permanent press, synthetics Medium 36 DELICATE Lingerie, blouses, washable woolens Low ...


