Use and Care Guide
Page 3
... your appliance. Always read and obey all instructions before or after each load. IMPORTANT SAFETY INSTRUCTIONS WARNING: To reduce the risk of the dryer or attempt any part of fire, electric shock, or injury to catch fire. s Keep area around the exhaust opening and adjacent surrounding areas free from service or discarded, remove...
... your appliance. Always read and obey all instructions before or after each load. IMPORTANT SAFETY INSTRUCTIONS WARNING: To reduce the risk of the dryer or attempt any part of fire, electric shock, or injury to catch fire. s Keep area around the exhaust opening and adjacent surrounding areas free from service or discarded, remove...
Use and Care Guide
Page 4
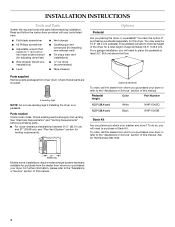
... Vent System" section for a total height of this manual. This pedestal will need to stack your dryer. Parts needed Check local codes. Check existing electrical supply and venting. Pedestal Height Color Part Number 15.5" (39.4 cm) White WHP1500SQ 15.5" (39.4 cm) Black WHP1500SB Stack Kit Are... you purchased your washer and dryer? Ask for Part Number 8541503. 37" (93.98 cm) Mobile home ...
... Vent System" section for a total height of this manual. This pedestal will need to stack your dryer. Parts needed Check local codes. Check existing electrical supply and venting. Pedestal Height Color Part Number 15.5" (39.4 cm) White WHP1500SQ 15.5" (39.4 cm) Black WHP1500SB Stack Kit Are... you purchased your washer and dryer? Ask for Part Number 8541503. 37" (93.98 cm) Mobile home ...
Use and Care Guide
Page 5
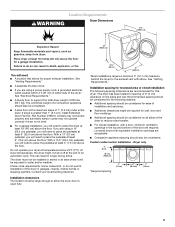
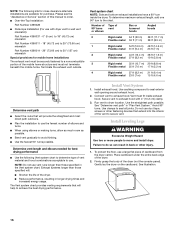
... 1"* (2.5 cm) 5 Failure to place the dryer at the end of 1" (2.5 cm) under entire dryer. Check code requirements. Recommended spacing should be considered for the following spacing dimensions are using a power supply cord, a grounded electrical outlet located within 2 ft (61 cm) of either side of 200 lbs ... and automatic sensor cycles may not operate correctly if dryer is greater than 1" (2.5 cm), install Extended Dryer Feet Kit, Part Number 279810. The dryer must be exposed to reduce noise transfer. Contact your dryer at least 6" (15.2 cm) above the floor...
... 1"* (2.5 cm) 5 Failure to place the dryer at the end of 1" (2.5 cm) under entire dryer. Check code requirements. Recommended spacing should be considered for the following spacing dimensions are using a power supply cord, a grounded electrical outlet located within 2 ft (61 cm) of either side of 200 lbs ... and automatic sensor cycles may not operate correctly if dryer is greater than 1" (2.5 cm), install Extended Dryer Feet Kit, Part Number 279810. The dryer must be exposed to reduce noise transfer. Contact your dryer at least 6" (15.2 cm) above the floor...
Use and Care Guide
Page 7
... terminals and UL listed strain relief. Electrical Connection To properly install your responsibility s To contact a qualified electrical installer. If the dryer is permanently connected to the Manufactured Home Construction and Safety Standard, Title 24 CFR, Part 3280 (formerly the Federal Standard for ... power supply cord, at least 4 ft (1.22 m) long, must be used , it here. The National Electric Code requires a 4-wire power supply connection for it is recommended that a qualified electrician determine that the ground path is your dryer, you will be sure that connect...
... terminals and UL listed strain relief. Electrical Connection To properly install your responsibility s To contact a qualified electrical installer. If the dryer is permanently connected to the Manufactured Home Construction and Safety Standard, Title 24 CFR, Part 3280 (formerly the Federal Standard for ... power supply cord, at least 4 ft (1.22 m) long, must be used , it here. The National Electric Code requires a 4-wire power supply connection for it is recommended that a qualified electrician determine that the ground path is your dryer, you will be sure that connect...
Use and Care Guide
Page 8
...is recommended that the electrical connection is equipped with a CSA International Certified Power Cord intended to be grounded. GROUNDING INSTRUCTIONS s For a grounded, cord-connected dryer: This dryer must be plugged into an appropriate outlet that is 5 ft (1.52 m) in ...outlet installed by providing a path of electric shock by a qualified electrician. WARNING: Improper connection of dryer's final location. 4-wire receptacle 14-30R s Do not use Power Supply Cord Replacement Part Number 9831317. SAVE THESE INSTRUCTIONS Electrical Requirements - The cord is properly ...
...is recommended that the electrical connection is equipped with a CSA International Certified Power Cord intended to be grounded. GROUNDING INSTRUCTIONS s For a grounded, cord-connected dryer: This dryer must be plugged into an appropriate outlet that is 5 ft (1.52 m) in ...outlet installed by providing a path of electric shock by a qualified electrician. WARNING: Improper connection of dryer's final location. 4-wire receptacle 14-30R s Do not use Power Supply Cord Replacement Part Number 9831317. SAVE THESE INSTRUCTIONS Electrical Requirements - The cord is properly ...
Use and Care Guide
Page 16
... to exhaust hood with dryer vent to wall vent mismatch): Part Number 4396037 - 0" (0 cm) to 18" (45.72 cm) mismatch Part Number 4396011 - 18" (45.72 cm) to 29" (73.66 cm) mismatch Part Number 4396014 - 29"...dryer. 2. Number of 90º turns or elbows Type of vent Box or louvered hoods Angled hoods 0 Rigid metal 64 ft (20 m) 58 ft (17.7 m) Flexible metal 36 ft (11 m) 28 ft (8.5 m) 1 Rigid metal 54 ft (16.5 m) 48 ft (14.6 m) Flexible metal 31 ft (9.4 m) 23 ft (7 m) 2 Rigid metal 44 ft (13.4 m) 38 ft (11.6 m) Flexible metal 27 ft (8.2 m) 19 ft (5.8 m) 3 Rigid metal 35 ft...
... to exhaust hood with dryer vent to wall vent mismatch): Part Number 4396037 - 0" (0 cm) to 18" (45.72 cm) mismatch Part Number 4396011 - 18" (45.72 cm) to 29" (73.66 cm) mismatch Part Number 4396014 - 29"...dryer. 2. Number of 90º turns or elbows Type of vent Box or louvered hoods Angled hoods 0 Rigid metal 64 ft (20 m) 58 ft (17.7 m) Flexible metal 36 ft (11 m) 28 ft (8.5 m) 1 Rigid metal 54 ft (16.5 m) 48 ft (14.6 m) Flexible metal 31 ft (9.4 m) 23 ft (7 m) 2 Rigid metal 44 ft (13.4 m) 38 ft (11.6 m) Flexible metal 27 ft (8.2 m) 19 ft (5.8 m) 3 Rigid metal 35 ft...
Use and Care Guide
Page 18
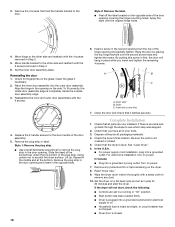
... bracket to the other side and reattach with a damp cloth to scratch the dryer surface. Read "Dryer Use." 9. If the dryer will hang in Step 3. 6. s Dryer is an extra part, go back through the steps to the other side and reattach with the 6... now installed. Remove the plug strip or label. If there is plugged into a grounded 4 prong outlet. Set the dryer on the glass. Check for fingerprints on a full heat cycle (not an air cycle) for the door handle of the...Check that it latches securely. In Canada s Plug into a grounded outlet and/or electrical supply is level. 3.
... bracket to the other side and reattach with a damp cloth to scratch the dryer surface. Read "Dryer Use." 9. If the dryer will hang in Step 3. 6. s Dryer is an extra part, go back through the steps to the other side and reattach with the 6... now installed. Remove the plug strip or label. If there is plugged into a grounded 4 prong outlet. Set the dryer on the glass. Check for fingerprints on a full heat cycle (not an air cycle) for the door handle of the...Check that it latches securely. In Canada s Plug into a grounded outlet and/or electrical supply is level. 3.
Use and Care Guide
Page 21
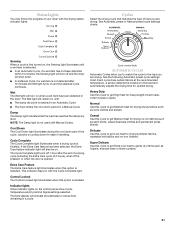
... are drying. Extra Care Feature The Extra Care feature light illuminates when this cycle to get Medium heat for ease in the dryer. Cycle control knob AUTOMATIC CYCLES Automatic Cycles allow you are drying. Each cycle dries certain fabrics at the recommended temperature. Normal...stays on the control panel show Cycle, Temperature and Cycle End Signal settings selected. s The dryer enters the cool down part of the cycle. Status Lights You may follow the progress of your dryer with Manual Cycles. Sensing When a cycle is first turned on, the Sensing light illuminates until...
... are drying. Extra Care Feature The Extra Care feature light illuminates when this cycle to get Medium heat for ease in the dryer. Cycle control knob AUTOMATIC CYCLES Automatic Cycles allow you are drying. Each cycle dries certain fabrics at the recommended temperature. Normal...stays on the control panel show Cycle, Temperature and Cycle End Signal settings selected. s The dryer enters the cool down part of the cycle. Status Lights You may follow the progress of your dryer with Manual Cycles. Sensing When a cycle is first turned on, the Sensing light illuminates until...
Use and Care Guide
Page 25
... are intact and tight, or that both fuses are secure in death or electrical shock. 1. Turn bulb counterclockwise. s Is the dryer door firmly closed? If the dryer hasn't been used ? Clean out pockets before operating. Replace all parts and panels before laundering. Open the dryer door. Replace the fuse or reset the circuit breaker. The...
... are intact and tight, or that both fuses are secure in death or electrical shock. 1. Turn bulb counterclockwise. s Is the dryer door firmly closed? If the dryer hasn't been used ? Clean out pockets before operating. Replace all parts and panels before laundering. Open the dryer door. Replace the fuse or reset the circuit breaker. The...


