Specification Sheet
Page 1
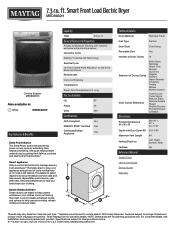
...clothes and reduce static. D200104XXD. ft. General Features & Properties Advanced Moisture Sensing with product. MED8630HSpecSheetV01. Printed in : White MED8630HW Key Features & Benefits Extra Power Button The Extra Power button boosts drying power on the Drive Motor and Drum Remote start or...Style Side Swing Reversible Door Yes Number of Dryer Cycles 14 Selection of cycle notifications so no load is left behind. Features subject to change . Details and privacy info at maytag.com/connect. †Visit maytag.com for planning purposes only. Specifications subject ...
...clothes and reduce static. D200104XXD. ft. General Features & Properties Advanced Moisture Sensing with product. MED8630HSpecSheetV01. Printed in : White MED8630HW Key Features & Benefits Extra Power Button The Extra Power button boosts drying power on the Drive Motor and Drum Remote start or...Style Side Swing Reversible Door Yes Number of Dryer Cycles 14 Selection of cycle notifications so no load is left behind. Features subject to change . Details and privacy info at maytag.com/connect. †Visit maytag.com for planning purposes only. Specifications subject ...
Owners Manual
Page 4
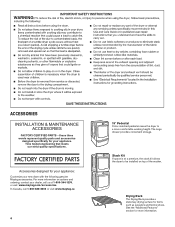
... Drying Rack provides a stationary drying surface for your appliance: Customize your new dryer with the following genuine Maytag accessories. Stack Kit If space is at 1-800-344-1274, or visit: www.maytag.com/accessories. See the "Additional Features" section for your dealer, call us... INSTALLATION & MAINTENANCE ACCESSORIES FACTORY CERTIFIED PARTS - In Canada, call 1-800-688-2002 or visit: www.maytag.ca 4 15" Pedestal Color-matched pedestal raises the dryer to a more information on options and ordering, contact your appliance. Time tested engineering that meets our strict...
... Drying Rack provides a stationary drying surface for your appliance: Customize your new dryer with the following genuine Maytag accessories. Stack Kit If space is at 1-800-344-1274, or visit: www.maytag.com/accessories. See the "Additional Features" section for your dealer, call us... INSTALLATION & MAINTENANCE ACCESSORIES FACTORY CERTIFIED PARTS - In Canada, call 1-800-688-2002 or visit: www.maytag.ca 4 15" Pedestal Color-matched pedestal raises the dryer to a more information on options and ordering, contact your appliance. Time tested engineering that meets our strict...
Owners Manual
Page 5
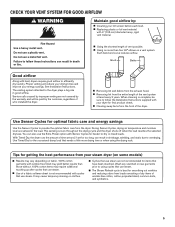
...venting are sensed in a vent system. When cleaning is not recommended with wrinkle-free finish may vary depending on clothes. With Timed Dry, the dryer runs the amount of vent possible. n Use of wrinkle-free cotton, cotton-polyester blend, common knits, and synthetics. 5 Wash any starched ...from the entire length of the vent system at least every 2 years. Tips for smoothing out wrinkles and reducing odors from your dryer for optimal fabric care and energy savings Use the Sensor Cycles to overdrying. Proper venting will be sure to follow the Installation Instructions...
...venting are sensed in a vent system. When cleaning is not recommended with wrinkle-free finish may vary depending on clothes. With Timed Dry, the dryer runs the amount of vent possible. n Use of wrinkle-free cotton, cotton-polyester blend, common knits, and synthetics. 5 Wash any starched ...from the entire length of the vent system at least every 2 years. Tips for smoothing out wrinkles and reducing odors from your dryer for optimal fabric care and energy savings Use the Sensor Cycles to overdrying. Proper venting will be sure to follow the Installation Instructions...
Owners Manual
Page 6
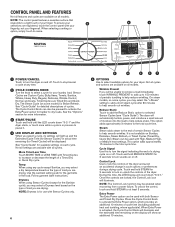
...at any cycle except Sanitize, you are drying. When selecting a setting or option, simply touch its settings will count down "3-2-1" and the dryer starts, or touch once while a cycle is in process to turn sounds on the display will automatically tumble, pause, and introduce a ... Custom Cycle, Bulky Items, Towels, Sanitize, Whites, Heavy Duty, Regular, Delicates, Wrinkle Control, Normal, and Jeans. Touch and hold STEAM for your dryer. To unlock the control, touch and hold until the LED counts down "3-2-1." EXTRA POWER 4 1 AirDry High : Less More Off +Steam Sensing...
...at any cycle except Sanitize, you are drying. When selecting a setting or option, simply touch its settings will count down "3-2-1" and the dryer starts, or touch once while a cycle is in process to turn sounds on the display will automatically tumble, pause, and introduce a ... Custom Cycle, Bulky Items, Towels, Sanitize, Whites, Heavy Duty, Regular, Delicates, Wrinkle Control, Normal, and Jeans. Touch and hold STEAM for your dryer. To unlock the control, touch and hold until the LED counts down "3-2-1." EXTRA POWER 4 1 AirDry High : Less More Off +Steam Sensing...
Owners Manual
Page 7
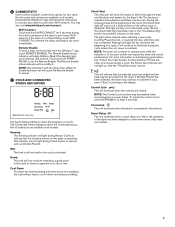
...and reduce wrinkling. For more information on all cycles and options are available on maintaining good airflow, see "Check Your Vent System for the dryer's life. See the "Troubleshooting" section. Control Lock This will not light during a cycle, the Check Vent indicator will begin a dry cycle... operating. The Cycle Status Indicators show the connected status. Download the Whirlpool® app and follow the instructions to connect your dryer to indicate that the selected cycle has ended and the load may also visit www.whirlpool.com/connect. To unlock the control,...
...and reduce wrinkling. For more information on all cycles and options are available on maintaining good airflow, see "Check Your Vent System for the dryer's life. See the "Troubleshooting" section. Control Lock This will not light during a cycle, the Check Vent indicator will begin a dry cycle... operating. The Cycle Status Indicators show the connected status. Download the Whirlpool® app and follow the instructions to connect your dryer to indicate that the selected cycle has ended and the load may also visit www.whirlpool.com/connect. To unlock the control,...
Owners Manual
Page 8
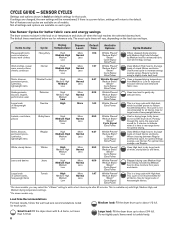
...to increase energy savings versus Regular cycle by Medium heat for that cycle. Use Sensor Cycles for better fabric care and energy savings The dryer senses moisture in bold are for all fabrics. Uses Medium High heat to dry large loads of heavyweight fabrics. †On steam models,...Power Offers stepped drying starting with High heat, which has been proven to add a short steam cycle after 60 minutes. Small load: Fill the dryer drum with High, Medium High, and Medium drying temperature settings. *On steam models only. The default times mentioned below are default settings for ...
...to increase energy savings versus Regular cycle by Medium heat for that cycle. Use Sensor Cycles for better fabric care and energy savings The dryer senses moisture in bold are for all fabrics. Uses Medium High heat to dry large loads of heavyweight fabrics. †On steam models,...Power Offers stepped drying starting with High heat, which has been proven to add a short steam cycle after 60 minutes. Small load: Fill the dryer drum with High, Medium High, and Medium drying temperature settings. *On steam models only. The default times mentioned below are default settings for ...

Owners Manual
Page 9
...Prevent Cycle Details: Use to add a short steam cycle after 60 minutes. Do not overload. CYCLE GUIDE - Large load: Fill the dryer drum up to Medium heat setting may be used for drying mediumweight items such as sheets, blouses, dresses, underwear, permanent press fabrics,...the Normal Cycle, Highest Temperature Setting, Normal Dryness Level. Steam cycles are unsure of fabrics in the display. Small load: Fill the dryer drum with High, Medium High, and Medium drying temperature settings. Items need to dry foam, rubber, plastic, or heat-sensitive fabrics...
...Prevent Cycle Details: Use to add a short steam cycle after 60 minutes. Do not overload. CYCLE GUIDE - Large load: Fill the dryer drum up to Medium heat setting may be used for drying mediumweight items such as sheets, blouses, dresses, underwear, permanent press fabrics,...the Normal Cycle, Highest Temperature Setting, Normal Dryness Level. Steam cycles are unsure of fabrics in the display. Small load: Fill the dryer drum with High, Medium High, and Medium drying temperature settings. Items need to dry foam, rubber, plastic, or heat-sensitive fabrics...
Owners Manual
Page 10
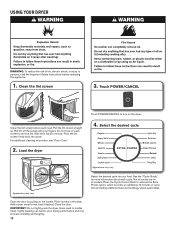
... load. Roll lint off the screen with your load. Do not rinse or wash screen to tumble freely. For additional cleaning information, see "Dryer Care." 4. See the "Cycle Guide" for your fingers. Push the lint screen firmly back into place. Press the Cycle Control Knob to ...screen before operating this appliance. 1. Appearance may vary. Close the door. Not all cycles are on all models. Place laundry in the dryer. USING YOUR DRYER WARNING: To reduce the risk of cycle time (including additional heat and tumbling, where applicable). Pull the lint screen straight up. Wet ...
... load. Roll lint off the screen with your load. Do not rinse or wash screen to tumble freely. For additional cleaning information, see "Dryer Care." 4. See the "Cycle Guide" for your fingers. Push the lint screen firmly back into place. Press the Cycle Control Knob to ...screen before operating this appliance. 1. Appearance may vary. Close the door. Not all cycles are on all models. Place laundry in the dryer. USING YOUR DRYER WARNING: To reduce the risk of cycle time (including additional heat and tumbling, where applicable). Pull the lint screen straight up. Wet ...
Owners Manual
Page 11
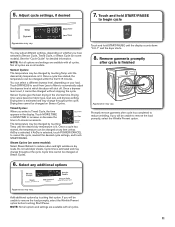
... Promptly remove garments after cycle is estimated and may vary. Add additional options by touching Temp until the display counts down "3-2-1" and the dryer starts. 8. See the "Cycle Guide" for detailed information. NOTE: Not all options and settings are on all models. Steam Cycles (on... on some models). You can be changed by touching Temp until the desired dry temperature is set, it cannot be changed at which the dryer will be changed within the first 5-8 minutes. Once a dryness level is lit. Once a cycle has started , the temperature can select ...
... Promptly remove garments after cycle is estimated and may vary. Add additional options by touching Temp until the display counts down "3-2-1" and the dryer starts. 8. See the "Cycle Guide" for detailed information. NOTE: Not all options and settings are on all models. Steam Cycles (on... on some models). You can be changed by touching Temp until the desired dry temperature is set, it cannot be changed at which the dryer will be changed within the first 5-8 minutes. Once a dryness level is lit. Once a cycle has started , the temperature can select ...
Owners Manual
Page 12
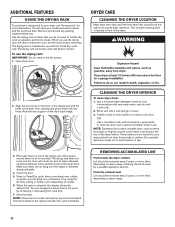
... opening and press down fully into holes. Rest the rear support on the drying rack after the cycle is finished. CLEANING THE DRYER INTERIOR To clean dryer drum: 1. Use a mild hand dish detergent mixed at a low concentration with very warm water, and rub with a wet sponge or towel. 3. ...for use . NOTE: Garments that you use the drying rack: IMPORTANT: Do not remove the lint screen. 1. Dry unstable dye items inside the dryer cabinet Lint should be dried on a clothesline or by increasing or decreasing the cycle time. 7. From the exhaust vent Lint should be sure to ...
... opening and press down fully into holes. Rest the rear support on the drying rack after the cycle is finished. CLEANING THE DRYER INTERIOR To clean dryer drum: 1. Use a mild hand dish detergent mixed at a low concentration with very warm water, and rub with a wet sponge or towel. 3. ...for use . NOTE: Garments that you use the drying rack: IMPORTANT: Do not remove the lint screen. 1. Dry unstable dye items inside the dryer cabinet Lint should be dried on a clothesline or by increasing or decreasing the cycle time. 7. From the exhaust vent Lint should be sure to ...
Owners Manual
Page 13
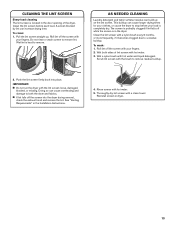
...every 6 months, or more frequently, if it becomes clogged due to both sides of the dryer. Wet both the dryer and fabrics. Clean the lint screen before your clothes, or cause the dryer to remove. This buildup can cause overheating and damage to a residue buildup. Push the lint...drying time. Clean the lint screen with your fingers. Wet a nylon brush with hot water. 5. Roll lint off while the screen is in the dryer. n If lint falls off the screen with a clean towel. Reinstall screen in the Installation Instructions. 4. Thoroughly dry lint screen with your fingers....
...every 6 months, or more frequently, if it becomes clogged due to both sides of the dryer. Wet both the dryer and fabrics. Clean the lint screen before your clothes, or cause the dryer to remove. This buildup can cause overheating and damage to a residue buildup. Push the lint...drying time. Clean the lint screen with your fingers. Wet a nylon brush with hot water. 5. Roll lint off while the screen is in the dryer. n If lint falls off the screen with a clean towel. Reinstall screen in the Installation Instructions. 4. Thoroughly dry lint screen with your fingers....
Owners Manual
Page 14
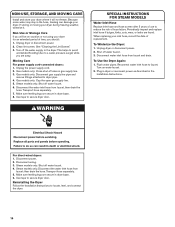
...water pressure surge) while you will not freeze. For direct-wired dryers: 1. Make sure leveling legs are secure in the hose, freezing can damage your dryer. Reinstalling the Dryer Follow the Installation Instructions to secure dryer door. Gas models only: Disconnect gas supply line pipe and ... found. Steam models only: Shut off water faucet. 6. Moving Care For power supply cord-connected dryers: 1. NON-USE, STORAGE, AND MOVING CARE Install and store your dryer during freezing weather, winterize it will be on water faucet. 2. SPECIAL INSTRUCTIONS FOR STEAM MODELS Water...
...water pressure surge) while you will not freeze. For direct-wired dryers: 1. Make sure leveling legs are secure in the hose, freezing can damage your dryer. Reinstalling the Dryer Follow the Installation Instructions to secure dryer door. Gas models only: Disconnect gas supply line pipe and ... found. Steam models only: Shut off water faucet. 6. Moving Care For power supply cord-connected dryers: 1. NON-USE, STORAGE, AND MOVING CARE Install and store your dryer during freezing weather, winterize it will be on water faucet. 2. SPECIAL INSTRUCTIONS FOR STEAM MODELS Water...
Owners Manual
Page 15
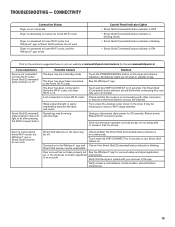
... Smart Grid (Connected) status indicator is connected to home Wi-Fi router • Smart Grid (Connected) status indicator is blinking slowly Dryer is off . Return power. in standby mode. Verify correct e-mail address, mobile number, and notification preferences. 15 Touch and hold ...WIFI CONNECT for account setup and dryer registration up to install a Wi-Fi range extender. It may Check whether the Smart Grid (Connected) status indicator is ON First ...
... Smart Grid (Connected) status indicator is connected to home Wi-Fi router • Smart Grid (Connected) status indicator is blinking slowly Dryer is off . Return power. in standby mode. Verify correct e-mail address, mobile number, and notification preferences. 15 Touch and hold ...WIFI CONNECT for account setup and dryer registration up to install a Wi-Fi range extender. It may Check whether the Smart Grid (Connected) status indicator is ON First ...

Owners Manual
Page 16
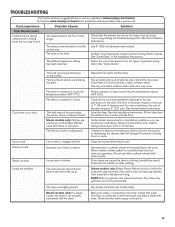
... two household fuses or circuit breakers. TROUBLESHOOTING First try the solutions suggested here or visit our website at www.maytag.com/owners (in Canada, www.maytag.ca/owners) for 5-10 minutes. Wrong type of dryer drum. Hold your hand under the outside exhaust hood to recommended load size in "Cycle Guide." Lint screen...
... two household fuses or circuit breakers. TROUBLESHOOTING First try the solutions suggested here or visit our website at www.maytag.com/owners (in Canada, www.maytag.ca/owners) for 5-10 minutes. Wrong type of dryer drum. Hold your hand under the outside exhaust hood to recommended load size in "Cycle Guide." Lint screen...
Owners Manual
Page 17
... First try the solutions suggested here or visit our website at www.maytag.com/owners (in Canada, www.maytag.ca/owners) for assistance and to the dryer. The exhaust vent diameter is not level. The dryer is not the correct size. The AirDry temperature setting has been selected.... See the Installation Instructions. Use 4" (102 mm) diameter vent material. Clothes not contacting the moisture sensors during Sensor Cycles. See "Level Dryer" in a closet. Select the correct temperature for the types of drying time in clothes. See "Cycle Guide." Cycle time is connected to ...
... First try the solutions suggested here or visit our website at www.maytag.com/owners (in Canada, www.maytag.ca/owners) for assistance and to the dryer. The exhaust vent diameter is not level. The dryer is not the correct size. The AirDry temperature setting has been selected.... See the Installation Instructions. Use 4" (102 mm) diameter vent material. Clothes not contacting the moisture sensors during Sensor Cycles. See "Level Dryer" in a closet. Select the correct temperature for the types of drying time in clothes. See "Cycle Guide." Cycle time is connected to ...

Owners Manual
Page 18
...your (low or no line voltage home power supply, keeping the condition) dryer's heater from the area, rewash and dry the clothing. Refer to restart the dryer. Call for at www.maytag.com/owners (in the dryer too long. If you are gone from turning on . During this diagnostic ...code is disabled, the LED Display will count down "3-2-1." Dryer Displaying Code Message or Cycle Status Indicator Lights Up...
...your (low or no line voltage home power supply, keeping the condition) dryer's heater from the area, rewash and dry the clothing. Refer to restart the dryer. Call for at www.maytag.com/owners (in the dryer too long. If you are gone from turning on . During this diagnostic ...code is disabled, the LED Display will count down "3-2-1." Dryer Displaying Code Message or Cycle Status Indicator Lights Up...
Installation Instructions
Page 2
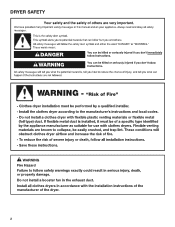
DRYER SAFETY 2
DRYER SAFETY 2
Installation Instructions
Page 3
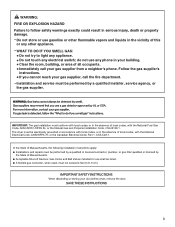
The dryer must be listed. WARNING: FIRE OR EXPLOSION HAZARD Failure to light any appliance. • Do not touch any other flammable vapors and liquids in serious ...
The dryer must be listed. WARNING: FIRE OR EXPLOSION HAZARD Failure to light any appliance. • Do not touch any other flammable vapors and liquids in serious ...

Installation Instructions
Page 4
...Leveling legs (4) Parts needed (not supplied with a pedestal or a stack kit. NOTE: Do not use leveling legs supplied with dryer if installing with dryer): ■■ Vent clamps ■■ Vent elbows and vent work Tools needed for all installations: Tools needed for gas ... or hex-head socket wrench Wire stripper (direct wire installations) 4 Rubber washer 5' (1.52 m) inlet hose Parts package is located in dryer drum. INSTALLATION REQUIREMENTS Tools and Parts Gather the required tools and parts before starting installation. Check that opens to propane gas Parts supplied ...
...Leveling legs (4) Parts needed (not supplied with a pedestal or a stack kit. NOTE: Do not use leveling legs supplied with dryer if installing with dryer): ■■ Vent clamps ■■ Vent elbows and vent work Tools needed for all installations: Tools needed for gas ... or hex-head socket wrench Wire stripper (direct wire installations) 4 Rubber washer 5' (1.52 m) inlet hose Parts package is located in dryer drum. INSTALLATION REQUIREMENTS Tools and Parts Gather the required tools and parts before starting installation. Check that opens to propane gas Parts supplied ...

Installation Instructions
Page 5
... kPa). If slope is greater than 1" (25 mm), install Extended Dryer Feet Kit, Part Number 279810. Maytag® Models IMPORTANT: Do not operate, install, or store dryer where it will need 18" (460 mm) to bottom of dryer. ■■ The dryer must support dryer weight of automatic sensor cycles, resulting in an area where it...
... kPa). If slope is greater than 1" (25 mm), install Extended Dryer Feet Kit, Part Number 279810. Maytag® Models IMPORTANT: Do not operate, install, or store dryer where it will need 18" (460 mm) to bottom of dryer. ■■ The dryer must support dryer weight of automatic sensor cycles, resulting in an area where it...


