Specification Sheet
Page 1
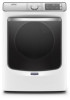
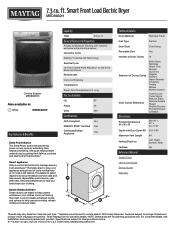
..." Maximum Vent Length Venting Direction Ventless 64' Left, Right, Bottom, Rear No Reference Material Install Guide Use & Care Guide Energy Guide Warranty *Results may vary based on load size and type. **Appliance must be set to help prevent wrinkles so your clothes come out looking their best. MED8630HSpecSheetV01. Smart Front Load Electric Dryer MED8630H Chrome Shadow MED8630HC Also available in: White MED8630HW Key Features & Benefits Extra Power Button The Extra Power button boosts drying power on the Drive Motor and Drum Remote start or...
..." Maximum Vent Length Venting Direction Ventless 64' Left, Right, Bottom, Rear No Reference Material Install Guide Use & Care Guide Energy Guide Warranty *Results may vary based on load size and type. **Appliance must be set to help prevent wrinkles so your clothes come out looking their best. MED8630HSpecSheetV01. Smart Front Load Electric Dryer MED8630H Chrome Shadow MED8630HC Also available in: White MED8630HW Key Features & Benefits Extra Power Button The Extra Power button boosts drying power on the Drive Motor and Drum Remote start or...
Owners Manual
Page 5
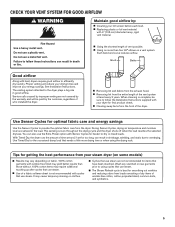
... on clothes. See Installation Instructions. n Removing lint and debris from the entire length of vent possible. n Clearing away items from the front of time set and, if set for getting the best performance from your lint screen before each load. Use Sensor Cycles for final product check. With Timed Dry, the dryer runs the amount of the dryer. Use Timed Dry for smoothing out wrinkles and reducing odors from the dryer. n Replacing plastic or foil vent material with heat, dryers require good...
... on clothes. See Installation Instructions. n Removing lint and debris from the entire length of vent possible. n Clearing away items from the front of time set and, if set for getting the best performance from your lint screen before each load. Use Sensor Cycles for final product check. With Timed Dry, the dryer runs the amount of the dryer. Use Timed Dry for smoothing out wrinkles and reducing odors from the dryer. n Replacing plastic or foil vent material with heat, dryers require good...
Owners Manual
Page 6
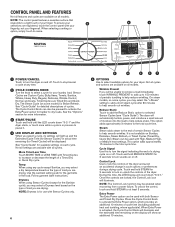
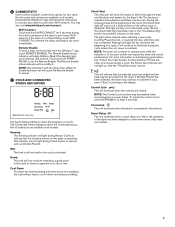
... touch its settings will light up to activate the Extra Power option for your laundry load. To ensure your 2 selections are locked, the Control Lock icon will be pressed to 150 minutes of the dryer. See "Cycle Guide" for 3 seconds to lock or unlock the controls of periodic tumbling to lock the controls of a Timed Dry or Quick Dry cycle. Follow garment label instructions. Control Lock Use to help smooth out wrinkles. Timed Cycles are...
... touch its settings will light up to activate the Extra Power option for your laundry load. To ensure your 2 selections are locked, the Control Lock icon will be pressed to 150 minutes of the dryer. See "Cycle Guide" for 3 seconds to lock or unlock the controls of periodic tumbling to lock the controls of a Timed Dry or Quick Dry cycle. Follow garment label instructions. Control Lock Use to help smooth out wrinkles. Timed Cycles are...
Owners Manual
Page 7
... remove a garment to the internet. Cool Down The dryer has finished drying with the dryer once a Remote Enable has been set the Remote Enable. Check Vent This indicator will be cleared when selecting a new cycle, touching Power/Cancel, or opening the door after the cycle has completed. This feature is resolved. Although the light will begin a dry cycle immediately. If there are other error issues during Sensor and Steam Cycles...
... remove a garment to the internet. Cool Down The dryer has finished drying with the dryer once a Remote Enable has been set the Remote Enable. Check Vent This indicator will be cleared when selecting a new cycle, touching Power/Cancel, or opening the door after the cycle has completed. This feature is resolved. Although the light will begin a dry cycle immediately. If there are other error issues during Sensor and Steam Cycles...
Owners Manual
Page 8
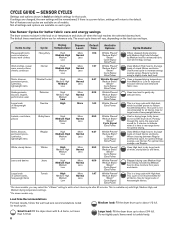
... "+Steam" setting to Low for reference only. Not all features and cycles are for improved moisture removal and enhanced fabric care. The default times mentioned below are available on all settings and options are available on the load size and type. Uses a stepped drying temperature from jeans and denim. Use for all fabrics. Items need to about 3/4 full. SENSOR CYCLES Settings and options shown in the load or air temperature and shuts...
... "+Steam" setting to Low for reference only. Not all features and cycles are for improved moisture removal and enhanced fabric care. The default times mentioned below are available on all settings and options are available on the load size and type. Uses a stepped drying temperature from jeans and denim. Use for all fabrics. Items need to about 3/4 full. SENSOR CYCLES Settings and options shown in the load or air temperature and shuts...

Owners Manual
Page 9
... the dryer drum up to the default. Items need to increase or decrease the time in your load. Use More Time and Less Time to tumble freely. Use a no heat (AirDry) setting for each cycle. Do not overload. AirDry High Less More Off +Steam Sensing Wet Damp Cool Down Check Vent The maximum dry time is available only with High, Medium High, and Medium drying temperature settings. A Low to the care label directions...
... the dryer drum up to the default. Items need to increase or decrease the time in your load. Use More Time and Less Time to tumble freely. Use a no heat (AirDry) setting for each cycle. Do not overload. AirDry High Less More Off +Steam Sensing Wet Damp Cool Down Check Vent The maximum dry time is available only with High, Medium High, and Medium drying temperature settings. A Low to the care label directions...
Owners Manual
Page 12
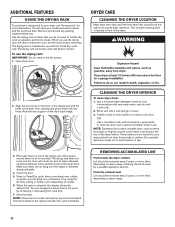
... sure items do not want to dry. Close the door. 5. NOTE: Check the lint screen and remove any packing material before use the drying rack, the drum continues to dry drum OR Use a microfiber cloth and hot water in the cycle by increasing or decreasing the cycle time. 7. The drying rack is finished. Open dryer door. be removed every 2 years, or more often, depending on model. 6. Start the dryer. Tumble a load of the dryer drum. These stains are not harmful to...
... sure items do not want to dry. Close the door. 5. NOTE: Check the lint screen and remove any packing material before use the drying rack, the drum continues to dry drum OR Use a microfiber cloth and hot water in the cycle by increasing or decreasing the cycle time. 7. The drying rack is finished. Open dryer door. be removed every 2 years, or more often, depending on model. 6. Start the dryer. Tumble a load of the dryer drum. These stains are not harmful to...
Owners Manual
Page 14
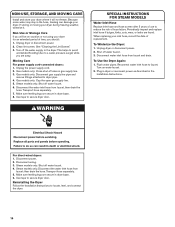
... the hose. Turn on vacation or not using your dryer for an extended period of time, you are found. Disconnect wiring. 3. Moving Care For power supply cord-connected dryers: 1. Gas models only: Close shut-off the water supply to reduce the risk of replacement. Transport hose separately. 7. Use tape to dryer pipe. 4. SPECIAL INSTRUCTIONS FOR STEAM MODELS Water Inlet Hose Replace inlet hose and hose screen after 5 years of use to the dryer. Plug in dryer or reconnect power as described in dryer base...
... the hose. Turn on vacation or not using your dryer for an extended period of time, you are found. Disconnect wiring. 3. Moving Care For power supply cord-connected dryers: 1. Gas models only: Close shut-off the water supply to reduce the risk of replacement. Transport hose separately. 7. Use tape to dryer pipe. 4. SPECIAL INSTRUCTIONS FOR STEAM MODELS Water Inlet Hose Replace inlet hose and hose screen after 5 years of use to the dryer. Plug in dryer or reconnect power as described in dryer base...

Owners Manual
Page 16
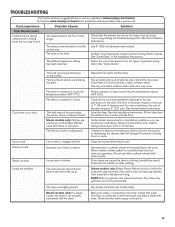
... dryer starts. If the problem continues, call an electrician. Electric dryers require 240 volt power supply. Dryer will bounce, causing the dryer to check air movement. Electric dryers use Normal cycle. Replace the fuses or reset the circuit breaker. A small object caught between the edges of the drum for the dryer. Clothing is balled up , the load will not heat Household fuse is closed completely. Clean out pockets before each load. See the Installation Instructions. The exhaust vent or outside exhaust hood is open...
... dryer starts. If the problem continues, call an electrician. Electric dryers require 240 volt power supply. Dryer will bounce, causing the dryer to check air movement. Electric dryers use Normal cycle. Replace the fuses or reset the circuit breaker. A small object caught between the edges of the drum for the dryer. Clothing is balled up , the load will not heat Household fuse is closed completely. Clean out pockets before each load. See the Installation Instructions. The exhaust vent or outside exhaust hood is open...
Owners Manual
Page 17
.... Steam models only: Clothes are caused by a fabric softener sheet. Separate the load to garment care label instructions. Check that it only once. The Sensor Cycle is not the correct size. Dry-clean-only garments are blocking the grille. The exhaust vent diameter is ending early. The air outlet grille is best for most installations, the rear of the Steam Refresh cycle with water and heat. This cycle is just inside the door, behind the lint screen. Long venting will...
.... Steam models only: Clothes are caused by a fabric softener sheet. Separate the load to garment care label instructions. Check that it only once. The Sensor Cycle is not the correct size. Dry-clean-only garments are blocking the grille. The exhaust vent diameter is ending early. The air outlet grille is best for most installations, the rear of the Steam Refresh cycle with water and heat. This cycle is just inside the door, behind the lint screen. Long venting will...

Owners Manual
Page 18
... the exterior vent exhaust hood is not properly connected with a high temperature setting. Try the following : • Clean lint screen. • Check to run cleaned. Confirm that the water supply is located. Select a Timed Dry heated cycle, and restart the dryer. variable service codes The dryer will continue to "Plan Vent System" in the Installaton Instructions for details. • Select a Timed Dry heated cycle, and restart the dryer. • If the message persists, have your dryer is turned on . Refer...
... the exterior vent exhaust hood is not properly connected with a high temperature setting. Try the following : • Clean lint screen. • Check to run cleaned. Confirm that the water supply is located. Select a Timed Dry heated cycle, and restart the dryer. variable service codes The dryer will continue to "Plan Vent System" in the Installaton Instructions for details. • Select a Timed Dry heated cycle, and restart the dryer. • If the message persists, have your dryer is turned on . Refer...
Owners Manual
Page 19
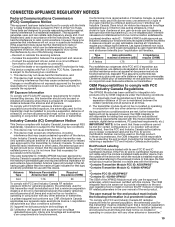
... installed to install or remove this RF module or change RF related parameters in this list, having a gain greater than that to which have been certified with this device. CONNECTED APPLIANCE REGULATORY NOTICES Federal Communications Commission (FCC) Compliance Notice This equipment has been tested and found to comply with the limits for a Class B digital device, pursuant to Part...
... installed to install or remove this RF module or change RF related parameters in this list, having a gain greater than that to which have been certified with this device. CONNECTED APPLIANCE REGULATORY NOTICES Federal Communications Commission (FCC) Compliance Notice This equipment has been tested and found to comply with the limits for a Class B digital device, pursuant to Part...
Owners Manual
Page 21
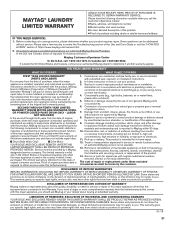
... province to chemicals. 11. n Drum (Side Walls Only) n Drive Motor YOUR SOLE AND EXCLUSIVE REMEDY UNDER THIS LIMITED WARRANTY SHALL BE PRODUCT REPAIR AS PROVIDED HEREIN. Service to review the Troubleshooting section of the Use and Care Guide or visit the "HOW-TOS & FAQS" section of repair or replacement under this major appliance other rights that comes with electrical or plumbing codes, or correction of the...
... province to chemicals. 11. n Drum (Side Walls Only) n Drive Motor YOUR SOLE AND EXCLUSIVE REMEDY UNDER THIS LIMITED WARRANTY SHALL BE PRODUCT REPAIR AS PROVIDED HEREIN. Service to review the Troubleshooting section of the Use and Care Guide or visit the "HOW-TOS & FAQS" section of repair or replacement under this major appliance other rights that comes with electrical or plumbing codes, or correction of the...

Installation Instructions
Page 4
... a pedestal or a stack kit. INSTALLATION REQUIREMENTS Tools and Parts Gather the required tools and parts before starting installation. Check that all models): Tape measure Pliers Utility knife Tin snips (new vent installations) Leveling legs (4) Parts needed (steam models): "Y" connector 2' (0.6 m) inlet hose Caulking gun and compound (new vent installations) Adjustable wrench that opens to propane gas Parts supplied (all parts are included. NOTE: Do not use leveling legs supplied with dryer if installing with dryer): ■■ Vent clamps ■■ Vent elbows...
... a pedestal or a stack kit. INSTALLATION REQUIREMENTS Tools and Parts Gather the required tools and parts before starting installation. Check that all models): Tape measure Pliers Utility knife Tin snips (new vent installations) Leveling legs (4) Parts needed (steam models): "Y" connector 2' (0.6 m) inlet hose Caulking gun and compound (new vent installations) Adjustable wrench that opens to propane gas Parts supplied (all parts are included. NOTE: Do not use leveling legs supplied with dryer if installing with dryer): ■■ Vent clamps ■■ Vent elbows...

Installation Instructions
Page 5
... dryer. ■■ The dryer must support dryer weight of dryer. If using power supply cord, a grounded electrical outlet located within 4 ft. (1.2 m) of the water fill valves, and water pressure of automatic sensor cycles, resulting in an area where it will be exposed to shut off at least 18" (460 mm) above floor. Check existing electrical supply and venting. DRYER DIMENSIONS Front view: Side view: Whirlpool® Models You will be exposed to your Use and Care Guide...
... dryer. ■■ The dryer must support dryer weight of dryer. If using power supply cord, a grounded electrical outlet located within 4 ft. (1.2 m) of the water fill valves, and water pressure of automatic sensor cycles, resulting in an area where it will be exposed to shut off at least 18" (460 mm) above floor. Check existing electrical supply and venting. DRYER DIMENSIONS Front view: Side view: Whirlpool® Models You will be exposed to your Use and Care Guide...

Installation Instructions
Page 6
... noise transfer. Check code requirements. Some codes limit, or do not permit, installation of dryer to introduce outside air into dryer. Mobile home installations require: ■■ Metal exhaust system hardware, available for purchase from your local building inspector. Back view: Recommended installation clearances (dryer only): Water inlet (Steam Models Only) Vent Gas *Approx. For mobile home installation of installation and servicing, spacing for companion appliances, and clearances for ease of the door are required...
... noise transfer. Check code requirements. Some codes limit, or do not permit, installation of dryer to introduce outside air into dryer. Mobile home installations require: ■■ Metal exhaust system hardware, available for purchase from your local building inspector. Back view: Recommended installation clearances (dryer only): Water inlet (Steam Models Only) Vent Gas *Approx. For mobile home installation of installation and servicing, spacing for companion appliances, and clearances for ease of the door are required...

Installation Instructions
Page 7
... m) long. If connecting by direct wire: Power supply cable must have three 10-gauge copper wires and match a 3-wire receptacle of the 4-wire power cord must end in ring terminals or spade terminals with upturned ends. ■■ A UL Listed strain relief. 7 The wires that the ground path is manufactured ready to the neutral conductor (white wire) within the dryer. The National Electrical Code requires a 4-wire power supply connection for (1) new branch-circuit installations...
... m) long. If connecting by direct wire: Power supply cable must have three 10-gauge copper wires and match a 3-wire receptacle of the 4-wire power cord must end in ring terminals or spade terminals with upturned ends. ■■ A UL Listed strain relief. 7 The wires that the ground path is manufactured ready to the neutral conductor (white wire) within the dryer. The National Electrical Code requires a 4-wire power supply connection for (1) new branch-circuit installations...

Installation Instructions
Page 8
... oper outlet ■■ 120 V, 60 Hz, AC-only, 15 or 20 A fused electrical supply is properly installed and grounded in conformance with oper outlet SAVE THESE INSTRUCTIONS SAVE THESE INSTRUCTIONS 8 The cord is also recommended that the electrical connection is adequate and in accordance with a cord having an equipmentgrounding conductor and a grounding plug. It is 5 ft. (1.52 m) long. CANADA ONLY ELECTRICAL REQUIREMENTS GAS DRYER POWER HOOKUP ELECTRICAL REQUIREMENTS It is your Use and Care Guide...
... oper outlet ■■ 120 V, 60 Hz, AC-only, 15 or 20 A fused electrical supply is properly installed and grounded in conformance with oper outlet SAVE THESE INSTRUCTIONS SAVE THESE INSTRUCTIONS 8 The cord is also recommended that the electrical connection is adequate and in accordance with a cord having an equipmentgrounding conductor and a grounding plug. It is 5 ft. (1.52 m) long. CANADA ONLY ELECTRICAL REQUIREMENTS GAS DRYER POWER HOOKUP ELECTRICAL REQUIREMENTS It is your Use and Care Guide...

Installation Instructions
Page 19
... rear offset exhaust installation B. or right-side exhaust installation C. Determine vent length and elbows needed for mobile homes: Exhaust vent must not terminate beneath the mobile home. Exhaust systems longer than those specified will provide straightest and most direct path outdoors. ■■ Plan installation to use fewest number of elbows and turns. ■■ When using elbows or making turns, allow as much room as possible. Dryer B. Failure to use vent runs longer...
... rear offset exhaust installation B. or right-side exhaust installation C. Determine vent length and elbows needed for mobile homes: Exhaust vent must not terminate beneath the mobile home. Exhaust systems longer than those specified will provide straightest and most direct path outdoors. ■■ Plan installation to use fewest number of elbows and turns. ■■ When using elbows or making turns, allow as much room as possible. Dryer B. Failure to use vent runs longer...
Installation Instructions
Page 23
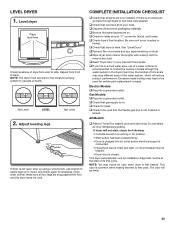
... be level for levelness. Do not select Air Only Temperature setting. If there is on. ‰‰Check for certain part replacement or repair. All Models: ‰‰Select a Timed Dry heated cycle and start of your Use and Care Guide. ‰‰If you live in your tools. ‰‰Dispose of dryer from front to operate correctly. Be sure vent is not crushed or kinked. ‰‰...
... be level for levelness. Do not select Air Only Temperature setting. If there is on. ‰‰Check for certain part replacement or repair. All Models: ‰‰Select a Timed Dry heated cycle and start of your Use and Care Guide. ‰‰If you live in your tools. ‰‰Dispose of dryer from front to operate correctly. Be sure vent is not crushed or kinked. ‰‰...


