
Owners Manual
Page 5
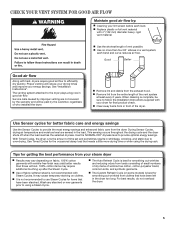
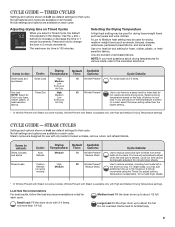
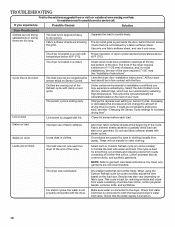
... dryness. Use Timed Cycles for the occasional damp load that needs a little more than those without. 100% cotton items may cause temporary staining on some models) is complete, be paid by the customer, regardless of the dryer. n The Auto Refresh Cycle is not recommended to over-drying. n Remove lint and debris...
... dryness. Use Timed Cycles for the occasional damp load that needs a little more than those without. 100% cotton items may cause temporary staining on some models) is complete, be paid by the customer, regardless of the dryer. n The Auto Refresh Cycle is not recommended to over-drying. n Remove lint and debris...
Owners Manual
Page 6
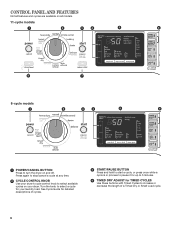
... your dryer's cycle control knob to select available cycles on and off. CONTROL PANEL AND FEATURES Not all features and cycles are available on all models. 11-cycle models 1 2 3 4 5 6 8 7 8-cycle models 1 2 3 4 5 6 1 POWER/CANCEL BUTTON Press to turn the dryer on your dryer.
... your dryer's cycle control knob to select available cycles on and off. CONTROL PANEL AND FEATURES Not all features and cycles are available on all models. 11-cycle models 1 2 3 4 5 6 8 7 8-cycle models 1 2 3 4 5 6 1 POWER/CANCEL BUTTON Press to turn the dryer on your dryer.
Owners Manual
Page 7
... will remember this button to turn the signal indicating the end of a drying cycle on or off. Wrinkle Prevent/Wrinkle Prevent with Steam (on some models) If you to take clothes out of the load that do not need to turn the LED drum light on or off, or to adjust... on Sensor Cycles, if desired. See Cycle Guide for your dryer. This option adds approximately 8 minutes to the total cycle time. 8 STEAM BOOST (on some models) Press to add the Reduce Static option to select available options for available settings on each cycle. 5 LED DISPLAY AND SETTINGS BUTTONS When you know...
... will remember this button to turn the signal indicating the end of a drying cycle on or off. Wrinkle Prevent/Wrinkle Prevent with Steam (on some models) If you to take clothes out of the load that do not need to turn the LED drum light on or off, or to adjust... on Sensor Cycles, if desired. See Cycle Guide for your dryer. This option adds approximately 8 minutes to the total cycle time. 8 STEAM BOOST (on some models) Press to add the Reduce Static option to select available options for available settings on each cycle. 5 LED DISPLAY AND SETTINGS BUTTONS When you know...
Owners Manual
Page 8
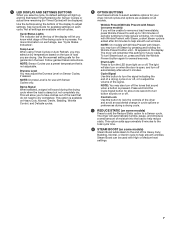
... heat initially, followed by Medium heat for improved moisture removal and enhanced fabric care. Wrinkle Prevent with Steam is available only with Steam (on some models). Do not overload. Work clothes, casual Normal Medium More 38 wear, mixed cottons, Normal sheets, corduroys Less Damp Dry Signal Wrinkle Prevent† Reduce Static... energy savings The dryer senses moisture in the load or air temperature and shuts off when the load reaches the selected dryness level. Not all models.
... heat initially, followed by Medium heat for improved moisture removal and enhanced fabric care. Wrinkle Prevent with Steam is available only with Steam (on some models). Do not overload. Work clothes, casual Normal Medium More 38 wear, mixed cottons, Normal sheets, corduroys Less Damp Dry Signal Wrinkle Prevent† Reduce Static... energy savings The dryer senses moisture in the load or air temperature and shuts off when the load reaches the selected dryness level. Not all models.
Owners Manual
Page 9
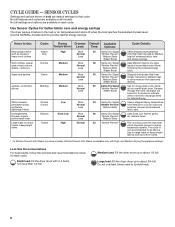
...dryer drum up to dry foam, Low rubber, plastic, or Extra Low heat-sensitive Air Only fabrics. Adjusting drying time on some models) Cycle Details: Use to refresh: Drying Default Available Cycle: Temperature: Time: Options: Shirts, blouses, Auto Medium 15 Wrinkle Prevent&#... follow the load size recommendations noted for drying heavyweight items such as sheets, blouses, dresses, underwear, permanent press fabrics, and some models). Large load: Fill the dryer drum up to the care label directions. Use the + and - If you select a Timed ...
...dryer drum up to dry foam, Low rubber, plastic, or Extra Low heat-sensitive Air Only fabrics. Adjusting drying time on some models) Cycle Details: Use to refresh: Drying Default Available Cycle: Temperature: Time: Options: Shirts, blouses, Auto Medium 15 Wrinkle Prevent&#... follow the load size recommendations noted for drying heavyweight items such as sheets, blouses, dresses, underwear, permanent press fabrics, and some models). Large load: Fill the dryer drum up to the care label directions. Use the + and - If you select a Timed ...
Owners Manual
Page 10
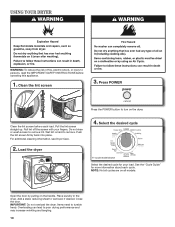
.... Clean the lint screen 3. Push the lint screen firmly back into place. Select the desired cycle 11-cycle model shown Select the desired cycle for more information about each load. NOTE: Not all models. Place laundry in the dryer. Add a static reducing sheet to remove. Wet lint is hard to wet load...
.... Clean the lint screen 3. Push the lint screen firmly back into place. Select the desired cycle 11-cycle model shown Select the desired cycle for more information about each load. NOTE: Not all models. Place laundry in the dryer. Add a static reducing sheet to remove. Wet lint is hard to wet load...
Owners Manual
Page 11
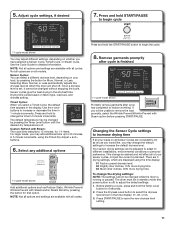
...depending on all options and settings are displayed using the Timed Dry Adjust + and buttons. 6. temp level dryness level damp signal 11-cycle model shown Promptly remove garments after cycle is lit. + - To change is off . The dryer must be changed without steam has completed ... NOTE: The settings cannot be changed by pressing the Temp Level button until the desired dry temperature is finished + - NOTE: Not all models. Press START/PAUSE to adjust the default settings. 1. Changing the Sensor Cycle settings to begin cycle + - Press and hold the START/...
...depending on all options and settings are displayed using the Timed Dry Adjust + and buttons. 6. temp level dryness level damp signal 11-cycle model shown Promptly remove garments after cycle is lit. + - To change is off . The dryer must be changed without steam has completed ... NOTE: The settings cannot be changed by pressing the Temp Level button until the desired dry temperature is finished + - NOTE: Not all models. Press START/PAUSE to adjust the default settings. 1. Changing the Sensor Cycle settings to begin cycle + - Press and hold the START/...
Owners Manual
Page 12
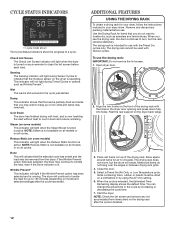
... Wrinkle Prevent™ This indicator will rotate. Use the Drying Rack for up or iron while still damp may be removed from items dried on model and selected settings) after the cycle is selected, the Estimated Time Remaining display shows the default time. When you use the drying rack: IMPORTANT... is lit. NOTE: Check the lint screen and remove any packing material before each load. temp level dryness level damp signal 11-cycle model shown The Cycle Status Indicators show the progress of the drying rack. The dryer will indicate that you do not hang over the edges ...
... Wrinkle Prevent™ This indicator will rotate. Use the Drying Rack for up or iron while still damp may be removed from items dried on model and selected settings) after the cycle is selected, the Estimated Time Remaining display shows the default time. When you use the drying rack: IMPORTANT... is lit. NOTE: Check the lint screen and remove any packing material before each load. temp level dryness level damp signal 11-cycle model shown The Cycle Status Indicators show the progress of the drying rack. The dryer will indicate that you do not hang over the edges ...
Owners Manual
Page 14
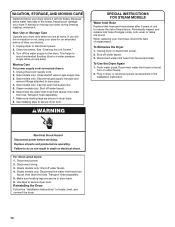
... weather, winterize it will be on water faucet. 2. Flush water pipes. Transport hose separately. 5. Turn off water faucet. 4. Gas models only: Close shutoff valve in the Installation Instruction. Disconnect the water inlet hose from faucet and drain. Periodically inspect and replace inlet hose ...kinks, cuts, wear, or leaks are away. Transport hose separately. 7. To Use the Dryer Again 1. For direct-wired dryers: 1. Steam models only: Disconnect the water inlet hose from faucet, then drain the hose. If storing or moving your dryer. This helps to avoid unintended flooding...
... weather, winterize it will be on water faucet. 2. Flush water pipes. Transport hose separately. 5. Turn off water faucet. 4. Gas models only: Close shutoff valve in the Installation Instruction. Disconnect the water inlet hose from faucet and drain. Periodically inspect and replace inlet hose ...kinks, cuts, wear, or leaks are away. Transport hose separately. 7. To Use the Dryer Again 1. For direct-wired dryers: 1. Steam models only: Disconnect the water inlet hose from faucet, then drain the hose. If storing or moving your dryer. This helps to avoid unintended flooding...
Owners Manual
Page 16
...also "Changing the Sensor Cycle settings to both the faucet and dryer's water inlet valve. When using the Custom Refresh cycle (on some models) to possibly avoid a service call. Increasing or decreasing the dryness level will change the amount of drying time in clothes. These will...Select Auto or Custom Refresh cycle (on . 16 Dry smaller loads that it only once. Closet doors must have ventilation openings at www.maytag.com/help for reducing wrinkles and odors from dryer at the beginning of the cycle. See "Installation Instructions". If loads are not recommended....
...also "Changing the Sensor Cycle settings to both the faucet and dryer's water inlet valve. When using the Custom Refresh cycle (on some models) to possibly avoid a service call. Increasing or decreasing the dryness level will change the amount of drying time in clothes. These will...Select Auto or Custom Refresh cycle (on . 16 Dry smaller loads that it only once. Closet doors must have ventilation openings at www.maytag.com/help for reducing wrinkles and odors from dryer at the beginning of the cycle. See "Installation Instructions". If loads are not recommended....
Owners Manual
Page 18
... REMEDIES; In the U.S.A., call . 6/08 Keep this limited warranty. This major appliance is located in accordance with Maytag published installation instructions. 10. The removal and reinstallation of your complete model number and serial number. MAYTAG SHALL NOT BE LIABLE FOR INCIDENTAL OR CONSEQUENTIAL DAMAGES. YOUR SOLE AND EXCLUSIVE REMEDY UNDER THIS LIMITED WARRANTY...
... REMEDIES; In the U.S.A., call . 6/08 Keep this limited warranty. This major appliance is located in accordance with Maytag published installation instructions. 10. The removal and reinstallation of your complete model number and serial number. MAYTAG SHALL NOT BE LIABLE FOR INCIDENTAL OR CONSEQUENTIAL DAMAGES. YOUR SOLE AND EXCLUSIVE REMEDY UNDER THIS LIMITED WARRANTY...
Installation Instructions
Page 1
... Hose 16 Connect Vent 17 Level Dryer 17 Complete Installation Checklist 18 Door reversal (OPTIONAL 19 INSTALLATION NOTES Date of purchase Date of installation Installer Model number Serial number W10057363B W10310420B -
... Hose 16 Connect Vent 17 Level Dryer 17 Complete Installation Checklist 18 Door reversal (OPTIONAL 19 INSTALLATION NOTES Date of purchase Date of installation Installer Model number Serial number W10057363B W10310420B -

Installation Instructions
Page 19
... Using a Phillips screwdriver, remove the 10 screws securing the inner door to remove the door. Door Reversal (optional) The following instructions are for models with the inside of the door facing up and out to the outer door. Remove door from the dryer door before proceeding. Using a Torx®...to the dryer and lift up . Reinstall the 4 screws in your retailer, or see the For Assistance or Service page in the holes. IMPORTANT: For models with a square shaped door, an additional kit is a registered trademark of dryer door frame, as shown. 3. Lift off the inner door and set ...
... Using a Phillips screwdriver, remove the 10 screws securing the inner door to remove the door. Door Reversal (optional) The following instructions are for models with the inside of the door facing up and out to the outer door. Remove door from the dryer door before proceeding. Using a Torx®...to the dryer and lift up . Reinstall the 4 screws in your retailer, or see the For Assistance or Service page in the holes. IMPORTANT: For models with a square shaped door, an additional kit is a registered trademark of dryer door frame, as shown. 3. Lift off the inner door and set ...
Dimension Guide
Page 1
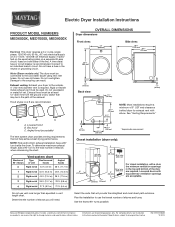
... inside the dryer. For complete details, see Installation Instructions packed with equivalent air ventilation openings are required. Water (Steam models only): The dryer must be connected to the total number of the door are acceptable. Damage to an individual branch ...) 31/2"* (89 mm) NOTE: Most installations require a minimum of elbows you will help achieve best drying performance. Electric Dryer Installation Instructions PRODUCT MODEL NUMBERS MED6000X, MED7000X, MED9000X Electrical: This dryer requires a 3 or 4 wire, single phase, 120/240 volt, 60 Hz., AC only electrical...
... inside the dryer. For complete details, see Installation Instructions packed with equivalent air ventilation openings are required. Water (Steam models only): The dryer must be connected to the total number of the door are acceptable. Damage to an individual branch ...) 31/2"* (89 mm) NOTE: Most installations require a minimum of elbows you will help achieve best drying performance. Electric Dryer Installation Instructions PRODUCT MODEL NUMBERS MED6000X, MED7000X, MED9000X Electrical: This dryer requires a 3 or 4 wire, single phase, 120/240 volt, 60 Hz., AC only electrical...

Warranty Information
Page 1
...that have been removed, altered, or cannot be found by checking the "Assistance or Service" section or by Maytag. 5. Dealer name Address Phone number Model number Serial number Purchase date 18 EXCLUSION OF INCIDENTAL AND CONSEQUENTIAL DAMAGES YOUR SOLE AND EXCLUSIVE REMEDY UNDER THIS LIMITED... the country in which it is installed in an inaccessible location or is not installed in accordance with the product, Maytag brand of your complete model number and serial number. In Canada, call . Replacement parts or repair labor on the product. This major appliance...
...that have been removed, altered, or cannot be found by checking the "Assistance or Service" section or by Maytag. 5. Dealer name Address Phone number Model number Serial number Purchase date 18 EXCLUSION OF INCIDENTAL AND CONSEQUENTIAL DAMAGES YOUR SOLE AND EXCLUSIVE REMEDY UNDER THIS LIMITED... the country in which it is installed in an inaccessible location or is not installed in accordance with the product, Maytag brand of your complete model number and serial number. In Canada, call . Replacement parts or repair labor on the product. This major appliance...


