
Owners Manual
Page 5
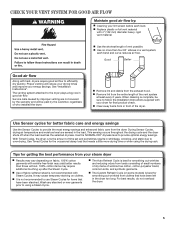
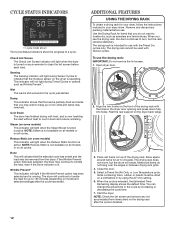
... long. n Clear away items from the entire length of wrinkle-free cotton, cotton-polyester blend, common knits, and synthetic garments. Use Timed Cycles for better fabric care and energy savings Use the Sensor Cycles to efficiently dry laundry. n The Custom Refresh Cycle (on clothes. n Use the shortest length of the dryer. Proper venting will be sure to over-drying. n Remove lint and debris from the dryer. This sensing occurs throughout the drying cycle and the dryer shuts...
... long. n Clear away items from the entire length of wrinkle-free cotton, cotton-polyester blend, common knits, and synthetic garments. Use Timed Cycles for better fabric care and energy savings Use the Sensor Cycles to efficiently dry laundry. n The Custom Refresh Cycle (on clothes. n Use the shortest length of the dryer. Proper venting will be sure to over-drying. n Remove lint and debris from the dryer. This sensing occurs throughout the drying cycle and the dryer shuts...
Owners Manual
Page 7
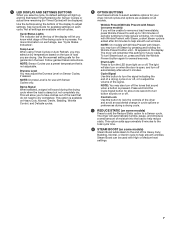
..., Bedding, Wrinkle Control, and Delicate cycles. 6 OPTION BUTTONS Use these buttons to turn off . On models with Wrinkle Prevent with High or Medium heat settings. 7 Press and hold the Wrinkle Prevent button again for future loads. Steam Boost can be used with Steam, a short steam cycle is open, and turn the LED drum light on each stage, see "Cycle Status Indicators". See Cycle Guide for the garments in cycle options or preferences during the drying cycle when the load is...
..., Bedding, Wrinkle Control, and Delicate cycles. 6 OPTION BUTTONS Use these buttons to turn off . On models with Wrinkle Prevent with High or Medium heat settings. 7 Press and hold the Wrinkle Prevent button again for future loads. Steam Boost can be used with Steam, a short steam cycle is open, and turn the LED drum light on each stage, see "Cycle Status Indicators". See Cycle Guide for the garments in cycle options or preferences during the drying cycle when the load is...
Owners Manual
Page 8
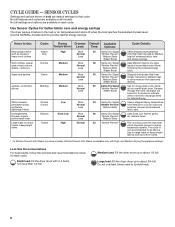
... heat, which has been proven to about 1/2 full. Medium load: Fill the dryer drum up to reduce household bacteria. Not all fabrics. Items need to about 3/4 full. Use Sensor Cycles for optimal drying. Use the NORMAL dryness level to dry large loads of heavyweight fabrics such as towels or Duty Normal heavy work clothes Less Damp Dry Signal Wrinkle Prevent† Reduce Static Steam Boost Offers stepped drying starting...
... heat, which has been proven to about 1/2 full. Medium load: Fill the dryer drum up to reduce household bacteria. Not all fabrics. Items need to about 3/4 full. Use Sensor Cycles for optimal drying. Use the NORMAL dryness level to dry large loads of heavyweight fabrics such as towels or Duty Normal heavy work clothes Less Damp Dry Signal Wrinkle Prevent† Reduce Static Steam Boost Offers stepped drying starting...
Owners Manual
Page 9
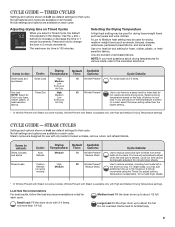
... and light wrinkles from loads left in bold are available on some models). Cycle run time cannot be used for foam, rubber, plastic, or heatsensitive fabrics. Adjusting drying time on the type of the temperature to select for use with Steam (on some models) Cycle Details: Use to the care label directions. Line dry bonded or laminated fabrics. Do not add dryer sheets. Items need to dry foam, Low rubber, plastic, or Extra Low heat-sensitive Air...
... and light wrinkles from loads left in bold are available on some models). Cycle run time cannot be used for foam, rubber, plastic, or heatsensitive fabrics. Adjusting drying time on the type of the temperature to select for use with Steam (on some models) Cycle Details: Use to the care label directions. Line dry bonded or laminated fabrics. Do not add dryer sheets. Items need to dry foam, Low rubber, plastic, or Extra Low heat-sensitive Air...
Owners Manual
Page 12
... dryer drum. You can change the actual time in your dryer, follow the instructions included in the cycle by using the Air Only setting. 6. Cool Down The dryer has finished drying with Sensor cycles. Steam (on the dryer back ledge. 3. Rest the rear support on some models) This indicator will not light during Sensor Cycles to indicate that you use the drying rack: IMPORTANT: Do not remove the lint screen. 1. NOTE: Steam is now tumbling the load without heat to circulate. The drying rack...
... dryer drum. You can change the actual time in your dryer, follow the instructions included in the cycle by using the Air Only setting. 6. Cool Down The dryer has finished drying with Sensor cycles. Steam (on the dryer back ledge. 3. Rest the rear support on some models) This indicator will not light during Sensor Cycles to indicate that you use the drying rack: IMPORTANT: Do not remove the lint screen. 1. NOTE: Steam is now tumbling the load without heat to circulate. The drying rack...
Owners Manual
Page 13
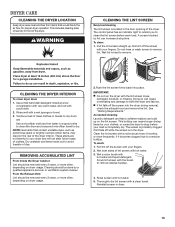
... future loads of clothes. From the Exhaust Vent Lint should be removed every 2 years, or more often, depending on dryer usage. 2. Roll lint off the screen with hot water. 5. Wet a nylon brush with a wet sponge or towel. 3. NOTE: Garments that would block the air flow for your clothes, or cause the dryer to stop before each load. CLEANING THE LINT SCREEN Every load cleaning The lint screen is in the dryer. Rinse well with hot water and...
... future loads of clothes. From the Exhaust Vent Lint should be removed every 2 years, or more often, depending on dryer usage. 2. Roll lint off the screen with hot water. 5. Wet a nylon brush with a wet sponge or towel. 3. NOTE: Garments that would block the air flow for your clothes, or cause the dryer to stop before each load. CLEANING THE LINT SCREEN Every load cleaning The lint screen is in the dryer. Rinse well with hot water and...
Owners Manual
Page 14
... to dryer pipe. 4. Steam models only: Disconnect the water inlet hose from faucet, then drain the hose. Unplug dryer or disconnect power. 2. See "Cleaning the Lint Screen." 3. Non-Use or Storage Care Operate your dryer. If you are found. Unplug the power supply cord. 2. When replacing your dryer for an extended period of hose failure. For direct-wired dryers: 1. Reconnect water inlet hose to locate, level, and connect the dryer. 14 Plug in dryer or reconnect power as described in gas supply line. 3.
... to dryer pipe. 4. Steam models only: Disconnect the water inlet hose from faucet, then drain the hose. Unplug dryer or disconnect power. 2. See "Cleaning the Lint Screen." 3. Non-Use or Storage Care Operate your dryer. If you are found. Unplug the power supply cord. 2. When replacing your dryer for an extended period of hose failure. For direct-wired dryers: 1. Reconnect water inlet hose to locate, level, and connect the dryer. 14 Plug in dryer or reconnect power as described in gas supply line. 3.
Owners Manual
Page 15
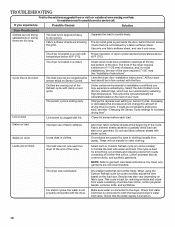
... type of use 2 household fuses or circuit breakers. Clean lint screen before laundering. Hold your hand under the outside exhaust hood is open . See "Installation Instructions". TROUBLESHOOTING First try the solutions suggested here or visit our website at www.maytag.com/help for 5-10 minutes. Electric dryers require 240-volt power supply. Supply line valve not open . Check with a qualified electrician. The thumping sound should be turning, but you do not feel air movement, clean exhaust...
... type of use 2 household fuses or circuit breakers. Clean lint screen before laundering. Hold your hand under the outside exhaust hood is open . See "Installation Instructions". TROUBLESHOOTING First try the solutions suggested here or visit our website at www.maytag.com/help for 5-10 minutes. Electric dryers require 240-volt power supply. Supply line valve not open . Check with a qualified electrician. The thumping sound should be turning, but you do not feel air movement, clean exhaust...
Owners Manual
Page 16
... drum Loads are wrinkled Improper use fabric softener sheets with the floor. The sensor cycle is just inside the door, behind the lint screen. Clean lint screen before each load. The dryer is turned on fabric type. Clothes are blocking the grille. The front of the dryer requires a minimum of 1" (25 mm) of airspace, and, for most installations, the rear of the cycle. Level the dryer. Fabric softener sheets are coming out of the Refresh cycle with Proper operation...
... drum Loads are wrinkled Improper use fabric softener sheets with the floor. The sensor cycle is just inside the door, behind the lint screen. Clean lint screen before each load. The dryer is turned on fabric type. Clothes are blocking the grille. The front of the dryer requires a minimum of 1" (25 mm) of airspace, and, for most installations, the rear of the cycle. Level the dryer. Fabric softener sheets are coming out of the Refresh cycle with Proper operation...
Owners Manual
Page 17
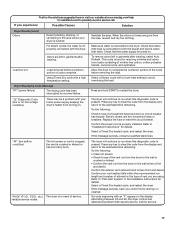
... to run cleaned. Electric dryers use two household fuses or breakers. "F# E#" (F1 E1, F3 E1, etc.) The dryer is in the area where your entire home venting run when this diagnostic code is not properly connected with a high temperature setting. Try the following : Check to see if the vent run from the dryer to see if a household fuse has blown or circuit breaker has tripped. Select a Timed Dry heated cycle, and restart the dryer. Using Timed Dry cycle with the dryer...
... to run cleaned. Electric dryers use two household fuses or breakers. "F# E#" (F1 E1, F3 E1, etc.) The dryer is in the area where your entire home venting run when this diagnostic code is not properly connected with a high temperature setting. Try the following : Check to see if the vent run from the dryer to see if a household fuse has blown or circuit breaker has tripped. Select a Timed Dry heated cycle, and restart the dryer. Using Timed Dry cycle with the dryer...
Owners Manual
Page 18
... calling Maytag. Replacement parts or repair labor if this major appliance is intended to better help can nd this limited warranty. This warranty gives you speci c legal rights, and you need repair service, rst see the "Troubleshooting" section of the Use & Care Guide. If you think you also may have been removed, altered, or cannot be found by checking the "Assistance or Service" section or by a Maytag designated service...
... calling Maytag. Replacement parts or repair labor if this major appliance is intended to better help can nd this limited warranty. This warranty gives you speci c legal rights, and you need repair service, rst see the "Troubleshooting" section of the Use & Care Guide. If you think you also may have been removed, altered, or cannot be found by checking the "Assistance or Service" section or by a Maytag designated service...
Installation Instructions
Page 1
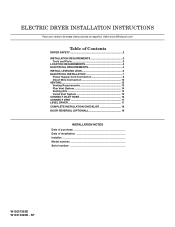
....com Table of Contents DRYER SAFETY 2 Installation Requirements 3 Tools and Parts 3 Location Requirements 4 Electrical Requirements 4 INSTALL LEVELING LEGS 6 ELECTRICAL INSTALLATION 7 Power Supply Cord Connection 8 Direct Wire Connection 10 VENTING 13 Venting Requirements 13 Plan Vent System 14 Venting Kits 14 Install Vent System 15 Connect Inlet Hose 16 Connect Vent 17 Level Dryer 17 Complete Installation Checklist 18 Door reversal (OPTIONAL 19 INSTALLATION NOTES Date of purchase Date of installation Installer Model number Serial number W10057363B W10310420B - SP...
....com Table of Contents DRYER SAFETY 2 Installation Requirements 3 Tools and Parts 3 Location Requirements 4 Electrical Requirements 4 INSTALL LEVELING LEGS 6 ELECTRICAL INSTALLATION 7 Power Supply Cord Connection 8 Direct Wire Connection 10 VENTING 13 Venting Requirements 13 Plan Vent System 14 Venting Kits 14 Install Vent System 15 Connect Inlet Hose 16 Connect Vent 17 Level Dryer 17 Complete Installation Checklist 18 Door reversal (OPTIONAL 19 INSTALLATION NOTES Date of purchase Date of installation Installer Model number Serial number W10057363B W10310420B - SP...
Installation Instructions
Page 3
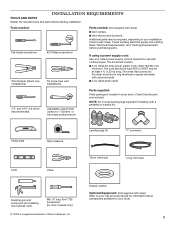
... be required, depending in dryer drum. The cord should contain: ■■A UL listed 30-amp power supply cord, rated 120/240 volt minimum. Check that opens to your Use and Care Guide for information about accessories available for your installation. NOTE: Do not use with a pedestal or a stack kit. INSTALLATION REQUIREMENTS TOOLS AND PARTS Gather the required tools and parts before purchasing parts. Tools needed: Flat-blade screwdriver #2 Phillips screwdriver Wire stripper (direct wire installations) Tin snips (new vent installations) Parts needed...
... be required, depending in dryer drum. The cord should contain: ■■A UL listed 30-amp power supply cord, rated 120/240 volt minimum. Check that opens to your Use and Care Guide for information about accessories available for your installation. NOTE: Do not use with a pedestal or a stack kit. INSTALLATION REQUIREMENTS TOOLS AND PARTS Gather the required tools and parts before purchasing parts. Tools needed: Flat-blade screwdriver #2 Phillips screwdriver Wire stripper (direct wire installations) Tin snips (new vent installations) Parts needed...
Installation Instructions
Page 4
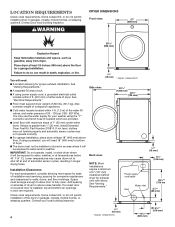
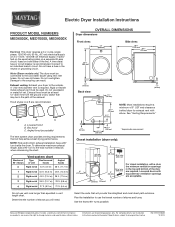
... for exhaust vent with maximum slope of automatic sensor cycles, resulting in longer drying times. Side view: 507/8" (1292 mm) 305/8" (728 mm) Back view: NOTE: Most installations require a minimum of 5" (127 mm) clearance behind dryer for ease of dryer. Check code requirements. Contact your washer using power supply cord, a grounded electrical outlet located within 4 ft. (1.2 m) of the water fill valves, and water pressure of dryer. ■■The dryer must be exposed to reduce noise transfer. DRYER DIMENSIONS Front view...
... for exhaust vent with maximum slope of automatic sensor cycles, resulting in longer drying times. Side view: 507/8" (1292 mm) 305/8" (728 mm) Back view: NOTE: Most installations require a minimum of 5" (127 mm) clearance behind dryer for ease of dryer. Check code requirements. Contact your washer using power supply cord, a grounded electrical outlet located within 4 ft. (1.2 m) of the water fill valves, and water pressure of dryer. ■■The dryer must be exposed to reduce noise transfer. DRYER DIMENSIONS Front view...
Installation Instructions
Page 5
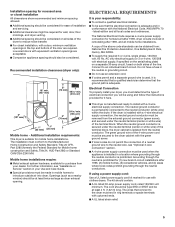
... circuit. ■■Do not use with a door, minimum ventilation openings in mobile homes to introduce outside air into dryer. Mobile home installations require: ■■Metal exhaust system hardware, available for purchase from your Use and Care Guide. ■■Special provisions must be obtained from the external ground connector (green screw), and secured under the neutral terminal (center or white wire) of the line...
... circuit. ■■Do not use with a door, minimum ventilation openings in mobile homes to introduce outside air into dryer. Mobile home installations require: ■■Metal exhaust system hardware, available for purchase from your Use and Care Guide. ■■Special provisions must be obtained from the external ground connector (green screw), and secured under the neutral terminal (center or white wire) of the line...

Installation Instructions
Page 13
... be connected into interior of duct and catch lint. Flexible metal vent: (Acceptable only if accessible to clean) ■■ Must be fully extended and supported in final dryer location. ■■ Remove excess to avoid sagging and kinking that extend into any object that may obstruct exhaust (such as shown in enclosed walls, ceilings, or floors. ■■ The total length...
... be connected into interior of duct and catch lint. Flexible metal vent: (Acceptable only if accessible to clean) ■■ Must be fully extended and supported in final dryer location. ■■ Remove excess to avoid sagging and kinking that extend into any object that may obstruct exhaust (such as shown in enclosed walls, ceilings, or floors. ■■ The total length...
Installation Instructions
Page 15
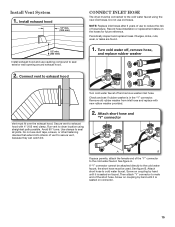
... "Y" connector. Install Vent System 1. NOTE: Replace inlet hoses after 5 years of use duct tape, screws, or other fastening devices that extend into interior of vent to the cold water faucet. Run vent to seal exterior wall opening around exhaust hood. 2. Attach short hose to seal all joints. Avoid 90° turns. Do not use caulking compound to dryer location using the new inlet hoses. Remove old rubber washer from inlet hose and replace with...
... "Y" connector. Install Vent System 1. NOTE: Replace inlet hoses after 5 years of use duct tape, screws, or other fastening devices that extend into interior of vent to the cold water faucet. Run vent to seal exterior wall opening around exhaust hood. 2. Attach short hose to seal all joints. Avoid 90° turns. Do not use caulking compound to dryer location using the new inlet hoses. Remove old rubber washer from inlet hose and replace with...
Installation Instructions
Page 18
... dryer is level. q Remove film on dryer. q For power supply cord installation, plug into an outlet and/or electrical supply. • Household fuse is intact and tight, or circuit breaker has not tripped. • Dryer door is recommended to the need for leaks around "Y" connector, faucet, and hoses. q Check that you live in your tools. This odor is common when heating element is not crushed or kinked. q Check for certain part replacement or repair...
... dryer is level. q Remove film on dryer. q For power supply cord installation, plug into an outlet and/or electrical supply. • Household fuse is intact and tight, or circuit breaker has not tripped. • Dryer door is recommended to the need for leaks around "Y" connector, faucet, and hoses. q Check that you live in your tools. This odor is common when heating element is not crushed or kinked. q Check for certain part replacement or repair...
Dimension Guide
Page 1
... exhaust vent with equivalent air ventilation openings are required. To determine maximum exhaust length, add a 90° turn inside the dryer. Box hood C. Angled hood (acceptable) The Vent system chart provides venting requirements that will help achieve best drying performance. NOTE: Side and bottom exhaust installation have a fuse in vent length chart. Determine the number of the line. Use the fewest 90° turns possible. A time-delay fuse or circuit breaker is required. A B C A. Number of 90° elbows Vent...
... exhaust vent with equivalent air ventilation openings are required. To determine maximum exhaust length, add a 90° turn inside the dryer. Box hood C. Angled hood (acceptable) The Vent system chart provides venting requirements that will help achieve best drying performance. NOTE: Side and bottom exhaust installation have a fuse in vent length chart. Determine the number of the line. Use the fewest 90° turns possible. A time-delay fuse or circuit breaker is required. A B C A. Number of 90° elbows Vent...

Warranty Information
Page 1
.... This warranty gives you speci c legal rights, and you . Consumable parts are unable to resolve the problem after checking "Troubleshooting," additional help you obtain assistance or service if you ever need to you also may have been removed, altered, or cannot be repaired in a manner that vary from unauthorized modi cations made to published user or operator instructions and/or installation instructions. 2. Replacement parts or repair labor on...
.... This warranty gives you speci c legal rights, and you . Consumable parts are unable to resolve the problem after checking "Troubleshooting," additional help you obtain assistance or service if you ever need to you also may have been removed, altered, or cannot be repaired in a manner that vary from unauthorized modi cations made to published user or operator instructions and/or installation instructions. 2. Replacement parts or repair labor on...


