
Owners Manual
Page 4
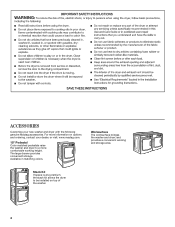
.... 15" Pedestal Color matched pedestals raise the washer and dryer to be installed on options and ordering, contact your new washer and dryer with the following genuine Maytag accessories. Stack Kit If space is at a premium, the stack kit allows the dryer to a more information on top of the washer. 4 For more comfortable working...
.... 15" Pedestal Color matched pedestals raise the washer and dryer to be installed on options and ordering, contact your new washer and dryer with the following genuine Maytag accessories. Stack Kit If space is at a premium, the stack kit allows the dryer to a more information on top of the washer. 4 For more comfortable working...
Owners Manual
Page 5
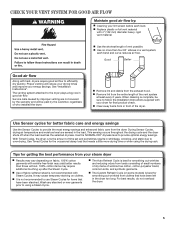
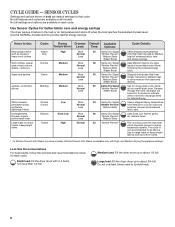
...yield better results than four 90° elbows in the load. It may cause temporary staining on fabric. 100% cotton garments with your steam dryer n Results may require additional touching up after the Steam Cycle. n Use of vent possible. Wash any starched or new garments prior to ...using a Steam Cycle. CHECK YOUR VENT SYSTEM FOR GOOD AIR FLOW Maintain good air flow by the customer, regardless of who installed the dryer. During Sensor Cycles, drying air temperature and moisture level are not covered by the warranty and will reduce your drying times and improve ...
...yield better results than four 90° elbows in the load. It may cause temporary staining on fabric. 100% cotton garments with your steam dryer n Results may require additional touching up after the Steam Cycle. n Use of vent possible. Wash any starched or new garments prior to ...using a Steam Cycle. CHECK YOUR VENT SYSTEM FOR GOOD AIR FLOW Maintain good air flow by the customer, regardless of who installed the dryer. During Sensor Cycles, drying air temperature and moisture level are not covered by the warranty and will reduce your drying times and improve ...
Owners Manual
Page 6
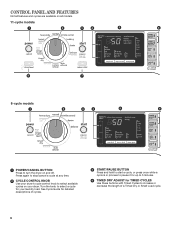
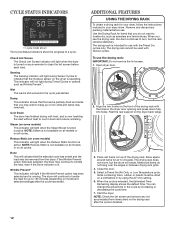
...detailed descriptions of a Timed Dry or Small Load cycle. 6 Press again to stop/cancel a cycle at any time. 2 CYCLE CONTROL KNOB Use your dryer's cycle control knob to increase or decrease the length of cycles. 3 START/PAUSE BUTTON Press and hold to start a cycle, or press once while a... for up to 5 minutes. 4 TIMED DRY ADJUST for TIMED CYCLES Use these buttons with Timed Cycles to select available cycles on your dryer. Turn the knob to turn the dryer on and off. CONTROL PANEL AND FEATURES Not all features and cycles are available on all models. 11-cycle models 1 2 3 4 5 6 8...
...detailed descriptions of a Timed Dry or Small Load cycle. 6 Press again to stop/cancel a cycle at any time. 2 CYCLE CONTROL KNOB Use your dryer's cycle control knob to increase or decrease the length of cycles. 3 START/PAUSE BUTTON Press and hold to start a cycle, or press once while a... for up to 5 minutes. 4 TIMED DRY ADJUST for TIMED CYCLES Use these buttons with Timed Cycles to select available cycles on your dryer. Turn the knob to turn the dryer on and off. CONTROL PANEL AND FEATURES Not all features and cycles are available on all models. 11-cycle models 1 2 3 4 5 6 8...
Owners Manual
Page 7
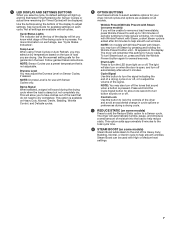
..., its default settings will automatically tumble, pause, and introduce a small amount of the signal. Drum Light Press to help reduce wrinkling. The dryer will light up to 150 minutes of periodic tumbling to a Sensor cycle. 5 LED DISPLAY AND SETTINGS BUTTONS When you may turn off Steam by... cycles. 6 OPTION BUTTONS Use these buttons to select available options for several seconds. Press and hold the Wrinkle Prevent button again for your dryer. Damp Signal When selected, a signal will let you are available on , press and hold the Cycle Signal button for use a preset ...
..., its default settings will automatically tumble, pause, and introduce a small amount of the signal. Drum Light Press to help reduce wrinkling. The dryer will light up to 150 minutes of periodic tumbling to a Sensor cycle. 5 LED DISPLAY AND SETTINGS BUTTONS When you may turn off Steam by... cycles. 6 OPTION BUTTONS Use these buttons to select available options for several seconds. Press and hold the Wrinkle Prevent button again for your dryer. Damp Signal When selected, a signal will let you are available on , press and hold the Cycle Signal button for use a preset ...
Owners Manual
Page 8
...on some models). Partway through the cycle, the signal will sound for each cycle. Medium load: Fill the dryer drum up to about 3/4 full. Large load: Fill the dryer drum up to about 1/2 full. Wrinkle Prevent with high heat, which has been proven to drive moisture from ...features and cycles are default settings for improved moisture removal and enhanced fabric care. Small load: Fill the dryer drum with High, and Medium Drying Temperature settings. do not overfill dryer drum. This cycle is available only with 3-4 items, not more than 1/4 full. Use the NORMAL ...
...on some models). Partway through the cycle, the signal will sound for each cycle. Medium load: Fill the dryer drum up to about 3/4 full. Large load: Fill the dryer drum up to about 1/2 full. Wrinkle Prevent with high heat, which has been proven to drive moisture from ...features and cycles are default settings for improved moisture removal and enhanced fabric care. Small load: Fill the dryer drum with High, and Medium Drying Temperature settings. do not overfill dryer drum. This cycle is available only with 3-4 items, not more than 1/4 full. Use the NORMAL ...
Owners Manual
Page 9
...based on Timed Cycles + - Wrinkle Prevent with Steam is available only with High and Medium Drying Temperature settings. Large load: Fill the dryer drum up to Medium heat setting may be used for drying heavyweight items such as sheets, blouses, dresses, underwear, permanent press fabrics, ... load size recommendations noted for foam, rubber, plastic, or heatsensitive fabrics. If you may be manually adjusted. Do not add dryer sheets. Do not add dryer sheets. † Or Wrinkle Prevent with 3-4 items, not more than the higher setting. † Or Wrinkle Prevent with ...
...based on Timed Cycles + - Wrinkle Prevent with Steam is available only with High and Medium Drying Temperature settings. Large load: Fill the dryer drum up to Medium heat setting may be used for drying heavyweight items such as sheets, blouses, dresses, underwear, permanent press fabrics, ... load size recommendations noted for foam, rubber, plastic, or heatsensitive fabrics. If you may be manually adjusted. Do not add dryer sheets. Do not add dryer sheets. † Or Wrinkle Prevent with 3-4 items, not more than the higher setting. † Or Wrinkle Prevent with ...
Owners Manual
Page 10
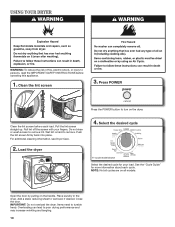
...your load. Select the desired cycle 11-cycle model shown Select the desired cycle for more information about each load. IMPORTANT: Do not overload the dryer. Overloading can lead to wet load, if desired. Pull the lint screen straight up. Wet lint is hard to tumble freely. For additional ...need to remove. Do not rinse or wash screen to persons, read the IMPORTANT SAFETY INSTRUCTIONS before each cycle. Close the door. USING YOUR DRYER WARNING: To reduce the risk of fire, electric shock, or injury to remove lint. Press POWER Press the POWER button to turn on all...
...your load. Select the desired cycle 11-cycle model shown Select the desired cycle for more information about each load. IMPORTANT: Do not overload the dryer. Overloading can lead to wet load, if desired. Pull the lint screen straight up. Wet lint is hard to tumble freely. For additional ...need to remove. Do not rinse or wash screen to persons, read the IMPORTANT SAFETY INSTRUCTIONS before each cycle. Close the door. USING YOUR DRYER WARNING: To reduce the risk of fire, electric shock, or injury to remove lint. Press POWER Press the POWER button to turn on all...
Owners Manual
Page 11
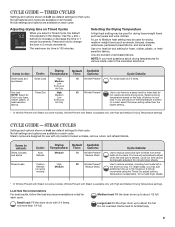
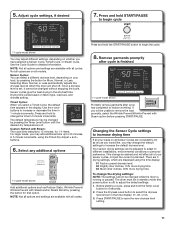
...the load promptly, select the Wrinkle Prevent/Wrinkle Prevent with Steam option before pressing START/PAUSE. There are 3 drying settings, which the dryer will affect all Sensor Cycles are available with Steam: The cycle time defaults to begin cycle + - Before starting a cycle, press and...steam has completed to adjust the default settings. 1. See the Cycle Guide for 6 seconds. 2. Sensor Cycles: You can be changed while the dryer is lit. + - Selecting More, Normal, or Less automatically adjusts the dryness level at which are displayed using the Timed Dry Adjust + and ...
...the load promptly, select the Wrinkle Prevent/Wrinkle Prevent with Steam option before pressing START/PAUSE. There are 3 drying settings, which the dryer will affect all Sensor Cycles are available with Steam: The cycle time defaults to begin cycle + - Before starting a cycle, press and...steam has completed to adjust the default settings. 1. See the Cycle Guide for 6 seconds. 2. Sensor Cycles: You can be changed while the dryer is lit. + - Selecting More, Normal, or Less automatically adjusts the dryness level at which are displayed using the Timed Dry Adjust + and ...
Owners Manual
Page 12
... hooks on model and selected settings) after the cycle is lit. Rest the rear support on top of a cycle. Place wet items on the dryer back ledge. 3. NOTE: Check the lint screen and remove any packing material before each load. Check Lint Screen The Check Lint Screen indicator will ...indicate that the moisture sensor on the drying rack after the cycle has ended. The drying rack cannot be removed from items dried on the dryer is active. Reduce Static (on some models) This indicator will light during Timed Cycles or options such as sweaters and tennis shoes. Done This...
... hooks on model and selected settings) after the cycle is lit. Rest the rear support on top of a cycle. Place wet items on the dryer back ledge. 3. NOTE: Check the lint screen and remove any packing material before each load. Check Lint Screen The Check Lint Screen indicator will ...indicate that the moisture sensor on the drying rack after the cycle has ended. The drying rack cannot be removed from items dried on the dryer is active. Reduce Static (on some models) This indicator will light during Timed Cycles or options such as sweaters and tennis shoes. Done This...
Owners Manual
Page 13
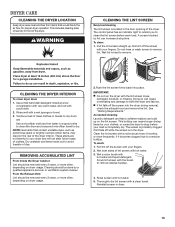
...blocked by a qualified appliance servicer or ventilation system cleaner. Roll lint off the screen with a soft cloth. 2. IMPORTANT: n Do not run the dryer with your fingers. Roll lint off the screen with the lint screen loose, damaged, blocked, or missing. This includes clearing piles of laundry in the...be removed every 2 years, or more frequently, if it becomes clogged due to dry. Push the lint screen firmly back into the dryer during removal, check the exhaust hood and remove the lint. Doing so can increase drying time. See "Venting Requirements." As needed cleaning ...
...blocked by a qualified appliance servicer or ventilation system cleaner. Roll lint off the screen with a soft cloth. 2. IMPORTANT: n Do not run the dryer with your fingers. Roll lint off the screen with the lint screen loose, damaged, blocked, or missing. This includes clearing piles of laundry in the...be removed every 2 years, or more frequently, if it becomes clogged due to dry. Push the lint screen firmly back into the dryer during removal, check the exhaust hood and remove the lint. Doing so can increase drying time. See "Venting Requirements." As needed cleaning ...
Owners Manual
Page 14
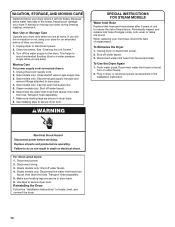
...risk of replacement. Non-Use or Storage Care Operate your dryer where it . Gas models only: Close shutoff valve in dryer base. 8. Use masking tape to dryer pipe. 4. To Use the Dryer Again 1. Plug in dryer or reconnect power as described in dryer base. 6. Transport hose separately. 5. Clean lint screen. ...Make sure leveling legs are secure in gas supply line. 3. Because some water may stay in the hoses, freezing can damage your dryer for an extended period of time, you are found. This helps to avoid unintended flooding (due to faucet. Steam models only: Disconnect...
...risk of replacement. Non-Use or Storage Care Operate your dryer where it . Gas models only: Close shutoff valve in dryer base. 8. Use masking tape to dryer pipe. 4. To Use the Dryer Again 1. Plug in dryer or reconnect power as described in dryer base. 6. Transport hose separately. 5. Clean lint screen. ...Make sure leveling legs are secure in gas supply line. 3. Because some water may stay in the hoses, freezing can damage your dryer for an extended period of time, you are found. This helps to avoid unintended flooding (due to faucet. Steam models only: Disconnect...
Owners Manual
Page 15
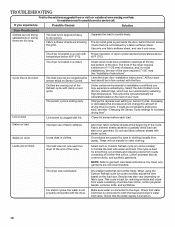
... and run Door not closed completely. Check the front and rear edges of the drum for the types of garments being dried. All four dryer feet should diminish after a few minutes of fuse. This is closed completely. The exhaust vent or outside exhaust hood to possibly avoid a service... setting has been selected. TROUBLESHOOTING First try the solutions suggested here or visit our website at www.maytag.com/help for assistance and to check air movement. Electric dryers use . The dryer may hear the gas valve clicking as it opens and closes. If you do not feel air movement...
... and run Door not closed completely. Check the front and rear edges of the drum for the types of garments being dried. All four dryer feet should diminish after a few minutes of fuse. This is closed completely. The exhaust vent or outside exhaust hood to possibly avoid a service... setting has been selected. TROUBLESHOOTING First try the solutions suggested here or visit our website at www.maytag.com/help for assistance and to check air movement. Electric dryers use . The dryer may hear the gas valve clicking as it opens and closes. If you do not feel air movement...
Owners Manual
Page 16
... only once. Loose dyes in a room with Proper operation of dryer cycles requires temperatures above temperature below 45ºF (7ºC). 45ºF (7ºC). The dryer was not removed from dryer at www.maytag.com/help for smoothing out wrinkles and reducing odors from loads consisting... of wrinkle-free cotton, cotton polyester blends, common knits, and synthetics. The dryer is best for assistance and to a...
... only once. Loose dyes in a room with Proper operation of dryer cycles requires temperatures above temperature below 45ºF (7ºC). 45ºF (7ºC). The dryer was not removed from dryer at www.maytag.com/help for smoothing out wrinkles and reducing odors from loads consisting... of wrinkle-free cotton, cotton polyester blends, common knits, and synthetics. The dryer is best for assistance and to a...
Owners Manual
Page 17
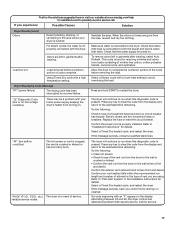
...or kinked or has too many turns. The dryer will continue to run when this diagnostic code is present. First try the solutions suggested here or visit our website at www.maytag.com/help for assistance and to restart the dryer. Load removed before removing the load. the vent... is clogged; Alternating between F# and E#, the dryer control has detected a problem that the water supply is best for reducing...
...or kinked or has too many turns. The dryer will continue to run when this diagnostic code is present. First try the solutions suggested here or visit our website at www.maytag.com/help for assistance and to restart the dryer. Load removed before removing the load. the vent... is clogged; Alternating between F# and E#, the dryer control has detected a problem that the water supply is best for reducing...
Installation Instructions
Page 1
... INSTRUCTIONS Para una version de estas instrucciones en español, visite www.Whirlpool.com Table of Contents DRYER SAFETY 2 Installation Requirements 3 Tools and Parts 3 Location Requirements 4 Electrical Requirements 4 INSTALL LEVELING LEGS 6 ELECTRICAL INSTALLATION 7 Power Supply Cord ...Requirements 13 Plan Vent System 14 Venting Kits 14 Install Vent System 15 Connect Inlet Hose 16 Connect Vent 17 Level Dryer 17 Complete Installation Checklist 18 Door reversal (OPTIONAL 19 INSTALLATION NOTES Date of purchase Date of installation Installer Model number Serial...
... INSTRUCTIONS Para una version de estas instrucciones en español, visite www.Whirlpool.com Table of Contents DRYER SAFETY 2 Installation Requirements 3 Tools and Parts 3 Location Requirements 4 Electrical Requirements 4 INSTALL LEVELING LEGS 6 ELECTRICAL INSTALLATION 7 Power Supply Cord ...Requirements 13 Plan Vent System 14 Venting Kits 14 Install Vent System 15 Connect Inlet Hose 16 Connect Vent 17 Level Dryer 17 Complete Installation Checklist 18 Door reversal (OPTIONAL 19 INSTALLATION NOTES Date of purchase Date of installation Installer Model number Serial...
Installation Instructions
Page 2
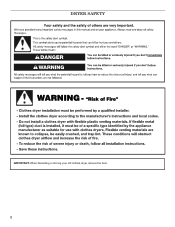
DRYER SAFETY IMPORTANT: When discarding or storing your old clothes dryer, remove the door. 2
DRYER SAFETY IMPORTANT: When discarding or storing your old clothes dryer, remove the door. 2
Installation Instructions
Page 3
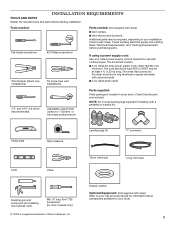
...gun and compound (for installing new exhaust vent) Min. 8" long Torx® T25 screwdriver (for door reversal only) ® TORX is located in dryer drum. The kit should be type SRD or SRDT and be required, depending in ring terminals or spade terminals with clothes...included. Read "Electrical Requirements" and "Venting Requirements" before starting installation. Short inlet hose Long inlet hose Rubber washer Optional Equipment: (Not supplied with dryer) Refer to your Use and Care Guide for information about accessories available for use leveling legs supplied if installing with...
...gun and compound (for installing new exhaust vent) Min. 8" long Torx® T25 screwdriver (for door reversal only) ® TORX is located in dryer drum. The kit should be type SRD or SRDT and be required, depending in ring terminals or spade terminals with clothes...included. Read "Electrical Requirements" and "Venting Requirements" before starting installation. Short inlet hose Long inlet hose Rubber washer Optional Equipment: (Not supplied with dryer) Refer to your Use and Care Guide for information about accessories available for use leveling legs supplied if installing with...
Installation Instructions
Page 4
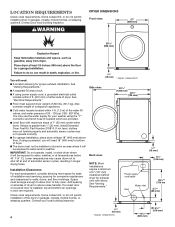
... requirements. Also consider weight of companion appliance. ■■Cold water faucets located within 2 ft. (610 mm) of either side of dryer. ■■The dryer must not be installed or stored in an area where it will need : ■■A location allowing for your washer using the "Y" ... use the water supply for proper exhaust installation. If not level, clothes may not tumble properly and automatic sensor cycles may cause dryer not to water and/or weather. Installation Clearances For each arrangement, consider allowing more space for ease of 5" (127 mm) clearance behind...
... requirements. Also consider weight of companion appliance. ■■Cold water faucets located within 2 ft. (610 mm) of either side of dryer. ■■The dryer must not be installed or stored in an area where it will need : ■■A location allowing for your washer using the "Y" ... use the water supply for proper exhaust installation. If not level, clothes may not tumble properly and automatic sensor cycles may cause dryer not to water and/or weather. Installation Clearances For each arrangement, consider allowing more space for ease of 5" (127 mm) clearance behind...
Installation Instructions
Page 5
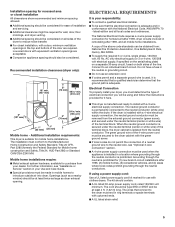
...installation must conform to an individual branch circuit. The green ground wire of the 4-wire power cord must be secured to the dryer cabinet with upturned ends. ■■A UL listed strain relief. 5 Electrical Connection To properly install your responsibility: ■■...should also be considered. Mobile home installations require: ■■Metal exhaust system hardware, available for mobile home installations. If the dryer is installed with a door, minimum ventilation openings in remodeling after 1996, (2) mobile homes, (3) recreational vehicles, and (4) areas ...
...installation must conform to an individual branch circuit. The green ground wire of the 4-wire power cord must be secured to the dryer cabinet with upturned ends. ■■A UL listed strain relief. 5 Electrical Connection To properly install your responsibility: ■■...should also be considered. Mobile home installations require: ■■Metal exhaust system hardware, available for mobile home installations. If the dryer is installed with a door, minimum ventilation openings in remodeling after 1996, (2) mobile homes, (3) recreational vehicles, and (4) areas ...
Installation Instructions
Page 6
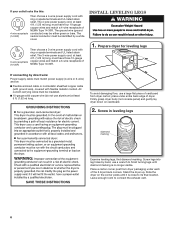
...: ■■Flexible armored cable or nonmetallic sheathed copper cable (with ground wire), covered with flexible metallic conduit. Install Leveling Legs 1. Slide the dryer on cardboard. 2. All current-carrying wires must be insulated. ■■10-gauge solid copper wire (do not use aluminum) at least 4... ft. (1.22 m) long, must have three 10-gauge copper wires and match a 3-wire receptacle of the 2 dryer back corners. place under each of NEMA Type 10-30R. Screw in leveling legs diamond marking Examine leveling legs, find diamond marking. Leave ...
...: ■■Flexible armored cable or nonmetallic sheathed copper cable (with ground wire), covered with flexible metallic conduit. Install Leveling Legs 1. Slide the dryer on cardboard. 2. All current-carrying wires must be insulated. ■■10-gauge solid copper wire (do not use aluminum) at least 4... ft. (1.22 m) long, must have three 10-gauge copper wires and match a 3-wire receptacle of the 2 dryer back corners. place under each of NEMA Type 10-30R. Screw in leveling legs diamond marking Examine leveling legs, find diamond marking. Leave ...


