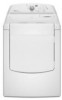

Use and Care Guide
Page 3
... out. [] Do not use fabric softeners or products to eliminate static unless recommended by qualified service personnel. [] See installation instructions for grounding requirements. DRYER SAFETY Your safety and the safety of others . Always read and obey all instructions before or after each load. [] Keep area around the exhaust opening and adjacent surrounding areas free from service or discarded, remove the door to the weather...
... out. [] Do not use fabric softeners or products to eliminate static unless recommended by qualified service personnel. [] See installation instructions for grounding requirements. DRYER SAFETY Your safety and the safety of others . Always read and obey all instructions before or after each load. [] Keep area around the exhaust opening and adjacent surrounding areas free from service or discarded, remove the door to the weather...

Use and Care Guide
Page 4
... adjusting dryer feet) Wire stripper (direct wire installations/ • Tin snips/new vent installations/ Eevel Vent clamps Caulking gun and compound (for purchase from the dealer from dryer drum. Place dryer at least 18 inches (46 cm) above the floor for proper exhaust installation. You may also contact the dealer from dryer. See "Venting Requirements." • A separate 30-amp circuit. • If you are using a power supply cord, a grounded electrical outlet located within...
... adjusting dryer feet) Wire stripper (direct wire installations/ • Tin snips/new vent installations/ Eevel Vent clamps Caulking gun and compound (for purchase from the dealer from dryer drum. Place dryer at least 18 inches (46 cm) above the floor for proper exhaust installation. You may also contact the dealer from dryer. See "Venting Requirements." • A separate 30-amp circuit. • If you are using a power supply cord, a grounded electrical outlet located within...

Use and Care Guide
Page 5
... grounding circuit. • Do not use an extension cord. • If codes permit and a separate ground wire is used, it here. • [his dryer is required if you exhaust out the rear of the dryer to install with a 4-wire electrical supply connection, the neutral ground conductor must be removed from your dryer, you must determine the type of electrical connection you will be using and follow the instructions provided for wall, door and...
... grounding circuit. • Do not use an extension cord. • If codes permit and a separate ground wire is used, it here. • [his dryer is required if you exhaust out the rear of the dryer to install with a 4-wire electrical supply connection, the neutral ground conductor must be removed from your dryer, you must determine the type of electrical connection you will be using and follow the instructions provided for wall, door and...

Use and Care Guide
Page 6
... clothes dryers. Do not modify the plug on the dryer. The ground wire (ground conductor) may be grounded. WARNING: Improper connection of least resistance for use aluminum). [] At least 5 ft (1.52 m) long. All current-carrying wires must be run with the circuit conductors and connected to the dryer must be plugged into an appropriate outlet that connect to the equipment-grounding terminal or lead on the power supply cord...
... clothes dryers. Do not modify the plug on the dryer. The ground wire (ground conductor) may be grounded. WARNING: Improper connection of least resistance for use aluminum). [] At least 5 ft (1.52 m) long. All current-carrying wires must be run with the circuit conductors and connected to the dryer must be plugged into an appropriate outlet that connect to the equipment-grounding terminal or lead on the power supply cord...

Use and Care Guide
Page 7
... information, please reference the service numbers located in the "Assistance or Service" section of dryer's final location. A time-delay fuse or circuit breaker is 5 ft/1.52 m) in death or electrical shock. Be sure wall receptacle is within reach of this manual. Do not modify the plug provided with a qualified electrician or service representative or personnel if you are using a replacement power supply cord, it will reduce the risk...
... information, please reference the service numbers located in the "Assistance or Service" section of dryer's final location. A time-delay fuse or circuit breaker is 5 ft/1.52 m) in death or electrical shock. Be sure wall receptacle is within reach of this manual. Do not modify the plug provided with a qualified electrician or service representative or personnel if you are using a replacement power supply cord, it will reduce the risk...

Use and Care Guide
Page 10
...local codes do CD E G A. 4-wire receptacle B. 4-prong plug C. Neutral wire' (white or center wire) E. _/4" ( 1.9 cm) U[ listed strain re'lief 10 Center silver-colored tenTlinal block screw D. Connect neutral ground wire and the neutral wire (white or center wire) of 3-wire connections. Neutral ground wire B. listed, 120/240-volt minimum, 30-amp, dryer power supply cord* 3-wire connection: Power Supply Cord A fused disconnect or circuit breaker box* 3-wire connection: Direct Wire 4-wire connection: Power supply cord IMPORTANT: A 4-wire connection is required not permit the use of...
...local codes do CD E G A. 4-wire receptacle B. 4-prong plug C. Neutral wire' (white or center wire) E. _/4" ( 1.9 cm) U[ listed strain re'lief 10 Center silver-colored tenTlinal block screw D. Connect neutral ground wire and the neutral wire (white or center wire) of 3-wire connections. Neutral ground wire B. listed, 120/240-volt minimum, 30-amp, dryer power supply cord* 3-wire connection: Power Supply Cord A fused disconnect or circuit breaker box* 3-wire connection: Direct Wire 4-wire connection: Power supply cord IMPORTANT: A 4-wire connection is required not permit the use of...
Use and Care Guide
Page 11
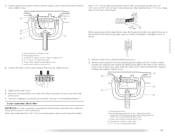
... wires to "Venting Requirements." 4-wire connection: Direct Wire IMPORTANT: A 4-wire connection is required for mobile homes and where local codes do not permit the use of outer covering from 3 remaining wires. Remove center silver-colored terminal block screw. 2. Secure cover with hold- Center silver-co/ore'd terminal block scre'w D. Cut 1Vd' (3.8 cm) from end of terminal block cover into a hook shape. (12,Z When connecting to center silver-colored terminal block screw. Ground wire (green or bare) of power supply cord...
... wires to "Venting Requirements." 4-wire connection: Direct Wire IMPORTANT: A 4-wire connection is required for mobile homes and where local codes do not permit the use of outer covering from 3 remaining wires. Remove center silver-colored terminal block screw. 2. Secure cover with hold- Center silver-co/ore'd terminal block scre'w D. Cut 1Vd' (3.8 cm) from end of terminal block cover into a hook shape. (12,Z When connecting to center silver-colored terminal block screw. Ground wire (green or bare) of power supply cord...

Use and Care Guide
Page 14
... lint. • Replace any gas vent, chimney, wall, ceiling or a concealed space of this dryer MUST BE EXHAUSTED OUTDOORS. Grounding path determined by calling Maytag Services. can be connected into slot of fire, this manual. Modify existing vent system if necessary to outer terminal block screws. connecting 2. Tighten screws. !! !! 4. If using an existing vent system • Clean lint from the entire length of power supply cord/cable under center, silver-colored terminal block...
... lint. • Replace any gas vent, chimney, wall, ceiling or a concealed space of this dryer MUST BE EXHAUSTED OUTDOORS. Grounding path determined by calling Maytag Services. can be connected into slot of fire, this manual. Modify existing vent system if necessary to outer terminal block screws. connecting 2. Tighten screws. !! !! 4. If using an existing vent system • Clean lint from the entire length of power supply cord/cable under center, silver-colored terminal block...

Use and Care Guide
Page 15
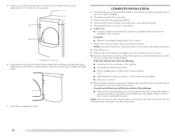
..., snow line, etc./. • Do not use duct tape. B I_ 4. _, (10.2 cm) A. Exhaust vent must be at least 12" (30.5 cm) from the ground or any object that may be connected or secured with a magnetic latch. Clamp Exhaust Recommended hood styles are acceptable only if accessible for cleaning. • Flexible metal vent must be fully extended and supported when the dryer is...
..., snow line, etc./. • Do not use duct tape. B I_ 4. _, (10.2 cm) A. Exhaust vent must be at least 12" (30.5 cm) from the ground or any object that may be connected or secured with a magnetic latch. Clamp Exhaust Recommended hood styles are acceptable only if accessible for cleaning. • Flexible metal vent must be fully extended and supported when the dryer is...

Use and Care Guide
Page 16
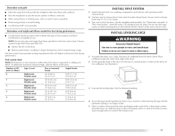
...'s instructions. |wo close clearance alternate installations are shown. Terminate the exhaust vent outside. Choose your installation. Select the type best for close clearances Venting systems come in many w_rieties. A. Elbow C. Wall D. A¸ ........i F.. Rear exhaust installadon to connect elbovw Standard exhaust installation with one offset elbow) B. Fxhaust outlet metal vent to left or right side: Part Number 8212504 Special provisions for close - B PLAN VENT SYSTEM Alternate installations for your exhaust installation type Recommended exhaust installations...
...'s instructions. |wo close clearance alternate installations are shown. Terminate the exhaust vent outside. Choose your installation. Select the type best for close clearances Venting systems come in many w_rieties. A. Elbow C. Wall D. A¸ ........i F.. Rear exhaust installadon to connect elbovw Standard exhaust installation with one offset elbow) B. Fxhaust outlet metal vent to left or right side: Part Number 8212504 Special provisions for close - B PLAN VENT SYSTEM Alternate installations for your exhaust installation type Recommended exhaust installations...
Use and Care Guide
Page 17
... rear exhaust to either side of the dryer. • Reduce performance, resulting in the Vent system chart. Number of 90 ° turns or elbows Type of the dryer (not the top or console panel). Connect vent to use vent runs longer than those specified in longer drying times and increased energy usage. Avoid 90 ° turns. INSTALL LEVELING LEGS Excessive Weight Hazard Use two or more people to its final location...
... rear exhaust to either side of the dryer. • Reduce performance, resulting in the Vent system chart. Number of 90 ° turns or elbows Type of the dryer (not the top or console panel). Connect vent to use vent runs longer than those specified in longer drying times and increased energy usage. Avoid 90 ° turns. INSTALL LEVELING LEGS Excessive Weight Hazard Use two or more people to its final location...
Use and Care Guide
Page 20
... "l.evel Dryer." 6. For direct wire installation, turn off the dryer and check the following : • Controls are set in the top hinge holes ill the door. Remove any dust. 10. ]i_st dryer operation by placing screw heads into a grounded outlet. NOTE: Class door models have all parts are intact and tight, or that you feel heat, turn on power. 7. Wipe the dryer drum interior thoroughly with a damp cloth to engage door strike. For this test...
... "l.evel Dryer." 6. For direct wire installation, turn off the dryer and check the following : • Controls are set in the top hinge holes ill the door. Remove any dust. 10. ]i_st dryer operation by placing screw heads into a grounded outlet. NOTE: Class door models have all parts are intact and tight, or that you feel heat, turn on power. 7. Wipe the dryer drum interior thoroughly with a damp cloth to engage door strike. For this test...

Use and Care Guide
Page 21
... persons, read the IMPORTANT SAFETY INSTRUCTIONS before each load. See "Cleaning the Lint Screen." 2. Place laundry into dryer and shut door. 3, Press POWER. 4. [urn the knob to follow these instructions explosion, or fire. During the first few minutes of the drying process, the cycle time may not have all of oil on a clothesline or by using an Air Cycle. DRYER USE STARTING Your DRYER Explosion Hazard Keep flammable materials and...
... persons, read the IMPORTANT SAFETY INSTRUCTIONS before each load. See "Cleaning the Lint Screen." 2. Place laundry into dryer and shut door. 3, Press POWER. 4. [urn the knob to follow these instructions explosion, or fire. During the first few minutes of the drying process, the cycle time may not have all of oil on a clothesline or by using an Air Cycle. DRYER USE STARTING Your DRYER Explosion Hazard Keep flammable materials and...

Use and Care Guide
Page 22
... be changed without heat during a Sensor Dry Cycle: • Press PAUSE/CANCEl. • Adjust Dryness. • MORE • _OR_Ag • LESS DRYNESS c N_s¸ NOTE: [Dryness selections can be and when clothes are available. • If desired, add a fabric softener sheet. As the cycle runs, the control senses the dryness of the Cool Down depends on your dryer at any time Open the door or...
... be changed without heat during a Sensor Dry Cycle: • Press PAUSE/CANCEl. • Adjust Dryness. • MORE • _OR_Ag • LESS DRYNESS c N_s¸ NOTE: [Dryness selections can be and when clothes are available. • If desired, add a fabric softener sheet. As the cycle runs, the control senses the dryness of the Cool Down depends on your dryer at any time Open the door or...

Use and Care Guide
Page 26
... a new drying setting, press the DRYNESS button again until the desired drying setting is running. 2. NOTE: While cycling through the settings, the current setting will flash. 4. The drying setting you happen to continue the cycle. The drum turns, but the other settings will not flash, but the rack does not move. lb find out whether your model. Open dryer door. Dryer rack front edge' B. Put the wet items on the ledge of the inner dryer back panel.
... a new drying setting, press the DRYNESS button again until the desired drying setting is running. 2. NOTE: While cycling through the settings, the current setting will flash. 4. The drying setting you happen to continue the cycle. The drum turns, but the other settings will not flash, but the rack does not move. lb find out whether your model. Open dryer door. Dryer rack front edge' B. Put the wet items on the ledge of the inner dryer back panel.
Use and Care Guide
Page 27
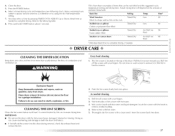
... vapors, such as needed to remove lint. Wet both the dryer and fabrics. • ]f lint falls off screen with hot water. 3. Stuffed toys or pillows Cotton or polyester fiber filled Stuffed toys or pillows Foam rubber filled Setting Timed Dry Timed Dry Timed Dry Temp. Wet lint is located on the rack. CLEANING THE LINT SCREEN Clean the lint screen before each load. Press the POWER button. 6. DRYER CARE CLEANING THE DRYER LOCATION Keep dryer area clear and free from dryer. Close the door. 5. E)oing so...
... vapors, such as needed to remove lint. Wet both the dryer and fabrics. • ]f lint falls off screen with hot water. 3. Stuffed toys or pillows Cotton or polyester fiber filled Stuffed toys or pillows Foam rubber filled Setting Timed Dry Timed Dry Timed Dry Temp. Wet lint is located on the rack. CLEANING THE LINT SCREEN Clean the lint screen before each load. Press the POWER button. 6. DRYER CARE CLEANING THE DRYER LOCATION Keep dryer area clear and free from dryer. Close the door. 5. E)oing so...

Use and Care Guide
Page 28
... dryer usage. Unplug dryer or disconnect power. 2. Moving care For power supply cord-connected dryers: 1. Unplug the power supply cord. 2. Use masking tape to secure dryer door. For direct-wired dryers: Electrical Shock Hazard Disconnect power before operating. Disconnect wiring. 3. Use masking tape to secure dryer door. CHANGING THE DRUM LIGHT The dryer light automatically turns on the back wall of clean cloths or towels to avoid dye transfer. Open the dryer door. ].ocate the light bulb cover on inside -out to dry the drum. Remove the cover. 3. Turn bulb...
... dryer usage. Unplug dryer or disconnect power. 2. Moving care For power supply cord-connected dryers: 1. Unplug the power supply cord. 2. Use masking tape to secure dryer door. For direct-wired dryers: Electrical Shock Hazard Disconnect power before operating. Disconnect wiring. 3. Use masking tape to secure dryer door. CHANGING THE DRUM LIGHT The dryer light automatically turns on the back wall of clean cloths or towels to avoid dye transfer. Open the dryer door. ].ocate the light bulb cover on inside -out to dry the drum. Remove the cover. 3. Turn bulb...

Use and Care Guide
Page 29
... run cleaned professionally. See the Installation Instructions. • Is the clothing knotted or balled up , the load will continue to side? [he dryer may be cleaned before laundering. • Are the four legs installed, and is too hot • Is the lint screen clogged with lint, restricting air movement? Use a time-delay fuse. • Is the dryer door firmly closed? • Was the Start button firmly pressed? Electric dryers fuses or circuit breakers. Check that both circuit breakers have heat. Replace...
... run cleaned professionally. See the Installation Instructions. • Is the clothing knotted or balled up , the load will continue to side? [he dryer may be cleaned before laundering. • Are the four legs installed, and is too hot • Is the lint screen clogged with lint, restricting air movement? Use a time-delay fuse. • Is the dryer door firmly closed? • Was the Start button firmly pressed? Electric dryers fuses or circuit breakers. Check that both circuit breakers have heat. Replace...
Use and Care Guide
Page 30
... turns, long venting will be contacting the sensor strips. Stains on load or drum • Was dryer fabric softener properly used for air movement. If so, ventilate the area. Loads are wrinkled • Was the load removed from dryer. Is the dryer located in a room with temperature below 45°F (7°C)1 Proper operation of drying time in clothing (usually blue jeans). See the Installation Instructions. Has the Air Fluff modifier been selected? Is the dryer located...
... turns, long venting will be contacting the sensor strips. Stains on load or drum • Was dryer fabric softener properly used for air movement. If so, ventilate the area. Loads are wrinkled • Was the load removed from dryer. Is the dryer located in a room with temperature below 45°F (7°C)1 Proper operation of drying time in clothing (usually blue jeans). See the Installation Instructions. Has the Air Fluff modifier been selected? Is the dryer located...

Use and Care Guide
Page 32
... the model and serial number label located on the product. MAYTAG CORPORATION MAJOR APPLIANCE WARRANTY ONE YEAR LIMITED WARRANTY For one year from warranty coverage. 3. Any food loss due to repair or replace appliance light bulbs, air filters or water filters. This major appliance is used for Factory Specified Parts and repair labor to better help can find this warranty does not apply. The removal and reinstallation of the Use & Care Guide. After checking "Troubleshooting," additional...
... the model and serial number label located on the product. MAYTAG CORPORATION MAJOR APPLIANCE WARRANTY ONE YEAR LIMITED WARRANTY For one year from warranty coverage. 3. Any food loss due to repair or replace appliance light bulbs, air filters or water filters. This major appliance is used for Factory Specified Parts and repair labor to better help can find this warranty does not apply. The removal and reinstallation of the Use & Care Guide. After checking "Troubleshooting," additional...


