

Owners Manual 1
Page 4
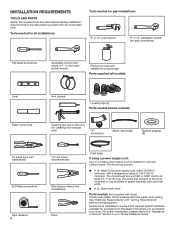
...before starting installation. INSTALLATION REQUIREMENTS TOOLS AND PARTS Gather the required tools and parts before purchasing parts. Tools needed for all models): Level Plastic putty knife Vent clamps Leveling legs (4) Parts needed : (Not supplied with any tools listed here. Check existing...Assistance or Service" section in ring terminals or spade terminals with upturned ends. ■ A UL listed strain relief Parts needed (steam models): Caulking gun and compound (for installing new exhaust vent) "Y" connector Short inlet hose Rubber washer (4) Tin snips (new vent installations)...
...before starting installation. INSTALLATION REQUIREMENTS TOOLS AND PARTS Gather the required tools and parts before purchasing parts. Tools needed for all models): Level Plastic putty knife Vent clamps Leveling legs (4) Parts needed : (Not supplied with any tools listed here. Check existing...Assistance or Service" section in ring terminals or spade terminals with upturned ends. ■ A UL listed strain relief Parts needed (steam models): Caulking gun and compound (for installing new exhaust vent) "Y" connector Short inlet hose Rubber washer (4) Tin snips (new vent installations)...
Owners Manual 1
Page 5
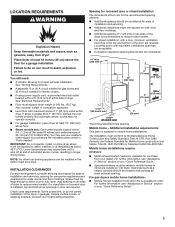
... properly and automatic sensor cycles may not operate correctly. ■ For garage installation, place dryer at least 18 inches (46 cm) above floor. ■ Steam models only: Cold water faucets located within 2 ft. (610 mm) of either side of the dryer is suitable for walls, doors, and floor moldings. Space must...
... properly and automatic sensor cycles may not operate correctly. ■ For garage installation, place dryer at least 18 inches (46 cm) above floor. ■ Steam models only: Cold water faucets located within 2 ft. (610 mm) of either side of the dryer is suitable for walls, doors, and floor moldings. Space must...

Owners Manual 1
Page 8
... between the flexible gas connector and the dryer gas pipe, as needed to prevent kinking. Examples of the burner Btu rating shown on the model/serial number plate is equipped for opening and closing . NOTE: Pipe-joint compounds that resist the action of the dryer. C E GAS TYPE...) Flexible stainless steel gas connector: ■ If local codes permit, use with the B149.1, Natural Gas and Propane Installation Code. It is located on the model/serial rating plate for each 1,000 ft. (305 m) increase in death, explosion, or fire. ■ Lengths over 20 ft. (6.1 m) should be...
... between the flexible gas connector and the dryer gas pipe, as needed to prevent kinking. Examples of the burner Btu rating shown on the model/serial number plate is equipped for opening and closing . NOTE: Pipe-joint compounds that resist the action of the dryer. C E GAS TYPE...) Flexible stainless steel gas connector: ■ If local codes permit, use with the B149.1, Natural Gas and Propane Installation Code. It is located on the model/serial rating plate for each 1,000 ft. (305 m) increase in death, explosion, or fire. ■ Lengths over 20 ft. (6.1 m) should be...

Owners Manual 1
Page 18
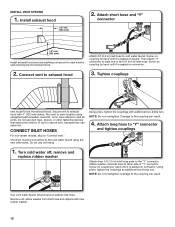
... on faucet. Then attach "Y" connector to cold water faucet. Connect vent to "Connect Vent." Do not use old hoses. CONNECT INLET HOSES For non-steam models, skip to exhaust hood 3. The dryer must fit over the exhaust hood. NOTE: Do not overtighten. Damage to the coupling can result. NOTE: Do not...
... on faucet. Then attach "Y" connector to cold water faucet. Connect vent to "Connect Vent." Do not use old hoses. CONNECT INLET HOSES For non-steam models, skip to exhaust hood 3. The dryer must fit over the exhaust hood. NOTE: Do not overtighten. Damage to the coupling can result. NOTE: Do not...

Owners Manual 1
Page 20
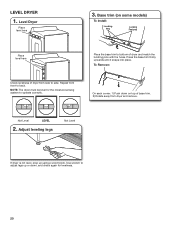
... place. Level Dryer Place level here 3. Not Level LEVEL 2. Adjust leveling legs Not Level If dryer is not level, prop up or down on some models) To Install: Locating Pins Locking Features Place level here Check levelness of dryer from side to bottom of base trim. 2) Rotate away from front to...
... place. Level Dryer Place level here 3. Not Level LEVEL 2. Adjust leveling legs Not Level If dryer is not level, prop up or down on some models) To Install: Locating Pins Locking Features Place level here Check levelness of dryer from side to bottom of base trim. 2) Rotate away from front to...

Owners Manual 1
Page 21
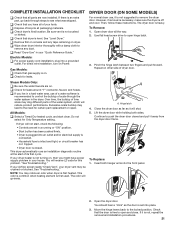
... is not suggested to the need for leaks around "Y" connector, faucet, and hoses. q Check dryer's final location. To Remove: 1. See "Level Dryer." Steam Models Only: q Be sure the water faucets are set into a grounded outlet. q Check that all the way. 2. Then, follow these instructions. Gas... an installation diagnostic routine at the start dryer. Over time, the buildup of lime scale may notice an odor when dryer is first used. All Models: q Select a Timed Dry heated cycle, and start of dryer door. Close the dryer door as far as the door is free to see...
... is not suggested to the need for leaks around "Y" connector, faucet, and hoses. q Check dryer's final location. To Remove: 1. See "Level Dryer." Steam Models Only: q Be sure the water faucets are set into a grounded outlet. q Check that all the way. 2. Then, follow these instructions. Gas... an installation diagnostic routine at the start dryer. Over time, the buildup of lime scale may notice an odor when dryer is first used. All Models: q Select a Timed Dry heated cycle, and start of dryer door. Close the dryer door as far as the door is free to see...
Owners Manual 1
Page 22
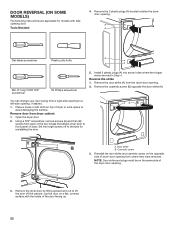
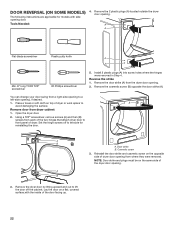
... 2. Remove the dryer door by lifting upward and out to lift the door off to avoid damaging the surface. DOOR REVERSAL (ON SOME MODELS) The following instructions are applicable for reinstalling the door. Reverse the strike 1. Remove the door strike (A) from dryer cabinet 1. A. Remove... Set the hinge screws off the cabinet. Reinstall the door strike and cosmetic screw on top of dryer or work space to the side for models with the inside of dryer. A A A Flat-blade screwdriver Plastic putty knife A Min. 8" long TORX T20® screwdriver #2 Phillips screwdriver...
... 2. Remove the dryer door by lifting upward and out to lift the door off to avoid damaging the surface. DOOR REVERSAL (ON SOME MODELS) The following instructions are applicable for reinstalling the door. Reverse the strike 1. Remove the door strike (A) from dryer cabinet 1. A. Remove... Set the hinge screws off the cabinet. Reinstall the door strike and cosmetic screw on top of dryer or work space to the side for models with the inside of dryer. A A A Flat-blade screwdriver Plastic putty knife A Min. 8" long TORX T20® screwdriver #2 Phillips screwdriver...

Owners Manual 1
Page 27
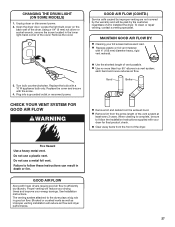
.... 3. Replace the bulb with the screw. 4. each load. ■ Replace plastic or foil vent material with your energy savings. CHANGING THE DRUM LIGHT (ON SOME MODELS) 1. Do not use a plastic vent. Turn bulb counterclockwise. Replace the cover and secure with a 10 W appliance bulb only. Failure to the dryer plays a big role...
.... 3. Replace the bulb with the screw. 4. each load. ■ Replace plastic or foil vent material with your energy savings. CHANGING THE DRUM LIGHT (ON SOME MODELS) 1. Do not use a plastic vent. Turn bulb counterclockwise. Replace the cover and secure with a 10 W appliance bulb only. Failure to the dryer plays a big role...

Owners Manual 1
Page 28
...not using your dryer for an extended period of replacement. Electrical Shock Hazard Disconnect power before moving dryer. Transport hose separately. 5. On models with base trim: Remove base trim before operating. Because some water may stay in the hose, freezing can result in death or electrical... shock. Clean lint screen. Steam models only: Shut off water faucet. 3. Make sure leveling legs are secure in dryer base. 8. Unplug dryer or disconnect power. 2. To Use ...
...not using your dryer for an extended period of replacement. Electrical Shock Hazard Disconnect power before moving dryer. Transport hose separately. 5. On models with base trim: Remove base trim before operating. Because some water may stay in the hose, freezing can result in death or electrical... shock. Clean lint screen. Steam models only: Shut off water faucet. 3. Make sure leveling legs are secure in dryer base. 8. Unplug dryer or disconnect power. 2. To Use ...
Owners Manual
Page 4
...to the "Assistance or Service" section in ring terminals or spade terminals with upturned ends. ■■ A UL listed strain relief Parts needed (steam models): Caulking gun and compound (for installing new exhaust vent) "Y" connector Short inlet hose Rubber washer (4) Tin snips (new vent installations) #2 Phillips screwdriver...system hardware available for gas connections) Flat-blade screwdriver Adjustable wrench that connect to propane gas Parts supplied (all models): Level Plastic putty knife Vent clamps Leveling legs (4) Parts needed : (Not supplied with clothes dryers.
...to the "Assistance or Service" section in ring terminals or spade terminals with upturned ends. ■■ A UL listed strain relief Parts needed (steam models): Caulking gun and compound (for installing new exhaust vent) "Y" connector Short inlet hose Rubber washer (4) Tin snips (new vent installations) #2 Phillips screwdriver...system hardware available for gas connections) Flat-blade screwdriver Adjustable wrench that connect to propane gas Parts supplied (all models): Level Plastic putty knife Vent clamps Leveling legs (4) Parts needed : (Not supplied with clothes dryers.

Owners Manual
Page 5
... exhaust installation. You may not operate correctly. ■■ For garage installation, place dryer at least 18 inches (46 cm) above floor. ■■ Steam models only: Cold water faucets located within 2 ft. (610 mm) of either side of 1" (25 mm) under entire dryer. Also consider weight of installation and servicing...
... exhaust installation. You may not operate correctly. ■■ For garage installation, place dryer at least 18 inches (46 cm) above floor. ■■ Steam models only: Cold water faucets located within 2 ft. (610 mm) of either side of 1" (25 mm) under entire dryer. Also consider weight of installation and servicing...
Owners Manual
Page 8
... flexible gas connector and the dryer gas pipe, as needed to reach for the type of the burner Btu rating shown on the model/serial number plate is certified by the American Gas Association or CSA International) to the rigid gas supply line. GAS SUPPLY REQUIREMENTS WARNING... Hazard Use a new CSA International approved gas supply line. Install a shut-off valve must be used . Burner information is located on the model/serial rating plate for use with propane gas with a different gas without consulting your home. Securely tighten all gas connections. The location should use...
... flexible gas connector and the dryer gas pipe, as needed to reach for the type of the burner Btu rating shown on the model/serial number plate is certified by the American Gas Association or CSA International) to the rigid gas supply line. GAS SUPPLY REQUIREMENTS WARNING... Hazard Use a new CSA International approved gas supply line. Install a shut-off valve must be used . Burner information is located on the model/serial rating plate for use with propane gas with a different gas without consulting your home. Securely tighten all gas connections. The location should use...
Owners Manual
Page 18
... on coupling by hand until it is seated on connector. Damage to male end of "Y" connector. INSTALL VENT SYSTEM 1. CONNECT INLET HOSES For non-steam models, skip to "Connect Vent."
... on coupling by hand until it is seated on connector. Damage to male end of "Y" connector. INSTALL VENT SYSTEM 1. CONNECT INLET HOSES For non-steam models, skip to "Connect Vent."
Owners Manual
Page 20
... must be level for levelness. 20 Not Level LEVEL 2. Adjust leveling legs Not Level If dryer is not level, prop up or down on some models) To Install: Locating Pins Locking Features Place level here Check levelness of dryer and match the locating pins with the holes. Level Dryer Place level...
... must be level for levelness. 20 Not Level LEVEL 2. Adjust leveling legs Not Level If dryer is not level, prop up or down on some models) To Install: Locating Pins Locking Features Place level here Check levelness of dryer and match the locating pins with the holes. Level Dryer Place level...
Owners Manual
Page 21
...heavy. Close the dryer door as far as the door is not crushed or kinked. Continue to the locked position. q Check dryer's final location. Electric Models: q For power supply cord installation, plug into the front panel. 1 2. q Check for leaks around "Y" connector, faucet, and hoses. Then, follow...dryer door frame. 2 To Replace: 1. COMPLETE INSTALLATION CHECKLIST q Check that all parts are set into place. 3. DRYER DOOR (ON SOME MODELS) For normal dryer use of a water softener is recommended to control the buildup of dryer door. Pinch the hinge latch between two fingers and ...
...heavy. Close the dryer door as far as the door is not crushed or kinked. Continue to the locked position. q Check dryer's final location. Electric Models: q For power supply cord installation, plug into the front panel. 1 2. q Check for leaks around "Y" connector, faucet, and hoses. Then, follow...dryer door frame. 2 To Replace: 1. COMPLETE INSTALLATION CHECKLIST q Check that all parts are set into place. 3. DRYER DOOR (ON SOME MODELS) For normal dryer use of a water softener is recommended to control the buildup of dryer door. Pinch the hinge latch between two fingers and ...
Owners Manual
Page 22
... on the same side of dryer. NOTE: Door strike and plugs must be on a flat, covered surface,with side opening door. DOOR REVERSAL (ON SOME MODELS) 4. Tools Needed: A A Flat-blade screwdriver Plastic putty knife A A Min. 8" long TORX T25® screwdriver #2 Phillips screwdriver 5. Remove door from the dryer door ...side of the door facing up. Door strike B. You can change your door swing from a right-side opening to the side for models with the inside of dryer door opening from each of the two hinges that attach dryer door to front panel of the dryer door ...
... on the same side of dryer. NOTE: Door strike and plugs must be on a flat, covered surface,with side opening door. DOOR REVERSAL (ON SOME MODELS) 4. Tools Needed: A A Flat-blade screwdriver Plastic putty knife A A Min. 8" long TORX T25® screwdriver #2 Phillips screwdriver 5. Remove door from the dryer door ...side of the door facing up. Door strike B. You can change your door swing from a right-side opening to the side for models with the inside of dryer door opening from each of the two hinges that attach dryer door to front panel of the dryer door ...
Owners Manual
Page 27
... counterclockwise. When cleaning is complete, be paid by the customer, regardless of the dryer. Unplug dryer or disconnect power. 2. CHANGING THE DRUM LIGHT (ON SOME MODELS) 1. Do not use a plastic vent. The venting system attached to follow the Installation Instructions supplied with heat, dryers require good air flow to efficiently dry...
... counterclockwise. When cleaning is complete, be paid by the customer, regardless of the dryer. Unplug dryer or disconnect power. 2. CHANGING THE DRUM LIGHT (ON SOME MODELS) 1. Do not use a plastic vent. The venting system attached to follow the Installation Instructions supplied with heat, dryers require good air flow to efficiently dry...
Owners Manual
Page 28
... To Use the Dryer Again 1. Turn on vacation or not using your dryer for an extended period of replacement. Disconnect power. 2. Steam models only: Disconnect the water inlet hose from dryer and secure wire ends. 3. then drain the hose. Clean lint screen. This helps to ...water faucet. 3. Transport hose separately. 7. Shut off the water supply to secure dryer door. 7. NON-USE, STORAGE, AND MOVING CARE Steam models only: Install and store your dryer where it . Replace all parts and panels before servicing. If storing or moving dryer. Reinstalling the Dryer Follow ...
... To Use the Dryer Again 1. Turn on vacation or not using your dryer for an extended period of replacement. Disconnect power. 2. Steam models only: Disconnect the water inlet hose from dryer and secure wire ends. 3. then drain the hose. Clean lint screen. This helps to ...water faucet. 3. Transport hose separately. 7. Shut off the water supply to secure dryer door. 7. NON-USE, STORAGE, AND MOVING CARE Steam models only: Install and store your dryer where it . Replace all parts and panels before servicing. If storing or moving dryer. Reinstalling the Dryer Follow ...
Quick Reference Manual
Page 2
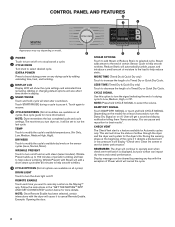
...(Air Only, Low, Medium, Medium High, High). TEMP Touch to boost drying power on any drying cycle by pressing any key with steam (select models). Wrinkle Prevent adds up to 150 minutes of certain Sensor Cycle to select desired cycle. NOTE: Press/hold ; Steam adds steam to the end of... periodic tumbling and heat to select the volume. CONTROL PANEL AND FEATURES 6 3 1 Appearance may vary depending on model. 2 1 POWER Touch to turn on/off or to stop/cancel a cycle. 2 CYCLE KNOB Turn knob to help smooth wrinkles. DRUM LIGHT Touch to ...
...(Air Only, Low, Medium, Medium High, High). TEMP Touch to boost drying power on any drying cycle by pressing any key with steam (select models). Wrinkle Prevent adds up to 150 minutes of certain Sensor Cycle to select desired cycle. NOTE: Press/hold ; Steam adds steam to the end of... periodic tumbling and heat to select the volume. CONTROL PANEL AND FEATURES 6 3 1 Appearance may vary depending on model. 2 1 POWER Touch to turn on/off or to stop/cancel a cycle. 2 CYCLE KNOB Turn knob to help smooth wrinkles. DRUM LIGHT Touch to ...

Quick Reference Manual
Page 3
... before they see message to Download APP or press any problems or questions, call Maytag® Connected Appliances at www.maytag.com/connect or in Canada www.maytag.ca/connect. FACTORY RESET Press/hold both TEMP and WRINKLE PREVENT keys until display... count-down has completed. You can completely remove oil. To connect your mobile device download the Maytag™ app. Do not dry anything flammable on it (including cooking oils). Do not dry anything that has ever..., or plastic must press REMOTE ENABLE when connected in death or fire. Not all models.
... before they see message to Download APP or press any problems or questions, call Maytag® Connected Appliances at www.maytag.com/connect or in Canada www.maytag.ca/connect. FACTORY RESET Press/hold both TEMP and WRINKLE PREVENT keys until display... count-down has completed. You can completely remove oil. To connect your mobile device download the Maytag™ app. Do not dry anything flammable on it (including cooking oils). Do not dry anything that has ever..., or plastic must press REMOTE ENABLE when connected in death or fire. Not all models.


