Owners Manual
Page 2
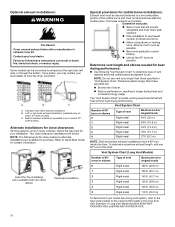
... suitable for use with flexible plastic venting materials or flexible metal (foil type) duct. Flexible venting materials are not followed. These conditions will follow instructions. We have provided many important safety messages in this manual and on your appliance. If flexible metal duct is the safety alert symbol. "Risk of Fire" − Clothes dryer installation must be easily crushed, and trap lint. This...
... suitable for use with flexible plastic venting materials or flexible metal (foil type) duct. Flexible venting materials are not followed. These conditions will follow instructions. We have provided many important safety messages in this manual and on your appliance. If flexible metal duct is the safety alert symbol. "Risk of Fire" − Clothes dryer installation must be easily crushed, and trap lint. This...
Owners Manual
Page 3
... OLD CLOTHES DRYER, REMOVE THE DOOR. Items contaminated with gasoline, dry-cleaning solvents, or other flammable or explosive substances, as they give off vapors that the heat is dissipated. � Do not use heat to contaminated loads, the final part of the appliance and exhaust duct should be cleaned periodically by the manufacturer (e.g. Avoid stopping a tumble dryer before the end of the drying cycle unless all instructions before using...
... OLD CLOTHES DRYER, REMOVE THE DOOR. Items contaminated with gasoline, dry-cleaning solvents, or other flammable or explosive substances, as they give off vapors that the heat is dissipated. � Do not use heat to contaminated loads, the final part of the appliance and exhaust duct should be cleaned periodically by the manufacturer (e.g. Avoid stopping a tumble dryer before the end of the drying cycle unless all instructions before using...
Owners Manual
Page 4
... radiation exposure limits for general population, antenna(s) used for compliance could void the user's authority to connect your responsibility. The SAID code is maintained between the equipment and receiver. � Connect the equipment into an outlet on , the user is encouraged to try to which can be guided through the steps to set up a user account and to operate the equipment. This...
... radiation exposure limits for general population, antenna(s) used for compliance could void the user's authority to connect your responsibility. The SAID code is maintained between the equipment and receiver. � Connect the equipment into an outlet on , the user is encouraged to try to which can be guided through the steps to set up a user account and to operate the equipment. This...
Owners Manual
Page 5
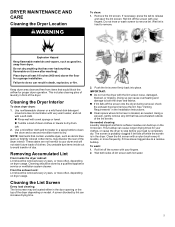
...) above the floor for a garage installation. Use a microfiber cloth and hot water in the door opening or the top of the dryer depending on the lint screen. From the exhaust vent: Lint should be located either in a spray bottle to clean the drum and a second microfiber towel to dry drum. Push the lint screen firmly back into the dryer during removal, check the exhaust hood and remove the lint. Clean the lint screen with a wet sponge or towel. �...
...) above the floor for a garage installation. Use a microfiber cloth and hot water in the door opening or the top of the dryer depending on the lint screen. From the exhaust vent: Lint should be located either in a spray bottle to clean the drum and a second microfiber towel to dry drum. Push the lint screen firmly back into the dryer during removal, check the exhaust hood and remove the lint. Clean the lint screen with a wet sponge or towel. �...
Owners Manual
Page 6
... driver or socket wrench, remove the screw located in dryer or reconnect power. See Installation Instructions. Service calls caused by the customer, regardless of the vent system at least every 2 years. For ordering and contact information, please reference your model. Scrub lint screen with hot water. 5. Replace the bulb with 4" (102 mm) diameter heavy, rigid vent material. � Use the shortest length of the dryer. 3. Check Your Vent System for final product check...
... driver or socket wrench, remove the screw located in dryer or reconnect power. See Installation Instructions. Service calls caused by the customer, regardless of the vent system at least every 2 years. For ordering and contact information, please reference your model. Scrub lint screen with hot water. 5. Replace the bulb with 4" (102 mm) diameter heavy, rigid vent material. � Use the shortest length of the dryer. 3. Check Your Vent System for final product check...
Owners Manual
Page 7
... the Installation Instructions. Flush water pipes. Transport hose separately. 3. If storing or moving your dryer where it . Unplug the power supply cord. 2. Disconnect wiring. 3. Reconnect water inlet hose to secure dryer door. Moving Care For power supply cord-connected dryers: 1. Gather required tools and parts before operating. Use tape to faucet. Water inlet hose Replace inlet hose and hose screen after 5 years of replacement. Plug in dryer or reconnect power as described in death or electrical shock. 1. Steam models only: Disconnect the water inlet hose from...
... the Installation Instructions. Flush water pipes. Transport hose separately. 3. If storing or moving your dryer where it . Unplug the power supply cord. 2. Disconnect wiring. 3. Reconnect water inlet hose to secure dryer door. Moving Care For power supply cord-connected dryers: 1. Gather required tools and parts before operating. Use tape to faucet. Water inlet hose Replace inlet hose and hose screen after 5 years of replacement. Plug in dryer or reconnect power as described in death or electrical shock. 1. Steam models only: Disconnect the water inlet hose from...
Owners Manual
Page 8
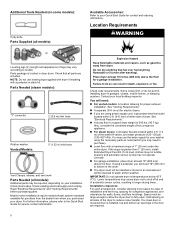
...; For garage installation, place dryer at temperatures below 45°F (7°C). Check that has ever had anything flammable on it will need to model) Parts package is located in the door are included. Check existing electrical supply and venting. You will be required, depending on your Quick Start Guide for a garage installation. Also, consider the combined weight of the companion appliance. � For steam dryers: Cold water faucets located within...
...; For garage installation, place dryer at temperatures below 45°F (7°C). Check that has ever had anything flammable on it will need to model) Parts package is located in the door are included. Check existing electrical supply and venting. You will be required, depending on your Quick Start Guide for a garage installation. Also, consider the combined weight of the companion appliance. � For steam dryers: Cold water faucets located within...

Owners Manual
Page 9
... as large as the dryer exhaust opening (such as a nearby window) should contain: � A UL-listed 30 A power supply cord, rated 120/240 V minimum. Louvered doors with a 3-wire electrical supply connection. A copy of the above code standards can be kinked. or 4-wire, 120/208 V electrical supply, if specified on the serial/rating plate) on a separate 30 A circuit, fused on all sides of the dryer to reduce noise transfer. � For...
... as large as the dryer exhaust opening (such as a nearby window) should contain: � A UL-listed 30 A power supply cord, rated 120/240 V minimum. Louvered doors with a 3-wire electrical supply connection. A copy of the above code standards can be kinked. or 4-wire, 120/208 V electrical supply, if specified on the serial/rating plate) on a separate 30 A circuit, fused on all sides of the dryer to reduce noise transfer. � For...

Owners Manual
Page 10
... of least resistance for electric current. SAVE THESE INSTRUCTIONS Electric Requirements - Canada WARNING Electrical Shock Hazard Plug into an appropriate outlet that the electrical connection is within reach of least resistance for electric current. A time-delay fuse or circuit breaker is 5 ft. (1.52 m) long. Do not modify the plug provided with the appliance: if it will not fit the outlet, have a proper outlet installed by direct wire: Power supply cable must be...
... of least resistance for electric current. SAVE THESE INSTRUCTIONS Electric Requirements - Canada WARNING Electrical Shock Hazard Plug into an appropriate outlet that the electrical connection is within reach of least resistance for electric current. A time-delay fuse or circuit breaker is 5 ft. (1.52 m) long. Do not modify the plug provided with the appliance: if it will not fit the outlet, have a proper outlet installed by direct wire: Power supply cable must be...
Owners Manual
Page 11
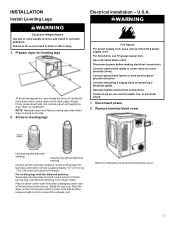
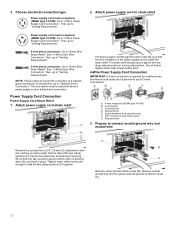
... dryer. WARNING Fire Hazard For power supply cord, use 10 gauge copper wire. Use a UL listed strain relief. Stand the dryer up. Remove hold-down on cardboard. Failure to do so can result in leveling legs Electrical Installation - NOTE: Residual water from dryer carton; Connect neutral wire (white or center wire) to finish turning legs until diamond marking is close to connect the exhaust vent. Use a wrench to center terminal (silver). Prepare dryer...
... dryer. WARNING Fire Hazard For power supply cord, use 10 gauge copper wire. Use a UL listed strain relief. Stand the dryer up. Remove hold-down on cardboard. Failure to do so can result in leveling legs Electrical Installation - NOTE: Residual water from dryer carton; Connect neutral wire (white or center wire) to finish turning legs until diamond marking is close to connect the exhaust vent. Use a wrench to center terminal (silver). Prepare dryer...
Owners Manual
Page 12
... Requirements." Choose electrical connection type Power supply cord 4-wire receptacle (NEMA Type 14-30R): Go to "3-Wire Power Supply Cord Connection." Do not further tighten strain relief screws at this point. 4-Wire Power Supply Cord Connection IMPORTANT: A 4-wire connection is pointing down (D), and hold the two clamp sections (C) together. Spade terminals with either a power supply cord or a direct wire connection. Then, go to "Optional 3-wire Connection." Then, go to "Venting Requirements." 4-wire direct connection: Go to "Direct Wire Strain Relief," then "4-Wire Direct Wire...
... Requirements." Choose electrical connection type Power supply cord 4-wire receptacle (NEMA Type 14-30R): Go to "3-Wire Power Supply Cord Connection." Do not further tighten strain relief screws at this point. 4-Wire Power Supply Cord Connection IMPORTANT: A 4-wire connection is pointing down (D), and hold the two clamp sections (C) together. Spade terminals with either a power supply cord or a direct wire connection. Then, go to "Optional 3-wire Connection." Then, go to "Venting Requirements." 4-wire direct connection: Go to "Direct Wire Strain Relief," then "4-Wire Direct Wire...

Owners Manual
Page 13
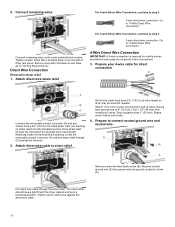
... to "Venting Requirements." Spade terminals with hold-down screw. Insert tab of terminal block cover into slot of power supply cord under outer terminal block screws. Tighten screw. 6. Connect neutral wire (white or center) (C) of power supply cord under center terminal block screw (B). Now, go to neutral wire. Neutral prong D. Connect neutral wire Connect remaining wires under center terminal block screw (B). Neutral (white or center wire) 3. 4. Ring terminals G. Connect neutral ground wire (E) and neutral wire (white or center) (C) of dryer rear panel...
... to "Venting Requirements." Spade terminals with hold-down screw. Insert tab of terminal block cover into slot of power supply cord under outer terminal block screws. Tighten screw. 6. Connect neutral wire (white or center) (C) of power supply cord under center terminal block screw (B). Now, go to neutral wire. Neutral prong D. Connect neutral wire Connect remaining wires under center terminal block screw (B). Neutral (white or center wire) 3. 4. Ring terminals G. Connect neutral ground wire (E) and neutral wire (white or center) (C) of dryer rear panel...
Owners Manual
Page 14
...) UL-listed strain relief (UL marking on strain relief). Put direct wire cable through the hole below the terminal block opening , screw the removable conduit connector (A) onto the strain relief threads (C) and tighten securely. 2. Tighten strain relief screw against the direct wire cable. 14 Shape ends of dryer rear panel. Remove neutral ground wire (E) from remaining 3 wires. Insert tab of terminal block cover into slot of wires into hooks. 4. Direct Wire Connection Direct wire strain relief...
...) UL-listed strain relief (UL marking on strain relief). Put direct wire cable through the hole below the terminal block opening , screw the removable conduit connector (A) onto the strain relief threads (C) and tighten securely. 2. Tighten strain relief screw against the direct wire cable. 14 Shape ends of dryer rear panel. Remove neutral ground wire (E) from remaining 3 wires. Insert tab of terminal block cover into slot of wires into hooks. 4. Direct Wire Connection Direct wire strain relief...

Owners Manual
Page 16
... is acceptable before connecting. 1. Now, go to "Venting Requirements." Tighten screws. 4. Connect external ground wire Install the correct strain relief for your electrical connection method. Tighten screw. 16 Connect remaining wires Place hooked ends of dryer rear panel. Now, go to "Venting Requirements." Squeeze hooked ends together and tighten screws. Insert tab of terminal block cover into slot of remaining direct wire cable wires under outer terminal block screws (hooks facing right). 6. Optional 3-Wire Connection (Power Supply Cord Shown) IMPORTANT: You...
... is acceptable before connecting. 1. Now, go to "Venting Requirements." Tighten screws. 4. Connect external ground wire Install the correct strain relief for your electrical connection method. Tighten screw. 16 Connect remaining wires Place hooked ends of dryer rear panel. Now, go to "Venting Requirements." Squeeze hooked ends together and tighten screws. Insert tab of terminal block cover into slot of remaining direct wire cable wires under outer terminal block screws (hooks facing right). 6. Optional 3-Wire Connection (Power Supply Cord Shown) IMPORTANT: You...
Owners Manual
Page 17
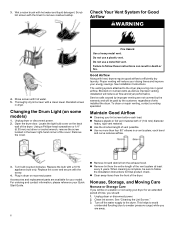
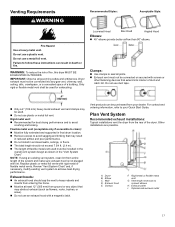
... exhausting. Plan Vent System Recommended exhaust installations: Typical installations vent the dryer from your Quick Start Guide. Optional side exhaust outlet 17 Failure to avoid crushing and kinking. Only rigid or flexible metal vent shall be connected into interior of duct and catch lint. Flexible metal vent (acceptable only if accessible to clean): � Must be purchased from the rear of the system and make sure exhaust hood is not plugged...
... exhausting. Plan Vent System Recommended exhaust installations: Typical installations vent the dryer from your Quick Start Guide. Optional side exhaust outlet 17 Failure to avoid crushing and kinking. Only rigid or flexible metal vent shall be connected into interior of duct and catch lint. Flexible metal vent (acceptable only if accessible to clean): � Must be purchased from the rear of the system and make sure exhaust hood is not plugged...
Owners Manual
Page 18
... Quick Start Guide for close clearances Venting systems come in the inner door well. Determine vent length and elbows needed for best drying performance: � Use following kits for close -clearance installations are available for your model has a long vent system, refer to exhaust out the right side, left side, or through the bottom. Example: A Long Vent Model would be converted to the type code located on the serial number plate in many varieties. A. or right-side exhaust installation...
... Quick Start Guide for close clearances Venting systems come in the inner door well. Determine vent length and elbows needed for best drying performance: � Use following kits for close -clearance installations are available for your model has a long vent system, refer to exhaust out the right side, left side, or through the bottom. Example: A Long Vent Model would be converted to the type code located on the serial number plate in many varieties. A. or right-side exhaust installation...

Owners Manual
Page 19
... a dryer is seated on connector. 3. NOTE: For long vent systems, use caulking compound to seal exterior wall opening around exhaust hood. 2. Additional Elbows In cases in which the Installation Instructions do not address the vent length for the specific number of the 2 ft. (0.6 m) inlet hose. Install exhaust hood 1. Periodically inspect and replace hoses if bulges, kinks, cuts, wear, or leaks are found. Connect vent to exhaust hood Attach 2 ft. (0.6 m) inlet hose to "Connect Vent...
... a dryer is seated on connector. 3. NOTE: For long vent systems, use caulking compound to seal exterior wall opening around exhaust hood. 2. Additional Elbows In cases in which the Installation Instructions do not address the vent length for the specific number of the 2 ft. (0.6 m) inlet hose. Install exhaust hood 1. Periodically inspect and replace hoses if bulges, kinks, cuts, wear, or leaks are found. Connect vent to exhaust hood Attach 2 ft. (0.6 m) inlet hose to "Connect Vent...
Owners Manual
Page 20
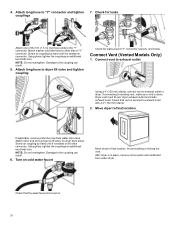
... water faucet Move dryer to "Y" connector and tighten 7. Using pliers, tighten the couplings an additional two-thirds turn . Connect Vent (Vented Models Only) 1. Connect vent to exhaust outlet Using a 4" (102 mm) clamp, connect vent to exhaust hood with a 4" (102 mm) clamp. 2. Check that the water faucet is clean. Using pliers, tighten the couplings an additional two-thirds turn . Turn on dryer back panel. After dryer is secured to exhaust outlet in place, remove corner posts and cardboard from water inlet valve...
... water faucet Move dryer to "Y" connector and tighten 7. Using pliers, tighten the couplings an additional two-thirds turn . Connect Vent (Vented Models Only) 1. Connect vent to exhaust outlet Using a 4" (102 mm) clamp, connect vent to exhaust hood with a 4" (102 mm) clamp. 2. Check that the water faucet is clean. Using pliers, tighten the couplings an additional two-thirds turn . Turn on dryer back panel. After dryer is secured to exhaust outlet in place, remove corner posts and cardboard from water inlet valve...
Owners Manual
Page 21
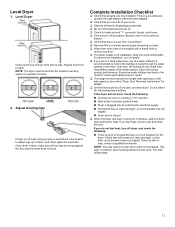
... If dryer is first used. For direct wire installation, turn off dryer, and check the following : � Controls are set in a running for 5 minutes, open the dryer door and feel for 20 minutes, and start , check the following : � There may lead to the need for levelness. This odor is common when heating element is not level, prop up or down, and check again for certain part replacement or repair. � To change the door...
... If dryer is first used. For direct wire installation, turn off dryer, and check the following : � Controls are set in a running for 5 minutes, open the dryer door and feel for 20 minutes, and start , check the following : � There may lead to the need for levelness. This odor is common when heating element is not level, prop up or down, and check again for certain part replacement or repair. � To change the door...
Quick Reference Sheet
Page 1
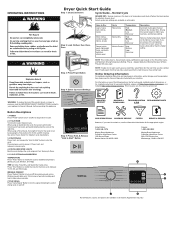
....maytag.com/owners, or in your machine. Press Power Button NOTE: If loads do not seem as dry as - CYCLE SIGNAL Press "Cycle Signal" Button to Start Temp Time Options Cycle United States: Signal 1-800-344-1274 Step 5. NOTE: This clothes dryer's, Government energy certifications were based on fabric type, load size, and dryness setting. OPERATING INSTRUCTIONS Dryer Quick Start Guide Step 1. Normal Cycle SENSOR DRY- If you dry a similar load. shipped defaults of the temperature to select desired cycle. CYCLE KNOB Turn...
....maytag.com/owners, or in your machine. Press Power Button NOTE: If loads do not seem as dry as - CYCLE SIGNAL Press "Cycle Signal" Button to Start Temp Time Options Cycle United States: Signal 1-800-344-1274 Step 5. NOTE: This clothes dryer's, Government energy certifications were based on fabric type, load size, and dryness setting. OPERATING INSTRUCTIONS Dryer Quick Start Guide Step 1. Normal Cycle SENSOR DRY- If you dry a similar load. shipped defaults of the temperature to select desired cycle. CYCLE KNOB Turn...


