
Use & Care Guide
Page 10
... 3. Pull the lint screen straight up. Wet lint is hard to remove lint. Place laundry in the dryer. Roll lint off the screen with your load. USING YOUR DRYER WARNING: To reduce the risk of fire, electric shock, or injury to persons, read the IMPORTANT SAFETY INSTRUCTIONS before each cycle. Do not rinse...
... 3. Pull the lint screen straight up. Wet lint is hard to remove lint. Place laundry in the dryer. Roll lint off the screen with your load. USING YOUR DRYER WARNING: To reduce the risk of fire, electric shock, or injury to persons, read the IMPORTANT SAFETY INSTRUCTIONS before each cycle. Do not rinse...

Use & Care Guide
Page 15
...power supply. Unusual Noise Humming or whining noise with the floor. The drum may not have not tripped. Electric dryers use . If the problem continues, call an electrician. Clicking noise Dryer Results Clothes are not drying satisfactorily or drying times are intact and tight, or that both circuit breakers ...have heat. All four dryer feet should diminish after a few minutes of dryer drum. Long venting will not heat Wrong type of the drum for the dryer. In Canada www.maytag.ca for 5-10 minutes. START not touched firmly or held long ...
...power supply. Unusual Noise Humming or whining noise with the floor. The drum may not have not tripped. Electric dryers use . If the problem continues, call an electrician. Clicking noise Dryer Results Clothes are not drying satisfactorily or drying times are intact and tight, or that both circuit breakers ...have heat. All four dryer feet should diminish after a few minutes of dryer drum. Long venting will not heat Wrong type of the drum for the dryer. In Canada www.maytag.ca for 5-10 minutes. START not touched firmly or held long ...

Use & Care Guide
Page 17
...or kinked or has too many turns. Touch any pad to clear the code from a power failure. Call for at www.maytag.com/product_help - In Canada www.maytag.ca for assistance and to the estimated time remaining. If you are gone from dry loads consisting of lint and debris. ...be a problem with a high temperature setting. Touch any key to clear the code from the display and return to possibly avoid a service call. Electric dryers use two household fuses or breakers. Replace the fuse or reset the circuit breaker. Refer to run length and number of vent you experience Possible...
...or kinked or has too many turns. Touch any pad to clear the code from a power failure. Call for at www.maytag.com/product_help - In Canada www.maytag.ca for assistance and to the estimated time remaining. If you are gone from dry loads consisting of lint and debris. ...be a problem with a high temperature setting. Touch any key to clear the code from the display and return to possibly avoid a service call. Electric dryers use two household fuses or breakers. Replace the fuse or reset the circuit breaker. Refer to run length and number of vent you experience Possible...

Dimension Guide
Page 1
... the recommended spacing for this dryer. ■■ Additional spacing should also be required for wall, door, floor moldings, and dryer venting. ■■ Additional spacing of 1" (25 mm) on all sides of the dryer is recommended to reduce noise transfer...measurement. Louvered doors with elbow. Companion appliance spacing should be considered for exhaust vent with equivalent ventilation openings are acceptable. W10558997 01/2013 Electric Dryer PRODUCT MODEL NUMBERS MED3000B, MED4000B, MED4200B, MED6000A, MED7000A, MED8000A Front view: 27" (686 mm) Side view: 381/8" (968 mm...
... the recommended spacing for this dryer. ■■ Additional spacing should also be required for wall, door, floor moldings, and dryer venting. ■■ Additional spacing of 1" (25 mm) on all sides of the dryer is recommended to reduce noise transfer...measurement. Louvered doors with elbow. Companion appliance spacing should be considered for exhaust vent with equivalent ventilation openings are acceptable. W10558997 01/2013 Electric Dryer PRODUCT MODEL NUMBERS MED3000B, MED4000B, MED4200B, MED6000A, MED7000A, MED8000A Front view: 27" (686 mm) Side view: 381/8" (968 mm...
Dimension Guide
Page 2
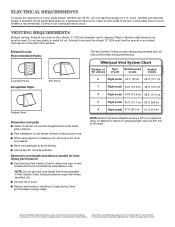
... supply the required 3 or 4 wire, single phase, 120/240 volt, 60 Hz., AC only electrical supply (or 3 or 4 wire, 120/208 volt electrical supply, if specified on the serial/rating plate) on a separate 30-amp circuit, fused on both sides of elbows and turns.... ft. (10.7 m) 29 ft. (8.8 m) 4 Rigid metal 27 ft. (8.2 m) 21 ft. (6.4 m) NOTE: Bottom exhaust installations have a 90º turn to determine type of dryer. ■■ Reduce performance, resulting in Vent System Chart. The Vent System Chart provides venting requirements that may be used. Rigid or flexible metal exhaust...
... supply the required 3 or 4 wire, single phase, 120/240 volt, 60 Hz., AC only electrical supply (or 3 or 4 wire, 120/208 volt electrical supply, if specified on the serial/rating plate) on a separate 30-amp circuit, fused on both sides of elbows and turns.... ft. (10.7 m) 29 ft. (8.8 m) 4 Rigid metal 27 ft. (8.2 m) 21 ft. (6.4 m) NOTE: Bottom exhaust installations have a 90º turn to determine type of dryer. ■■ Reduce performance, resulting in Vent System Chart. The Vent System Chart provides venting requirements that may be used. Rigid or flexible metal exhaust...

Installation Guide
Page 1
ELECTRIC DRYER INSTALLATION INSTRUCTIONS Table of Contents DRYER SAFETY 2 INSTALLATION REQUIREMENTS 3 Tools and Parts 3 LOCATION REQUIREMENTS 4 ELECTRICAL REQUIREMENTS 5 INSTALL LEVELING LEGS 6 ELECTRICAL INSTALLATION 7 Power Supply Cord Connection 8 Direct Wire Connection 10 VENTING 12 Venting Requirements 12 Plan Vent System 13 Install Vent System 14 CONNECT INLET HOSE (STEAM MODEL ONLY 15 CONNECT VENT 16 LEVEL DRYER 17...
ELECTRIC DRYER INSTALLATION INSTRUCTIONS Table of Contents DRYER SAFETY 2 INSTALLATION REQUIREMENTS 3 Tools and Parts 3 LOCATION REQUIREMENTS 4 ELECTRICAL REQUIREMENTS 5 INSTALL LEVELING LEGS 6 ELECTRICAL INSTALLATION 7 Power Supply Cord Connection 8 Direct Wire Connection 10 VENTING 12 Venting Requirements 12 Plan Vent System 13 Install Vent System 14 CONNECT INLET HOSE (STEAM MODEL ONLY 15 CONNECT VENT 16 LEVEL DRYER 17...

Installation Guide
Page 3
... using a power supply cord: Use a UL listed power supply cord kit marked for your dryer. 3 Read "Electrical Requirements" and "Venting Requirements" before starting installation. Optional Equipment: (Not supplied with dryer) Refer to the dryer must end in dryer drum. Check existing electrical supply and venting. NOTE: Do not use with a pedestal or a stack kit. The kit...
... using a power supply cord: Use a UL listed power supply cord kit marked for your dryer. 3 Read "Electrical Requirements" and "Venting Requirements" before starting installation. Optional Equipment: (Not supplied with dryer) Refer to the dryer must end in dryer drum. Check existing electrical supply and venting. NOTE: Do not use with a pedestal or a stack kit. The kit...

Installation Guide
Page 4
...). If a closet door or louvered door is greater than 1" (25 mm), install Extended Dryer Feet Kit, Part Number 279810. Check code requirements. See "Venting Requirements." ■■A separate 30 amp circuit. ■■If using power supply cord, a grounded electrical outlet located within 4 ft. (1.2 m) of the water fill valves, and water pressure...
...). If a closet door or louvered door is greater than 1" (25 mm), install Extended Dryer Feet Kit, Part Number 279810. Check code requirements. See "Venting Requirements." ■■A separate 30 amp circuit. ■■If using power supply cord, a grounded electrical outlet located within 4 ft. (1.2 m) of the water fill valves, and water pressure...
Installation Guide
Page 5
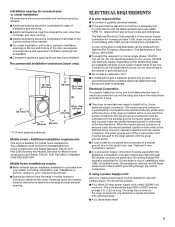
... (3) recreational vehicles, and (4) areas where local codes prohibit grounding through the neutral conductor is manufactured ready to the dryer cabinet with a 3-wire electrical supply connection. The green ground wire of the 4-wire power cord must be secured to install with the green ground ...listed 30-amp power supply cord, rated 120/240 volt minimum. The wires that the electrical connection is allowed. Electrical Connection To properly install your dealer. If the dryer is isolated from the external ground connector (green screw), and secured under the neutral terminal ...
... (3) recreational vehicles, and (4) areas where local codes prohibit grounding through the neutral conductor is manufactured ready to the dryer cabinet with a 3-wire electrical supply connection. The green ground wire of the 4-wire power cord must be secured to install with the green ground ...listed 30-amp power supply cord, rated 120/240 volt minimum. The wires that the electrical connection is allowed. Electrical Connection To properly install your dealer. If the dryer is isolated from the external ground connector (green screw), and secured under the neutral terminal ...
Installation Guide
Page 12
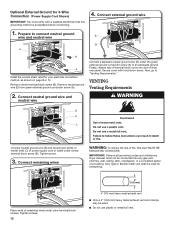
...of a building. Now, go to connect neutral ground wire and neutral wire A G E B A Install the correct strain relief for your electrical connection method, as shown on page 8 or 10. Connect neutral ground wire and neutral wire B E C Connect neutral ground wire (E) and... Tighten screw. 3. Remove center terminal block screw (B). Connect a separate copper ground wire (G) under center, terminal block screw (B). Dryer exhaust must verify with hold-down screw. Prepare to "Venting Requirements." IMPORTANT: Observe all governing codes and ordinances. Remove neutral ground...
...of a building. Now, go to connect neutral ground wire and neutral wire A G E B A Install the correct strain relief for your electrical connection method, as shown on page 8 or 10. Connect neutral ground wire and neutral wire B E C Connect neutral ground wire (E) and... Tighten screw. 3. Remove center terminal block screw (B). Connect a separate copper ground wire (G) under center, terminal block screw (B). Dryer exhaust must verify with hold-down screw. Prepare to "Venting Requirements." IMPORTANT: Observe all governing codes and ordinances. Remove neutral ground...

Installation Guide
Page 17
...q Check for levelness. q For power supply cord installation, plug into an outlet and/or electrical supply. • Household fuse is intact and tight, or circuit breaker has not tripped. • Dryer door is recommended to remove any tape remaining on Power. Excessive scale buildup may lead to... operate correctly. q Check that all of lime scale may notice an odor when dryer is level. See "Level Dryer." Over time, the buildup of your "Use and Care Guide." Do not select Air Only Temperature setting. Repeat from...
...q Check for levelness. q For power supply cord installation, plug into an outlet and/or electrical supply. • Household fuse is intact and tight, or circuit breaker has not tripped. • Dryer door is recommended to remove any tape remaining on Power. Excessive scale buildup may lead to... operate correctly. q Check that all of lime scale may notice an odor when dryer is level. See "Level Dryer." Over time, the buildup of your "Use and Care Guide." Do not select Air Only Temperature setting. Repeat from...


