

Door Reversal Instructions
Page 1
... electrical shock. 1. DRYER DOOR REVERSAL INSTRUCTIONS Tools Needed Flat-blade screwdriver Plastic putty knife Minimum 8" long TORX® T25® #2 Phillips screwdriver star driver You can change your door swing from a right-side opening to a left-side opening door. Do not pull on top of Acument Intellectual Property, LLC. 1 TORX and T25 are applicable for models with putty knife or screwdriver. Electrical Shock Hazard Disconnect power before removing doors. Remove...
... electrical shock. 1. DRYER DOOR REVERSAL INSTRUCTIONS Tools Needed Flat-blade screwdriver Plastic putty knife Minimum 8" long TORX® T25® #2 Phillips screwdriver star driver You can change your door swing from a right-side opening to a left-side opening door. Do not pull on top of Acument Intellectual Property, LLC. 1 TORX and T25 are applicable for models with putty knife or screwdriver. Electrical Shock Hazard Disconnect power before removing doors. Remove...

Owners Manual
Page 2
... installer. − Install the clothes dryer according to the manufacturer's instructions and local codes. − Do not install a clothes dryer with clothes dryers. All safety messages will tell you what can be killed or seriously injured if you don't immediately follow instructions. WARNING You can kill or hurt you don't follow instructions. If flexible metal duct is installed, it must be easily crushed, and trap lint. Flexible venting...
... installer. − Install the clothes dryer according to the manufacturer's instructions and local codes. − Do not install a clothes dryer with clothes dryers. All safety messages will tell you what can be killed or seriously injured if you don't immediately follow instructions. WARNING You can kill or hurt you don't follow instructions. If flexible metal duct is installed, it must be easily crushed, and trap lint. Flexible venting...

Owners Manual
Page 3
... fire, electric shock, or injury to persons when using your dryer. SAVE THESE INSTRUCTIONS 3 To reduce the risk of a tumble dryer cycle occurs without heat (cool down period). Avoid stopping a tumble dryer before the end of the drying cycle unless all instructions before or after each load. � Keep area around the exhaust opening and adjacent surrounding areas free from service or discarded, remove the door to the drying compartment...
... fire, electric shock, or injury to persons when using your dryer. SAVE THESE INSTRUCTIONS 3 To reduce the risk of a tumble dryer cycle occurs without heat (cool down period). Avoid stopping a tumble dryer before the end of the drying cycle unless all instructions before or after each load. � Keep area around the exhaust opening and adjacent surrounding areas free from service or discarded, remove the door to the drying compartment...

Owners Manual
Page 4
... harmful interference, and 2. Once installed, launch the app. The SAID code is subject to connect your appliance. To comply with FCC and Industry Canada RF radiation exposure limits for general population, antenna(s) used for compliance could void the user's authority to be co-located or operating in conjunction with Part 15 of the FCC Rules. Operation is either printed on...
... harmful interference, and 2. Once installed, launch the app. The SAID code is subject to connect your appliance. To comply with FCC and Industry Canada RF radiation exposure limits for general population, antenna(s) used for compliance could void the user's authority to be co-located or operating in conjunction with Part 15 of the FCC Rules. Operation is either printed on...

Owners Manual
Page 5
... to dry. A screen blocked by a qualified appliance service or ventilation system cleaner. See "Venting Requirements" in the dryer. Using a vacuum, gently remove any lint that has ever had anything flammable on model. This buildup can increase drying time. 2. Remove the lint screen. Wet lint is in the Installation Instructions. � Clean space where lint screen is completely dry. Use a microfiber cloth and very warm water in front of clothes. Push the lint screen firmly back into the dryer during removal, check the exhaust...
... to dry. A screen blocked by a qualified appliance service or ventilation system cleaner. See "Venting Requirements" in the dryer. Using a vacuum, gently remove any lint that has ever had anything flammable on model. This buildup can increase drying time. 2. Remove the lint screen. Wet lint is in the Installation Instructions. � Clean space where lint screen is completely dry. Use a microfiber cloth and very warm water in front of clothes. Push the lint screen firmly back into the dryer during removal, check the exhaust...

Owners Manual
Page 6
... disconnect power. 2. Clean lint screen. Steam models only: Shut off water faucet. Steam models only: Shut off water faucet. Use tape to secure dryer door. 5. See "Install and remove base trim (on vacation or not using your dryer for details. Replace the cover and secure with heat, dryers require good airflow to follow these instructions can result in death or fire. Do not use a metal foil vent. See Installation Instructions. Service calls caused by improper venting are away. Disconnect wiring. 3. Using a 1/4" (6.5 mm) nut driver...
... disconnect power. 2. Clean lint screen. Steam models only: Shut off water faucet. Steam models only: Shut off water faucet. Use tape to secure dryer door. 5. See "Install and remove base trim (on vacation or not using your dryer for details. Replace the cover and secure with heat, dryers require good airflow to follow these instructions can result in death or fire. Do not use a metal foil vent. See Installation Instructions. Service calls caused by improper venting are away. Disconnect wiring. 3. Using a 1/4" (6.5 mm) nut driver...

Owners Manual
Page 7
...INSTALLATION REQUIREMENTS Tools and Parts NOTE: Install the clothes dryer according to model) Parts package is located in the Installation Instructions. Parts Needed (steam models): "Y" connector Rubber washer Pliers Tape measure 2' (0.6 m) inlet hose 5' (1.52 m) inlet hose 7 Tools Needed for Steam Models Install and store your dryer during freezing weather, winterize it will not freeze. To winterize the dryer: 1. Gather required tools and parts before starting installation. If storing or moving your dryer where it . Flush water pipes. Plug in dryer or reconnect power...
...INSTALLATION REQUIREMENTS Tools and Parts NOTE: Install the clothes dryer according to model) Parts package is located in the Installation Instructions. Parts Needed (steam models): "Y" connector Rubber washer Pliers Tape measure 2' (0.6 m) inlet hose 5' (1.52 m) inlet hose 7 Tools Needed for Steam Models Install and store your dryer during freezing weather, winterize it will not freeze. To winterize the dryer: 1. Gather required tools and parts before starting installation. If storing or moving your dryer where it . Flush water pipes. Plug in dryer or reconnect power...

Owners Manual
Page 8
... Quick Start Guide for proper exhaust installation. You will need to support dryer weight of 20-120 psi (138-827 kPa). See "Venting Requirements." � A separate 30 A circuit for electric dryers. � If you may cause dryer not to reduce noise transfer. � For closet installation with a door, minimum ventilation openings in longer drying times. Also, consider the combined weight of the companion appliance. � For steam dryers: Cold water faucets located within...
... Quick Start Guide for proper exhaust installation. You will need to support dryer weight of 20-120 psi (138-827 kPa). See "Venting Requirements." � A separate 30 A circuit for electric dryers. � If you may cause dryer not to reduce noise transfer. � For closet installation with a door, minimum ventilation openings in longer drying times. Also, consider the combined weight of the companion appliance. � For steam dryers: Cold water faucets located within...

Owners Manual
Page 9
... 10-gauge copper wires and match a 4-wire receptacle of NEMA Type 14-30 R. Connect to the dryer must be removed from the external ground connector (green screw), and secured under the neutral terminal (center or white wire) of the terminal block. The National Electrical Code requires a 4-wire power supply connection for Mobile Homes, CAN/CSAZ240 MH. If using and follow the instructions provided for (1) new branch-circuit installations after 1996, and...
... 10-gauge copper wires and match a 4-wire receptacle of NEMA Type 14-30 R. Connect to the dryer must be removed from the external ground connector (green screw), and secured under the neutral terminal (center or white wire) of the terminal block. The National Electrical Code requires a 4-wire power supply connection for Mobile Homes, CAN/CSAZ240 MH. If using and follow the instructions provided for (1) new branch-circuit installations after 1996, and...
Owners Manual
Page 10
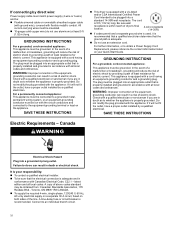
... with all local codes. SAVE THESE INSTRUCTIONS Electric Requirements - All current-carrying wires must be grounded. The plug must be plugged into a grounded 4 prong outlet. A copy of dryer's final 4-wire receptacle location. (14-30R) � If codes permit and a separate ground wire is used, it will not fit the outlet, have a proper outlet installed by a qualified electrician. If connecting by direct wire: Power supply cable must match power supply (4-wire or 3-wire) and be: �...
... with all local codes. SAVE THESE INSTRUCTIONS Electric Requirements - All current-carrying wires must be grounded. The plug must be plugged into a grounded 4 prong outlet. A copy of dryer's final 4-wire receptacle location. (14-30R) � If codes permit and a separate ground wire is used, it will not fit the outlet, have a proper outlet installed by a qualified electrician. If connecting by direct wire: Power supply cable must match power supply (4-wire or 3-wire) and be: �...
Owners Manual
Page 11
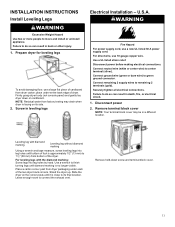
... factory testing may be in leveling legs Electrical Installation - Stand the dryer up. Remove hold-down on the corner posts until bottom of cardboard from dryer packaging under entire back edge of the two dryer back corners. INSTALLATION INSTRUCTIONS Install Leveling Legs WARNING Excessive Weight Hazard Use two or more people to connect the exhaust vent. WARNING Fire Hazard For power supply cord, use 10 gauge copper wire...
... factory testing may be in leveling legs Electrical Installation - Stand the dryer up. Remove hold-down on the corner posts until bottom of cardboard from dryer packaging under entire back edge of the two dryer back corners. INSTALLATION INSTRUCTIONS Install Leveling Legs WARNING Excessive Weight Hazard Use two or more people to connect the exhaust vent. WARNING Fire Hazard For power supply cord, use 10 gauge copper wire...
Owners Manual
Page 12
... dryer cabinet and be used with upturned ends F. 3/4" (19 mm) UL-listed strain relief G. Choose electrical connection type Power supply cord 4-wire receptacle (NEMA Type 14-30R): Refer to "3-Wire Power Supply Connection". Neutral prong E. Be sure that one tab is pointing up (A) and the other is required for mobile homes and where local codes do not permit connection of 3-wire connections. Spade terminals with either a power supply cord or a direct wire connection. Prepare ground wire...
... dryer cabinet and be used with upturned ends F. 3/4" (19 mm) UL-listed strain relief G. Choose electrical connection type Power supply cord 4-wire receptacle (NEMA Type 14-30R): Refer to "3-Wire Power Supply Connection". Neutral prong E. Be sure that one tab is pointing up (A) and the other is required for mobile homes and where local codes do not permit connection of 3-wire connections. Spade terminals with either a power supply cord or a direct wire connection. Prepare ground wire...

Owners Manual
Page 13
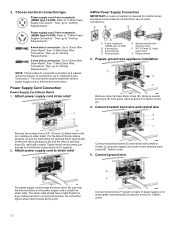
..., go to "Venting Requirements." 3-Wire Power Supply Connection IMPORTANT: Use where local codes permit connecting cabinetground conductor to neutral wire. Attach direct wire strain relief A. 3-wire receptacle (NEMA type 10-30R) B. 3-wire plug C. Neutral prong D. Neutral (white or center wire) Unscrew the removable conduit connector (A) and any screws from a 3/4" (19 mm) UL-listed strain relief (UL marking on strain relief). For 4-wire Direct Wire Connection, continue to step 3. 4-wire direct wire connection: Go to strain relief Remove center terminal block screw...
..., go to "Venting Requirements." 3-Wire Power Supply Connection IMPORTANT: Use where local codes permit connecting cabinetground conductor to neutral wire. Attach direct wire strain relief A. 3-wire receptacle (NEMA type 10-30R) B. 3-wire plug C. Neutral prong D. Neutral (white or center wire) Unscrew the removable conduit connector (A) and any screws from a 3/4" (19 mm) UL-listed strain relief (UL marking on strain relief). For 4-wire Direct Wire Connection, continue to step 3. 4-wire direct wire connection: Go to strain relief Remove center terminal block screw...
Owners Manual
Page 14
... terminal block screw (B). Squeeze hooked ends together and tighten screw. Direct wire cable must have 5 ft (1.52 m) of extra length so dryer may be moved if needed . Strip insulation back 1" (25 mm). Now, go to "Venting Requirements." 3-Wire Direct Wire Connection IMPORTANT: Use where local codes permit connecting cabinetground conductor to connect neutral bond wire and neutral wire Connect ground wire (green or bare) (F) of extra length so dryer may be moved if needed . 4-Wire Direct Wire Connection IMPORTANT: A 4-wire connection...
... terminal block screw (B). Squeeze hooked ends together and tighten screw. Direct wire cable must have 5 ft (1.52 m) of extra length so dryer may be moved if needed . Strip insulation back 1" (25 mm). Now, go to "Venting Requirements." 3-Wire Direct Wire Connection IMPORTANT: Use where local codes permit connecting cabinetground conductor to connect neutral bond wire and neutral wire Connect ground wire (green or bare) (F) of extra length so dryer may be moved if needed . 4-Wire Direct Wire Connection IMPORTANT: A 4-wire connection...

Owners Manual
Page 15
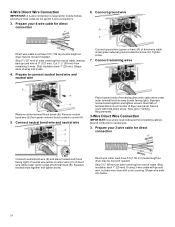
... bond wire and neutral wire Install the correct strain relief for your electrical connection method. 4. Remove center screw Remove center terminal block screw (B). 5. Connect remaining wires Connect neutral bond wire (E) and neutral wire (white or center wire) (C) of remaining direct wire cable wires under outer terminal block screws. Remove neutral bond wire (E) from green external ground conductor screw (A). 2. Connect neutral bond wire and neutral wire Place hooked end of neutral wire (white or center) (C) of dryer rear panel. Prepare to "Venting Requirements."
... bond wire and neutral wire Install the correct strain relief for your electrical connection method. 4. Remove center screw Remove center terminal block screw (B). 5. Connect remaining wires Connect neutral bond wire (E) and neutral wire (white or center wire) (C) of remaining direct wire cable wires under outer terminal block screws. Remove neutral bond wire (E) from green external ground conductor screw (A). 2. Connect neutral bond wire and neutral wire Place hooked end of neutral wire (white or center) (C) of dryer rear panel. Prepare to "Venting Requirements."

Owners Manual
Page 16
... the entire length of the system before installing the dryer. � Make sure external exhaust hoods outside of duct and catch lint. Vent products can result in final dryer location. � Remove excess to your dealer. Connect external ground wire Connect a separate copper ground wire (G) from ground or any gas vent, chimney, wall, ceiling, attic, crawlspace, or a concealed space of dryer rear panel. Dryer exhaust must not be used for best drying performance...
... the entire length of the system before installing the dryer. � Make sure external exhaust hoods outside of duct and catch lint. Vent products can result in final dryer location. � Remove excess to your dealer. Connect external ground wire Connect a separate copper ground wire (G) from ground or any gas vent, chimney, wall, ceiling, attic, crawlspace, or a concealed space of dryer rear panel. Dryer exhaust must not be used for best drying performance...

Owners Manual
Page 17
... vent G. Vent length necessary to avoid kinking. � Use as few 90° turns as possible. Contact your local dealer. Standard rear offset exhaust installation B. Left- or right-side exhaust installation (available only on select 27"- Over-The-Top installation (also available with a manufacturer's exhaust cover kit. Terminate exhaust vent outside. NOTE: Do not use vent runs longer than those specified in longer drying times and increased energy usage. Vent System Chart Number of 90° turns...
... vent G. Vent length necessary to avoid kinking. � Use as few 90° turns as possible. Contact your local dealer. Standard rear offset exhaust installation B. Left- or right-side exhaust installation (available only on select 27"- Over-The-Top installation (also available with a manufacturer's exhaust cover kit. Terminate exhaust vent outside. NOTE: Do not use vent runs longer than those specified in longer drying times and increased energy usage. Vent System Chart Number of 90° turns...

Owners Manual
Page 18
....5 m) To determine if your model has a long vent system, refer to the type code located on the serial number plate in which the Installation Instructions do not address the vent length for the specific number of elbows required for future reference. The dryer must fit over the exhaust hood. Remove old rubber washer from 40 ft [12.2 m] to 20 ft [6.0m]). Then attach "Y" connector to exhaust hood Using pliers, tighten the couplings...
....5 m) To determine if your model has a long vent system, refer to the type code located on the serial number plate in which the Installation Instructions do not address the vent length for the specific number of elbows required for future reference. The dryer must fit over the exhaust hood. Remove old rubber washer from 40 ft [12.2 m] to 20 ft [6.0m]). Then attach "Y" connector to exhaust hood Using pliers, tighten the couplings...
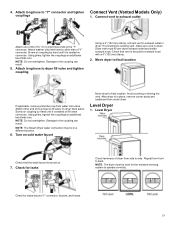
Owners Manual
Page 19
... Dryer Check that vent is turned on connector. 4. Attach long hose to dryer fill valve and tighten coupling Using a 4" (102 mm) clamp, connect vent to fill valve on cold water faucet Move dryer to final location If applicable, remove protective cap from under dryer. Attach other side of long hose to exhaust outlet in dryer. After dryer is clean. Turn on dryer back panel. Move dryer to final location. Check for leaks around "Y" connector, faucets, and hoses. 19 Damage to side. Connect vent to exhaust outlet Attach...
... Dryer Check that vent is turned on connector. 4. Attach long hose to dryer fill valve and tighten coupling Using a 4" (102 mm) clamp, connect vent to fill valve on cold water faucet Move dryer to final location If applicable, remove protective cap from under dryer. Attach other side of long hose to exhaust outlet in dryer. After dryer is clean. Turn on dryer back panel. Move dryer to final location. Check for leaks around "Y" connector, faucets, and hoses. 19 Damage to side. Connect vent to exhaust outlet Attach...

Owners Manual
Page 20
... dryer. Use wrench to see online "Dryer Door Reversal Instructions" for details. � Set the heat cycle for 20 minutes, and start , check the following : � There may be 2 household fuses or circuit breakers for certain part replacement or repair. � To change the door swing from dryer and remove. For direct wire installation, turn off dryer, and check the following : � Controls are on top of the water system, which will go back through the water system in a running for 5 minutes, open...
... dryer. Use wrench to see online "Dryer Door Reversal Instructions" for details. � Set the heat cycle for 20 minutes, and start , check the following : � There may be 2 household fuses or circuit breakers for certain part replacement or repair. � To change the door swing from dryer and remove. For direct wire installation, turn off dryer, and check the following : � Controls are on top of the water system, which will go back through the water system in a running for 5 minutes, open...


