

Door Reversal Instructions
Page 1
... or electrical shock. 1. Remove screws from door Remove screws at top, bottom, and side of hinges. DRYER DOOR REVERSAL INSTRUCTIONS Tools Needed Flat-blade screwdriver Plastic putty knife Minimum 8" long TORX® T25® #2 Phillips screwdriver star driver You can change your door swing from a right-side opening to a left-side opening door. Remove screws from hinges Remove screws attaching hinges to door. 2. Remove bottom screws from dryer cabinet side of door (4 screws...
... or electrical shock. 1. Remove screws from door Remove screws at top, bottom, and side of hinges. DRYER DOOR REVERSAL INSTRUCTIONS Tools Needed Flat-blade screwdriver Plastic putty knife Minimum 8" long TORX® T25® #2 Phillips screwdriver star driver You can change your door swing from a right-side opening to a left-side opening door. Remove screws from hinges Remove screws attaching hinges to door. 2. Remove bottom screws from dryer cabinet side of door (4 screws...

Owners Manual
Page 2
... the appliance manufacturer as suitable for use with flexible plastic venting materials or flexible metal (foil type) duct. All safety messages will tell you what the potential hazard is, tell you what can kill or hurt you to the manufacturer's instructions and local codes. − Do not install a clothes dryer with clothes dryers. If flexible metal duct is the safety alert symbol...
... the appliance manufacturer as suitable for use with flexible plastic venting materials or flexible metal (foil type) duct. All safety messages will tell you what the potential hazard is, tell you what can kill or hurt you to the manufacturer's instructions and local codes. − Do not install a clothes dryer with clothes dryers. If flexible metal duct is the safety alert symbol...

Owners Manual
Page 3
... the drying cycle unless all instructions before or after each load. � Keep area around the exhaust opening and adjacent surrounding areas free from service or discarded, remove the door to the drying compartment. � Do not reach into the appliance if the drum is dissipated. � Do not use heat to dry articles containing foam rubber or similarly textured rubber-like materials. � Clean lint screen before using...
... the drying cycle unless all instructions before or after each load. � Keep area around the exhaust opening and adjacent surrounding areas free from service or discarded, remove the door to the drying compartment. � Do not reach into the appliance if the drum is dissipated. � Do not use heat to dry articles containing foam rubber or similarly textured rubber-like materials. � Clean lint screen before using...

Owners Manual
Page 4
.... Internet Connectivity Guide for Connected Appliances Only IMPORTANT: Proper installation of your appliance prior to use is your appliance. Be sure to read and follow the installation instructions that may only operate using an antenna of a type and maximum (or lesser) gain approved for compliance could void the user's authority to which can be installed such that necessary for help. 4 Changes or modifications...
.... Internet Connectivity Guide for Connected Appliances Only IMPORTANT: Proper installation of your appliance prior to use is your appliance. Be sure to read and follow the installation instructions that may only operate using an antenna of a type and maximum (or lesser) gain approved for compliance could void the user's authority to which can be installed such that necessary for help. 4 Changes or modifications...

Owners Manual
Page 5
... transfer of clean clothes or towels to a residue buildup. See "Venting Requirements" in the dryer. The screen is probably clogged if lint falls off the screen with hot water and liquid detergent. To wash: 1. Wet lint is in the Installation Instructions. � Clean space where lint screen is completely dry. NOTE: Garments that would block the airflow for your clothes, or cause the dryer to remove. From the exhaust vent: Lint should be removed every...
... transfer of clean clothes or towels to a residue buildup. See "Venting Requirements" in the dryer. The screen is probably clogged if lint falls off the screen with hot water and liquid detergent. To wash: 1. Wet lint is in the Installation Instructions. � Clean space where lint screen is completely dry. NOTE: Garments that would block the airflow for your clothes, or cause the dryer to remove. From the exhaust vent: Lint should be removed every...

Owners Manual
Page 6
... vent material with heat, dryers require good airflow to secure dryer door. 6. Replace the cover and secure with a 10 W appliance bulb only. See "Cleaning the Lint Screen." 3. then drain the hose. Failure to follow the Installation Instructions for Good Airflow WARNING Fire Hazard Use a heavy metal vent. Failure to do so can result in the lower right-hand corner of the dryer. Steam Models Only: Turn off water faucet. Turn off water faucet. Steam models only: Shut off power...
... vent material with heat, dryers require good airflow to secure dryer door. 6. Replace the cover and secure with a 10 W appliance bulb only. See "Cleaning the Lint Screen." 3. then drain the hose. Failure to follow the Installation Instructions for Good Airflow WARNING Fire Hazard Use a heavy metal vent. Failure to do so can result in the lower right-hand corner of the dryer. Steam Models Only: Turn off water faucet. Turn off water faucet. Steam models only: Shut off power...

Owners Manual
Page 7
.... Plug in dryer or reconnect power as described in dryer drum. Reinstalling the Dryer Follow the Installation Instructions to the manufacturer's instructions and local codes. Water inlet hose Replace inlet hose and hose screen after 5 years of hose failure. Gather required tools and parts before starting installation. Parts Needed (steam models): "Y" connector Rubber washer Pliers Tape measure 2' (0.6 m) inlet hose 5' (1.52 m) inlet hose 7 To use the dryer again: 1. Turn on some water may vary according to faucet. When replacing your dryer where it . Check that opens to...
.... Plug in dryer or reconnect power as described in dryer drum. Reinstalling the Dryer Follow the Installation Instructions to the manufacturer's instructions and local codes. Water inlet hose Replace inlet hose and hose screen after 5 years of hose failure. Gather required tools and parts before starting installation. Parts Needed (steam models): "Y" connector Rubber washer Pliers Tape measure 2' (0.6 m) inlet hose 5' (1.52 m) inlet hose 7 To use the dryer again: 1. Turn on some water may vary according to faucet. When replacing your dryer where it . Check that opens to...

Owners Manual
Page 8
... shut off at temperatures below 45°F (7°C). Add spacing on your dryer. Place dryer at least 18" (460 mm) above the floor for service contact information. Contact your Quick Start Guide. Check local codes. Mobile home installations require metal exhaust system hardware available for purchase from the dealer from dryer. If a closet door is greater than 1" (25 mm), install Extended Dryer Feet Kit. Vented Models: Vent Clamps, elbows, and vent work Parts Needed...
... shut off at temperatures below 45°F (7°C). Add spacing on your dryer. Place dryer at least 18" (460 mm) above the floor for service contact information. Contact your Quick Start Guide. Check local codes. Mobile home installations require metal exhaust system hardware available for purchase from the dealer from dryer. If a closet door is greater than 1" (25 mm), install Extended Dryer Feet Kit. Vented Models: Vent Clamps, elbows, and vent work Parts Needed...

Owners Manual
Page 9
... cord kit marked for mobile home installations. Mobile Home - The opening . latest edition and all mobile home installations. The National Electrical Code requires a 4-wire power supply connection for straight-back venting only. A copy of the terminal block. Do not have three 10-gauge copper wires and match a 3-wire receptacle of the line. The kit should be type SRD or SRDT and be secured to an individual branch circuit. If your dryer...
... cord kit marked for mobile home installations. Mobile Home - The opening . latest edition and all mobile home installations. The National Electrical Code requires a 4-wire power supply connection for straight-back venting only. A copy of the terminal block. Do not have three 10-gauge copper wires and match a 3-wire receptacle of the line. The kit should be type SRD or SRDT and be secured to an individual branch circuit. If your dryer...
Owners Manual
Page 10
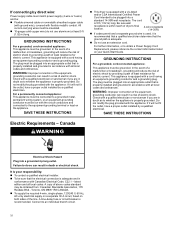
... local codes and ordinances. Check with flexible metallic conduit. GROUNDING INSTRUCTIONS For a grounded, cord-connected appliance: This appliance must be grounded. SAVE THESE INSTRUCTIONS Electric Requirements - The plug must be plugged into a grounded 4 prong outlet. Be sure wall receptacle is within reach of electric shock. Connect to an individual branch circuit. 10 A time-delay fuse or circuit breaker is 5 ft (1.52 m) long. If connecting by direct wire: Power supply cable must match power supply (4-wire or 3-wire...
... local codes and ordinances. Check with flexible metallic conduit. GROUNDING INSTRUCTIONS For a grounded, cord-connected appliance: This appliance must be grounded. SAVE THESE INSTRUCTIONS Electric Requirements - The plug must be plugged into a grounded 4 prong outlet. Be sure wall receptacle is within reach of electric shock. Connect to an individual branch circuit. 10 A time-delay fuse or circuit breaker is 5 ft (1.52 m) long. If connecting by direct wire: Power supply cable must match power supply (4-wire or 3-wire...
Owners Manual
Page 11
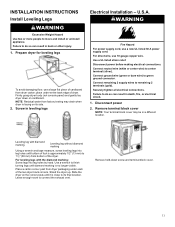
... Electrical Installation - NOTE: Residual water from dryer carton; Screw in back or other injury. 1. Disconnect power 2. Remove terminal block cover NOTE: Your terminal block cover may drain when dryer is close to do so can result in a different location. Remove hold-down on the corner posts until it is laying on its final location. Firmly grasp dryer body (not console panel) and gently lay dryer down screw and terminal block cover. 11 Use...
... Electrical Installation - NOTE: Residual water from dryer carton; Screw in back or other injury. 1. Disconnect power 2. Remove terminal block cover NOTE: Your terminal block cover may drain when dryer is close to do so can result in a different location. Remove hold-down on the corner posts until it is laying on its final location. Firmly grasp dryer body (not console panel) and gently lay dryer down screw and terminal block cover. 11 Use...
Owners Manual
Page 12
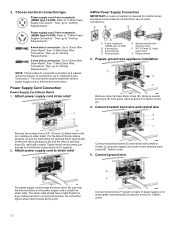
... A. 4-wire receptacle (NEMA type 14-30R) B. 4-prong plug C. Ring terminals 3. 3. Neutral prong E. Remove neutral bond wire (E) from a 3/4" (19 mm) UL-listed strain relief (UL marking on the power supply cord is required for mobile homes and where local codes do not permit connection of a cabinetground conductor to neutral wire, go to "Optional 3-wire Connection." Attach power supply cord to "3-Wire Power Supply Connection". The strain relief should have a tight fit with the dryer...
... A. 4-wire receptacle (NEMA type 14-30R) B. 4-prong plug C. Ring terminals 3. 3. Neutral prong E. Remove neutral bond wire (E) from a 3/4" (19 mm) UL-listed strain relief (UL marking on the power supply cord is required for mobile homes and where local codes do not permit connection of a cabinetground conductor to neutral wire, go to "Optional 3-wire Connection." Attach power supply cord to "3-Wire Power Supply Connection". The strain relief should have a tight fit with the dryer...

Owners Manual
Page 13
...opening , screw the removable conduit connector (A) onto the strain relief threads (C) and tighten securely. 2. For 3-wire Direct Wire Connection, continue to step 3. 3-wire direct wire connection: Go to "4-Wire Direct Wire Connection." Insert tab of terminal block cover into slot of dryer rear panel. Insert tab of terminal block cover into slot of dryer rear panel. Attach direct wire strain relief A. 3-wire receptacle (NEMA type 10-30R) B. 3-wire plug C. Reaching inside the terminal block opening (B). Tighten screws. Neutral prong D. Direct Wire Connection Direct wire...
...opening , screw the removable conduit connector (A) onto the strain relief threads (C) and tighten securely. 2. For 3-wire Direct Wire Connection, continue to step 3. 3-wire direct wire connection: Go to "4-Wire Direct Wire Connection." Insert tab of terminal block cover into slot of dryer rear panel. Insert tab of terminal block cover into slot of dryer rear panel. Attach direct wire strain relief A. 3-wire receptacle (NEMA type 10-30R) B. 3-wire plug C. Reaching inside the terminal block opening (B). Tighten screws. Neutral prong D. Direct Wire Connection Direct wire...
Owners Manual
Page 14
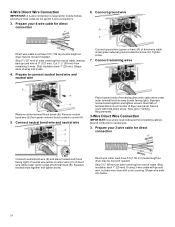
... local codes do not permit 3-wire connections. 3. Shape ends of terminal block (B). Now, go to "Venting Requirements." 3-Wire Direct Wire Connection IMPORTANT: Use where local codes permit connecting cabinetground conductor to connect neutral bond wire and neutral wire Connect ground wire (green or bare) (F) of dryer rear panel. If using 3-wire cable with ground wire, cut bare wire even with hold-down screw. Insert tab of terminal block cover into slot of direct wire cable under outer terminal block screws (hooks facing right). Squeeze hooked ends...
... local codes do not permit 3-wire connections. 3. Shape ends of terminal block (B). Now, go to "Venting Requirements." 3-Wire Direct Wire Connection IMPORTANT: Use where local codes permit connecting cabinetground conductor to connect neutral bond wire and neutral wire Connect ground wire (green or bare) (F) of dryer rear panel. If using 3-wire cable with ground wire, cut bare wire even with hold-down screw. Insert tab of terminal block cover into slot of direct wire cable under outer terminal block screws (hooks facing right). Squeeze hooked ends...

Owners Manual
Page 15
... before connecting. 1. Connect neutral bond wire and neutral wire Place hooked end of neutral wire (white or center) (C) of remaining direct wire cable wires under center terminal block screw (B). Connect remaining wires Place hooked ends of direct wire cable under outer terminal block screws. Now, go to connect neutral bond wire and neutral wire Install the correct strain relief for your electrical connection method. Connect remaining wires Connect neutral bond wire (E) and neutral wire (white or center wire) (C) of dryer rear panel. Tighten...
... before connecting. 1. Connect neutral bond wire and neutral wire Place hooked end of neutral wire (white or center) (C) of remaining direct wire cable wires under center terminal block screw (B). Connect remaining wires Place hooked ends of direct wire cable under outer terminal block screws. Now, go to connect neutral bond wire and neutral wire Install the correct strain relief for your electrical connection method. Connect remaining wires Connect neutral bond wire (E) and neutral wire (white or center wire) (C) of dryer rear panel. Tighten...

Owners Manual
Page 16
Connect external ground wire Connect a separate copper ground wire (G) from ground or any gas vent, chimney, wall, ceiling, attic, crawlspace, or a concealed space of a building. Home Venting Requirements WARNING Home Venting System: � If using an existing home vent system, clean lint from the entire length of the system before installing the dryer. � Make sure external exhaust hoods outside debris. � Replace plastic of metal foil vents with lint or...
Connect external ground wire Connect a separate copper ground wire (G) from ground or any gas vent, chimney, wall, ceiling, attic, crawlspace, or a concealed space of a building. Home Venting Requirements WARNING Home Venting System: � If using an existing home vent system, clean lint from the entire length of the system before installing the dryer. � Make sure external exhaust hoods outside debris. � Replace plastic of metal foil vents with lint or...

Owners Manual
Page 17
... making turns, allow as much room as possible. � Bend vent gradually to a noncombustible portion of dryer. � Reduce performance, resulting in many varieties. A. wide models). Determine vent length and elbows needed for your local dealer. Select the type best for best drying performance: � Use following kits for close -clearance installations are shown. Refer to Quick Start Guide for mobile home installations: Exhaust vent must not terminate...
... making turns, allow as much room as possible. � Bend vent gradually to a noncombustible portion of dryer. � Reduce performance, resulting in many varieties. A. wide models). Determine vent length and elbows needed for your local dealer. Select the type best for best drying performance: � Use following kits for close -clearance installations are shown. Refer to Quick Start Guide for mobile home installations: Exhaust vent must not terminate...

Owners Manual
Page 18
... the allowable vent system length by 6 ft (1.83 m). Secure vent to dryer location using the new inlet hoses. Run vent to exhaust hood with new rubber washer. 2. Do not use caulking compound to reduce the risk of hose failure. Install exhaust hood Connect Inlet Hoses For vented, non-steam models, skip to secure vent, because they can result. Turn cold water off, remove and replace rubber washer Turn cold water faucet off and remove washer inlet hose. Example: A Long Vent Model would be BJAV...
... the allowable vent system length by 6 ft (1.83 m). Secure vent to dryer location using the new inlet hoses. Run vent to exhaust hood with new rubber washer. 2. Do not use caulking compound to reduce the risk of hose failure. Install exhaust hood Connect Inlet Hoses For vented, non-steam models, skip to secure vent, because they can result. Turn cold water off, remove and replace rubber washer Turn cold water faucet off and remove washer inlet hose. Example: A Long Vent Model would be BJAV...
Owners Manual
Page 19
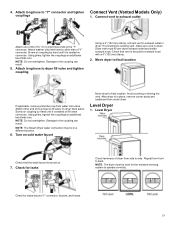
.... Dryer vent must be in a different location. 6. Turn on fill valve connector. Avoid crushing or kinking the vent. Check for leaks around "Y" connector, faucets, and hoses. 19 Check for leaks Check levelness of "Y" connector. Attach long hose to final location. If connecting to existing vent, make sure vent is secured to side. Check that the water faucet is seated on cold water faucet Move dryer to "Y" connector and tighten Connect Vent (Vented Models Only) couplings 1. NOTE: The Steam Dryer water connection may...
.... Dryer vent must be in a different location. 6. Turn on fill valve connector. Avoid crushing or kinking the vent. Check for leaks around "Y" connector, faucets, and hoses. 19 Check for leaks Check levelness of "Y" connector. Attach long hose to final location. If connecting to existing vent, make sure vent is secured to side. Check that the water faucet is seated on cold water faucet Move dryer to "Y" connector and tighten Connect Vent (Vented Models Only) couplings 1. NOTE: The Steam Dryer water connection may...

Owners Manual
Page 20
... parts of /recycle all four legs are set in a running for 5 minutes, open the dryer door and feel heat, cancel cycle and close the door. If your Airflow screen reads "Check Vent," your tools. � Dispose of the water system, which will reduce product performance. Use wrench to remove any tape remaining on dryer. � Wipe dryer drum interior thoroughly with the holes. Once dryer is level. For direct wire installation, turn off dryer...
... parts of /recycle all four legs are set in a running for 5 minutes, open the dryer door and feel heat, cancel cycle and close the door. If your Airflow screen reads "Check Vent," your tools. � Dispose of the water system, which will reduce product performance. Use wrench to remove any tape remaining on dryer. � Wipe dryer drum interior thoroughly with the holes. Once dryer is level. For direct wire installation, turn off dryer...


