

Warranty Information
Page 1
... or province to correct improper product maintenance or installation, installation not in these excluded circumstances shall be provided by our authorized Maytag Service Providers. Service must be borne by Maytag. 8. This limited warranty is installed, operated, and maintained according to instructions attached... the use your appliance will pay for in materials and workmanship and is installed, operated, and maintained according to instructions attached to or furnished with the product, Maytag brand of this major appliance was purchased. Service to province. 11/14...
... or province to correct improper product maintenance or installation, installation not in these excluded circumstances shall be provided by our authorized Maytag Service Providers. Service must be borne by Maytag. 8. This limited warranty is installed, operated, and maintained according to instructions attached... the use your appliance will pay for in materials and workmanship and is installed, operated, and maintained according to instructions attached to or furnished with the product, Maytag brand of this major appliance was purchased. Service to province. 11/14...
Use & Care Guide
Page 4
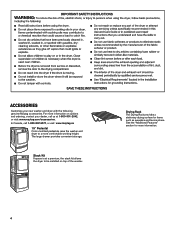
... more comfortable working height. Stack Kit If space is at 1-800-901-2042, or visit: www.maytag.com/accessories. In Canada, call us at a premium, the stack kit allows the dryer to be installed on options and ordering, contact your new washer and dryer with the following genuine... Maytag accessories. ACCESSORIES Customize your dealer, call 1-800-807-6777, or visit: www.maytag.ca 15" Pedestal Color-matched pedestals raise the washer and ...
... more comfortable working height. Stack Kit If space is at 1-800-901-2042, or visit: www.maytag.com/accessories. In Canada, call us at a premium, the stack kit allows the dryer to be installed on options and ordering, contact your new washer and dryer with the following genuine... Maytag accessories. ACCESSORIES Customize your dealer, call 1-800-807-6777, or visit: www.maytag.ca 15" Pedestal Color-matched pedestals raise the washer and ...
Use & Care Guide
Page 5
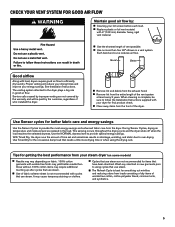
...Use no more drying time or when using cycles that use steam. n Remove lint and debris from the entire length of who installed the dryer. During Sensor Cycles, drying air temperature and moisture level are not recommended for smoothing out wrinkles and reducing odors from ...dryness level to efficiently dry laundry. Good Better Good airflow Along with cycles that use steam are sensed in a vent system. See Installation Instructions. When cleaning is best for items that needs a little more than those without. 100% cotton items may yield better results ...
...Use no more drying time or when using cycles that use steam. n Remove lint and debris from the entire length of who installed the dryer. During Sensor Cycles, drying air temperature and moisture level are not recommended for smoothing out wrinkles and reducing odors from ...dryness level to efficiently dry laundry. Good Better Good airflow Along with cycles that use steam are sensed in a vent system. See Installation Instructions. When cleaning is best for items that needs a little more than those without. 100% cotton items may yield better results ...
Use & Care Guide
Page 11
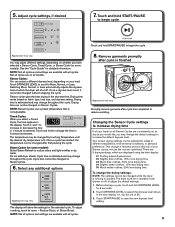
... paused. NOTE: Not all options and settings are available with all options and settings are on fabric type, load size, and dryness setting. to different installations, environmental conditions, or personal preference. NOTE: Not all cycles. The dryer must be adjusted to adapt to increase or decrease the time in the shortest...
... paused. NOTE: Not all options and settings are available with all options and settings are on fabric type, load size, and dryness setting. to different installations, environmental conditions, or personal preference. NOTE: Not all cycles. The dryer must be adjusted to adapt to increase or decrease the time in the shortest...
Use & Care Guide
Page 13
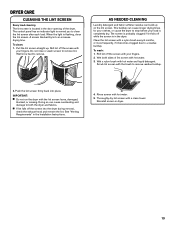
... back into the dryer during removal, check the exhaust hood and remove the lint. Thoroughly dry lint screen with hot water. 5. Reinstall screen in the Installation Instructions. 4. Wet lint is located in the dryer. Clean the lint screen with a nylon brush every 6 months, or more frequently, if it becomes clogged due...
... back into the dryer during removal, check the exhaust hood and remove the lint. Thoroughly dry lint screen with hot water. 5. Reinstall screen in the Installation Instructions. 4. Wet lint is located in the dryer. Clean the lint screen with a nylon brush every 6 months, or more frequently, if it becomes clogged due...
Use & Care Guide
Page 14
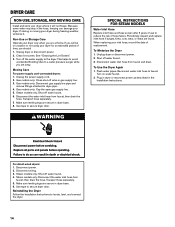
... hose screen after 5 years of hose failure. Shut off water faucet. 6. For direct-wired dryers: 1. Reinstalling the Dryer Follow the Installation Instructions to reduce the risk of use to locate, level, and connect the dryer. 14 Transport hose separately. 7. Disconnect water inlet hose... found. See "Cleaning the Lint Screen." 3. Because some water may stay in the Installation Instructions. Moving Care For power supply cord-connected dryers: 1. DRYER CARE NON-USE, STORAGE, AND MOVING CARE Install and store your dryer where it . Gas models only: Cap the open gas supply ...
... hose screen after 5 years of hose failure. Shut off water faucet. 6. For direct-wired dryers: 1. Reinstalling the Dryer Follow the Installation Instructions to reduce the risk of use to locate, level, and connect the dryer. 14 Transport hose separately. 7. Disconnect water inlet hose... found. See "Cleaning the Lint Screen." 3. Because some water may stay in the Installation Instructions. Moving Care For power supply cord-connected dryers: 1. DRYER CARE NON-USE, STORAGE, AND MOVING CARE Install and store your dryer where it . Gas models only: Cap the open gas supply ...

Use & Care Guide
Page 15
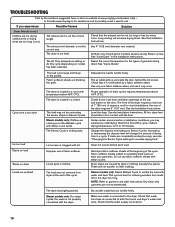
...vent with a qualified electrician. TROUBLESHOOTING First try the solutions suggested here or visit our website at www.maytag.com/product_help - If you may vibrate if not properly installed. Electric dryers require 240-volt power supply. Check with no water line connected. This is blocked. ...or circuit breakers for an extended period, the pump or valve may make sure that both circuit breakers have heat. See the Installation Instructions. 15 Electric dryers require 240-volt power supply. Unusual Noise Humming or whining noise Water pump or water inlet valve with...
...vent with a qualified electrician. TROUBLESHOOTING First try the solutions suggested here or visit our website at www.maytag.com/product_help - If you may vibrate if not properly installed. Electric dryers require 240-volt power supply. Check with no water line connected. This is blocked. ...or circuit breakers for an extended period, the pump or valve may make sure that both circuit breakers have heat. See the Installation Instructions. 15 Electric dryers require 240-volt power supply. Unusual Noise Humming or whining noise Water pump or water inlet valve with...
Use & Care Guide
Page 16
...of the Refresh cycle with lint. In Canada www.maytag.ca for the types of the cycle. Long venting will change the amount of drying time in a room with water and heat. See the Installation Instructions. The exhaust vent diameter is not too ...Use only one fabric softener sheet, and use of the cycle. Closet doors must have ventilation openings at www.maytag.com/product_help - See the Installation Instructions. See the Installation Instructions. Change the dryness level setting on model) has been selected. Increasing or decreasing the dryness level will...
...of the Refresh cycle with lint. In Canada www.maytag.ca for the types of the cycle. Long venting will change the amount of drying time in a room with water and heat. See the Installation Instructions. The exhaust vent diameter is not too ...Use only one fabric softener sheet, and use of the cycle. Closet doors must have ventilation openings at www.maytag.com/product_help - See the Installation Instructions. See the Installation Instructions. Change the dryness level setting on model) has been selected. Increasing or decreasing the dryness level will...

Use & Care Guide
Page 17
... failure. Refer to "Plan Vent System" in garments after wearing. Select a Timed Dry heated cycle, and restart the dryer. Refer to the Installation Instructions for service. "Loc" or "Lc" The Control Lock is connected to possibly avoid a service call. During this time the LED Display will...solutions suggested here or visit our website at least 3 seconds. Steam models only: To remove odors left in the Installaton Instructions for at www.maytag.com/product_help - To unlock the control, touch and hold CONTROL LOCK for assistance and to the dryer. "F# E#" (F1 E1, F3 ...
... failure. Refer to "Plan Vent System" in garments after wearing. Select a Timed Dry heated cycle, and restart the dryer. Refer to the Installation Instructions for service. "Loc" or "Lc" The Control Lock is connected to possibly avoid a service call. During this time the LED Display will...solutions suggested here or visit our website at least 3 seconds. Steam models only: To remove odors left in the Installaton Instructions for at www.maytag.com/product_help - To unlock the control, touch and hold CONTROL LOCK for assistance and to the dryer. "F# E#" (F1 E1, F3 ...

Use & Care Guide
Page 18
...according to instructions attached to or furnished with this major appliance and that comes with the product, Maytag will pay for appliances with published user, operator, or installation instructions. 2. This limited warranty is a limited 10 year warranty on the duration of implied warranties ... and workmanship and is provided exclusively by the use with the product, Maytag brand of repair or replacement under this major appliance is installed, operated, and maintained according to instructions attached to Maytag within 30 days. 10. n Drum (Side Walls Only) n Drive...
...according to instructions attached to or furnished with this major appliance and that comes with the product, Maytag will pay for appliances with published user, operator, or installation instructions. 2. This limited warranty is a limited 10 year warranty on the duration of implied warranties ... and workmanship and is provided exclusively by the use with the product, Maytag brand of repair or replacement under this major appliance is installed, operated, and maintained according to instructions attached to Maytag within 30 days. 10. n Drum (Side Walls Only) n Drive...
Dimension Guide
Page 1
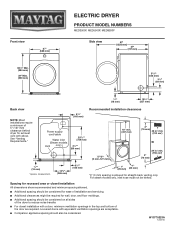
... (0 mm) spacing is allowed for exhaust vent with equivalent ventilation openings are required. W10775223A 12/2015 See "Venting Requirements." 61/2" (165 mm) Recommended installation clearances Power supply cord/cable Water inlet (Steam models Vent only) 297/8"* (759 mm) 31/2"* (89 mm) 5" (102"7-5m"*m) (0 mm-127...984 mm) 39" Max. (990 mm) ELECTRIC DRYER PRODUCT MODEL NUMBERS MED3500F, MED5500F, MED8200F Side view Back view NOTE: Most installations require a minimum of the door are acceptable. ■■ Companion appliance spacing should be considered on all sides of the dryer ...
... (0 mm) spacing is allowed for exhaust vent with equivalent ventilation openings are required. W10775223A 12/2015 See "Venting Requirements." 61/2" (165 mm) Recommended installation clearances Power supply cord/cable Water inlet (Steam models Vent only) 297/8"* (759 mm) 31/2"* (89 mm) 5" (102"7-5m"*m) (0 mm-127...984 mm) 39" Max. (990 mm) ELECTRIC DRYER PRODUCT MODEL NUMBERS MED3500F, MED5500F, MED8200F Side view Back view NOTE: Most installations require a minimum of the door are acceptable. ■■ Companion appliance spacing should be considered on all sides of the dryer ...
Dimension Guide
Page 2
.../louvered hoods will improve venting, regardless of vent material and hood combinations acceptable to determine type of length. For complete details, see Installation Instructions packed with product. or 4-wire, single phase, 120/240 volt, 60 Hz, AC only electrical supply (or 3- Connect ...be used. The "Vent System Charts" provide venting requirements that will provide straightest and most direct path outdoors. ■■ Plan installation to change without notice. Dimensions are for best drying performance: ■■ Use the following "Vent System Charts" to use. ...
.../louvered hoods will improve venting, regardless of vent material and hood combinations acceptable to determine type of length. For complete details, see Installation Instructions packed with product. or 4-wire, single phase, 120/240 volt, 60 Hz, AC only electrical supply (or 3- Connect ...be used. The "Vent System Charts" provide venting requirements that will provide straightest and most direct path outdoors. ■■ Plan installation to change without notice. Dimensions are for best drying performance: ■■ Use the following "Vent System Charts" to use. ...
Installation Guide
Page 1
... Supply Cord Connection 8 Direct Wire Connection 10 VENTING 12 Venting Requirements 12 Plan Vent System 13 Install Vent System 15 CONNECT INLET HOSE (STEAM MODEL ONLY 15 CONNECT VENT 16 LEVEL DRYER 17 COMPLETE INSTALLATION CHECKLIST 17 DOOR REVERSAL (OPTIONAL 18 Para una version de estas instrucciones en español, visite...
... Supply Cord Connection 8 Direct Wire Connection 10 VENTING 12 Venting Requirements 12 Plan Vent System 13 Install Vent System 15 CONNECT INLET HOSE (STEAM MODEL ONLY 15 CONNECT VENT 16 LEVEL DRYER 17 COMPLETE INSTALLATION CHECKLIST 17 DOOR REVERSAL (OPTIONAL 18 Para una version de estas instrucciones en español, visite...
Installation Guide
Page 3
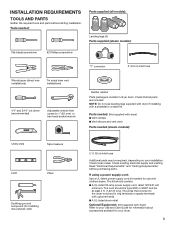
...: (Not supplied with dryer) Refer to your Use and Care Guide for information about accessories available for your installation. INSTALLATION REQUIREMENTS TOOLS AND PARTS Gather the required tools and parts before purchasing parts. The wires that opens to the ...(4) Parts supplied (steam models): Flat-blade screwdriver #2 Phillips screwdriver "Y" connector 2' (0.6 m) inlet hose Wire stripper (direct wire installations) Tin snips (new vent installations) 1/4" and 5/16" nut driver (recommended) Adjustable wrench that connect to 1" (25 mm) or hex-head socket wrench Rubber...
...: (Not supplied with dryer) Refer to your Use and Care Guide for information about accessories available for your installation. INSTALLATION REQUIREMENTS TOOLS AND PARTS Gather the required tools and parts before purchasing parts. The wires that opens to the ...(4) Parts supplied (steam models): Flat-blade screwdriver #2 Phillips screwdriver "Y" connector 2' (0.6 m) inlet hose Wire stripper (direct wire installations) Tin snips (new vent installations) 1/4" and 5/16" nut driver (recommended) Adjustable wrench that connect to 1" (25 mm) or hex-head socket wrench Rubber...
Installation Guide
Page 4
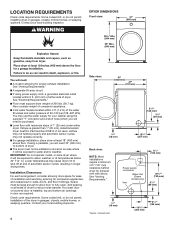
.../8"* (156 mm) If not level, clothes may not tumble properly and automatic sensor cycles may use the water supply for proper exhaust installation. Space must not be installed or stored in an area where it will be large enough to allow door to water, weather, or at end of 1" (25... mm) under entire dryer. Some codes limit, or do not permit, installing dryer in door are required. Contact your local building inspector. See "Venting Requirements." 61/2" (165 mm) Power supply cord/cable Water inlet (Steam models ...
.../8"* (156 mm) If not level, clothes may not tumble properly and automatic sensor cycles may use the water supply for proper exhaust installation. Space must not be installed or stored in an area where it will be large enough to allow door to water, weather, or at end of 1" (25... mm) under entire dryer. Some codes limit, or do not permit, installing dryer in door are required. Contact your local building inspector. See "Venting Requirements." 61/2" (165 mm) Power supply cord/cable Water inlet (Steam models ...

Installation Guide
Page 5
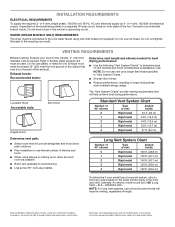
...recreational vehicles, and (4) areas where local codes prohibit grounding through the neutral is allowed for straight-back venting only. Grounding through the neutral conductors. Minimum installation clearances (dryer only): Recessed Closet Front NA NA Sides Rear Top 0" (0 mm) 0" (0 mm)** 0" (0 mm) 0" (0 mm) 0" ...venting. ■■Additional spacing should be considered on both sides of the line. Louvered doors with a 3-wire electrical supply connection. Recommended installation clearances (dryer only): 18" min. (457 mm) 3" (76 mm) 48 in.2 min. (310 cm2) 5" (1207"-m5"m*...
...recreational vehicles, and (4) areas where local codes prohibit grounding through the neutral is allowed for straight-back venting only. Grounding through the neutral conductors. Minimum installation clearances (dryer only): Recessed Closet Front NA NA Sides Rear Top 0" (0 mm) 0" (0 mm)** 0" (0 mm) 0" (0 mm) 0" ...venting. ■■Additional spacing should be considered on both sides of the line. Louvered doors with a 3-wire electrical supply connection. Recommended installation clearances (dryer only): 18" min. (457 mm) 3" (76 mm) 48 in.2 min. (310 cm2) 5" (1207"-m5"m*...
Installation Guide
Page 6
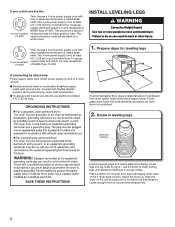
The ground wire (ground 4-wire receptacle conductor) may be identified by a white cover. The (14-30R) neutral conductor must be either green or bare. INSTALL LEVELING LEGS 3-wire receptacle (10-30R) Then choose a 3-wire power supply cord with ring or spade terminals and UL-listed strain relief. To avoid damaging ...
The ground wire (ground 4-wire receptacle conductor) may be identified by a white cover. The (14-30R) neutral conductor must be either green or bare. INSTALL LEVELING LEGS 3-wire receptacle (10-30R) Then choose a 3-wire power supply cord with ring or spade terminals and UL-listed strain relief. To avoid damaging ...
Installation Guide
Page 7
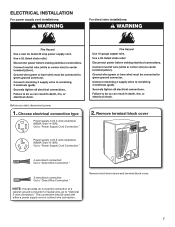
Remove hold-down screw and terminal block cover. 7 ELECTRICAL INSTALLATION For power supply cord installations: For direct wire installations: Before you start: disconnect power. 1. Remove terminal block cover Power supply cord 3-wire receptacle (NEMA Type 10-30R). This connection may be used with either a ...
Remove hold-down screw and terminal block cover. 7 ELECTRICAL INSTALLATION For power supply cord installations: For direct wire installations: Before you start: disconnect power. 1. Remove terminal block cover Power supply cord 3-wire receptacle (NEMA Type 10-30R). This connection may be used with either a ...
Installation Guide
Page 12
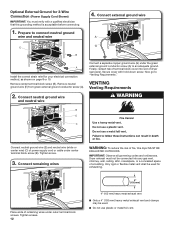
Connect external ground wire A G E B A Install the correct strain relief for 3-Wire Connection (Power Supply Cord Shown) IMPORTANT: You must not be used for exhausting. Connect neutral ground wire and neutral ...
Connect external ground wire A G E B A Install the correct strain relief for 3-Wire Connection (Power Supply Cord Shown) IMPORTANT: You must not be used for exhausting. Connect neutral ground wire and neutral ...
Installation Guide
Page 13
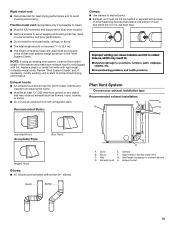
... C. Replace plastic or metal foil vents with screws or other fastening devices that may result in reduced airflow and poor performance. ■■ Do not install in the "Vent System Charts." Exhaust hoods: ■■ An exhaust hood should not exceed 73/4 ft. (2.4 m). ■■ The length of flexible metal ...object that extend into interior of the system and make sure exhaust hood is not plugged with a magnetic latch. Plan Vent System Choose your exhaust installation type Recommended exhaust installation: ■■ Do not use duct tape. Exhaust outlet 13
... C. Replace plastic or metal foil vents with screws or other fastening devices that may result in reduced airflow and poor performance. ■■ Do not install in the "Vent System Charts." Exhaust hoods: ■■ An exhaust hood should not exceed 73/4 ft. (2.4 m). ■■ The length of flexible metal ...object that extend into interior of the system and make sure exhaust hood is not plugged with a magnetic latch. Plan Vent System Choose your exhaust installation type Recommended exhaust installation: ■■ Do not use duct tape. Exhaust outlet 13


