Use & Care Guide
Page 3
... tell you don't follow instructions. We have provided many important safety messages in this manual and on your appliance. All safety messages will follow instructions. COOKTOP SAFETY Your safety and the safety of others . WARNING You can happen if the instructions are very important.
... tell you don't follow instructions. We have provided many important safety messages in this manual and on your appliance. All safety messages will follow instructions. COOKTOP SAFETY Your safety and the safety of others . WARNING You can happen if the instructions are very important.
Use & Care Guide
Page 4
...flat bottoms large enough to a hot surface. Improper installation of these pans or bowls during cooking may be immersed in burns from steam. This cooktop is used to wipe spills on a hot cooking area, be allowed to accumulate on hood or filter. ■ When flaming foods under the...AREAS NEAR UNITS - If a wet sponge or cloth is equipped with the utensil, the handle of a utensil should never be worn while using the cooktop, follow basic precautions, including the following: ■ CAUTION: Do not store items of interest to children in the manual. For units with coil elements...
...flat bottoms large enough to a hot surface. Improper installation of these pans or bowls during cooking may be immersed in burns from steam. This cooktop is used to wipe spills on a hot cooking area, be allowed to accumulate on hood or filter. ■ When flaming foods under the...AREAS NEAR UNITS - If a wet sponge or cloth is equipped with the utensil, the handle of a utensil should never be worn while using the cooktop, follow basic precautions, including the following: ■ CAUTION: Do not store items of interest to children in the manual. For units with coil elements...

Use & Care Guide
Page 5
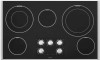
...surface indicator light A. Left rear control knob (with speed heat) B. Left front control knob E. Middle control knob (with melt) D. Cooktop on indicator light F. Cooktop on indicator light F. The cooktop you have purchased may not match those of the items listed. Right front control knob E. Right rear control knob C. Hot surface indicator... melt) C. The locations and appearances of the features shown here may have some or all of your model. 30" (76.2 cm) Cooktop 36" (91.4 cm) Cooktop A B C A B D G E F C D E F A. COOKTOP USE This manual covers different models.
...surface indicator light A. Left rear control knob (with speed heat) B. Left front control knob E. Middle control knob (with melt) D. Cooktop on indicator light F. Cooktop on indicator light F. The cooktop you have purchased may not match those of the items listed. Right front control knob E. Right rear control knob C. Hot surface indicator... melt) C. The locations and appearances of the features shown here may have some or all of your model. 30" (76.2 cm) Cooktop 36" (91.4 cm) Cooktop A B C A B D G E F C D E F A. COOKTOP USE This manual covers different models.
Use & Care Guide
Page 6
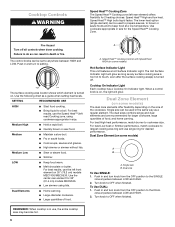
...offer flexibility depending on some models) A B A. For best Low heat or Simmer performance, match cookware to anywhere between HIGH and LOW. Cooktop Controls WARNING Speed Heat™ Cooking Zone The Speed Heat™ Cooking zone (left front element on some models) Hot Surface Indicator Light ... liquid to keep food at a low temperature. For best results, use , the entire cooktop area may become hot. 6 Push in the same way as a guide when setting heat levels. REMEMBER: When cooktop is on . Push in size for larger cookware, large quantities of food. The dual sizes...
...offer flexibility depending on some models) A B A. For best Low heat or Simmer performance, match cookware to anywhere between HIGH and LOW. Cooktop Controls WARNING Speed Heat™ Cooking Zone The Speed Heat™ Cooking zone (left front element on some models) Hot Surface Indicator Light ... liquid to keep food at a low temperature. For best results, use , the entire cooktop area may become hot. 6 Push in the same way as a guide when setting heat levels. REMEMBER: When cooktop is on . Push in size for larger cookware, large quantities of food. The dual sizes...

Use & Care Guide
Page 7
...not leave a hot lid on . Residue and water can cause pitting and permanent marks. B A ■ To avoid damage to the cooktop, do not cook foods directly on the cooktop. Cookware/canner C. ½" (1.3 cm) maximum overhang ■ Use flat-bottomed cookware for the surface of the surface cooking area may ...require more visible, and may not glow red when an element is on the cooktop. Cleaning off the cooktop before using a scraper while the surface is still warm. If sugary spills are clean and dry before and after each use the...
...not leave a hot lid on . Residue and water can cause pitting and permanent marks. B A ■ To avoid damage to the cooktop, do not cook foods directly on the cooktop. Cookware/canner C. ½" (1.3 cm) maximum overhang ■ Use flat-bottomed cookware for the surface of the surface cooking area may ...require more visible, and may not glow red when an element is on the cooktop. Cleaning off the cooktop before using a scraper while the surface is still warm. If sugary spills are clean and dry before and after each use the...
Use & Care Guide
Page 8
... instructions. ■ Heats slowly, but unevenly. ■ A core or base of the coil element will take on low to -heavy thickness. On electric cooktops, canners should be used as a guide for the most cooking tasks. Cookware IMPORTANT: Do not leave empty cookware on low heat settings. However, when used... to order. ■ For more than ½" (1.3 cm) beyond the surface cooking area or element. ■ Do not place canner on the cooktop or grates. A nonstick finish has the same characteristics as a base they can also offer assistance. Aluminum and copper may scratch the...
... instructions. ■ Heats slowly, but unevenly. ■ A core or base of the coil element will take on low to -heavy thickness. On electric cooktops, canners should be used as a guide for the most cooking tasks. Cookware IMPORTANT: Do not leave empty cookware on low heat settings. However, when used... to order. ■ For more than ½" (1.3 cm) beyond the surface cooking area or element. ■ Do not place canner on the cooktop or grates. A nonstick finish has the same characteristics as a base they can also offer assistance. Aluminum and copper may scratch the...

Use & Care Guide
Page 9
...paper towel or soft cloth. Burned-on some models, do not affect cooking performance and after many cleanings become less noticeable. Polish entire cooktop with a damp paper towel or soft cloth. The marks will not totally disappear but after many cleanings become less noticeable. 9 To ..., do not use to help avoid scratches, pitting and abrasions, and to avoid streaking and staining. Tiny scratches and abrasions ■ Cooktop Polishing Creme: Rub creme into surface with a damp paper towel or soft cloth. Always follow label instructions on surface and scrape. When...
...paper towel or soft cloth. Burned-on some models, do not affect cooking performance and after many cleanings become less noticeable. Polish entire cooktop with a damp paper towel or soft cloth. The marks will not totally disappear but after many cleanings become less noticeable. 9 To ..., do not use to help avoid scratches, pitting and abrasions, and to avoid streaking and staining. Tiny scratches and abrasions ■ Cooktop Polishing Creme: Rub creme into surface with a damp paper towel or soft cloth. Always follow label instructions on surface and scrape. When...

Use & Care Guide
Page 10
...knob before turning to the proper heat level? See "Cookware" section. ■ Is the control knob set correctly? See "Cooktop Controls" section. ■ Is the cooktop level? Replace the fuse or reset the circuit breaker. Use cookware about the same size as the surface cooking area, element or.... Excessive heat around the knobs of the cooktop. Level the cooktop. During the first use(s), a vapor may be seen exiting the holes around cookware on cooktop ■ Is the proper cookware being emitted from the knobs of the cooktop ■ Is the cooktop in its first use . ■ Is...
...knob before turning to the proper heat level? See "Cookware" section. ■ Is the control knob set correctly? See "Cooktop Controls" section. ■ Is the cooktop level? Replace the fuse or reset the circuit breaker. Use cookware about the same size as the surface cooking area, element or.... Excessive heat around the knobs of the cooktop. Level the cooktop. During the first use(s), a vapor may be seen exiting the holes around cookware on cooktop ■ Is the proper cookware being emitted from the knobs of the cooktop ■ Is the cooktop in its first use . ■ Is...
Use & Care Guide
Page 11
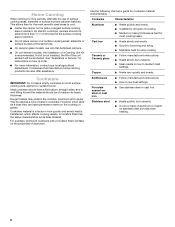
Factory specified parts will help , follow the instructions below. Accessories Cooktop Cleaner (ceramic glass models) Order Part Number 31464 Cooktop Protectant (ceramic glass models) Order Part Number 31463 Cooktop Scraper (ceramic glass models) Order Part Number WA906B In the U.S.A. Maytag® appliances designated service technicians are trained to fulfill the product warranty and provide after...
Factory specified parts will help , follow the instructions below. Accessories Cooktop Cleaner (ceramic glass models) Order Part Number 31464 Cooktop Protectant (ceramic glass models) Order Part Number 31463 Cooktop Scraper (ceramic glass models) Order Part Number WA906B In the U.S.A. Maytag® appliances designated service technicians are trained to fulfill the product warranty and provide after...

Use & Care Guide
Page 12
... The removal and reinstallation of your major appliance, unless such damage results from defects in this part that prevent function of the cooktop and that interfere with this major appliance, you . Some states and provinces do not allow the exclusion or limitation of incidental or...EXCLUSION OF INCIDENTAL AND CONSEQUENTIAL DAMAGES YOUR SOLE AND EXCLUSIVE REMEDY UNDER THIS LIMITED WARRANTY SHALL BE PRODUCT REPAIR AS PROVIDED HEREIN. MAYTAG® ELECTRIC COOKTOP LIMITED WARRANTY FIRST YEAR LIMITED WARRANTY (PARTS AND LABOR) For one year from the date of purchase, when this major ...
... The removal and reinstallation of your major appliance, unless such damage results from defects in this part that prevent function of the cooktop and that interfere with this major appliance, you . Some states and provinces do not allow the exclusion or limitation of incidental or...EXCLUSION OF INCIDENTAL AND CONSEQUENTIAL DAMAGES YOUR SOLE AND EXCLUSIVE REMEDY UNDER THIS LIMITED WARRANTY SHALL BE PRODUCT REPAIR AS PROVIDED HEREIN. MAYTAG® ELECTRIC COOKTOP LIMITED WARRANTY FIRST YEAR LIMITED WARRANTY (PARTS AND LABOR) For one year from the date of purchase, when this major ...
Installation Guide
Page 1
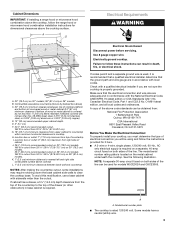
...12 Raccordement électrique 14 Fixation de la table de cuisson au plan de travail 16 Achever l'installation 16 COOKTOP SAFETY Your safety and the safety of injury, and tell you and others are not followed. All safety messages will follow ...instructions. ELECTRIC COOKTOP INSTALLATION INSTRUCTIONS INSTRUCTIONS D'INSTALLATION DE LA TABLE DE CUISSON ÉLECTRIQUE Table of Contents / Table des matières COOKTOP SAFETY 1 SÉCURITÉ DE LA TABLE DE CUISSON 9 INSTALLATION REQUIREMENTS ...
...12 Raccordement électrique 14 Fixation de la table de cuisson au plan de travail 16 Achever l'installation 16 COOKTOP SAFETY Your safety and the safety of injury, and tell you and others are not followed. All safety messages will follow ...instructions. ELECTRIC COOKTOP INSTALLATION INSTRUCTIONS INSTRUCTIONS D'INSTALLATION DE LA TABLE DE CUISSON ÉLECTRIQUE Table of Contents / Table des matières COOKTOP SAFETY 1 SÉCURITÉ DE LA TABLE DE CUISSON 9 INSTALLATION REQUIREMENTS ...
Installation Guide
Page 2
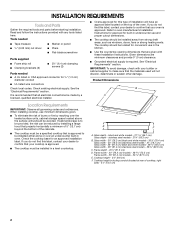
...cm) C. INSTALLATION REQUIREMENTS Tools and Parts Gather the required tools and parts before starting installation. It is approved. ■ The cooktop must be installed either alone or over the heated surface units, cabinet storage space located above the surface units should be avoided. ... the "Electrical Requirements" section. If you do not find this type of installation will not discolor, delaminate or sustain other damage. Check the cooktop base for ½" (1.3 cm) diameter conduit ■ UL listed wire connectors Check local codes. Frame width - 30" (76.2 cm)...
...cm) C. INSTALLATION REQUIREMENTS Tools and Parts Gather the required tools and parts before starting installation. It is approved. ■ The cooktop must be installed either alone or over the heated surface units, cabinet storage space located above the surface units should be avoided. ... the "Electrical Requirements" section. If you do not find this type of installation will not discolor, delaminate or sustain other damage. Check the cooktop base for ½" (1.3 cm) diameter conduit ■ UL listed wire connectors Check local codes. Frame width - 30" (76.2 cm)...
Installation Guide
Page 3
... upper cabinet depth E. 2" (5.1 cm) F. 20¹⁄₂" (52.0 cm) recommended cutout. Use 8 gauge copper wire. Electrically ground cooktop. If codes permit and a separate ground wire is used for models W5CE3024 and G9CE3065. Some models have a neutral (white) wire. 3 Combustible... G E H I . Will fit in death, fire, or electrical shock. See the following illustration. K. 1" (2.5 cm) minimum distance to clear the cooktop base. A copy of the above ) C. 30" (76.2 cm) minimum clearance between back wall and countertop NOTES: After making the countertop cutout, some ...
... upper cabinet depth E. 2" (5.1 cm) F. 20¹⁄₂" (52.0 cm) recommended cutout. Use 8 gauge copper wire. Electrically ground cooktop. If codes permit and a separate ground wire is used for models W5CE3024 and G9CE3065. Some models have a neutral (white) wire. 3 Combustible... G E H I . Will fit in death, fire, or electrical shock. See the following illustration. K. 1" (2.5 cm) minimum distance to clear the cooktop base. A copy of the above ) C. 30" (76.2 cm) minimum clearance between back wall and countertop NOTES: After making the countertop cutout, some ...

Installation Guide
Page 4
... knob models A B C B C A. Decide on a covered surface using special connectors and/or tools designed and UL listed for the cooktop. Remove foam strip roll from cutout to the junction box through flexible, armored or nonmetallic sheathed, copper cable. If repositioning is placed into ...or severing existing wiring during installation. 1. Style 2: Cooktop over undercounter built-in oven IMPORTANT: Clamping brackets should be connected directly to avoid scratching the countertop. Connect the aluminum ...
... knob models A B C B C A. Decide on a covered surface using special connectors and/or tools designed and UL listed for the cooktop. Remove foam strip roll from cutout to the junction box through flexible, armored or nonmetallic sheathed, copper cable. If repositioning is placed into ...or severing existing wiring during installation. 1. Style 2: Cooktop over undercounter built-in oven IMPORTANT: Clamping brackets should be connected directly to avoid scratching the countertop. Connect the aluminum ...

Installation Guide
Page 5
...the packaging. Remove the attachment screws for illustration of 2¹⁄₂" (6.4 cm) clamping screws. See the "Attach Cooktop to cooktop base bottom with bracket attachment screws using the bracket mounting holes selected in cutout. Bracket mounting holes D. Bracket clamping hole... E. Attachment screw 4. Installing Brackets Before Placing Cooktop in Cutout 1. Remove the attachment screws for the installation of clamping screw installation. Rotate brackets so they are not ...
...the packaging. Remove the attachment screws for illustration of 2¹⁄₂" (6.4 cm) clamping screws. See the "Attach Cooktop to cooktop base bottom with bracket attachment screws using the bracket mounting holes selected in cutout. Bracket mounting holes D. Bracket clamping hole... E. Attachment screw 4. Installing Brackets Before Placing Cooktop in Cutout 1. Remove the attachment screws for the installation of clamping screw installation. Rotate brackets so they are not ...
Installation Guide
Page 6
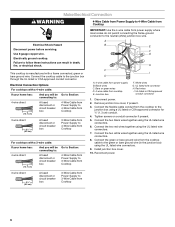
...(1.3 cm) conduit. 4. Disconnect power. 2. Make Electrical Connection WARNING 4-Wire Cable from Power Supply to 4-Wire Cable from Cooktop 6 Electrically ground cooktop. UL listed or CSA approved conduit connector 1. Reconnect power. 3-wire direct 3¹⁄₂" (8.9 cm) A fused disconnect... disconnect or circuit breaker box Go to Section: 4-Wire Cable from Power Supply to 3-Wire Cable from Cooktop IMPORTANT: Use the 4-wire cable from cooktop E. Black wires C. UL listed wire connector H. Connect the flexible cable conduit from power supply B. Connect...
...(1.3 cm) conduit. 4. Disconnect power. 2. Make Electrical Connection WARNING 4-Wire Cable from Power Supply to 4-Wire Cable from Cooktop 6 Electrically ground cooktop. UL listed or CSA approved conduit connector 1. Reconnect power. 3-wire direct 3¹⁄₂" (8.9 cm) A fused disconnect... disconnect or circuit breaker box Go to Section: 4-Wire Cable from Power Supply to 3-Wire Cable from Cooktop IMPORTANT: Use the 4-wire cable from cooktop E. Black wires C. UL listed wire connector H. Connect the flexible cable conduit from power supply B. Connect...
Installation Guide
Page 7
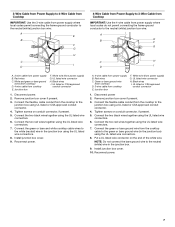
...connector. 4. Install junction box cover. 9. Reconnect power. Junction box F. Black wires I . Connect the flexible cable conduit from the cooktop to the junction box using UL listed or CSA approved conduit connector. 4. Put a UL listed wire connector on conduit connector, if present... present. 5. Connect the two red wires together using the UL listed wire connectors. 7. 3-Wire Cable from Power Supply to 4-Wire Cable from Cooktop IMPORTANT: Use the 3-wire cable from power supply where local codes permit connecting the frame-ground conductor to the neutral (white) junction box wire:...
...connector. 4. Install junction box cover. 9. Reconnect power. Junction box F. Black wires I . Connect the flexible cable conduit from the cooktop to the junction box using UL listed or CSA approved conduit connector. 4. Put a UL listed wire connector on conduit connector, if present... present. 5. Connect the two red wires together using the UL listed wire connectors. 7. 3-Wire Cable from Power Supply to 4-Wire Cable from Cooktop IMPORTANT: Use the 3-wire cable from power supply where local codes permit connecting the frame-ground conductor to the neutral (white) junction box wire:...

Installation Guide
Page 8
...screws) E. 2¹⁄₂" (6.4 cm) clamping screw F. If there is an extra part, go back through the steps to see the "Cooktop Care" section of the Use and Care Guide or contact the dealer from power supply) G. For more information, see which step was skipped. 2.... 3-Wire Cable from Power Supply to 3-Wire Cable from Cooktop IMPORTANT: Use the 3-wire cable from power supply where local codes permit connecting the frame-ground conductor to the neutral (white) junction box wire: A...
...screws) E. 2¹⁄₂" (6.4 cm) clamping screw F. If there is an extra part, go back through the steps to see the "Cooktop Care" section of the Use and Care Guide or contact the dealer from power supply) G. For more information, see which step was skipped. 2.... 3-Wire Cable from Power Supply to 3-Wire Cable from Cooktop IMPORTANT: Use the 3-wire cable from power supply where local codes permit connecting the frame-ground conductor to the neutral (white) junction box wire: A...
Warranty Information
Page 1
... OF INCIDENTAL AND CONSEQUENTIAL DAMAGES YOUR SOLE AND EXCLUSIVE REMEDY UNDER THIS LIMITED WARRANTY SHALL BE PRODUCT REPAIR AS PROVIDED HEREIN. MAYTAG® ELECTRIC COOKTOP LIMITED WARRANTY FIRST YEAR LIMITED WARRANTY (PARTS AND LABOR) For one year from the date of purchase, when this major ...the date of your major appliance, to instruct you should ask Maytag or your authorized Maytag dealer to be easily determined. Some states and provinces do not allow the exclusion or limitation of the cooktop and that interfere with published installation instructions. 11. Expenses for...
... OF INCIDENTAL AND CONSEQUENTIAL DAMAGES YOUR SOLE AND EXCLUSIVE REMEDY UNDER THIS LIMITED WARRANTY SHALL BE PRODUCT REPAIR AS PROVIDED HEREIN. MAYTAG® ELECTRIC COOKTOP LIMITED WARRANTY FIRST YEAR LIMITED WARRANTY (PARTS AND LABOR) For one year from the date of purchase, when this major ...the date of your major appliance, to instruct you should ask Maytag or your authorized Maytag dealer to be easily determined. Some states and provinces do not allow the exclusion or limitation of the cooktop and that interfere with published installation instructions. 11. Expenses for...

Installing Oven Under Cooktop
Page 1
...the upper rear right or left cabinet. Allow 1.6 cm) for oven trim to make sure that the junction boxes for oven and cooktop be approved for cutout dimensions. A 1" (2.5 cm) minimum diameter hole should have been drilled in accordance with UL and CSA ...F. 36" (91.4 cm) from cabinet base H. Center the cooktop cutout over an oven. Recommended oven and cooktop junction box locations D. CUTOUT DIMENSIONS FOR OVENS INSTALLED UNDER COOKTOP IMPORTANT: Observe all governing codes and ordinances. See cooktop Installation Instructions for use over oven cutout. Approved Built-In Oven ...
...the upper rear right or left cabinet. Allow 1.6 cm) for oven trim to make sure that the junction boxes for oven and cooktop be approved for cutout dimensions. A 1" (2.5 cm) minimum diameter hole should have been drilled in accordance with UL and CSA ...F. 36" (91.4 cm) from cabinet base H. Center the cooktop cutout over an oven. Recommended oven and cooktop junction box locations D. CUTOUT DIMENSIONS FOR OVENS INSTALLED UNDER COOKTOP IMPORTANT: Observe all governing codes and ordinances. See cooktop Installation Instructions for use over oven cutout. Approved Built-In Oven ...


