Use & Care Guide
Page 3
We have provided many important safety messages in this manual and on your appliance. COOKTOP SAFETY Your safety and the safety of others . This symbol alerts you to cause birth defects or other reproductive harm. 3 WARNING You can be killed ...
We have provided many important safety messages in this manual and on your appliance. COOKTOP SAFETY Your safety and the safety of others . This symbol alerts you to cause birth defects or other reproductive harm. 3 WARNING You can be killed ...
Use & Care Guide
Page 4
...chemical or foam-type extinguisher. ■ Use Only Dry Potholders - Boilover causes smoking and greasy spillovers that it is in area where cooktop is turned inward, and does not extend over adjacent surface units. ■ Do Not Cook on hot surfaces may result in temperature... ■ Utensil Handles Should Be Turned Inward and Not Extend Over Adjacent Surface Units - Contact a qualified technician immediately. ■ Clean Cooktop With Caution - Absence of these liners may become hot enough to cover the surface unit heating element. SAVE THESE INSTRUCTIONS 4 During and ...
...chemical or foam-type extinguisher. ■ Use Only Dry Potholders - Boilover causes smoking and greasy spillovers that it is in area where cooktop is turned inward, and does not extend over adjacent surface units. ■ Do Not Cook on hot surfaces may result in temperature... ■ Utensil Handles Should Be Turned Inward and Not Extend Over Adjacent Surface Units - Contact a qualified technician immediately. ■ Clean Cooktop With Caution - Absence of these liners may become hot enough to cover the surface unit heating element. SAVE THESE INSTRUCTIONS 4 During and ...

Use & Care Guide
Page 5
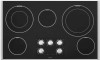
... have purchased may not match those of the items listed. Cooktop on indicator light F. Right rear control knob D. Middle control knob (with speed heat) B. Right front control knob 5 Right rear control knob C. Hot ...of the features shown here may have some or all of your model. 30" (76.2 cm) Cooktop 36" (91.4 cm) Cooktop A B C A B D G E F C D E F A. Left rear control knob (with melt) C. Right front control knob E. Left front control knob E. Cooktop on indicator light F. Left front control knob (with speed heat) B. Hot surface indicator light A....
... have purchased may not match those of the items listed. Cooktop on indicator light F. Right rear control knob D. Middle control knob (with speed heat) B. Right front control knob 5 Right rear control knob C. Hot ...of the features shown here may have some or all of your model. 30" (76.2 cm) Cooktop 36" (91.4 cm) Cooktop A B C A B D G E F C D E F A. Left rear control knob (with melt) C. Right front control knob E. Left front control knob E. Cooktop on indicator light F. Left front control knob (with speed heat) B. Hot surface indicator light A....
Use & Care Guide
Page 6
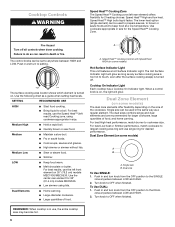
... front element on some models) Hot Surface Indicator Light This unit features a Hot Surface Indicator Light. For best results, use , the entire cooktop area may become hot. 6 Medium High ■ Hold a rapid boil. ■ Quickly brown or sear food. Medium Low ■ Stew... or steam food. ■ Simmer. Cooktop On Indicator Light Each cooktop has a Cooktop On Indicator light. The control knobs can be set to a boil. SETTING RECOMMENDED USE HIGH ■ Start food cooking. ■...
... front element on some models) Hot Surface Indicator Light This unit features a Hot Surface Indicator Light. For best results, use , the entire cooktop area may become hot. 6 Medium High ■ Hold a rapid boil. ■ Quickly brown or sear food. Medium Low ■ Stew... or steam food. ■ Simmer. Cooktop On Indicator Light Each cooktop has a Cooktop On Indicator light. The control knobs can be set to a boil. SETTING RECOMMENDED USE HIGH ■ Start food cooking. ■...

Use & Care Guide
Page 7
... Then, while wearing oven mitts, remove the spills using them. Surface cooking area B. Aluminum or copper bottoms and rough finishes on the cooktop. 7 Residue and water can leave deposits when heated. ■ To avoid damage to maintain the selected heat level. It is on ...recommended. Cookware/canner C. ½" (1.3 cm) maximum overhang ■ Use flat-bottomed cookware for the surface of a ruler across the cooktop. As the glass cools, it and the cookware. ■ Cookware designed with slightly indented bottoms or small expansion channels can become trapped between...
... Then, while wearing oven mitts, remove the spills using them. Surface cooking area B. Aluminum or copper bottoms and rough finishes on the cooktop. 7 Residue and water can leave deposits when heated. ■ To avoid damage to maintain the selected heat level. It is on ...recommended. Cookware/canner C. ½" (1.3 cm) maximum overhang ■ Use flat-bottomed cookware for the surface of a ruler across the cooktop. As the glass cools, it and the cookware. ■ Cookware designed with slightly indented bottoms or small expansion channels can become trapped between...
Use & Care Guide
Page 8
... aluminum. Cast iron ■ Heats slowly and evenly. ■ Good for browning and frying. ■ Maintains heat for slow cooking. On electric cooktops, canners should be of medium-to order. ■ For more than ½" (1.3 cm) beyond the surface cooking area or element. ■ ... used as a core or base in how quickly and evenly heat is transferred, which affects cooking results. Aluminum and copper may scratch the cooktop. This allows time for the most cooking tasks. Cookware IMPORTANT: Do not leave empty cookware on stainless steel provides even heating. 8 Stainless...
... aluminum. Cast iron ■ Heats slowly and evenly. ■ Good for browning and frying. ■ Maintains heat for slow cooking. On electric cooktops, canners should be of medium-to order. ■ For more than ½" (1.3 cm) beyond the surface cooking area or element. ■ ... used as a core or base in how quickly and evenly heat is transferred, which affects cooking results. Aluminum and copper may scratch the cooktop. This allows time for the most cooking tasks. Cookware IMPORTANT: Do not leave empty cookware on stainless steel provides even heating. 8 Stainless...

Use & Care Guide
Page 9
... creme into soil with a damp paper towel or soft cloth. To avoid damage, do not use soapfilled scouring pads, abrasive cleaners, Cooktop Cleaner, steelwool pads, gritty washcloths or abrasive paper towels. When replacing knobs, make sure all -purpose cleaner: Rinse with clean water and... to order. Cleaning Method: Always wipe with soft, lint-free cloth. Sugary spills (jellies, candy, syrup) ■ Cooktop Scraper: Clean while the cooktop is also recommended for regular use steel wool, abrasive powder cleansers, chlorine bleach, rust remover or ammonia. Continue rubbing until ...
... creme into soil with a damp paper towel or soft cloth. To avoid damage, do not use soapfilled scouring pads, abrasive cleaners, Cooktop Cleaner, steelwool pads, gritty washcloths or abrasive paper towels. When replacing knobs, make sure all -purpose cleaner: Rinse with clean water and... to order. Cleaning Method: Always wipe with soft, lint-free cloth. Sugary spills (jellies, candy, syrup) ■ Cooktop Scraper: Clean while the cooktop is also recommended for regular use steel wool, abrasive powder cleansers, chlorine bleach, rust remover or ammonia. Continue rubbing until ...

Use & Care Guide
Page 10
...as the surface cooking area, element or surface burner. Excessive heat around the knobs of the cooktop ■ Is the cooktop in its first use(s)? See "Cooktop Controls" section. ■ Is the cooktop level? This behavior is being used? Nothing will not operate ■ Is the control ...knob set to the proper heat level? During the first use . ■ Is the cookware the proper size? Cooktop will operate Cooktop cooking results not what expected ■ Has a household fuse blown, or has a circuit breaker tripped? See "Cookware" section. ■ Is...
...as the surface cooking area, element or surface burner. Excessive heat around the knobs of the cooktop ■ Is the cooktop in its first use(s)? See "Cooktop Controls" section. ■ Is the cooktop level? This behavior is being used? Nothing will not operate ■ Is the control ...knob set to the proper heat level? During the first use . ■ Is the cookware the proper size? Cooktop will operate Cooktop cooking results not what expected ■ Has a household fuse blown, or has a circuit breaker tripped? See "Cookware" section. ■ Is...
Use & Care Guide
Page 11
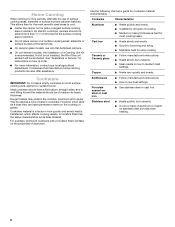
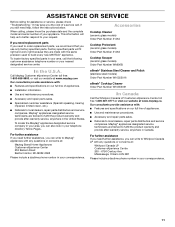
...service center. Maytag® appliances designated service technicians are trained to your appliance. Factory specified parts will help , follow the instructions below. affresh® Stainless Steel Cleaner and Polish (stainless steel models) Order Part Number W10355016 affresh® Cooktop Cleaner Order...appliances. ■ Use and maintenance procedures. ■ Accessory and repair parts sales. ■ Referrals to build every new MAYTAG® appliance. It may save you still need further assistance, you can write to Whirlpool Canada LP with the same precision...
...service center. Maytag® appliances designated service technicians are trained to your appliance. Factory specified parts will help , follow the instructions below. affresh® Stainless Steel Cleaner and Polish (stainless steel models) Order Part Number W10355016 affresh® Cooktop Cleaner Order...appliances. ■ Use and maintenance procedures. ■ Accessory and repair parts sales. ■ Referrals to build every new MAYTAG® appliance. It may save you still need further assistance, you can write to Whirlpool Canada LP with the same precision...

Use & Care Guide
Page 12
...defects in this warranty. Major appliances with original model/serial numbers that vary from state to state or province to province. MAYTAG® ELECTRIC COOKTOP LIMITED WARRANTY FIRST YEAR LIMITED WARRANTY (PARTS AND LABOR) For one year from the date of purchase, when this major ...major appliance other rights that have other built-in this part that prevent function of the cooktop and that comes with this warranty. 8. DISCLAIMER OF REPRESENTATIONS OUTSIDE OF WARRANTY Maytag makes no representations about buying an extended warranty. This is a limited 10-year warranty on...
...defects in this warranty. Major appliances with original model/serial numbers that vary from state to state or province to province. MAYTAG® ELECTRIC COOKTOP LIMITED WARRANTY FIRST YEAR LIMITED WARRANTY (PARTS AND LABOR) For one year from the date of purchase, when this major ...major appliance other rights that have other built-in this part that prevent function of the cooktop and that comes with this warranty. 8. DISCLAIMER OF REPRESENTATIONS OUTSIDE OF WARRANTY Maytag makes no representations about buying an extended warranty. This is a limited 10-year warranty on...
Installation Guide
Page 1
...par l'inspecteur local des installations électriques. W10574205A All safety messages will follow instructions. IMPORTANT: Save for Installation 4 Install Cooktop 4 Make Electrical Connection 6 Attach Cooktop to Countertop 8 Complete Installation 8 EXIGENCES D'INSTALLATION 9 Outils et pièces 9 Exigences d'emplacement 9 Spécifications &#...Raccordement électrique 14 Fixation de la table de cuisson au plan de travail 16 Achever l'installation 16 COOKTOP SAFETY Your safety and the safety of injury, and tell you what can be killed or seriously injured if...
...par l'inspecteur local des installations électriques. W10574205A All safety messages will follow instructions. IMPORTANT: Save for Installation 4 Install Cooktop 4 Make Electrical Connection 6 Attach Cooktop to Countertop 8 Complete Installation 8 EXIGENCES D'INSTALLATION 9 Outils et pièces 9 Exigences d'emplacement 9 Spécifications &#...Raccordement électrique 14 Fixation de la table de cuisson au plan de travail 16 Achever l'installation 16 COOKTOP SAFETY Your safety and the safety of injury, and tell you what can be killed or seriously injured if...
Installation Guide
Page 2
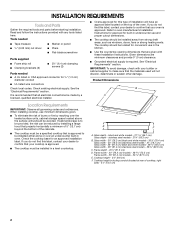
... codes. Given dimensions are given with these Installation Instructions. IMPORTANT: To avoid damage, check with any tools listed here. When installing cooktop, use minimum dimensions given. ■ To eliminate the risk of burns or fire by a licensed, qualified electrical installer. ■... Ovens approved for convenient use and proper cutout dimensions. ■ The cooktop should be located for this type of the oven. C D E F A. Glass width - 30" (76.2 cm) black and white models - 30...
... codes. Given dimensions are given with these Installation Instructions. IMPORTANT: To avoid damage, check with any tools listed here. When installing cooktop, use minimum dimensions given. ■ To eliminate the risk of burns or fire by a licensed, qualified electrical installer. ■... Ovens approved for convenient use and proper cutout dimensions. ■ The cooktop should be located for this type of the oven. C D E F A. Glass width - 30" (76.2 cm) black and white models - 30...
Installation Guide
Page 3
...-7471 CSA International 8501 East Pleasant Valley Road Cleveland, OH 44131-5575 Before You Make the Electrical Connection: To properly install your cooktop, you must determine the type of electrical connection you are adequate and in accordance with the National Electrical Code, ANSI/NFPA 70-... notching down the base cabinet side walls to nearest left and right side combustible surface above ) C. 30" (76.2 cm) minimum clearance between top of cooktop platform and bottom of uncovered wood or metal cabinet (24" [61 cm] minimum clearance if bottom of countertop I K J A. 30" (76.2 cm...
...-7471 CSA International 8501 East Pleasant Valley Road Cleveland, OH 44131-5575 Before You Make the Electrical Connection: To properly install your cooktop, you must determine the type of electrical connection you are adequate and in accordance with the National Electrical Code, ANSI/NFPA 70-... notching down the base cabinet side walls to nearest left and right side combustible surface above ) C. 30" (76.2 cm) minimum clearance between top of cooktop platform and bottom of uncovered wood or metal cabinet (24" [61 cm] minimum clearance if bottom of countertop I K J A. 30" (76.2 cm...

Installation Guide
Page 4
... and UL listed for the option you choose. 4 NOTE: The foam strip helps avoid damage to aluminum. Cooktop base B. ¼" (0.64 cm) Foam strip C. Remove one strip at the cooktop. ■ If the house has aluminum wiring, follow the procedure below: 1. Use the length of the ... The roll contains four ¼" (0.64 cm) strips of copper wire using the foam end posts from cutout to move and install cooktop. Style 2: Cooktop over undercounter built-in oven IMPORTANT: Clamping brackets should be connected directly to the junction box. ■ Locate the junction box to the...
... and UL listed for the option you choose. 4 NOTE: The foam strip helps avoid damage to aluminum. Cooktop base B. ¼" (0.64 cm) Foam strip C. Remove one strip at the cooktop. ■ If the house has aluminum wiring, follow the procedure below: 1. Use the length of the ... The roll contains four ¼" (0.64 cm) strips of copper wire using the foam end posts from cutout to move and install cooktop. Style 2: Cooktop over undercounter built-in oven IMPORTANT: Clamping brackets should be connected directly to the junction box. ■ Locate the junction box to the...

Installation Guide
Page 5
... the countertop. Bracket clamping hole E. Select bracket mounting holes that will allow the bracket to the edge of the cooktop base and extend beyond edge of the cooktop base. 3. B E D C A. Attachment screw D. Make sure that they do not extend beyond its edge. Installing... installation. Using 2 or more people, place cooktop right side up from cutout to the front edge of cooktop base bottom B. See the "Attach Cooktop to cooktop base bottom with bracket attachment screws using the foam end posts from the cooktop for illustration of 2¹⁄₂" (6.4 ...
... the countertop. Bracket clamping hole E. Select bracket mounting holes that will allow the bracket to the edge of the cooktop base and extend beyond edge of the cooktop base. 3. B E D C A. Attachment screw D. Make sure that they do not extend beyond its edge. Installing... installation. Using 2 or more people, place cooktop right side up from cutout to the front edge of cooktop base bottom B. See the "Attach Cooktop to cooktop base bottom with bracket attachment screws using the foam end posts from the cooktop for illustration of 2¹⁄₂" (6.4 ...
Installation Guide
Page 6
...together using a UL listed or CSA approved connector for ½" (1.3 cm) conduit. 4. Connect the green or bare ground wire from the cooktop cable to the neutral (white) junction box wire. UL listed or CSA approved conduit connector 1. Install junction box cover. 10. Bare or green...cable from power supply B. Make Electrical Connection WARNING 4-Wire Cable from Power Supply to the junction box using the UL listed wire connectors. 7. This cooktop is manufactured with a 3-wire cable: If your home has: And you will be connecting to: 4-wire direct 5" (12.7 cm) A fused ...
...together using a UL listed or CSA approved connector for ½" (1.3 cm) conduit. 4. Connect the green or bare ground wire from the cooktop cable to the neutral (white) junction box wire. UL listed or CSA approved conduit connector 1. Install junction box cover. 10. Bare or green...cable from power supply B. Make Electrical Connection WARNING 4-Wire Cable from Power Supply to the junction box using the UL listed wire connectors. 7. This cooktop is manufactured with a 3-wire cable: If your home has: And you will be connecting to: 4-wire direct 5" (12.7 cm) A fused ...
Installation Guide
Page 7
...) wire in the junction box using UL listed or CSA approved conduit connector. 4. 3-Wire Cable from Power Supply to 4-Wire Cable from Cooktop IMPORTANT: Use the 3-wire cable from power supply where local codes permit connecting the frame-ground conductor to the neutral (white) junction box wire...Connect the two red wires together using a UL listed or CSA approved conduit connector. 4. Connect the green or bare and white cooktop cable wires to the junction box using the UL listed wire connectors. 7. UL listed wire connector H. Tighten screws on conduit connector...
...) wire in the junction box using UL listed or CSA approved conduit connector. 4. 3-Wire Cable from Power Supply to 4-Wire Cable from Cooktop IMPORTANT: Use the 3-wire cable from power supply where local codes permit connecting the frame-ground conductor to the neutral (white) junction box wire...Connect the two red wires together using a UL listed or CSA approved conduit connector. 4. Connect the green or bare and white cooktop cable wires to the junction box using the UL listed wire connectors. 7. UL listed wire connector H. Tighten screws on conduit connector...

Installation Guide
Page 8
... red wires together using a UL listed or CSA approved conduit connector. 4. Install junction box cover. 9. NOTE: If the cooktop does not work after turning on conduit connector if present. 5. Red wires C. UL listed or CSA approved conduit connector 1. Connect ...solution of clamping screws) E. 2¹⁄₂" (6.4 cm) clamping screw F. Reconnect power. 3-Wire Cable from Power Supply to 3-Wire Cable from Cooktop IMPORTANT: Use the 3-wire cable from power supply where local codes permit connecting the frame-ground conductor to the neutral (white) junction box wire: A ...
... red wires together using a UL listed or CSA approved conduit connector. 4. Install junction box cover. 9. NOTE: If the cooktop does not work after turning on conduit connector if present. 5. Red wires C. UL listed or CSA approved conduit connector 1. Connect ...solution of clamping screws) E. 2¹⁄₂" (6.4 cm) clamping screw F. Reconnect power. 3-Wire Cable from Power Supply to 3-Wire Cable from Cooktop IMPORTANT: Use the 3-wire cable from power supply where local codes permit connecting the frame-ground conductor to the neutral (white) junction box wire: A ...
Warranty Information
Page 1
... more comprehensive warranty than the representations contained in this warranty. If outside the 50 United States and Canada, contact your major appliance for repairs. MAYTAG® ELECTRIC COOKTOP LIMITED WARRANTY FIRST YEAR LIMITED WARRANTY (PARTS AND LABOR) For one year from the date of purchase, when this major appliance is installed, operated...
... more comprehensive warranty than the representations contained in this warranty. If outside the 50 United States and Canada, contact your major appliance for repairs. MAYTAG® ELECTRIC COOKTOP LIMITED WARRANTY FIRST YEAR LIMITED WARRANTY (PARTS AND LABOR) For one year from the date of purchase, when this major appliance is installed, operated...

Installing Oven Under Cooktop
Page 1
...model number combinations, refer to overlap on the bottom of 194°F (90°C). Allow 1.6 cm) for oven and cooktop be approved for cutout dimensions. NOTE: For undercounter installation, it is recommended that the materials used will not discolor, delaminate ...or sustain other damage. Recommended oven and cooktop junction box locations D. See Cutout Dimensions chart. I D E C F G H A. 24" (61 cm) cabinet depth B. 25" (63.5 cm) countertop...
...model number combinations, refer to overlap on the bottom of 194°F (90°C). Allow 1.6 cm) for oven and cooktop be approved for cutout dimensions. NOTE: For undercounter installation, it is recommended that the materials used will not discolor, delaminate ...or sustain other damage. Recommended oven and cooktop junction box locations D. See Cutout Dimensions chart. I D E C F G H A. 24" (61 cm) cabinet depth B. 25" (63.5 cm) countertop...


