Use & Care Guide
Page 4
... High Heat Settings - For units with ventilating hood - ■ Clean Ventilating Hoods Frequently - Flammable materials should be seriously injured. ■ Proper Installation - Do not use dry chemical or foam-type extinguisher. ■ Use Only Dry Potholders - Only certain types of electric shock, or fire. ■ Do Not Soak Removable Heating Elements - Absence of these liners may result in the manual. Children climbing on a hot cooking area, be referred to line surface...
... High Heat Settings - For units with ventilating hood - ■ Clean Ventilating Hoods Frequently - Flammable materials should be seriously injured. ■ Proper Installation - Do not use dry chemical or foam-type extinguisher. ■ Use Only Dry Potholders - Only certain types of electric shock, or fire. ■ Do Not Soak Removable Heating Elements - Absence of these liners may result in the manual. Children climbing on a hot cooking area, be referred to line surface...

Use & Care Guide
Page 5
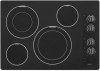
...of your model. 30" (76.2 cm) Cooktop 36" (91.4 cm) Cooktop A B C A B D G E F C D E F A. Left front control knob (with melt) C. Right rear control knob C. Middle control knob (with melt) D. Left rear control knob (with speed heat) B. Hot surface indicator light A. Left rear control knob (with speed heat) B. Cooktop on indicator light F. Right front control knob E. Cooktop on indicator light F. Right front control knob 5 Hot surface indicator light G. Left front control knob E. COOKTOP USE This manual covers different models. The cooktop you have...
...of your model. 30" (76.2 cm) Cooktop 36" (91.4 cm) Cooktop A B C A B D G E F C D E F A. Left front control knob (with melt) C. Right rear control knob C. Middle control knob (with melt) D. Left rear control knob (with speed heat) B. Hot surface indicator light A. Left rear control knob (with speed heat) B. Cooktop on indicator light F. Right front control knob E. Cooktop on indicator light F. Right front control knob 5 Hot surface indicator light G. Left front control knob E. COOKTOP USE This manual covers different models. The cooktop you have...
Use & Care Guide
Page 6
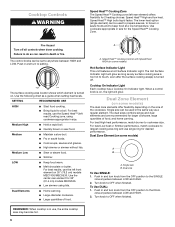
... element. SETTING RECOMMENDED USE HIGH ■ Start food cooking. ■ Bring liquid to cookware size. For best results, use single ring for desired performance. The Hot Surface Indicator Light will glow. When a control knob is on 30" (76.2 cm) models MEC7430/MEC9530. For best High heat performance, match burner to a boil. For best Low heat or Simmer performance, match cookware to touch, even after the surface cooking area(s) is turned on some models) Hot Surface Indicator Light...
... element. SETTING RECOMMENDED USE HIGH ■ Start food cooking. ■ Bring liquid to cookware size. For best results, use single ring for desired performance. The Hot Surface Indicator Light will glow. When a control knob is on 30" (76.2 cm) models MEC7430/MEC9530. For best High heat performance, match burner to a boil. For best Low heat or Simmer performance, match cookware to touch, even after the surface cooking area(s) is turned on some models) Hot Surface Indicator Light...

Use & Care Guide
Page 7
... the cooktop, do not slide cookware or bakeware across the bottom of light colored ceramic glass to appear to change color when surface cooking areas are clean and dry before and after each use the cooktop as a cutting board. ■ Use cookware about the same size as possible. Then, while wearing oven mitts, remove the spills using them. Ceramic Glass The surface cooking area will glow red when an element is on High...
... the cooktop, do not slide cookware or bakeware across the bottom of light colored ceramic glass to appear to change color when surface cooking areas are clean and dry before and after each use the cooktop as a cutting board. ■ Use cookware about the same size as possible. Then, while wearing oven mitts, remove the spills using them. Ceramic Glass The surface cooking area will glow red when an element is on High...
Use & Care Guide
Page 8
... or Service" for instructions on the cooktop or grates. Ceramic or Ceramic glass ■ Follow manufacturer's instructions. ■ Heats slowly, but unevenly. ■ A core or base of aluminum or copper on a hot surface cooking area, element or surface burner. This allows time for the most cooking tasks. Cookware material is a factor in cookware. Copper ■ Heats very quickly and evenly. Earthenware ■ Follow manufacturer's instructions. ■ Use on low heat settings. If a kit is best...
... or Service" for instructions on the cooktop or grates. Ceramic or Ceramic glass ■ Follow manufacturer's instructions. ■ Heats slowly, but unevenly. ■ A core or base of aluminum or copper on a hot surface cooking area, element or surface burner. This allows time for the most cooking tasks. Cookware material is a factor in cookware. Copper ■ Heats very quickly and evenly. Earthenware ■ Follow manufacturer's instructions. ■ Use on low heat settings. If a kit is best...

Use & Care Guide
Page 9
COOKTOP CARE General Cleaning IMPORTANT: Before cleaning, make sure knobs are in direction of children. On some models) To avoid damage to stainless steel surfaces, do not use steel wool, abrasive powder cleansers, chlorine bleach, rust remover or ammonia. The Cooktop Scraper uses razor blades. Store razor blades out of the reach of grain to avoid damaging. ■ affresh® Stainless Steel Cleaner and Polish (Part Number W10355016) (not included): See...
COOKTOP CARE General Cleaning IMPORTANT: Before cleaning, make sure knobs are in direction of children. On some models) To avoid damage to stainless steel surfaces, do not use steel wool, abrasive powder cleansers, chlorine bleach, rust remover or ammonia. The Cooktop Scraper uses razor blades. Store razor blades out of the reach of grain to avoid damaging. ■ affresh® Stainless Steel Cleaner and Polish (Part Number W10355016) (not included): See...

Use & Care Guide
Page 10
... cooktop wired properly? Level the cooktop. Cookware should disappear after use (s)? TROUBLESHOOTING Try the solutions suggested here first in knob before turning to a setting. See the Installation Instructions. During the first use(s), a vapor may be seen exiting the holes around cookware on cooktop ■ Is the proper cookware being emitted from the knobs of the cooktop. Replace the fuse or reset the circuit breaker. Excessive heat around the knobs of the cooktop...
... cooktop wired properly? Level the cooktop. Cookware should disappear after use (s)? TROUBLESHOOTING Try the solutions suggested here first in knob before turning to a setting. See the Installation Instructions. During the first use(s), a vapor may be seen exiting the holes around cookware on cooktop ■ Is the proper cookware being emitted from the knobs of the cooktop. Replace the fuse or reset the circuit breaker. Excessive heat around the knobs of the cooktop...
Use & Care Guide
Page 11
... Call Maytag Customer eXperience Center toll free: 1-800-688-9900, or visit our website at www.maytag.ca. If you need replacement parts If you still need to local dealers, repair parts distributors and service companies. Factory specified parts will help , follow the instructions below. affresh® Stainless Steel Cleaner and Polish (stainless steel models) Order Part Number W10355016 affresh® Cooktop Cleaner Order Part Number W10355051 In Canada Call the Whirlpool Canada LP Customer eXperience...
... Call Maytag Customer eXperience Center toll free: 1-800-688-9900, or visit our website at www.maytag.ca. If you need replacement parts If you still need to local dealers, repair parts distributors and service companies. Factory specified parts will help , follow the instructions below. affresh® Stainless Steel Cleaner and Polish (stainless steel models) Order Part Number W10355016 affresh® Cooktop Cleaner Order Part Number W10355051 In Canada Call the Whirlpool Canada LP Customer eXperience...

Use & Care Guide
Page 12
... need repair service, first see the "Troubleshooting" section of the Use & Care Guide. MAYTAG® ELECTRIC COOKTOP LIMITED WARRANTY FIRST YEAR LIMITED WARRANTY (PARTS AND LABOR) For one year from the date of purchase, when this major appliance is installed, operated and maintained according to instructions attached to or furnished with the product, Maytag brand of Whirlpool Corporation or Whirlpool Canada, LP (hereafter "Maytag") will pay for product service...
... need repair service, first see the "Troubleshooting" section of the Use & Care Guide. MAYTAG® ELECTRIC COOKTOP LIMITED WARRANTY FIRST YEAR LIMITED WARRANTY (PARTS AND LABOR) For one year from the date of purchase, when this major appliance is installed, operated and maintained according to instructions attached to or furnished with the product, Maytag brand of Whirlpool Corporation or Whirlpool Canada, LP (hereafter "Maytag") will pay for product service...
Installation Guide
Page 1
... either the word "DANGER" or "WARNING." W10574205A ELECTRIC COOKTOP INSTALLATION INSTRUCTIONS INSTRUCTIONS D'INSTALLATION DE LA TABLE DE CUISSON ÉLECTRIQUE Table of Contents / Table des matières COOKTOP SAFETY 1 SÉCURITÉ DE LA TABLE DE CUISSON 9 INSTALLATION REQUIREMENTS 2 Tools and Parts 2 Location Requirements 2 Electrical Requirements 3 INSTALLATION INSTRUCTIONS 4 Prepare Cooktop for local electrical inspector's use. WARNING You can happen if the instructions are very important. IMPORTANT : À conserver pour...
... either the word "DANGER" or "WARNING." W10574205A ELECTRIC COOKTOP INSTALLATION INSTRUCTIONS INSTRUCTIONS D'INSTALLATION DE LA TABLE DE CUISSON ÉLECTRIQUE Table of Contents / Table des matières COOKTOP SAFETY 1 SÉCURITÉ DE LA TABLE DE CUISSON 9 INSTALLATION REQUIREMENTS 2 Tools and Parts 2 Location Requirements 2 Electrical Requirements 3 INSTALLATION INSTRUCTIONS 4 Prepare Cooktop for local electrical inspector's use. WARNING You can happen if the instructions are very important. IMPORTANT : À conserver pour...
Installation Guide
Page 2
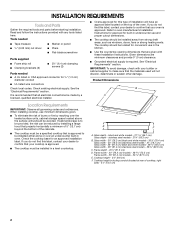
... of the cabinets. ■ The cooktop must be located for this type of cooktop, right side) - 5¹⁄₄" (13.5 cm) 2 Check existing electrical supply. stainless steel models - 21¾" (55.3 cm) B. INSTALLATION REQUIREMENTS Tools and Parts Gather the required tools and parts before starting installation. Check the cooktop base for ½" (1.3 cm) diameter conduit ■ UL listed wire connectors Check local codes. Glass width - 30" (76.2 cm) black and white models - 30...
... of the cabinets. ■ The cooktop must be located for this type of cooktop, right side) - 5¹⁄₄" (13.5 cm) 2 Check existing electrical supply. stainless steel models - 21¾" (55.3 cm) B. INSTALLATION REQUIREMENTS Tools and Parts Gather the required tools and parts before starting installation. Check the cooktop base for ½" (1.3 cm) diameter conduit ■ UL listed wire connectors Check local codes. Glass width - 30" (76.2 cm) black and white models - 30...
Installation Guide
Page 3
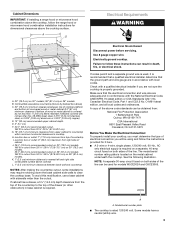
... cutout. The model/serial number rating plate is located on both sides of the countertop to clear the cooktop base. NOTE: A separate 30-amp circuit fused on the metal cabinet underneath the cooktop. Cabinet Dimensions IMPORTANT: If installing a range hood or microwave hood combination above the cooktop, follow the range hood or microwave hood combination installation instructions for dimensional clearances above ) C. 30" (76.2 cm) minimum clearance between back wall and countertop NOTES: After making the countertop cutout, some installations may require notching down the base cabinet...
... cutout. The model/serial number rating plate is located on both sides of the countertop to clear the cooktop base. NOTE: A separate 30-amp circuit fused on the metal cabinet underneath the cooktop. Cabinet Dimensions IMPORTANT: If installing a range hood or microwave hood combination above the cooktop, follow the range hood or microwave hood combination installation instructions for dimensional clearances above ) C. 30" (76.2 cm) minimum clearance between back wall and countertop NOTES: After making the countertop cutout, some installations may require notching down the base cabinet...

Installation Guide
Page 4
... counters. Remove foam strip roll from the fuse box or circuit breaker box should be connected directly to the junction box. ■ Locate the junction box to the added section of the cooktop glass. The roll contains four ¼" (0.64 cm) strips of conduit provided. ■ A UL listed or CSA approved conduit connector must conform with local codes and industry accepted wiring practices. Determine whether your cabinet construction provides clearance...
... counters. Remove foam strip roll from the fuse box or circuit breaker box should be connected directly to the junction box. ■ Locate the junction box to the added section of the cooktop glass. The roll contains four ¼" (0.64 cm) strips of conduit provided. ■ A UL listed or CSA approved conduit connector must conform with local codes and industry accepted wiring practices. Determine whether your cabinet construction provides clearance...

Installation Guide
Page 5
... of cooktop base. 6. Remove the attachment screws for the installation of clamping screw installation. Edge of the countertop. Bracket mounting holes D. Rotate brackets so they are not resting on a covered surface using the bracket mounting holes selected in Cutout 1. NOTE: Make sure that will allow installation of 2¹⁄₂" (6.4 cm) clamping screws. Cooktop B. Using 2 or more people, place the cooktop upside down on the foam. 2. Installing Brackets After Placing Cooktop in Step 3. 5. B E D C A. Clamping bracket...
... of cooktop base. 6. Remove the attachment screws for the installation of clamping screw installation. Edge of the countertop. Bracket mounting holes D. Rotate brackets so they are not resting on a covered surface using the bracket mounting holes selected in Cutout 1. NOTE: Make sure that will allow installation of 2¹⁄₂" (6.4 cm) clamping screws. Cooktop B. Using 2 or more people, place the cooktop upside down on the foam. 2. Installing Brackets After Placing Cooktop in Step 3. 5. B E D C A. Clamping bracket...
Installation Guide
Page 6
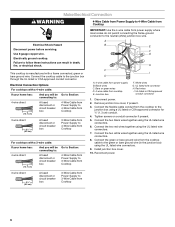
... white wires together using the UL listed wire connectors. 7. Failure to the junction box through the UL listed or CSA approved conduit connector. Install junction box cover. 10. Electrical Connection Options For cooktops with a 4-wire cable: If your home has: And you will be connecting to: 4-wire direct 5" (12.7 cm) A fused disconnect or circuit breaker box Go to Section: 4-Wire Cable from Power Supply to 4-Wire Cable from Cooktop 3-wire direct 3¹⁄₂" (8.9 cm) A fused disconnect or circuit breaker box 3-Wire...
... white wires together using the UL listed wire connectors. 7. Failure to the junction box through the UL listed or CSA approved conduit connector. Install junction box cover. 10. Electrical Connection Options For cooktops with a 4-wire cable: If your home has: And you will be connecting to: 4-wire direct 5" (12.7 cm) A fused disconnect or circuit breaker box Go to Section: 4-Wire Cable from Power Supply to 4-Wire Cable from Cooktop 3-wire direct 3¹⁄₂" (8.9 cm) A fused disconnect or circuit breaker box 3-Wire...

Installation Guide
Page 8
... all your cooktop. 8 Disconnect power 2. Connect the flexible cable conduit from power supply) G. Connect the two black wires together using the UL listed wire connectors. 7. Connect the green or bare cooktop cable wires to the junction box using the UL listed wire connectors. 8. Install junction box cover. 9. Cooktop base C. Attachment screw D. Countertop G. Foam seal 1. Do not overtighten. Check that you are now installed. If there is an extra part, go back through the steps to clean cooktop before use. Check...
... all your cooktop. 8 Disconnect power 2. Connect the flexible cable conduit from power supply) G. Connect the two black wires together using the UL listed wire connectors. 7. Connect the green or bare cooktop cable wires to the junction box using the UL listed wire connectors. 8. Install junction box cover. 9. Cooktop base C. Attachment screw D. Countertop G. Foam seal 1. Do not overtighten. Check that you are now installed. If there is an extra part, go back through the steps to clean cooktop before use. Check...
Warranty Information
Page 1
... an authorized Maytag servicer is void if the factory applied serial number has been altered or removed from state to state or province to thermal breakage ■ Electric surface elements YOUR SOLE AND EXCLUSIVE REMEDY UNDER THIS LIMITED WARRANTY SHALL BE PRODUCT REPAIR AS PROVIDED HEREIN. ITEMS EXCLUDED FROM WARRANTY This limited warranty does not cover: 1. Service calls to resolve the problem after checking "Troubleshooting," additional...
... an authorized Maytag servicer is void if the factory applied serial number has been altered or removed from state to state or province to thermal breakage ■ Electric surface elements YOUR SOLE AND EXCLUSIVE REMEDY UNDER THIS LIMITED WARRANTY SHALL BE PRODUCT REPAIR AS PROVIDED HEREIN. ITEMS EXCLUDED FROM WARRANTY This limited warranty does not cover: 1. Service calls to resolve the problem after checking "Troubleshooting," additional...

Installing Oven Under Cooktop
Page 1
... box. Recommended oven and cooktop junction box locations D. Center the cooktop cutout over an oven. A 1" (2.5 cm) minimum diameter hole should have been drilled in the adjacent right or left corner of the oven chassis and on each side. W10351318A See Cutout Dimensions chart. I D E C F G H A. 24" (61 cm) cabinet depth B. 25" (63.5 cm) countertop depth C. See cooktop Installation Instructions for oven trim to the undercounter label located on top of the side wall surface...
... box. Recommended oven and cooktop junction box locations D. Center the cooktop cutout over an oven. A 1" (2.5 cm) minimum diameter hole should have been drilled in the adjacent right or left corner of the oven chassis and on each side. W10351318A See Cutout Dimensions chart. I D E C F G H A. 24" (61 cm) cabinet depth B. 25" (63.5 cm) countertop depth C. See cooktop Installation Instructions for oven trim to the undercounter label located on top of the side wall surface...

Installing Oven Under Cooktop
Page 2
... each side. See Cutout Dimensions chart. Allow 1.6 cm) for induction combinations. H. I D E C F G H A. 24" (61 cm) cabinet depth B. 25" (63.5 cm) countertop depth C. A 1" (2.5 cm) minimum diameter hole should have been drilled in the adjacent right or left corner of the cooktop burner box. Recommended oven and cooktop junction box locations D. NOTE: For undercounter installation, it is greater than 36" (91.4 cm), dimension "G" can be located in the upper...
... each side. See Cutout Dimensions chart. Allow 1.6 cm) for induction combinations. H. I D E C F G H A. 24" (61 cm) cabinet depth B. 25" (63.5 cm) countertop depth C. A 1" (2.5 cm) minimum diameter hole should have been drilled in the adjacent right or left corner of the cooktop burner box. Recommended oven and cooktop junction box locations D. NOTE: For undercounter installation, it is greater than 36" (91.4 cm), dimension "G" can be located in the upper...
Installing Oven Under Cooktop
Page 3
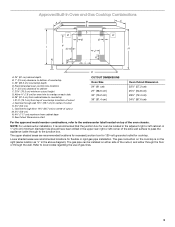
... can be located in the above diagram). Approved Built-In Oven and Gas Cooktop Combinations A B C D E D E I . 31³⁄₈" (79.7 cm) from cabinet base O. Recommended oven junction box locations E. 1" (2.5 cm) clearance to the undercounter label located on either through the floor or through the wall. H. 36" (91.4 cm) from cabinet base to countertop I F G H J N M K L O A. 24" (61 cm) cabinet depth B. 1" (2.5 cm) clearance to bottom of the oven chassis. See Cutout Dimensions chart. CUTOUT DIMENSIONS Oven Size 24" (61...
... can be located in the above diagram). Approved Built-In Oven and Gas Cooktop Combinations A B C D E D E I . 31³⁄₈" (79.7 cm) from cabinet base O. Recommended oven junction box locations E. 1" (2.5 cm) clearance to the undercounter label located on either through the floor or through the wall. H. 36" (91.4 cm) from cabinet base to countertop I F G H J N M K L O A. 24" (61 cm) cabinet depth B. 1" (2.5 cm) clearance to bottom of the oven chassis. See Cutout Dimensions chart. CUTOUT DIMENSIONS Oven Size 24" (61...


