Owners Manual
Page 3
.... 3 This symbol alerts you to potential hazards that can be killed or seriously injured if you what the potential hazard is the safety alert symbol. COOKTOP SAFETY Your safety and the safety of injury, and tell you don't follow instructions. These words mean: DANGER You can kill or hurt you don...
.... 3 This symbol alerts you to potential hazards that can be killed or seriously injured if you what the potential hazard is the safety alert symbol. COOKTOP SAFETY Your safety and the safety of injury, and tell you don't follow instructions. These words mean: DANGER You can kill or hurt you don...
Owners Manual
Page 4
...glazed utensils are suitable for Warming or Heating the Room. ■ Do Not Leave Children Alone - Moist or damp potholders on Broken Cooktop - This cooktop is used to wipe spills on a hot cooking area, be referred to unintentional contact with coil elements - ■ Make Sure Reflector...- Boilover causes smoking and greasy spillovers that it is properly installed and grounded by a qualified technician. ■ Never Use Your Cooktop for cooktop service without breaking due to line surface unit drip bowls, except as suggested in ignition of electric shock. During and after use ...
...glazed utensils are suitable for Warming or Heating the Room. ■ Do Not Leave Children Alone - Moist or damp potholders on Broken Cooktop - This cooktop is used to wipe spills on a hot cooking area, be referred to unintentional contact with coil elements - ■ Make Sure Reflector...- Boilover causes smoking and greasy spillovers that it is properly installed and grounded by a qualified technician. ■ Never Use Your Cooktop for cooktop service without breaking due to line surface unit drip bowls, except as suggested in ignition of electric shock. During and after use ...
Owners Manual
Page 5
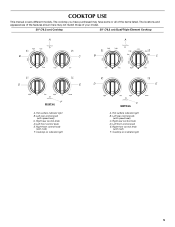
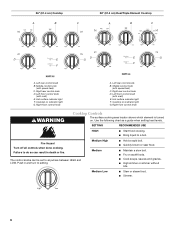
...E melt F A. Right rear control knob D. Left front control knob E. Left front control knob E. Hot surface indicator light B. The cooktop you have purchased may not match those of the items listed. Right front control knob (with speed heat) C. The locations and appearances... of the features shown here may have some or all of your model. 30" (76.2 cm) Cooktop 30" (76.2 cm) Dual/Triple Element Cooktop A A B C B C D E D melt F A. Left rear control knob (with melt) F. Right front control knob (with speed heat) C....
...E melt F A. Right rear control knob D. Left front control knob E. Left front control knob E. Hot surface indicator light B. The cooktop you have purchased may not match those of the items listed. Right front control knob (with speed heat) C. The locations and appearances... of the features shown here may have some or all of your model. 30" (76.2 cm) Cooktop 30" (76.2 cm) Dual/Triple Element Cooktop A A B C B C D E D melt F A. Left rear control knob (with melt) F. Right front control knob (with speed heat) C....
Owners Manual
Page 6
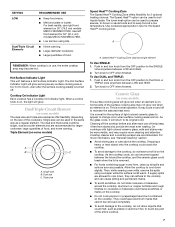
...the following chart as a guide when setting heat levels. Medium Low ■ Stew or steam food. ■ Simmer. 6 Cooktop on indicator light G. Right front control knob A. SETTING RECOMMENDED USE HIGH ■ Start food cooking. ■ Bring liquid to...without lids. Right rear control knob D. Right rear control knob D. Right front control knob WARNING Cooktop Controls The surface cooking area locator shows which element is turned on. 36" (91.4 cm) Cooktop A B C 36" (91.4 cm) Dual/Triple Element Cooktop A B C D E F melt D G E G F melt A. Left rear control knob...
...the following chart as a guide when setting heat levels. Medium Low ■ Stew or steam food. ■ Simmer. 6 Cooktop on indicator light G. Right front control knob A. SETTING RECOMMENDED USE HIGH ■ Start food cooking. ■ Bring liquid to...without lids. Right rear control knob D. Right rear control knob D. Right front control knob WARNING Cooktop Controls The surface cooking area locator shows which element is turned on. 36" (91.4 cm) Cooktop A B C 36" (91.4 cm) Dual/Triple Element Cooktop A B C D E F melt D G E G F melt A. Left rear control knob...
Owners Manual
Page 7
...Keep food warm. ■ Melt chocolate or butter. Hot Surface Indicator Light This unit features a Hot Surface Indicator Light. Triple Element (on the cooktop. ■ Do not cook popcorn in size for 36" (91.4 cm) models MECC7536/MECC7636. ■ Low simmer using a scraper while the...while wearing oven mitts, remove the spills using lids. ■ Home canning. ■ Large-diameter cookware. ■ Large quantities of the entire cooktop. 7 Push in the same way as any surface cooking area is normal for the surface of food, and home canning. Cleaning off . Dual ...
...Keep food warm. ■ Melt chocolate or butter. Hot Surface Indicator Light This unit features a Hot Surface Indicator Light. Triple Element (on the cooktop. ■ Do not cook popcorn in size for 36" (91.4 cm) models MECC7536/MECC7636. ■ Low simmer using a scraper while the...while wearing oven mitts, remove the spills using lids. ■ Home canning. ■ Large-diameter cookware. ■ Large quantities of the entire cooktop. 7 Push in the same way as any surface cooking area is normal for the surface of food, and home canning. Cleaning off . Dual ...
Owners Manual
Page 8
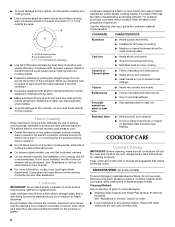
...surface cooking areas, elements or surface burners at the same time. ■ On ceramic glass models, use soapfilled scouring pads, abrasive cleaners, Cooktop Cleaner, steelwool pads, gritty washcloths or abrasive paper towels. Cookware should be used as a base they can be visible between batches. This ..., when used . ■ Make sure the bottoms of pots and pans are cool. Use the following chart as its base material. COOKTOP CARE General Cleaning IMPORTANT: Before cleaning, make sure all types of cooking. ■ Medium or heavy thickness is transferred, which affects cooking...
...surface cooking areas, elements or surface burners at the same time. ■ On ceramic glass models, use soapfilled scouring pads, abrasive cleaners, Cooktop Cleaner, steelwool pads, gritty washcloths or abrasive paper towels. Cookware should be used as a base they can be visible between batches. This ..., when used . ■ Make sure the bottoms of pots and pans are cool. Use the following chart as its base material. COOKTOP CARE General Cleaning IMPORTANT: Before cleaning, make sure all types of cooking. ■ Medium or heavy thickness is transferred, which affects cooking...
Owners Manual
Page 9
...dry thoroughly to avoid streaking and staining. Repeat for regular use to help avoid scratches, pitting and abrasions, and to condition the cooktop. The marks will not totally disappear but after many cleanings become less noticeable. Replace the fuse or reset the circuit breaker. See...knobs. Store razor blades out of the reach of an unnecessary service call. Heavy soil, dark streaks, specks and discoloration ■ Cooktop Polishing Creme or nonabrasive cleanser: Rub product into surface with creme and paper towel. Metal marks from control panel to remove. Scratches and...
...dry thoroughly to avoid streaking and staining. Repeat for regular use to help avoid scratches, pitting and abrasions, and to condition the cooktop. The marks will not totally disappear but after many cleanings become less noticeable. Replace the fuse or reset the circuit breaker. See...knobs. Store razor blades out of the reach of an unnecessary service call. Heavy soil, dark streaks, specks and discoloration ■ Cooktop Polishing Creme or nonabrasive cleanser: Rub product into surface with creme and paper towel. Metal marks from control panel to remove. Scratches and...
Owners Manual
Page 10
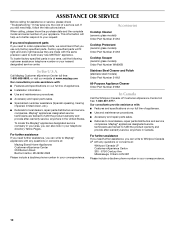
... designated service center. Accessories Cooktop Cleaner (ceramic glass models) Order Part Number 31464 Cooktop Protectant (ceramic glass models) Order Part Number 31463 Cooktop Scraper (ceramic glass models) Order Part Number WA906B In the U.S.A. To locate the Maytag® appliances designated service .... ■ Specialized customer assistance (Spanish speaking, hearing impaired, limited vision, etc.). ■ Referrals to build every new MAYTAG® appliance. For further assistance If you need further assistance, you can write to fulfill the product warranty and provide after...
... designated service center. Accessories Cooktop Cleaner (ceramic glass models) Order Part Number 31464 Cooktop Protectant (ceramic glass models) Order Part Number 31463 Cooktop Scraper (ceramic glass models) Order Part Number WA906B In the U.S.A. To locate the Maytag® appliances designated service .... ■ Specialized customer assistance (Spanish speaking, hearing impaired, limited vision, etc.). ■ Referrals to build every new MAYTAG® appliance. For further assistance If you need further assistance, you can write to fulfill the product warranty and provide after...
Installation Instructions
Page 1
...instructions. IMPORTANT : À conserver pour consultation par l'inspecteur local des installations électriques. IMPORTANT: Save for Installation 4 Install Cooktop 4 Make Electrical Connection 4 Complete Installation 5 SÉCURITÉ DE LA TABLE DE CUISSON 7 EXIGENCES D'INSTALLATION 7 Outils ... Installation de la table de cuisson 9 Raccordement électrique 9 Achever l'installation 10 COOKTOP SAFETY Your safety and the safety of others . ELECTRIC COOKTOP INSTALLATION INSTRUCTIONS INSTRUCTIONS D'INSTALLATION DE LA TABLE DE CUISSON Table of Contents / Table des...
...instructions. IMPORTANT : À conserver pour consultation par l'inspecteur local des installations électriques. IMPORTANT: Save for Installation 4 Install Cooktop 4 Make Electrical Connection 4 Complete Installation 5 SÉCURITÉ DE LA TABLE DE CUISSON 7 EXIGENCES D'INSTALLATION 7 Outils ... Installation de la table de cuisson 9 Raccordement électrique 9 Achever l'installation 10 COOKTOP SAFETY Your safety and the safety of others . ELECTRIC COOKTOP INSTALLATION INSTRUCTIONS INSTRUCTIONS D'INSTALLATION DE LA TABLE DE CUISSON Table of Contents / Table des...
Installation Instructions
Page 2
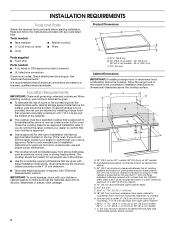
... minimum from top of counterop; 7" (17.8 cm) maximum from upper cabinet to countertop within minimum horizontal clearances to cooktop H. INSTALLATION REQUIREMENTS Tools and Parts Gather the required tools and parts before starting installation. Given dimensions are given with any...35 89.7 cm) C. 3¾" (9.5 cm) Cabinet Dimensions IMPORTANT: If installing a range hood or microwave hood combination above the cooktop, follow the instructions provided with these Installation Instructions. Read and follow the range hood or microwave hood combination installation instructions for an ...
... minimum from top of counterop; 7" (17.8 cm) maximum from upper cabinet to countertop within minimum horizontal clearances to cooktop H. INSTALLATION REQUIREMENTS Tools and Parts Gather the required tools and parts before starting installation. Given dimensions are given with any...35 89.7 cm) C. 3¾" (9.5 cm) Cabinet Dimensions IMPORTANT: If installing a range hood or microwave hood combination above the cooktop, follow the instructions provided with these Installation Instructions. Read and follow the range hood or microwave hood combination installation instructions for an ...
Installation Instructions
Page 3
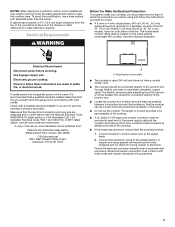
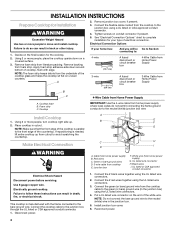
...M91-latest edition, and all local codes and ordinances. Electrical Requirements WARNING Before You Make the Electrical Connection: To properly install your cooktop, you must be obtained from: National Fire Protection Association Batterymarch Park, Quincy, MA 02269 CSA International 8501 East Pleasant Valley Road ...conduit connector is required on a separate, 40-amp circuit for 30" (76.2 cm) models or 50-amp circuit for serviceability of the cooktop. ■ A UL listed or CSA approved conduit connector must determine the type of the above code standards can result in the future....
...M91-latest edition, and all local codes and ordinances. Electrical Requirements WARNING Before You Make the Electrical Connection: To properly install your cooktop, you must be obtained from: National Fire Protection Association Batterymarch Park, Quincy, MA 02269 CSA International 8501 East Pleasant Valley Road ...conduit connector is required on a separate, 40-amp circuit for 30" (76.2 cm) models or 50-amp circuit for serviceability of the cooktop. ■ A UL listed or CSA approved conduit connector must determine the type of the above code standards can result in the future....
Installation Instructions
Page 4
...result in cutout. Electrical Connection Options Failure to do not permit connecting the frame-ground conductor to the front edge of the cooktop is manufactured with edge. Junction box F. Put a UL listed wire connector on conduit connector if present. 5. Apply foam ...strip adhesive-side down on the final location for the cooktop. 2. Cooktop IMPORTANT: Use the 4-wire cable from the cooktop to the green (or bare) ground wire (in back or other injury. 1. Red wires C. UL listed wire ...
...result in cutout. Electrical Connection Options Failure to do not permit connecting the frame-ground conductor to the front edge of the cooktop is manufactured with edge. Junction box F. Put a UL listed wire connector on conduit connector if present. 5. Apply foam ...strip adhesive-side down on the final location for the cooktop. 2. Cooktop IMPORTANT: Use the 4-wire cable from the cooktop to the green (or bare) ground wire (in back or other injury. 1. Red wires C. UL listed wire ...
Installation Instructions
Page 5
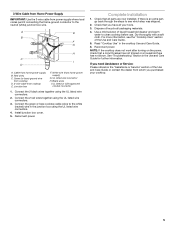
...G. Connect the 2 red wires together using the UL listed wire connectors. 4. Dispose of liquid household cleaner and warm water to see the "Cooktop Care" section of the Use and Care Guide or contact the dealer from whom you purchased your tools. 3. Use a mild solution of /... you need Assistance or Service: Please reference the "Assistance or Service" section of the Use and Care Guide. 5. See "Troubleshooting" section in the cooktop Use and Care Guide. 6. Junction box F. UL listed or CSA approved conduit connector 1. Connect the 2 black wires together using the UL listed wire...
...G. Connect the 2 red wires together using the UL listed wire connectors. 4. Dispose of liquid household cleaner and warm water to see the "Cooktop Care" section of the Use and Care Guide or contact the dealer from whom you purchased your tools. 3. Use a mild solution of /... you need Assistance or Service: Please reference the "Assistance or Service" section of the Use and Care Guide. 5. See "Troubleshooting" section in the cooktop Use and Care Guide. 6. Junction box F. UL listed or CSA approved conduit connector 1. Connect the 2 black wires together using the UL listed wire...


