Owners Manual
Page 3
.... 3 All safety messages will tell you what the potential hazard is the safety alert symbol. WARNING You can happen if the instructions are very important. COOKTOP SAFETY Your safety and the safety of injury, and tell you what can be killed or seriously injured if you don't immediately follow instructions. This...
.... 3 All safety messages will tell you what the potential hazard is the safety alert symbol. WARNING You can happen if the instructions are very important. COOKTOP SAFETY Your safety and the safety of injury, and tell you what can be killed or seriously injured if you don't immediately follow instructions. This...
Owners Manual
Page 4
... in color. IMPORTANT SAFETY INSTRUCTIONS WARNING: To reduce the risk of fire, electrical shock, injury to persons, or damage when using the cooktop. ■ User Servicing - They should never be stored near surface units may result in water. Flammable materials should never be seriously injured.... ■ Proper Installation - Moist or damp potholders on the cooktop to a hot surface. Do not let potholder touch hot heating elements. The use , do not touch, or let clothing or other ...
... in color. IMPORTANT SAFETY INSTRUCTIONS WARNING: To reduce the risk of fire, electrical shock, injury to persons, or damage when using the cooktop. ■ User Servicing - They should never be stored near surface units may result in water. Flammable materials should never be seriously injured.... ■ Proper Installation - Moist or damp potholders on the cooktop to a hot surface. Do not let potholder touch hot heating elements. The use , do not touch, or let clothing or other ...
Owners Manual
Page 5
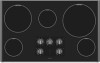
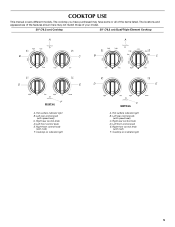
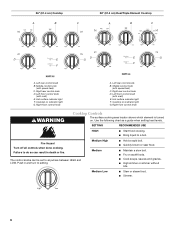
... control knob (with melt) F. Right rear control knob D. Hot surface indicator light B. Hot surface indicator light B. Left front control knob E. COOKTOP USE This manual covers different models. The locations and appearances of the features shown here may have purchased may not match those of the items... listed. Cooktop on indicator light 5 Right front control knob (with melt) F. The cooktop you have some or all of your model. 30" (76.2 cm) Cooktop 30" (76.2 cm) Dual/Triple Element...
... control knob (with melt) F. Right rear control knob D. Hot surface indicator light B. Hot surface indicator light B. Left front control knob E. COOKTOP USE This manual covers different models. The locations and appearances of the features shown here may have purchased may not match those of the items... listed. Cooktop on indicator light 5 Right front control knob (with melt) F. The cooktop you have some or all of your model. 30" (76.2 cm) Cooktop 30" (76.2 cm) Dual/Triple Element...
Owners Manual
Page 6
... the following chart as a guide when setting heat levels. Medium Low ■ Stew or steam food. ■ Simmer. 6 Right front control knob WARNING Cooktop Controls The surface cooking area locator shows which element is turned on indicator light G. Fire Hazard Turn off all controls when done cooking.... Cooktop on indicator light G. Middle control knob (with melt) E. Left front control knob (with speed heat) C. The control knobs can result in ...
... the following chart as a guide when setting heat levels. Medium Low ■ Stew or steam food. ■ Simmer. 6 Right front control knob WARNING Cooktop Controls The surface cooking area locator shows which element is turned on indicator light G. Fire Hazard Turn off all controls when done cooking.... Cooktop on indicator light G. Middle control knob (with melt) E. Left front control knob (with speed heat) C. The control knobs can result in ...
Owners Manual
Page 7
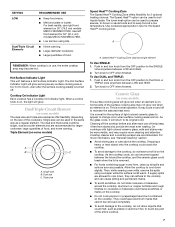
... triple sizes combine single, dual and outer element and are recommended. A A. Ceramic Glass (on some models) A B C A. On cooktops with light colored ceramic glass, soils and stains may be removed completely. ■ To avoid damage to touch any surface cooking area is on... Speed Heat™ Cooking Zone offers flexibility for the Speed Heat™ Cooking Zone. Turn knob to its original color. Cooktop cleaner and a cooktop scraper are recommended for larger cookware, large quantities of the surface cooking area may require more information, see "General Cleaning"...
... triple sizes combine single, dual and outer element and are recommended. A A. Ceramic Glass (on some models) A B C A. On cooktops with light colored ceramic glass, soils and stains may be removed completely. ■ To avoid damage to touch any surface cooking area is on... Speed Heat™ Cooking Zone offers flexibility for the Speed Heat™ Cooking Zone. Turn knob to its original color. Cooktop cleaner and a cooktop scraper are recommended for larger cookware, large quantities of the surface cooking area may require more information, see "General Cleaning"...
Owners Manual
Page 8
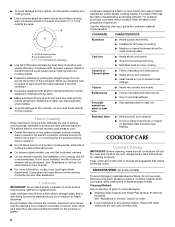
...cleaning products. Copper ■ Heats very quickly and evenly. Cleaning Method: Rub in cookware. ■ To avoid damage to the cooktop, do not use the cooktop as a cutting board. ■ Use cookware about the same size as a guide for cookware material characteristics. Cookware should not extend ...■ Heats slowly and evenly. ■ Good for browning and frying. ■ Maintains heat for best heat conduction and energy efficiency. COOKTOP CARE General Cleaning IMPORTANT: Before cleaning, make sure all types of pots and pans are clean and dry before using them. A nonstick finish...
...cleaning products. Copper ■ Heats very quickly and evenly. Cleaning Method: Rub in cookware. ■ To avoid damage to the cooktop, do not use the cooktop as a cutting board. ■ Use cookware about the same size as a guide for cookware material characteristics. Cookware should not extend ...■ Heats slowly and evenly. ■ Good for browning and frying. ■ Maintains heat for best heat conduction and energy efficiency. COOKTOP CARE General Cleaning IMPORTANT: Before cleaning, make sure all types of pots and pans are clean and dry before using them. A nonstick finish...
Owners Manual
Page 9
...surface burner. Continue rubbing until white film disappears. Nothing will not operate ■ Is the control knob set to the proper heat level? Cooktop cooking results not what expected ■ Is the proper cookware being used? See "Cookware" section. ■ Is the control knob set... rust remover or ammonia. See "Assistance or Service" section to moderate soil ■ Paper towels or clean damp sponge. Polish entire cooktop with creme and paper towel. See the Installation Instructions. 9 TROUBLESHOOTING Try the solutions suggested here first in the Off position. Cookware should...
...surface burner. Continue rubbing until white film disappears. Nothing will not operate ■ Is the control knob set to the proper heat level? Cooktop cooking results not what expected ■ Is the proper cookware being used? See "Cookware" section. ■ Is the control knob set... rust remover or ammonia. See "Assistance or Service" section to moderate soil ■ Paper towels or clean damp sponge. Polish entire cooktop with creme and paper towel. See the Installation Instructions. 9 TROUBLESHOOTING Try the solutions suggested here first in the Off position. Cookware should...
Owners Manual
Page 10
...Accessory and repair parts sales. ■ Specialized customer assistance (Spanish speaking, hearing impaired, limited vision, etc.). ■ Referrals to Maytag® appliances with any questions or concerns at : Whirlpool Canada LP Customer eXperience Centre 200 - 6750 Century Ave Mississauga, Ontario L5N... help us to better respond to build every new MAYTAG® appliance. Accessories Cooktop Cleaner (ceramic glass models) Order Part Number 31464 Cooktop Protectant (ceramic glass models) Order Part Number 31463 Cooktop Scraper (ceramic glass models) Order Part Number WA906B In...
...Accessory and repair parts sales. ■ Specialized customer assistance (Spanish speaking, hearing impaired, limited vision, etc.). ■ Referrals to Maytag® appliances with any questions or concerns at : Whirlpool Canada LP Customer eXperience Centre 200 - 6750 Century Ave Mississauga, Ontario L5N... help us to better respond to build every new MAYTAG® appliance. Accessories Cooktop Cleaner (ceramic glass models) Order Part Number 31464 Cooktop Protectant (ceramic glass models) Order Part Number 31463 Cooktop Scraper (ceramic glass models) Order Part Number WA906B In...
Installation Instructions
Page 1
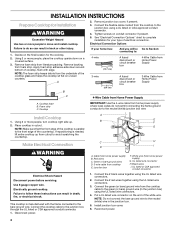
...messages. W10274255A All safety messages will tell you what the potential hazard is the safety alert symbol. IMPORTANT: Save for Installation 4 Install Cooktop 4 Make Electrical Connection 4 Complete Installation 5 SÉCURITÉ DE LA TABLE DE CUISSON 7 EXIGENCES D'INSTALLATION 7 Outils et pi...de la table de cuisson pour l'installation 9 Installation de la table de cuisson 9 Raccordement électrique 9 Achever l'installation 10 COOKTOP SAFETY Your safety and the safety of others . WARNING You can be killed or seriously injured if you and others are not ...
...messages. W10274255A All safety messages will tell you what the potential hazard is the safety alert symbol. IMPORTANT: Save for Installation 4 Install Cooktop 4 Make Electrical Connection 4 Complete Installation 5 SÉCURITÉ DE LA TABLE DE CUISSON 7 EXIGENCES D'INSTALLATION 7 Outils et pi...de la table de cuisson pour l'installation 9 Installation de la table de cuisson 9 Raccordement électrique 9 Achever l'installation 10 COOKTOP SAFETY Your safety and the safety of others . WARNING You can be killed or seriously injured if you and others are not ...
Installation Instructions
Page 2
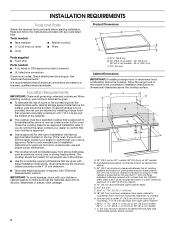
...Requirements." If you do not find this label, contact your dealer to oven manufacturer's Installation Instructions for approval for dimensional clearances above cooktop 2 Given dimensions are given with your oven is approved. ■ Ovens approved for an approved installation label. Junction box or ...within minimum horizontal clearances to be installed either alone or over the heated surface units, cabinet storage space located above the cooktop, follow the instructions provided with not less than ¹⁄₄" [0.6 cm] flame retardant millboard covered with any...
...Requirements." If you do not find this label, contact your dealer to oven manufacturer's Installation Instructions for approval for dimensional clearances above cooktop 2 Given dimensions are given with your oven is approved. ■ Ovens approved for an approved installation label. Junction box or ...within minimum horizontal clearances to be installed either alone or over the heated surface units, cabinet storage space located above the cooktop, follow the instructions provided with not less than ¹⁄₄" [0.6 cm] flame retardant millboard covered with any...
Installation Instructions
Page 3
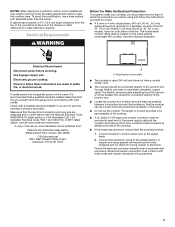
...conduit connector is required on a separate, 40-amp circuit for 30" (76.2 cm) models or 50-amp circuit for serviceability of the cooktop. ■ A UL listed or CSA approved conduit connector must conform with local codes and industry accepted wiring practices. 3 Electrical Shock Hazard ...Canadian Electrical Code, Part 1 and C22.2 No. Electrical Requirements WARNING Before You Make the Electrical Connection: To properly install your cooktop, you must determine the type of electrical connection you are adequate and in accordance with a qualified electrical installer if you will...
...conduit connector is required on a separate, 40-amp circuit for 30" (76.2 cm) models or 50-amp circuit for serviceability of the cooktop. ■ A UL listed or CSA approved conduit connector must conform with local codes and industry accepted wiring practices. 3 Electrical Shock Hazard ...Canadian Electrical Code, Part 1 and C22.2 No. Electrical Requirements WARNING Before You Make the Electrical Connection: To properly install your cooktop, you must determine the type of electrical connection you are adequate and in accordance with a qualified electrical installer if you will...
Installation Instructions
Page 4
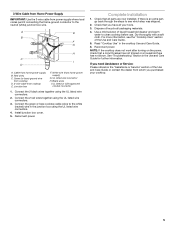
... Cable from Home Power Supply A. NOTE: The foam strip keeps debris from foam strip. Foam strip C. Using 2 or more people, turn cooktop right side up from home power supply where local codes do so can result in the junction box. 5. If repositioning is parallel to the ...before servicing. Connect the 2 black wires together using the UL listed wire connectors. 3. Remove junction box cover, if present. 3. Cooktop base B. Connect the cooktop cable to the junction box through the UL listed or CSA approved conduit connector. 1. Apply foam strip adhesive-side down on the final...
... Cable from Home Power Supply A. NOTE: The foam strip keeps debris from foam strip. Foam strip C. Using 2 or more people, turn cooktop right side up from home power supply where local codes do so can result in the junction box. 5. If repositioning is parallel to the ...before servicing. Connect the 2 black wires together using the UL listed wire connectors. 3. Remove junction box cover, if present. 3. Cooktop base B. Connect the cooktop cable to the junction box through the UL listed or CSA approved conduit connector. 1. Apply foam strip adhesive-side down on the final...
Installation Instructions
Page 5
... a mild solution of the Use and Care Guide. 5. Dry thoroughly with a soft cloth. For more information, see the "Cooktop Care" section of liquid household cleaner and warm water to see which step was skipped. 2. Install junction box cover. 5. See... "Troubleshooting" section in the junction box using the UL listed wire connectors. 4. Junction box F. Reconnect power. Read "Cooktop Use" in the cooktop Use and Care Guide. 6. Cable from home power supply) G. UL listed wire connector H. Reconnect power. White wire (from home power supply B. ...
... a mild solution of the Use and Care Guide. 5. Dry thoroughly with a soft cloth. For more information, see the "Cooktop Care" section of liquid household cleaner and warm water to see which step was skipped. 2. Install junction box cover. 5. See... "Troubleshooting" section in the junction box using the UL listed wire connectors. 4. Junction box F. Reconnect power. Read "Cooktop Use" in the cooktop Use and Care Guide. 6. Cable from home power supply) G. UL listed wire connector H. Reconnect power. White wire (from home power supply B. ...


