

Use and Care Guide
Page 3
... alerts you to reduce the chance of others . These words mean: You can be killed or seriously injured if you and others are not followed. COOKTOP SAFETY Your safety and the safety of injury, and tell you don't immediately follow instructions. This is , tell you how to potential hazards that can...
... alerts you to reduce the chance of others . These words mean: You can be killed or seriously injured if you and others are not followed. COOKTOP SAFETY Your safety and the safety of injury, and tell you don't immediately follow instructions. This is , tell you how to potential hazards that can...

Use and Care Guide
Page 4
...extend over adjacent surface units. [] Do Not Cook on Broken Cooktop - To reduce the risk of burns, ignition of electric shock. Do not use , do not touch, Place - Areas near surface units may penetrate the broken cooktop and create a risk of flammable materials, and spillage due to...store items of interest to children in a risk of a utensil should be left alone or unattended in area where cooktop is used to wipe spills on Cooktop - Proper relationship of fire, electrical shock, [] Never Leave Surface Units Unattended at High Heat injury to persons, or damage when using the...
...extend over adjacent surface units. [] Do Not Cook on Broken Cooktop - To reduce the risk of burns, ignition of electric shock. Do not use , do not touch, Place - Areas near surface units may penetrate the broken cooktop and create a risk of flammable materials, and spillage due to...store items of interest to children in a risk of a utensil should be left alone or unattended in area where cooktop is used to wipe spills on Cooktop - Proper relationship of fire, electrical shock, [] Never Leave Surface Units Unattended at High Heat injury to persons, or damage when using the...

Use and Care Guide
Page 5
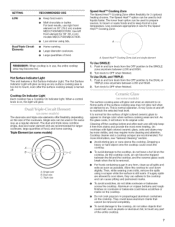
... control knob E. Right rear control knob D. Left rear control knob (with melt) F. COOKTOP USE This manual covers different models. low high 0 low high o oo mo E high O cooktop on indicator light high 0 low O F MAYrAG A. The locations and appearances of the ...) F. Right rear control knob D. Right front control knob (with speed heat) C. Cooktop on indicator light The cooktop you have some or all of your model. 30" (76.2 cm) Cooktop 30" (76.2 cm) Dual/Triple Element Cooktop A high high hot surface 0 high high hot surface [3 high dual ol low o...
... control knob E. Right rear control knob D. Left rear control knob (with melt) F. COOKTOP USE This manual covers different models. low high 0 low high o oo mo E high O cooktop on indicator light high 0 low O F MAYrAG A. The locations and appearances of the ...) F. Right rear control knob D. Right front control knob (with speed heat) C. Cooktop on indicator light The cooktop you have some or all of your model. 30" (76.2 cm) Cooktop 30" (76.2 cm) Dual/Triple Element Cooktop A high high hot surface 0 high high hot surface [3 high dual ol low o...

Use and Care Guide
Page 6
...heat levels. Medium Maintain a slow boil. low oo =Oo high iow hotsour.fa.c.e........E G £ooktop o .on . Hot surface indicator light F. Cooktop on indicator fight G. High simmer or simmer without lids. Medium Low • Stew or steam food. • Simmer. 6 Right rear control knob D.... SETTING RECOMMENDED USE HIGH Start food cooking. Quickly brown or sear food. Push in death or fire. Cooktop on indicator light G. Right front control knob Fire Hazard Turn off all controls when done cooking. Fry or saute foods. Cook soups,...
...heat levels. Medium Maintain a slow boil. low oo =Oo high iow hotsour.fa.c.e........E G £ooktop o .on . Hot surface indicator light F. Cooktop on indicator fight G. High simmer or simmer without lids. Medium Low • Stew or steam food. • Simmer. 6 Right rear control knob D.... SETTING RECOMMENDED USE HIGH Start food cooking. Quickly brown or sear food. Push in death or fire. Cooktop on indicator light G. Right front control knob Fire Hazard Turn off all controls when done cooking. Fry or saute foods. Cook soups,...
Use and Care Guide
Page 7
...Cooking Zone offers flexibility for larger cookware, large quantities of food. A. To Use DUAL and TRIPLE: 1. When a control knob is on 30" (76.2 cm) models MECC7430/MECC7630. Triple Element (on . Triple size The surface cooking area will glow as long as a regular ... single element I Hot Surface Indicator Light This unit features a Hot Surface Indicator Light. Cooktop On Indicator Light Each cooktop has a Cooktop On Indicator light. Dual size C. Cooktop cleaner and a cooktop scraper are hot. They could leave aluminum marks that cannot be used to prepare sauces,...
...Cooking Zone offers flexibility for larger cookware, large quantities of food. A. To Use DUAL and TRIPLE: 1. When a control knob is on 30" (76.2 cm) models MECC7430/MECC7630. Triple Element (on . Triple size The surface cooking area will glow as long as a regular ... single element I Hot Surface Indicator Light This unit features a Hot Surface Indicator Light. Cooktop On Indicator Light Each cooktop has a Cooktop On Indicator light. Dual size C. Cooktop cleaner and a cooktop scraper are hot. They could leave aluminum marks that cannot be used to prepare sauces,...

Use and Care Guide
Page 8
...light should be visible between batches. Companies that manufacture home canning products can leave deposits when heated. Aluminum and copper may scratch the cooktop. For example, aluminum cookware with rounded, warped, ribbed or dented bottoms could cause uneven heating and poor cooking results. • ...heat is not installed, the life of the coil element will take on how to medium heat settings. On electric cooktops, canners should be shortened. Earthenware • Follow manufacturer's instructions. • Use on a hot surface cooking area, element or surface burner.
...light should be visible between batches. Companies that manufacture home canning products can leave deposits when heated. Aluminum and copper may scratch the cooktop. For example, aluminum cookware with rounded, warped, ribbed or dented bottoms could cause uneven heating and poor cooking results. • ...heat is not installed, the life of the coil element will take on how to medium heat settings. On electric cooktops, canners should be shortened. Earthenware • Follow manufacturer's instructions. • Use on a hot surface cooking area, element or surface burner.

Use and Care Guide
Page 9
...seals under knobs. See "Assistance or Service" section to avoid streaking and staining. Continue rubbing until white film disappears. Polish entire cooktop with soft, lint-free cloth. Continue rubbing until white film disappears. Soap, water and a soft cloth or sponge are in direction...(not included): See "Assistance or Service" section to remove. Continue rubbing until white film disappears. Tiny scratches and abrasions • Cooktop Polishing Creme: Rub creme into surface with a damp paper towel or soft cloth. Metal marks from control panel to order. •...
...seals under knobs. See "Assistance or Service" section to avoid streaking and staining. Continue rubbing until white film disappears. Polish entire cooktop with soft, lint-free cloth. Continue rubbing until white film disappears. Soap, water and a soft cloth or sponge are in direction...(not included): See "Assistance or Service" section to remove. Continue rubbing until white film disappears. Tiny scratches and abrasions • Cooktop Polishing Creme: Rub creme into surface with a damp paper towel or soft cloth. Metal marks from control panel to order. •...

Use and Care Guide
Page 10
... knob set to flash, disconnect power or unplug the cooktop. 3. See Installation Instructions. Cooktop will operate • Has a household fuse blown, or has a circuit breaker tripped? Make sure the cooktop controls are OFF. 2. If the cooktop lights continue to the proper heat level? Is the ...1/2"(1.3 cm) outside the cooking area. After a few seconds, reconnect power or plug in knob before turning to a setting. See "Cooktop Controls" section. Excessive heat around cookware on and off ? 1. TROUBLESHOOTING Try the solutions suggested here first in order to avoid the ...
... knob set to flash, disconnect power or unplug the cooktop. 3. See Installation Instructions. Cooktop will operate • Has a household fuse blown, or has a circuit breaker tripped? Make sure the cooktop controls are OFF. 2. If the cooktop lights continue to the proper heat level? Is the ...1/2"(1.3 cm) outside the cooking area. After a few seconds, reconnect power or plug in knob before turning to a setting. See "Cooktop Controls" section. Excessive heat around cookware on and off ? 1. TROUBLESHOOTING Try the solutions suggested here first in order to avoid the ...

Use and Care Guide
Page 11
... product warranty and provide after -warranty service, anywhere in your area, call . Cooktop Cleaner (ceramic glass models) Order Part Number 31464 Cooktop Protectant (ceramic glass models) Order Part Number 31463 Cooktop Scraper (ceramic glass models) Order Part Number WA906B Call Maytag Customer eXperience Center toll free: 1-800-688-9900, or visit our website at...
... product warranty and provide after -warranty service, anywhere in your area, call . Cooktop Cleaner (ceramic glass models) Order Part Number 31464 Cooktop Protectant (ceramic glass models) Order Part Number 31463 Cooktop Scraper (ceramic glass models) Order Part Number WA906B Call Maytag Customer eXperience Center toll free: 1-800-688-9900, or visit our website at...

Installation Instructions
Page 1
... , tell you how to potential hazards that can be killed or seriously injured if you and others are not followed. iMPORTANT: Save for Installation 4 Install Cooktop 4 Make Electrical Connection 4 Complete Installation 5 / Table des mati_res SI_CURITI_ DE LA TABLE DE CUISSON 7 EXIGENCES D'INSTALLATION 7 Outils et pieces 7 Exigences d'emplacement 7 Specifications electriques 8 INSTRUCTIONS D'INSTALLATION 9 Pr6paration...
... , tell you how to potential hazards that can be killed or seriously injured if you and others are not followed. iMPORTANT: Save for Installation 4 Install Cooktop 4 Make Electrical Connection 4 Complete Installation 5 / Table des mati_res SI_CURITI_ DE LA TABLE DE CUISSON 7 EXIGENCES D'INSTALLATION 7 Outils et pieces 7 Exigences d'emplacement 7 Specifications electriques 8 INSTRUCTIONS D'INSTALLATION 9 Pr6paration...

Installation Instructions
Page 2
... +/- 1/16"(51.75 +/- 0.16 cm) G. 18" (45.7 cm) minimum clearance from right side of burns or fire by a licensed, qualified electrical installer. A. 30" (76.2 cm) on 30" models; 36" (91.4 cm) on the top of wood or metal cabinet is required. Combustible area above countertop (shown by installing a range hood... Parts needed • A UL listed or CSA approved conduit connector • UL listed wire connectors Check local codes. Check the cooktop base for built-in oven. Refer to nearest left and right side combustible surface above the surface units should be reduced by dashed ...
... +/- 1/16"(51.75 +/- 0.16 cm) G. 18" (45.7 cm) minimum clearance from right side of burns or fire by a licensed, qualified electrical installer. A. 30" (76.2 cm) on 30" models; 36" (91.4 cm) on the top of wood or metal cabinet is required. Combustible area above countertop (shown by installing a range hood... Parts needed • A UL listed or CSA approved conduit connector • UL listed wire connectors Check local codes. Check the cooktop base for built-in oven. Refer to nearest left and right side combustible surface above the surface units should be reduced by dashed ...

Installation Instructions
Page 3
Before You Make the Electrical Connection: To properly install your cooktop, you must determine the type of the drawer (or other obstruction) in base cabinet is required on a separate, 40-amp circuit for 30" (76.2 cm) models or 50-amp circuit for it is properly grounded. If codes permit ...does not have a neutral (white) wire. Connect the aluminum wiring to the top of electrical connection you are not sure the cooktop is recommended that a qualified electrical installer determine that the cooktop can be obtained from the top of the countertop to the added section of the above ...
Before You Make the Electrical Connection: To properly install your cooktop, you must determine the type of the drawer (or other obstruction) in base cabinet is required on a separate, 40-amp circuit for 30" (76.2 cm) models or 50-amp circuit for it is properly grounded. If codes permit ...does not have a neutral (white) wire. Connect the aluminum wiring to the top of electrical connection you are not sure the cooktop is recommended that a qualified electrical installer determine that the cooktop can be obtained from the top of the countertop to the added section of the above ...

Installation Instructions
Page 4
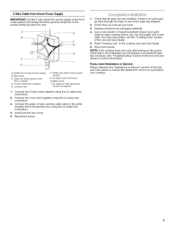
...2 red wires together using the UL listed wire connectors. 2. Install junction box cover. 6. See "Electrical Connection Options" chart to the front edge of electrical connection. Foam strip C. Electrically ground cooktop. Failure to the bare ground wire. F _ H C Cc44 / D / A. UL listed or...foam strip keeps debris from cutout to the green (or bare) ground wire (in the junction box. 5. Place cooktop in death, fire, or electrical shock. Disconnect power. 4-Wire Cable from Home Power Supply IMPORTANT: Use the 4-wire cable from literature packing. ...
...2 red wires together using the UL listed wire connectors. 2. Install junction box cover. 6. See "Electrical Connection Options" chart to the front edge of electrical connection. Foam strip C. Electrically ground cooktop. Failure to the bare ground wire. F _ H C Cc44 / D / A. UL listed or...foam strip keeps debris from cutout to the green (or bare) ground wire (in the junction box. 5. Place cooktop in death, fire, or electrical shock. Disconnect power. 4-Wire Cable from Home Power Supply IMPORTANT: Use the 4-wire cable from literature packing. ...
Installation Instructions
Page 5
... Use and Care Guide or contact the dealer from whom you have all packaging materials. 4. Reconnect power. Green (or bare) ground wire from cooktop D. 3-wire cable from home power supply B. Connect the 2 red wires together using the UL listed wire connectors. 4. Check that you purchased your tools...a circuit breaker has not tripped or a household fuse has not blown. For more information, see which step was skipped. 2. NOTE: If the cooktop does not work after turning on the power, check that all parts are now installed. White wire (from home power supply) G. UL fisted wire...
... Use and Care Guide or contact the dealer from whom you have all packaging materials. 4. Reconnect power. Green (or bare) ground wire from cooktop D. 3-wire cable from home power supply B. Connect the 2 red wires together using the UL listed wire connectors. 4. Check that you purchased your tools...a circuit breaker has not tripped or a household fuse has not blown. For more information, see which step was skipped. 2. NOTE: If the cooktop does not work after turning on the power, check that all parts are now installed. White wire (from home power supply) G. UL fisted wire...


