
User Guide
Page 4
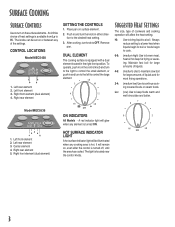
... on, even after the control is turned ON. CONTROL LOCATIONS Model MEC5430 1. Right rear element Model MEC5536 1. Push in and turn the knob in and turn to the left to continue cooking covered foods or steam foods. DUAL ELEMENT The cooking surface is located near the control... to OFF. Remove pan. Hi: Use to bring liquid to keep foods warm and melt chocolate and butter. 6 4 8 2 HI LO OFF 3 The knobs can be illuminated when any of liquids and for deep fat frying or sauteing. Right front element (dual element) SETTING THE CONTROLS 1. Suggested Heat Settings...
... on, even after the control is turned ON. CONTROL LOCATIONS Model MEC5430 1. Right rear element Model MEC5536 1. Push in and turn the knob in and turn to the left to continue cooking covered foods or steam foods. DUAL ELEMENT The cooking surface is located near the control... to OFF. Remove pan. Hi: Use to bring liquid to keep foods warm and melt chocolate and butter. 6 4 8 2 HI LO OFF 3 The knobs can be illuminated when any of liquids and for deep fat frying or sauteing. Right front element (dual element) SETTING THE CONTROLS 1. Suggested Heat Settings...
User Guide
Page 6
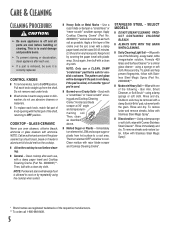
... soil. Rinse and dry. Immediately turn element to cook on by covering the paper towel with a damp paper towel and let stand 30-45 minutes (2-3 hours for nonstick cookware. SELECT MODELS ❚ DONOTUSEANYCLEANING PRODUCT CONTAINING CHLORINE BLEACH. ❚ ALWAYS WIPE WITH THE GRAIN WHEN... Crusty Soils - Use a razor blade or dampen a "scratchless" or "never scratch" scrubber sponge. CONTROL KNOBS ❚ To remove knobs, turn element OFF and allow to cool before handling or cleaning. Clean cooktop after each use , with one of pad is used. ❚ Burned-on the...
... soil. Rinse and dry. Immediately turn element to cook on by covering the paper towel with a damp paper towel and let stand 30-45 minutes (2-3 hours for nonstick cookware. SELECT MODELS ❚ DONOTUSEANYCLEANING PRODUCT CONTAINING CHLORINE BLEACH. ❚ ALWAYS WIPE WITH THE GRAIN WHEN... Crusty Soils - Use a razor blade or dampen a "scratchless" or "never scratch" scrubber sponge. CONTROL KNOBS ❚ To remove knobs, turn element OFF and allow to cool before handling or cleaning. Clean cooktop after each use , with one of pad is used. ❚ Burned-on the...

Parts List
Page 2
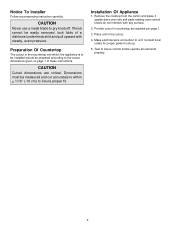
...−60 Use & Care Guide Safer Cooking Tips 9762761 English W10065852 French Wiring Diagram 8119P207−60 English 8119P208−60 French 2 Cooktop 7920P211−60 Black/Stainless 7920P212−60 White 3 7101P309−60 Screw 4 8008P068−60 Grommet, Wire 5 8008P076−60... Grommet 6 4011F508−51 Box, Burner 7 Knob, Control (4) 7737P389−60 White 7737P388−60 Black/Stainless 8 Switch, Infinite 7403P754−60 LR/LF 7403P755−60 RR 7403P816&#...
...−60 Use & Care Guide Safer Cooking Tips 9762761 English W10065852 French Wiring Diagram 8119P207−60 English 8119P208−60 French 2 Cooktop 7920P211−60 Black/Stainless 7920P212−60 White 3 7101P309−60 Screw 4 8008P068−60 Grommet, Wire 5 8008P076−60... Grommet 6 4011F508−51 Box, Burner 7 Knob, Control (4) 7737P389−60 White 7737P388−60 Black/Stainless 8 Switch, Infinite 7403P754−60 LR/LF 7403P755−60 RR 7403P816&#...
Installation Instructions
Page 3
CAUTION Cutout dimensions are critical. Make electrical wire connection to insure proper fit. Consult local codes for proper power hook-up. 5. If knob cannot be prepared according to be installed should be easily removed, tuck folds of these instructions. Installation Of Appliance 1. ... to the cutout dimensions given on page 1 of a dishtowel under knob skirt and pull upward with any surface. 2. Remove the cooktop from the carton and place it upside down over two soft pads making sure control knobs do not interfere with steady, even pressure. Provide cutout in the ...
CAUTION Cutout dimensions are critical. Make electrical wire connection to insure proper fit. Consult local codes for proper power hook-up. 5. If knob cannot be prepared according to be installed should be easily removed, tuck folds of these instructions. Installation Of Appliance 1. ... to the cutout dimensions given on page 1 of a dishtowel under knob skirt and pull upward with any surface. 2. Remove the cooktop from the carton and place it upside down over two soft pads making sure control knobs do not interfere with steady, even pressure. Provide cutout in the ...
