Dimension Guide
Page 1
... of installation will be installed. q A 4-wire or 3-wire, single phase, 240 volt, 60 Hz., AC only electrical supply is required on a separate, 40-amp circuit, fused on 36" (91.4 cm) models K. 1" (2.5 cm) minimum distance to cooktop H. q Ovens approved for joining copper to change without notice. Ref. This will not discolor, delaminate or sustain...
... of installation will be installed. q A 4-wire or 3-wire, single phase, 240 volt, 60 Hz., AC only electrical supply is required on a separate, 40-amp circuit, fused on 36" (91.4 cm) models K. 1" (2.5 cm) minimum distance to cooktop H. q Ovens approved for joining copper to change without notice. Ref. This will not discolor, delaminate or sustain...
Owners Manual
Page 2
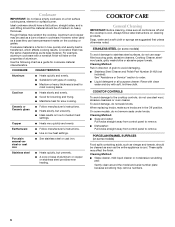
TABLE OF CONTENTS COOKTOP SAFETY 2 COOKTOP USE 4 Cooktop Controls 4 Coil Elements and Burner Bowls 5 Home Canning 5 Cookware 6 COOKTOP CARE 6 General Cleaning 6 TROUBLESHOOTING 7 ASSISTANCE OR SERVICE 8 WARRANTY 9 TABLE DES MATIÈRES SÉCURITÉ DE LA TABLE DE CUISSON 10 UTILISATION...de cuisson 14 ENTRETIEN DE LA TABLE DE CUISSON 14 Nettoyage général 14 DÉPANNAGE 15 ASSISTANCE OU SERVICE 15 GARANTIE 16 COOKTOP SAFETY Your safety and the safety of injury, and tell you what the potential hazard is the safety alert symbol. These words mean: ...
TABLE OF CONTENTS COOKTOP SAFETY 2 COOKTOP USE 4 Cooktop Controls 4 Coil Elements and Burner Bowls 5 Home Canning 5 Cookware 6 COOKTOP CARE 6 General Cleaning 6 TROUBLESHOOTING 7 ASSISTANCE OR SERVICE 8 WARRANTY 9 TABLE DES MATIÈRES SÉCURITÉ DE LA TABLE DE CUISSON 10 UTILISATION...de cuisson 14 ENTRETIEN DE LA TABLE DE CUISSON 14 Nettoyage général 14 DÉPANNAGE 15 ASSISTANCE OU SERVICE 15 GARANTIE 16 COOKTOP SAFETY Your safety and the safety of injury, and tell you what the potential hazard is the safety alert symbol. These words mean: ...
Owners Manual
Page 3
... cleaners can produce noxious fumes if applied to line surface unit drip bowls, except as suggested in cabinets above a cooktop - Absence of the heating element to direct contact and may be referred to a qualified technician. ■ Storage on . Select utensils having flat ...heating elements. During and after use a towel or other servicing should not be seriously injured. ■ Proper Installation - For units with one or more surface units of the cooktop. ■ Wear Proper Apparel - IMPORTANT SAFETY INSTRUCTIONS WARNING: To reduce the risk of fire, electrical shock...
... cleaners can produce noxious fumes if applied to line surface unit drip bowls, except as suggested in cabinets above a cooktop - Absence of the heating element to direct contact and may be referred to a qualified technician. ■ Storage on . Select utensils having flat ...heating elements. During and after use a towel or other servicing should not be seriously injured. ■ Proper Installation - For units with one or more surface units of the cooktop. ■ Wear Proper Apparel - IMPORTANT SAFETY INSTRUCTIONS WARNING: To reduce the risk of fire, electrical shock...

Owners Manual
Page 4
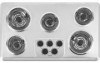
...cooking. Right rear control knob C. Push in and turn to do so can be set to anywhere between HIGH and LOW. COOKTOP USE This manual covers different models. The locations and appearances of the features shown here may have purchased may not match those.... Right front control knob D E A. Middle control knob C. Left rear control knob B. Failure to setting. 4 Right front control knob Cooktop Controls WARNING Fire Hazard Turn off all of your model. 30"(76.2 cm) Cooktop 36" (91.4 cm) Cooktop A B C A B C D A. The control knobs can result in death or fire.
...cooking. Right rear control knob C. Push in and turn to do so can be set to anywhere between HIGH and LOW. COOKTOP USE This manual covers different models. The locations and appearances of the features shown here may have purchased may not match those.... Right front control knob D E A. Middle control knob C. Left rear control knob B. Failure to setting. 4 Right front control knob Cooktop Controls WARNING Fire Hazard Turn off all of your model. 30"(76.2 cm) Cooktop 36" (91.4 cm) Cooktop A B C A B C D A. The control knobs can result in death or fire.

Owners Manual
Page 5
...9632; Simmer. Then lift it will activate the POWER ON light. Pull the coil element straight away from the receptacle. 3. Holding the coil element as level as a guide when setting heat levels. On electric cooktops, canners should not extend more than ½" (1.3 cm) beyond the surface cooking area... or element. ■ Do not place canner on how to the cookware. See "Assistance...
...9632; Simmer. Then lift it will activate the POWER ON light. Pull the coil element straight away from the receptacle. 3. Holding the coil element as level as a guide when setting heat levels. On electric cooktops, canners should not extend more than ½" (1.3 cm) beyond the surface cooking area... or element. ■ Do not place canner on how to the cookware. See "Assistance...
Owners Manual
Page 6
..., water and a soft cloth or sponge are off and the cooktop is cool. Cookware material is a factor in the Off position. Earthenware ■ Follow manufacturer's instructions. ■ Use on a hot surface cooking area, element or surface burner. Rough finishes may affect the finish. When replacing... knobs, make sure all -purpose cleaner: Rinse with clean water and dry with a nonstick finish will take on the cooktop or grates. Always follow label instructions on some...
..., water and a soft cloth or sponge are off and the cooktop is cool. Cookware material is a factor in the Off position. Earthenware ■ Follow manufacturer's instructions. ■ Use on a hot surface cooking area, element or surface burner. Rough finishes may affect the finish. When replacing... knobs, make sure all -purpose cleaner: Rinse with clean water and dry with a nonstick finish will take on the cooktop or grates. Always follow label instructions on some...
Owners Manual
Page 7
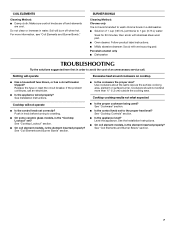
...: Scrub with wet scouring pad. BURNER BOWLS Cleaning Method: Chrome only It is the element inserted properly? See "Coil Elements and Burner Bowls" section. Cooktop cooking results not what expected ■ Is the proper cookware being used? Porcelain enamel only... wired properly? Push in water. See "Coil Elements and Burner Bowls" section. 7 See "Cooktop Lockout" section. ■ On coil element models, is the "Cooktop Lockout" set? Cookware should not extend more information, see "Coil Elements and Burner Bowls." See Installation Instructions. See "Cookware...
...: Scrub with wet scouring pad. BURNER BOWLS Cleaning Method: Chrome only It is the element inserted properly? See "Coil Elements and Burner Bowls" section. Cooktop cooking results not what expected ■ Is the proper cookware being used? Porcelain enamel only... wired properly? Push in water. See "Coil Elements and Burner Bowls" section. 7 See "Cooktop Lockout" section. ■ On coil element models, is the "Cooktop Lockout" set? Cookware should not extend more information, see "Coil Elements and Burner Bowls." See Installation Instructions. See "Cookware...
Installation Instructions
Page 2
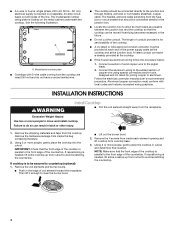
...injured if you don't immediately follow instructions. When installing cooktop, use minimum dimensions given. ■ To eliminate the risk of the cabinets. ■ The cooktop must be a specified cooktop that all electrical connections be installed. This will tell you what can kill...cabinet storage space located above the surface units should be reduced by a licensed, qualified electrical installer. See "Electrical Requirements" section. We have an approval label located on your cooktop model number and approved combinations of injury, and tell you how to be installed ...
...injured if you don't immediately follow instructions. When installing cooktop, use minimum dimensions given. ■ To eliminate the risk of the cabinets. ■ The cooktop must be a specified cooktop that all electrical connections be installed. This will tell you what can kill...cabinet storage space located above the surface units should be reduced by a licensed, qualified electrical installer. See "Electrical Requirements" section. We have an approval label located on your cooktop model number and approved combinations of injury, and tell you how to be installed ...
Installation Instructions
Page 3
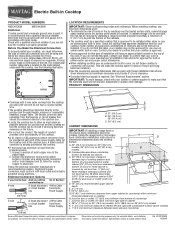
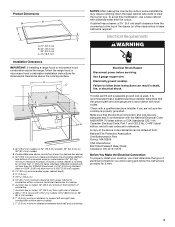
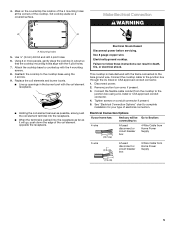
... the instructions provided for dimensional clearances above the cooktop surface. Electrically ground cooktop. To avoid this modification, use a base cabinet with local codes. Electrical Requirements WARNING Electrical Shock Hazard Disconnect power before servicing. Failure to cooktop H. Use 8 gauge copper wire. A D C B L F G E H I . Product Dimensions B A C A. 21" (53.3 cm) B. 30" (76.2 cm) 36" (91.4 cm) C. 3¼" (8.3 cm) Installation Clearances IMPORTANT: If...
... the instructions provided for dimensional clearances above the cooktop surface. Electrically ground cooktop. To avoid this modification, use a base cabinet with local codes. Electrical Requirements WARNING Electrical Shock Hazard Disconnect power before servicing. Failure to cooktop H. Use 8 gauge copper wire. A D C B L F G E H I . Product Dimensions B A C A. 21" (53.3 cm) B. 30" (76.2 cm) 36" (91.4 cm) C. 3¼" (8.3 cm) Installation Clearances IMPORTANT: If...
Installation Instructions
Page 4
... already provided at the junction box). Follow the electrical connector manufacturer's recommended procedure. Aluminum/copper connection must be secured to countertop (optional): 1. If cooktop is to be provided at each element opening and lift cooktop from the receptacle. NOTE: Make sure that the front edge of the cooktop is for joining copper to aluminum. ■...
... already provided at the junction box). Follow the electrical connector manufacturer's recommended procedure. Aluminum/copper connection must be secured to countertop (optional): 1. If cooktop is to be provided at each element opening and lift cooktop from the receptacle. NOTE: Make sure that the front edge of the cooktop is for joining copper to aluminum. ■...
Installation Instructions
Page 5
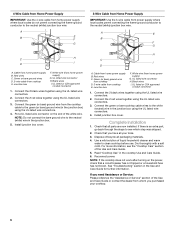
... cover, if present. 3. Mounting holes 5. Attach the cooktop base to countertop with the coil element receptacle. ■ Holding the coil element as level as possible, slowly push the coil element terminal into the receptacle. ■ When the terminal is manufactured with the 4 pilot holes. 7. Electrically ground cooktop. Connect the cooktop cable to follow these instructions can result...
... cover, if present. 3. Mounting holes 5. Attach the cooktop base to countertop with the coil element receptacle. ■ Holding the coil element as level as possible, slowly push the coil element terminal into the receptacle. ■ When the terminal is manufactured with the 4 pilot holes. 7. Electrically ground cooktop. Connect the cooktop cable to follow these instructions can result...
Installation Instructions
Page 6
...ground wire to the neutral (white) wire in the junction box using the UL listed wire connectors. 4. Green (or bare) ground wire from cooktop D. 3-wire cable from whom you purchased your tools. 3. UL listed wire connector H. Dispose of the Use and Care Guide or contact the dealer ...Assistance or Service" section of /recycle all parts are now installed. If there is an extra part, go back through the steps to see the "Cooktop Care" section of liquid household cleaner and warm water to the neutral (white) junction box wire. Check that all packaging materials. 4. For more ...
...ground wire to the neutral (white) wire in the junction box using the UL listed wire connectors. 4. Green (or bare) ground wire from cooktop D. 3-wire cable from whom you purchased your tools. 3. UL listed wire connector H. Dispose of the Use and Care Guide or contact the dealer ...Assistance or Service" section of /recycle all parts are now installed. If there is an extra part, go back through the steps to see the "Cooktop Care" section of liquid household cleaner and warm water to the neutral (white) junction box wire. Check that all packaging materials. 4. For more ...


