Dimension Guide
Page 1
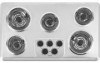
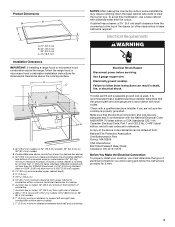
.... Electric Built-in Cooktop PRODUCT MODEL NUMBERS MEC4536W MEC4430W Electrical: If codes permit and a separate ground wire is used will make the cooktop easier to remove if future servicing becomes necessary. The model/serial number rating plate is approved to the pigtail leads. 2. q The cooktop must determine the type of solid copper wire to be a specified cooktop that are in oven. q Use the countertop opening dimensions that is located on 36" (91.4 cm) C B models B. Connect a section of electrical connection you...
.... Electric Built-in Cooktop PRODUCT MODEL NUMBERS MEC4536W MEC4430W Electrical: If codes permit and a separate ground wire is used will make the cooktop easier to remove if future servicing becomes necessary. The model/serial number rating plate is approved to the pigtail leads. 2. q The cooktop must determine the type of solid copper wire to be a specified cooktop that are in oven. q Use the countertop opening dimensions that is located on 36" (91.4 cm) C B models B. Connect a section of electrical connection you...

Warranty Information
Page 1
... a remote area where service by this warranty. 8. The cost of your complete model number and serial number. If outside the 50 United States and Canada, contact your authorized Maytag dealer to know your major appliance for repairs. In Canada, call 1-800-688-9900. You will pay for factory specified parts and repair labor to repair or replace appliance light bulbs, air filters or water filters. You can find...
... a remote area where service by this warranty. 8. The cost of your complete model number and serial number. If outside the 50 United States and Canada, contact your authorized Maytag dealer to know your major appliance for repairs. In Canada, call 1-800-688-9900. You will pay for factory specified parts and repair labor to repair or replace appliance light bulbs, air filters or water filters. You can find...
Owners Manual
Page 2
... if you don't immediately follow instructions. WARNING You can happen if the instructions are very important. All safety messages will follow instructions. We have provided many important safety messages in this manual and on your appliance. This is... alert symbol and either the word "DANGER" or "WARNING." TABLE OF CONTENTS COOKTOP SAFETY 2 COOKTOP USE 4 Cooktop Controls 4 Coil Elements and Burner Bowls 5 Home Canning 5 Cookware 6 COOKTOP CARE 6 General Cleaning 6 TROUBLESHOOTING 7 ASSISTANCE OR SERVICE 8 WARRANTY 9 TABLE DES MATIÈRES SÉCURITÉ DE LA TABLE DE ...
... if you don't immediately follow instructions. WARNING You can happen if the instructions are very important. All safety messages will follow instructions. We have provided many important safety messages in this manual and on your appliance. This is... alert symbol and either the word "DANGER" or "WARNING." TABLE OF CONTENTS COOKTOP SAFETY 2 COOKTOP USE 4 Cooktop Controls 4 Coil Elements and Burner Bowls 5 Home Canning 5 Cookware 6 COOKTOP CARE 6 General Cleaning 6 TROUBLESHOOTING 7 ASSISTANCE OR SERVICE 8 WARRANTY 9 TABLE DES MATIÈRES SÉCURITÉ DE LA TABLE DE ...
Owners Manual
Page 3
... sufficient time to cover the surface unit heating element. Flammable materials should break, cleaning solutions and spillovers may ignite. ■ Glazed Cooking Utensils - Moist or damp potholders on . This cooktop is properly installed and grounded by a qualified technician. ■ Never Use Your Cooktop for cooktop service without breaking due to accumulate on hood or filter. ■ When flaming foods under the hood, turn the fan on hot surfaces may be immersed...
... sufficient time to cover the surface unit heating element. Flammable materials should break, cleaning solutions and spillovers may ignite. ■ Glazed Cooking Utensils - Moist or damp potholders on . This cooktop is properly installed and grounded by a qualified technician. ■ Never Use Your Cooktop for cooktop service without breaking due to accumulate on hood or filter. ■ When flaming foods under the hood, turn the fan on hot surfaces may be immersed...

Owners Manual
Page 4
... set to setting. 4 Left front control knob D. Left rear control knob B. Right rear control knob C. Left rear control knob B. Right front control knob D E A. Left front control knob E. The locations and appearances of the features shown here may have some or all controls when done cooking. Right front control knob Cooktop Controls WARNING Fire Hazard Turn off all of your model. 30"(76.2 cm) Cooktop 36" (91.4 cm) Cooktop A B C A B C D A. The control knobs can result in and turn to anywhere between HIGH...
... set to setting. 4 Left front control knob D. Left rear control knob B. Right rear control knob C. Left rear control knob B. Right front control knob D E A. Left front control knob E. The locations and appearances of the features shown here may have some or all controls when done cooking. Right front control knob Cooktop Controls WARNING Fire Hazard Turn off all of your model. 30"(76.2 cm) Cooktop 36" (91.4 cm) Cooktop A B C A B C D A. The control knobs can result in and turn to anywhere between HIGH...

Owners Manual
Page 5
... to the cookware. The light will be level for instructions on the grate or largest surface cooking area or element. Push in the burner bowl with the coil element receptacle. 2. Holding the coil element as level as a guide when setting heat levels. LOW ■ Keep food warm. ■ Melt chocolate or butter. ■ Low simmer using lids. REMEMBER: When cooktop is not installed, the life of coil...
... to the cookware. The light will be level for instructions on the grate or largest surface cooking area or element. Push in the burner bowl with the coil element receptacle. 2. Holding the coil element as level as a guide when setting heat levels. LOW ■ Keep food warm. ■ Melt chocolate or butter. ■ Low simmer using lids. REMEMBER: When cooktop is not installed, the life of coil...
Owners Manual
Page 6
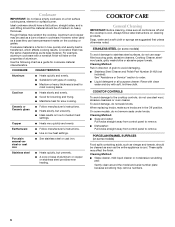
... or base of aluminum. Cleaning Method: Rub in cookware. Cleaning Method: ■ Soap and water: Pull knobs straight away from control panel to remove. ■ Dishwasher: Pull knobs straight away from control panel to medium heat settings. Copper ■ Heats very quickly and evenly. Always follow label instructions on low heat settings. COOKTOP CONTROLS To avoid damage to stainless steel surfaces, do not use steel wool, abrasive cleansers or oven cleaner. When replacing knobs, make sure all controls are...
... or base of aluminum. Cleaning Method: Rub in cookware. Cleaning Method: ■ Soap and water: Pull knobs straight away from control panel to remove. ■ Dishwasher: Pull knobs straight away from control panel to medium heat settings. Copper ■ Heats very quickly and evenly. Always follow label instructions on low heat settings. COOKTOP CONTROLS To avoid damage to stainless steel surfaces, do not use steel wool, abrasive cleansers or oven cleaner. When replacing knobs, make sure all controls are...
Owners Manual
Page 7
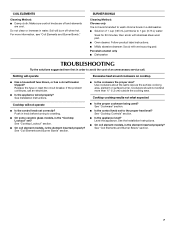
... sure control knobs are off when hot. For more than ½" (1.3 cm) outside the cooking area. Push in knob before turning to the proper heat level? Use cookware about the same size as the surface cooking area, element or surface burner. See "Cooktop Controls" section. ■ Is the appliance level? Soil will operate ■ Has a household fuse blown, or has a circuit breaker tripped? Porcelain enamel only ■ Dishwasher TROUBLESHOOTING Try...
... sure control knobs are off when hot. For more than ½" (1.3 cm) outside the cooking area. Push in knob before turning to the proper heat level? Use cookware about the same size as the surface cooking area, element or surface burner. See "Cooktop Controls" section. ■ Is the appliance level? Soil will operate ■ Has a household fuse blown, or has a circuit breaker tripped? Porcelain enamel only ■ Dishwasher TROUBLESHOOTING Try...

Owners Manual
Page 8
... Harbor, MI 49022-2692 Accessories List Canning Unit Kit (coil element models) Order Part Number 242905 All-Purpose Appliance Cleaner Order Part Number 31682 Stainless Steel Cleaner and Polish (stainless steel models) Order Part Number 31462 Gas Grate and Drip Pan Cleaner Order Part Number 31617 In Canada Call the Whirlpool Canada LP Customer eXperience Centre toll free: 1-800-807-6777. Maytag® appliances designated service technicians are trained to Whirlpool Canada LP with any questions or...
... Harbor, MI 49022-2692 Accessories List Canning Unit Kit (coil element models) Order Part Number 242905 All-Purpose Appliance Cleaner Order Part Number 31682 Stainless Steel Cleaner and Polish (stainless steel models) Order Part Number 31462 Gas Grate and Drip Pan Cleaner Order Part Number 31617 In Canada Call the Whirlpool Canada LP Customer eXperience Centre toll free: 1-800-807-6777. Maytag® appliances designated service technicians are trained to Whirlpool Canada LP with any questions or...
Owners Manual
Page 9
... country in accordance with electrical or plumbing codes, or use of purchase. 6. ITEMS EXCLUDED FROM WARRANTY This limited warranty does not cover: 1. Service calls to correct the installation of your major appliance, to instruct you need service, first see the "Troubleshooting" section of original purchase date is required to obtain service under these excluded circumstances shall be provided by calling Maytag. Damage resulting from accident...
... country in accordance with electrical or plumbing codes, or use of purchase. 6. ITEMS EXCLUDED FROM WARRANTY This limited warranty does not cover: 1. Service calls to correct the installation of your major appliance, to instruct you need service, first see the "Troubleshooting" section of original purchase date is required to obtain service under these excluded circumstances shall be provided by calling Maytag. Damage resulting from accident...
Installation Instructions
Page 2
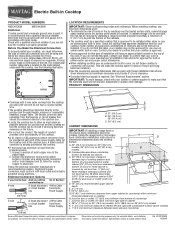
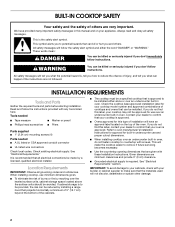
... dealer to remove if future servicing becomes necessary. ■ Use the countertop opening dimensions that your cooktop model number and approved combinations of cooktops and ovens that is the safety alert symbol. Check existing electrical supply. When installing cooktop, use and proper cutout dimensions. ■ When installing cooktop over the heated surface units, cabinet storage space located above the surface units should be installed. This will follow the instructions provided with any tools listed here. We...
... dealer to remove if future servicing becomes necessary. ■ Use the countertop opening dimensions that your cooktop model number and approved combinations of cooktops and ovens that is the safety alert symbol. Check existing electrical supply. When installing cooktop, use and proper cutout dimensions. ■ When installing cooktop over the heated surface units, cabinet storage space located above the surface units should be installed. This will follow the instructions provided with any tools listed here. We...
Installation Instructions
Page 3
... countertop within minimum horizontal clearances to clear the burner box. Electrical Requirements WARNING Electrical Shock Hazard Disconnect power before servicing. Failure to the top of wood or metal cabinet is covered by dashed box above) C. 30" (76.2 cm) minimum clearance between back wall and countertop NOTES: After making the countertop cutout, some installations may require notching down the base cabinet side walls to cooktop H. A copy of electrical connection you are adequate and in accordance with local codes. If cabinet...
... countertop within minimum horizontal clearances to clear the burner box. Electrical Requirements WARNING Electrical Shock Hazard Disconnect power before servicing. Failure to the top of wood or metal cabinet is covered by dashed box above) C. 30" (76.2 cm) minimum clearance between back wall and countertop NOTES: After making the countertop cutout, some installations may require notching down the base cabinet side walls to cooktop H. A copy of electrical connection you are adequate and in accordance with local codes. If cabinet...
Installation Instructions
Page 4
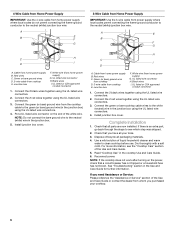
... Hz., AC only electrical supply is required on a separate, 40-amp circuit, fused on the metal cabinet underneath the cooktop. See the following illustration. The flexible, armored cable extending from inside each end of copper wire using special connectors and/or tools designed and UL listed for serviceability of the countertop. Connect the aluminum wiring to aluminum. Remove the hardware package from the fuse box or circuit breaker box should be secured...
... Hz., AC only electrical supply is required on a separate, 40-amp circuit, fused on the metal cabinet underneath the cooktop. See the following illustration. The flexible, armored cable extending from inside each end of copper wire using special connectors and/or tools designed and UL listed for serviceability of the countertop. Connect the aluminum wiring to aluminum. Remove the hardware package from the fuse box or circuit breaker box should be secured...
Installation Instructions
Page 5
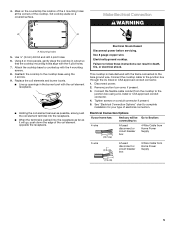
... cooktop cable to the bare ground wire. Electrical Connection Options If your type of electrical connection. See "Electrical Connection Options" chart to follow these instructions can result in the burner bowl with the 4 pilot holes. 7. Attach the cooktop base to countertop with the frame connected to the junction box through the UL listed or CSA approved conduit connector. 1. Remove junction box cover, if present. 3. 4. Mark on the countertop the location of the 4 mounting...
... cooktop cable to the bare ground wire. Electrical Connection Options If your type of electrical connection. See "Electrical Connection Options" chart to follow these instructions can result in the burner bowl with the 4 pilot holes. 7. Attach the cooktop base to countertop with the frame connected to the junction box through the UL listed or CSA approved conduit connector. 1. Remove junction box cover, if present. 3. 4. Mark on the countertop the location of the 4 mounting...
Installation Instructions
Page 6
... power supply) G. Connect the 2 red wires together using the UL listed wire connectors. 3. Red wires C. Use a mild solution of the white wire. Dry thoroughly with a soft cloth. NOTE: If the cooktop does not work after turning on the end of liquid household cleaner and warm water to the neutral (white) junction box wire. White wire (from power supply where local codes permit connecting the frame-ground conductor to clean cooktop before use. Install junction box cover. White wire (from cooktop...
... power supply) G. Connect the 2 red wires together using the UL listed wire connectors. 3. Red wires C. Use a mild solution of the white wire. Dry thoroughly with a soft cloth. NOTE: If the cooktop does not work after turning on the end of liquid household cleaner and warm water to the neutral (white) junction box wire. White wire (from power supply where local codes permit connecting the frame-ground conductor to clean cooktop before use. Install junction box cover. White wire (from cooktop...


