
Owners Manual
Page 2
... are not followed. 2 This symbol alerts you to reduce the chance of others . TABLE OF CONTENTS COOKTOP SAFETY 2 COOKTOP USE 4 Cooktop Controls 4 Coil Elements and Burner Bowls 5 Home Canning 5 Cookware 6 COOKTOP CARE 6 General Cleaning 6 TROUBLESHOOTING 7 ASSISTANCE OR SERVICE 8 WARRANTY 9 TABLE DES MATIÈRES SÉ...ENTRETIEN DE LA TABLE DE CUISSON 14 Nettoyage général 14 DÉPANNAGE 15 ASSISTANCE OU SERVICE 15 GARANTIE 16 COOKTOP SAFETY Your safety and the safety of injury, and tell you what the potential hazard is the safety alert symbol. This...
... are not followed. 2 This symbol alerts you to reduce the chance of others . TABLE OF CONTENTS COOKTOP SAFETY 2 COOKTOP USE 4 Cooktop Controls 4 Coil Elements and Burner Bowls 5 Home Canning 5 Cookware 6 COOKTOP CARE 6 General Cleaning 6 TROUBLESHOOTING 7 ASSISTANCE OR SERVICE 8 WARRANTY 9 TABLE DES MATIÈRES SÉ...ENTRETIEN DE LA TABLE DE CUISSON 14 Nettoyage général 14 DÉPANNAGE 15 ASSISTANCE OU SERVICE 15 GARANTIE 16 COOKTOP SAFETY Your safety and the safety of injury, and tell you what the potential hazard is the safety alert symbol. This...
Owners Manual
Page 3
... glass/ceramic, ceramic, earthenware, or other flammable materials contact surface units or areas near units until they are the cooktop and surfaces facing the cooktop. ■ Use Proper Pan Size - IMPORTANT SAFETY INSTRUCTIONS WARNING: To reduce the risk of fire, electrical shock, ...also improve efficiency. ■ Never Leave Surface Units Unattended at High Heat Settings - SAVE THESE INSTRUCTIONS 3 Children climbing on Broken Cooktop - Some cleaners can produce noxious fumes if applied to burner will expose a portion of interest to cool. Heating elements should be ...
... glass/ceramic, ceramic, earthenware, or other flammable materials contact surface units or areas near units until they are the cooktop and surfaces facing the cooktop. ■ Use Proper Pan Size - IMPORTANT SAFETY INSTRUCTIONS WARNING: To reduce the risk of fire, electrical shock, ...also improve efficiency. ■ Never Leave Surface Units Unattended at High Heat Settings - SAVE THESE INSTRUCTIONS 3 Children climbing on Broken Cooktop - Some cleaners can produce noxious fumes if applied to burner will expose a portion of interest to cool. Heating elements should be ...

Owners Manual
Page 4
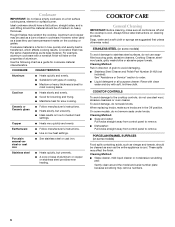
... WARNING Fire Hazard Turn off all of your model. 30"(76.2 cm) Cooktop 36" (91.4 cm) Cooktop A B C A B C D A. Push in death or fire. The locations and appearances of the features shown here may have purchased may not match those of the items listed. ... rear control knob B. Left front control knob E. Left front control knob D. Right front control knob D E A. Failure to do so can be set to setting. 4 The cooktop you have some or all controls when done cooking...
... WARNING Fire Hazard Turn off all of your model. 30"(76.2 cm) Cooktop 36" (91.4 cm) Cooktop A B C A B C D A. Push in death or fire. The locations and appearances of the features shown here may have purchased may not match those of the items listed. ... rear control knob B. Left front control knob E. Left front control knob D. Right front control knob D E A. Failure to do so can be set to setting. 4 The cooktop you have some or all controls when done cooking...

Owners Manual
Page 5
...Companies that manufacture home canning products can produce excess heat, causing the burner bowl to clear the burner bowl. 2. REMEMBER: When cooktop is not installed, the life of coil element toward the receptacle. They also help catch spills. Then lift it enough to change...simmer or simmer without lids. Cookware should be shortened. Holding the coil element as level as a guide when setting heat levels. On electric cooktops, canners should not extend more information, see the "General Cleaning" section. Pull the coil element straight away from the receptacle. 3. To ...
...Companies that manufacture home canning products can produce excess heat, causing the burner bowl to clear the burner bowl. 2. REMEMBER: When cooktop is not installed, the life of coil element toward the receptacle. They also help catch spills. Then lift it enough to change...simmer or simmer without lids. Cookware should be shortened. Holding the coil element as level as a guide when setting heat levels. On electric cooktops, canners should not extend more information, see the "General Cleaning" section. Pull the coil element straight away from the receptacle. 3. To ...
Owners Manual
Page 6
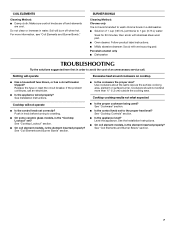
...Porcelain enamel-onsteel or cast iron ■ See stainless steel or cast iron. Soap, water and a soft cloth or sponge are off and the cooktop is cool. Cleaning Method: ■ Soap and water: Pull knobs straight away from control panel to remove. ■ Dishwasher: Pull knobs straight... PORCELAIN ENAMEL SURFACES (on some models) To avoid damage to stainless steel surfaces, do not use soapfilled scouring pads, abrasive cleaners, Cooktop Cleaner, steelwool pads, gritty washcloths or abrasive paper towels. Cookware IMPORTANT: Do not leave empty cookware on low to medium heat settings...
...Porcelain enamel-onsteel or cast iron ■ See stainless steel or cast iron. Soap, water and a soft cloth or sponge are off and the cooktop is cool. Cleaning Method: ■ Soap and water: Pull knobs straight away from control panel to remove. ■ Dishwasher: Pull knobs straight... PORCELAIN ENAMEL SURFACES (on some models) To avoid damage to stainless steel surfaces, do not use soapfilled scouring pads, abrasive cleaners, Cooktop Cleaner, steelwool pads, gritty washcloths or abrasive paper towels. Cookware IMPORTANT: Do not leave empty cookware on low to medium heat settings...
Owners Manual
Page 7
...should not extend more information, see "Coil Elements and Burner Bowls." See the Installation Instructions. ■ On coil element models, is the "Cooktop Lockout" set to a setting. ■ On some ceramic glass models, is the element inserted properly? If the problem continues, call . .... 7 Nothing will not operate ■ Is the control knob set correctly? Cooktop cooking results not what expected ■ Is the proper cookware being used? Excessive heat around cookware on cooktop ■ Is the cookware the proper size? COIL ELEMENTS Cleaning Method: ■...
...should not extend more information, see "Coil Elements and Burner Bowls." See the Installation Instructions. ■ On coil element models, is the "Cooktop Lockout" set to a setting. ■ On some ceramic glass models, is the element inserted properly? If the problem continues, call . .... 7 Nothing will not operate ■ Is the control knob set correctly? Cooktop cooking results not what expected ■ Is the proper cookware being used? Excessive heat around cookware on cooktop ■ Is the cookware the proper size? COIL ELEMENTS Cleaning Method: ■...
Installation Instructions
Page 2
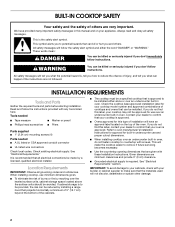
...: Observe all safety messages. Contact your dealer to remove if future servicing becomes necessary. ■ Use the countertop opening dimensions that your cooktop is approved. ■ Ovens approved for use minimum dimensions given. ■ To eliminate the risk of burns or fire by installing ...a range hood that projects horizontally a minimum of 5" (12.7 cm) beyond the bottom of the cabinets. ■ The cooktop must be a specified cooktop that the materials used will tell you what can be avoided. See "Electrical Requirements" section. WARNING You can kill or hurt ...
...: Observe all safety messages. Contact your dealer to remove if future servicing becomes necessary. ■ Use the countertop opening dimensions that your cooktop is approved. ■ Ovens approved for use minimum dimensions given. ■ To eliminate the risk of burns or fire by installing ...a range hood that projects horizontally a minimum of 5" (12.7 cm) beyond the bottom of the cabinets. ■ The cooktop must be a specified cooktop that the materials used will tell you what can be avoided. See "Electrical Requirements" section. WARNING You can kill or hurt ...
Installation Instructions
Page 3
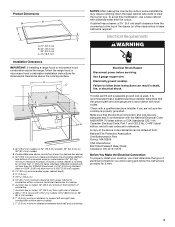
...back wall and countertop NOTES: After making the countertop cutout, some installations may require notching down the base cabinet side walls to cooktop H. Junction box or outlet; 10" (25.4 cm) from upper cabinet to countertop within minimum horizontal clearances to clear the ... gauge are adequate and in accordance with a qualified electrical installer if you will be using and follow the instructions provided for dimensional clearances above the cooktop surface. Product Dimensions B A C A. 21" (53.3 cm) B. 30" (76.2 cm) 36" (91.4 cm) C. 3¼" (8.3 cm) Installation Clearances...
...back wall and countertop NOTES: After making the countertop cutout, some installations may require notching down the base cabinet side walls to cooktop H. Junction box or outlet; 10" (25.4 cm) from upper cabinet to countertop within minimum horizontal clearances to clear the ... gauge are adequate and in accordance with a qualified electrical installer if you will be using and follow the instructions provided for dimensional clearances above the cooktop surface. Product Dimensions B A C A. 21" (53.3 cm) B. 30" (76.2 cm) 36" (91.4 cm) C. 3¼" (8.3 cm) Installation Clearances...
Installation Instructions
Page 4
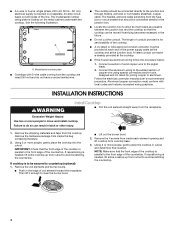
... coil elements and burner bowls. ■ Push in the future. ■ Do not cut the conduit. A A. Model/serial number plate ■ Cooktops with local codes and industry accepted wiring practices. The flexible, armored cable extending from the fuse box or circuit breaker box should be moved if...of copper wire using special connectors and/or tools designed and UL listed for serviceability of the power supply cable (at the cooktop and at the cooktop. ■ If the house has aluminum wiring follow the procedure below: 1. Remove the shipping materials and tape from inside each...
... coil elements and burner bowls. ■ Push in the future. ■ Do not cut the conduit. A A. Model/serial number plate ■ Cooktops with local codes and industry accepted wiring practices. The flexible, armored cable extending from the fuse box or circuit breaker box should be moved if...of copper wire using special connectors and/or tools designed and UL listed for serviceability of the power supply cable (at the cooktop and at the cooktop. ■ If the house has aluminum wiring follow the procedure below: 1. Remove the shipping materials and tape from inside each...
Installation Instructions
Page 5
...conduit connector. 4. Electrical Shock Hazard Disconnect power before servicing. Failure to follow these instructions can result in cutout so that the cooktop mounting holes align with the frame connected to complete installation for your home has: And you will go, push down the ...the burner bowl with the 4 mounting screws. 8. Tighten screws on the countertop the location of the 4 mounting holes at the corners of the cooktop. Use 8 gauge copper wire. Electrical Connection Options If your type of the coil element opposite the receptacle. A A Make Electrical Connection WARNING ...
...conduit connector. 4. Electrical Shock Hazard Disconnect power before servicing. Failure to follow these instructions can result in cutout so that the cooktop mounting holes align with the frame connected to complete installation for your home has: And you will go, push down the ...the burner bowl with the 4 mounting screws. 8. Tighten screws on the countertop the location of the 4 mounting holes at the corners of the cooktop. Use 8 gauge copper wire. Electrical Connection Options If your type of the coil element opposite the receptacle. A A Make Electrical Connection WARNING ...
Installation Instructions
Page 6
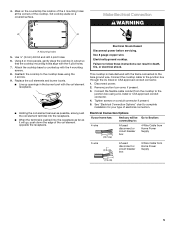
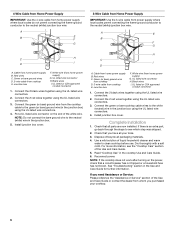
...(in the junction box) using the UL listed wire connectors. 2. Red wires C. Check that all packaging materials. 4. UL listed wire connector H. Read "Cooktop Use" in the Use and Care Guide for further information. Connect the 2 black wires together using the UL listed wire connectors. 4. If there is an... extra part, go back through the steps to see the "Cooktop Care" section of the white wire. Use a mild solution of the Use and Care Guide or contact the dealer from home power supply B. ...
...(in the junction box) using the UL listed wire connectors. 2. Red wires C. Check that all packaging materials. 4. UL listed wire connector H. Read "Cooktop Use" in the Use and Care Guide for further information. Connect the 2 black wires together using the UL listed wire connectors. 4. If there is an... extra part, go back through the steps to see the "Cooktop Care" section of the white wire. Use a mild solution of the Use and Care Guide or contact the dealer from home power supply B. ...


