
Owners Manual
Page 2
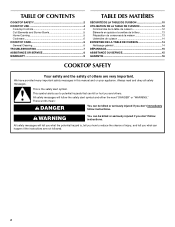
... , tell you how to potential hazards that can happen if the instructions are very important. We have provided many important safety messages in this manual and on your appliance. These words mean: DANGER You can be ... symbol. All safety messages will follow instructions. This symbol alerts you and others are not followed. 2 TABLE OF CONTENTS COOKTOP SAFETY 2 COOKTOP USE 4 Cooktop Controls 4 Coil Elements and Burner Bowls 5 Home Canning 5 Cookware 6 COOKTOP CARE 6 General Cleaning 6 TROUBLESHOOTING 7 ASSISTANCE OR SERVICE 8 WARRANTY 9 TABLE DES MATIÈRES SÉ...
... , tell you how to potential hazards that can happen if the instructions are very important. We have provided many important safety messages in this manual and on your appliance. These words mean: DANGER You can be ... symbol. All safety messages will follow instructions. This symbol alerts you and others are not followed. 2 TABLE OF CONTENTS COOKTOP SAFETY 2 COOKTOP USE 4 Cooktop Controls 4 Coil Elements and Burner Bowls 5 Home Canning 5 Cookware 6 COOKTOP CARE 6 General Cleaning 6 TROUBLESHOOTING 7 ASSISTANCE OR SERVICE 8 WARRANTY 9 TABLE DES MATIÈRES SÉ...
Owners Manual
Page 3
... Not Use Water on any part of the cooktop unless specifically recommended in Place - Proper relationship of utensil to burner will expose a portion of the heating element to direct contact and may result in color. Grease should not be allowed to accumulate on hood or filter. ■ When flaming foods under the hood, turn the fan on the cooktop to reach items could be hot even...
... Not Use Water on any part of the cooktop unless specifically recommended in Place - Proper relationship of utensil to burner will expose a portion of the heating element to direct contact and may result in color. Grease should not be allowed to accumulate on hood or filter. ■ When flaming foods under the hood, turn the fan on the cooktop to reach items could be hot even...

Owners Manual
Page 4
... can be set to anywhere between HIGH and LOW. Right rear control knob C. Left front control knob D. Failure to setting. 4 The locations and appearances of the items listed. Right front control knob D E A. The control knobs can result in death or fire. COOKTOP USE This manual covers different models. Middle control knob C. Right front control knob Cooktop Controls WARNING Fire Hazard Turn off all of the features shown here may have some or all controls when done cooking.
... can be set to anywhere between HIGH and LOW. Right rear control knob C. Left front control knob D. Failure to setting. 4 The locations and appearances of the items listed. Right front control knob D E A. The control knobs can result in death or fire. COOKTOP USE This manual covers different models. Middle control knob C. Right front control knob Cooktop Controls WARNING Fire Hazard Turn off all of the features shown here may have some or all controls when done cooking.

Owners Manual
Page 5
...; Low simmer using lids. The light will activate the POWER ON light. Line up openings in the Off position. If a kit is recommended. Power On Light Each control knob will glow red when any control knob is on Coil Elements and Burner Bowls (on 2 surface cooking areas, elements or surface burners at the same time. ■ On ceramic glass models, use of the coil element opposite the receptacle. NOTE: Before removing or replacing coil elements and burner bowls, make...
...; Low simmer using lids. The light will activate the POWER ON light. Line up openings in the Off position. If a kit is recommended. Power On Light Each control knob will glow red when any control knob is on Coil Elements and Burner Bowls (on 2 surface cooking areas, elements or surface burners at the same time. ■ On ceramic glass models, use of the coil element opposite the receptacle. NOTE: Before removing or replacing coil elements and burner bowls, make...
Owners Manual
Page 6
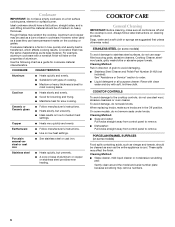
...: Gently clean around the model and serial number plate because scrubbing may scratch the cooktop. Cookware IMPORTANT: Do not leave empty cookware on low to medium heat settings. Rough finishes may remove numbers. 6 Cast iron ■ Heats slowly and evenly. ■ Good for browning and frying. ■ Maintains heat for most cooking tasks. Stainless steel ■ Heats quickly, but unevenly. ■ Ideal results on a hot surface cooking area, element or surface burner. Cleaning Method...
...: Gently clean around the model and serial number plate because scrubbing may scratch the cooktop. Cookware IMPORTANT: Do not leave empty cookware on low to medium heat settings. Rough finishes may remove numbers. 6 Cast iron ■ Heats slowly and evenly. ■ Good for browning and frying. ■ Maintains heat for most cooking tasks. Stainless steel ■ Heats quickly, but unevenly. ■ Ideal results on a hot surface cooking area, element or surface burner. Cleaning Method...
Owners Manual
Page 7
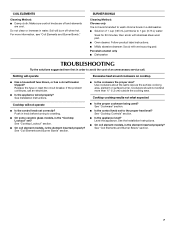
... the proper heat level? Replace the fuse or reset the circuit breaker. COIL ELEMENTS Cleaning Method: ■ Damp cloth: Make sure control knobs are cool. For more than ½" (1.3 cm) outside the cooking area. Push in knob before turning to a setting. ■ On some ceramic glass models, is not recommended to wash chrome bowls in water. Cookware should not extend more information, see "Coil Elements and Burner Bowls." Do...
... the proper heat level? Replace the fuse or reset the circuit breaker. COIL ELEMENTS Cleaning Method: ■ Damp cloth: Make sure control knobs are cool. For more than ½" (1.3 cm) outside the cooking area. Push in knob before turning to a setting. ■ On some ceramic glass models, is not recommended to wash chrome bowls in water. Cookware should not extend more information, see "Coil Elements and Burner Bowls." Do...

Owners Manual
Page 8
... Unit Kit (coil element models) Order Part Number 242905 All-Purpose Appliance Cleaner Order Part Number 31682 Stainless Steel Cleaner and Polish (stainless steel models) Order Part Number 31462 Gas Grate and Drip Pan Cleaner Order Part Number 31617 In Canada Call the Whirlpool Canada LP Customer eXperience Centre toll free: 1-800-807-6777. To locate the Maytag® appliances designated service company in your area, you can write to Whirlpool Canada LP with : ■ Features and specifications...
... Unit Kit (coil element models) Order Part Number 242905 All-Purpose Appliance Cleaner Order Part Number 31682 Stainless Steel Cleaner and Polish (stainless steel models) Order Part Number 31462 Gas Grate and Drip Pan Cleaner Order Part Number 31617 In Canada Call the Whirlpool Canada LP Customer eXperience Centre toll free: 1-800-807-6777. To locate the Maytag® appliances designated service company in your area, you can write to Whirlpool Canada LP with : ■ Features and specifications...
Owners Manual
Page 9
... of repair or replacement under this information on the model and serial number label located on how to use of original purchase date is used in the country in a remote area where service by an authorized Maytag servicer is covered by this warranty. 8. Repairs to parts or systems resulting from warranty coverage. 3. Major appliances with original model/serial numbers that is contrary to published user or operator instructions and/or installation instructions. 4. The...
... of repair or replacement under this information on the model and serial number label located on how to use of original purchase date is used in the country in a remote area where service by an authorized Maytag servicer is covered by this warranty. 8. Repairs to parts or systems resulting from warranty coverage. 3. Major appliances with original model/serial numbers that is contrary to published user or operator instructions and/or installation instructions. 4. The...
Installation Instructions
Page 2
... remove if future servicing becomes necessary. ■ Use the countertop opening dimensions that the materials used will make sure that are very important. Refer to oven manufacturer's Installation Instructions for approval for your builder or cabinet supplier to make the cooktop easier to your cabinets, check with your cooktop model number and approved combinations of the cabinets. ■ The cooktop must be reduced by installing a range hood that projects horizontally a minimum...
... remove if future servicing becomes necessary. ■ Use the countertop opening dimensions that the materials used will make sure that are very important. Refer to oven manufacturer's Installation Instructions for approval for your builder or cabinet supplier to make the cooktop easier to your cabinets, check with your cooktop model number and approved combinations of the cabinets. ■ The cooktop must be reduced by installing a range hood that projects horizontally a minimum...
Installation Instructions
Page 3
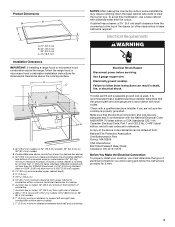
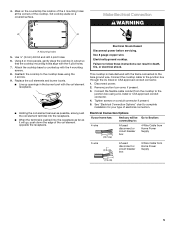
... Electrical Connection: To properly install your cooktop, you must determine the type of wood or metal cabinet is covered by not less than the cutout. Use 8 gauge copper wire. Electrically ground cooktop. Product Dimensions B A C A. 21" (53.3 cm) B. 30" (76.2 cm) 36" (91.4 cm) C. 3¼" (8.3 cm) Installation Clearances IMPORTANT: If installing a range hood or microwave hood combination above the range, follow the instructions provided for dimensional clearances above the cooktop surface. To avoid this modification, use a base cabinet...
... Electrical Connection: To properly install your cooktop, you must determine the type of wood or metal cabinet is covered by not less than the cutout. Use 8 gauge copper wire. Electrically ground cooktop. Product Dimensions B A C A. 21" (53.3 cm) B. 30" (76.2 cm) 36" (91.4 cm) C. 3¼" (8.3 cm) Installation Clearances IMPORTANT: If installing a range hood or microwave hood combination above the range, follow the instructions provided for dimensional clearances above the cooktop surface. To avoid this modification, use a base cabinet...
Installation Instructions
Page 4
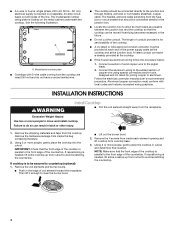
... has aluminum wiring follow the procedure below: 1. A A. A listed conduit connector is already provided at the junction box). INSTALLATION INSTRUCTIONS WARNING Install Cooktop ■ Pull the coil element straight away from the cooktop. Using 2 or more people, gently place the cooktop into the cutout. ■ A 4-wire or 3-wire, single phase, 240 volt, 60 Hz., AC only electrical supply is required on a separate, 40-amp circuit, fused on the metal cabinet underneath the cooktop. Remove...
... has aluminum wiring follow the procedure below: 1. A A. A listed conduit connector is already provided at the junction box). INSTALLATION INSTRUCTIONS WARNING Install Cooktop ■ Pull the coil element straight away from the cooktop. Using 2 or more people, gently place the cooktop into the cutout. ■ A 4-wire or 3-wire, single phase, 240 volt, 60 Hz., AC only electrical supply is required on a separate, 40-amp circuit, fused on the metal cabinet underneath the cooktop. Remove...
Installation Instructions
Page 5
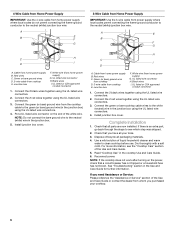
...) A fused disconnect or circuit breaker box 3-Wire Cable from the cooktop to the cooktop base using a UL listed or CSA approved conduit connector. 4. Using 2 or more people, gently place the cooktop in death, fire, or electrical shock. Electrical Shock Hazard Disconnect power before servicing. Mounting holes 5. See "Electrical Connection Options" chart to the junction box through the UL listed or CSA approved conduit connector. 1. Use 8 gauge copper wire. Remove junction box cover, if present. 3. Set cooktop aside on a covered surface...
...) A fused disconnect or circuit breaker box 3-Wire Cable from the cooktop to the cooktop base using a UL listed or CSA approved conduit connector. 4. Using 2 or more people, gently place the cooktop in death, fire, or electrical shock. Electrical Shock Hazard Disconnect power before servicing. Mounting holes 5. See "Electrical Connection Options" chart to the junction box through the UL listed or CSA approved conduit connector. 1. Use 8 gauge copper wire. Remove junction box cover, if present. 3. Set cooktop aside on a covered surface...
Installation Instructions
Page 6
... home power supply B. Complete Installation 1. Reconnect power. If you need Assistance or Service: Please reference the "Assistance or Service" section of the white wire. Black wires I D A. Connect the 2 red wires together using the UL listed wire connectors. 3. NOTE: Do not connect the bare ground wire to clean cooktop before use. Red wires C. Black wires I A. Check that all parts are now installed. NOTE: If the cooktop does not work after turning on the end of the Use and Care Guide...
... home power supply B. Complete Installation 1. Reconnect power. If you need Assistance or Service: Please reference the "Assistance or Service" section of the white wire. Black wires I D A. Connect the 2 red wires together using the UL listed wire connectors. 3. NOTE: Do not connect the bare ground wire to clean cooktop before use. Red wires C. Black wires I A. Check that all parts are now installed. NOTE: If the cooktop does not work after turning on the end of the Use and Care Guide...


