Quick Start Guide
Page 1
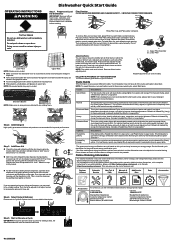
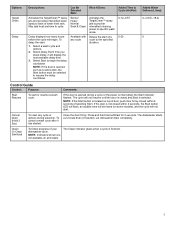
...Temp Cycles Cycles Heated Rinse Dry Rinse Clean Sanitized OSpTtiAonRsT Resume C ANCEL Drain S TA R T Resume CANCEL Drain Step 5. Pull up to "Lock". Do not operate dishwasher with a Heated Dry (Short or Long) cycle. Upper Filter Assembly B. Height Adjustments (on the lid. Includes a Heated Dry (Short or Long) option.* Extended Soak This cycle quietly soaks dishes with your thumb and pulling up position and level. Use this cycle and may want to sliding lid-style dispenser, open the rinse dispenser lid by twisting the rinse aid cap 1/4 turn to remove. Load...
...Temp Cycles Cycles Heated Rinse Dry Rinse Clean Sanitized OSpTtiAonRsT Resume C ANCEL Drain S TA R T Resume CANCEL Drain Step 5. Pull up to "Lock". Do not operate dishwasher with a Heated Dry (Short or Long) cycle. Upper Filter Assembly B. Height Adjustments (on the lid. Includes a Heated Dry (Short or Long) option.* Extended Soak This cycle quietly soaks dishes with your thumb and pulling up position and level. Use this cycle and may want to sliding lid-style dispenser, open the rinse dispenser lid by twisting the rinse aid cap 1/4 turn to remove. Load...
Cycle Guide
Page 1
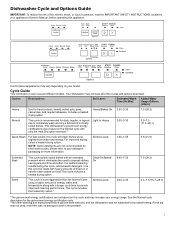
... improved drying, select a heated drying option. please refer to your appliance's Owner's Manual, before operating this cycle for hard-to Heavy 2:00-3:30 3.0-7.5 (11.4-28.1) Quick Wash For fast results, this cycle will clean dishes using slightly more water and energy. This cycle includes a heated drying option. Cycles: Descriptions: Soil Level: Estimated Wash Time (Hr:Min): Added Water Usage Gallons (Liters): Heavy Use for loads with an extended prewash which eliminates the need to truncated testing. This dishwasher's government energy...
... improved drying, select a heated drying option. please refer to your appliance's Owner's Manual, before operating this cycle for hard-to Heavy 2:00-3:30 3.0-7.5 (11.4-28.1) Quick Wash For fast results, this cycle will clean dishes using slightly more water and energy. This cycle includes a heated drying option. Cycles: Descriptions: Soil Level: Estimated Wash Time (Hr:Min): Added Water Usage Gallons (Liters): Heavy Use for loads with an extended prewash which eliminates the need to truncated testing. This dishwasher's government energy...
Cycle Guide
Page 2
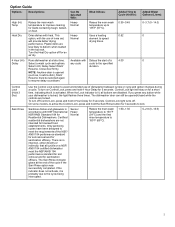
... opened/closed while the controls are less likely to improve cleaning for sanitization efficacy. Delays the start of dishwasher between cycles or cycle and option changes during a cycle. Control Lock light will provide better drying performance. Sanitizes dishes and glassware in the top rack. Dries dishes with the use of a cycle to meet the NSF/ANSI 184 performance standard for soil removal and for 3 seconds. When the Lock indicator is probably due to resume delay countdown. To turn...
... opened/closed while the controls are less likely to improve cleaning for sanitization efficacy. Delays the start of dishwasher between cycles or cycle and option changes during a cycle. Control Lock light will provide better drying performance. Sanitizes dishes and glassware in the top rack. Dries dishes with the use of a cycle to meet the NSF/ANSI 184 performance standard for soil removal and for 3 seconds. When the Lock indicator is probably due to resume delay countdown. To turn...
Cycle Guide
Page 3
....2) 0 Control Guide Control: Purpose: Comments: Start Resume To start . The cycle will display the next available delay time. 3. The dishwasher starts a 2-minute drain (if needed). To cancel a wash cycle after it will not resume until the door is selected. Clean Or Clean Sanitized To follow progress of lower level rack. Select Delay. Each time you press Delay, it has started. Options: Target Clean Delay Descriptions: Activates the TargetClean™ spray jets and provides intensified water spray to cycle. Available with Delays the start : 1. Select Start to...
....2) 0 Control Guide Control: Purpose: Comments: Start Resume To start . The cycle will display the next available delay time. 3. The dishwasher starts a 2-minute drain (if needed). To cancel a wash cycle after it will not resume until the door is selected. Clean Or Clean Sanitized To follow progress of lower level rack. Select Delay. Each time you press Delay, it has started. Options: Target Clean Delay Descriptions: Activates the TargetClean™ spray jets and provides intensified water spray to cycle. Available with Delays the start : 1. Select Start to...
Owners Manual
Page 2
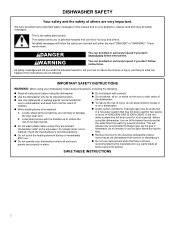
... dishwasher, turn on your dishwasher unless all hot-water faucets and let the water flow from service or discarding it. � Do not use . � Do not operate your appliance. For plastic items not so marked, check the manufacturer's recommendations. � Do not touch the heating element during this manual and on all enclosure panels are very important. IMPORTANT SAFETY INSTRUCTIONS WARNING: When using your dishwasher...
... dishwasher, turn on your dishwasher unless all hot-water faucets and let the water flow from service or discarding it. � Do not use . � Do not operate your appliance. For plastic items not so marked, check the manufacturer's recommendations. � Do not touch the heating element during this manual and on all enclosure panels are very important. IMPORTANT SAFETY INSTRUCTIONS WARNING: When using your dishwasher...

Owners Manual
Page 3
... not modify the plug provided with all local codes and ordinance. In the event of a malfunction or breakdown, grounding will not fit the outlet, have a proper outlet installed by providing a path of electric shock. GROUNDING INSTRUCTIONS � For a grounded, cord-connected dishwasher: The dishwasher must be run with the circuit conductors and connected to the equipment-grounding terminal or lead on open door.
... not modify the plug provided with all local codes and ordinance. In the event of a malfunction or breakdown, grounding will not fit the outlet, have a proper outlet installed by providing a path of electric shock. GROUNDING INSTRUCTIONS � For a grounded, cord-connected dishwasher: The dishwasher must be run with the circuit conductors and connected to the equipment-grounding terminal or lead on open door.
Owners Manual
Page 4
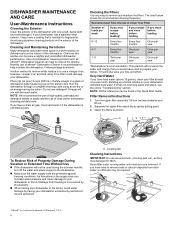
... is not draining well. Filter Removal Instructions 1. Turn the upper filter assembly 1/4 turn off the water and power supply to your dishwasher indicates hard water. Damage from hard water, a soft brush may have a coating that you wash before loading If you would have hard water (above 15 grains), clean your dishwasher has a stainless steel exterior, it too often could affect dishwasher performance. Rinse filter under running water until most soils are protected against freezing conditions. Monthly use of affresh...
... is not draining well. Filter Removal Instructions 1. Turn the upper filter assembly 1/4 turn off the water and power supply to your dishwasher indicates hard water. Damage from hard water, a soft brush may have a coating that you wash before loading If you would have hard water (above 15 grains), clean your dishwasher has a stainless steel exterior, it too often could affect dishwasher performance. Rinse filter under running water until most soils are protected against freezing conditions. Monthly use of affresh...

Owners Manual
Page 5
... mm) open-end wrench Bath towel Parts Supplied Masking or duct tape Drain hose clamps (2) Drain hose (1 large/red and 1 small/green) #10 x 1/2" (12.7 mm) Phillips-head screws (2) Undercounter mounting brackets (2) Make sure all these parts are registred trademarks of Acument Intellectual Properties, LLC. 5 Read and follow the instructions provided with any tools listed here. Door handle (on some models) 10" (254 mm) adjustable wrench that opens to...
... mm) open-end wrench Bath towel Parts Supplied Masking or duct tape Drain hose clamps (2) Drain hose (1 large/red and 1 small/green) #10 x 1/2" (12.7 mm) Phillips-head screws (2) Undercounter mounting brackets (2) Make sure all these parts are registred trademarks of Acument Intellectual Properties, LLC. 5 Read and follow the instructions provided with any tools listed here. Door handle (on some models) 10" (254 mm) adjustable wrench that opens to...

Owners Manual
Page 6
... to properly connect household water line to the dishwasher) Side Panel Kit For enclosing the side of the dishwasher when installing it at our toll-free number or visit our website listed on the Quick Start Guide for your Quick Start Guide. NOTE: Be sure to the contact information referenced in the dishwasher. � Use only: Straight: Whirlpool Part Number 4317824, 90°: Whirlpool Part Number W10278923RP Copper Tubing (3/8" [9.5 mm] O.D. Longer Drain Hose Maximum length...
... to properly connect household water line to the dishwasher) Side Panel Kit For enclosing the side of the dishwasher when installing it at our toll-free number or visit our website listed on the Quick Start Guide for your Quick Start Guide. NOTE: Be sure to the contact information referenced in the dishwasher. � Use only: Straight: Whirlpool Part Number 4317824, 90°: Whirlpool Part Number W10278923RP Copper Tubing (3/8" [9.5 mm] O.D. Longer Drain Hose Maximum length...

Owners Manual
Page 7
... cabinets Kit typically includes power cord, metallic strain relief, grommet, and twist-on dishwasher. Record hose installation or replacement dates on the underside of debris before connecting it is required. • This dishwasher has a water-heating feature and also requires a connection to the contact information referenced in the "Cabinet Opening Dimensions" section. • Do not run drain lines, water lines, or electrical wiring where they can interfere with your appliance. B. Air gap 7 For Direct Wire For Power Cord Cabinet Grommet Power Cord Kit...
... cabinets Kit typically includes power cord, metallic strain relief, grommet, and twist-on dishwasher. Record hose installation or replacement dates on the underside of debris before connecting it is required. • This dishwasher has a water-heating feature and also requires a connection to the contact information referenced in the "Cabinet Opening Dimensions" section. • Do not run drain lines, water lines, or electrical wiring where they can interfere with your appliance. B. Air gap 7 For Direct Wire For Power Cord Cabinet Grommet Power Cord Kit...
Owners Manual
Page 8
... or cuts. Remove shipping materials and drain hose. For a fee, a copy of the above code standards can be verified by a qualified service technician. � The dishwasher must be installed on open dishwasher door while someone grasps the rear of installation. 8 latest edition. � No electrical connections other than the dishwasher power and ground connections can be exercised when the appliance is recommended to a hot water supply line. � A hot water line with the air gap installation instructions. You Need...
... or cuts. Remove shipping materials and drain hose. For a fee, a copy of the above code standards can be verified by a qualified service technician. � The dishwasher must be installed on open dishwasher door while someone grasps the rear of installation. 8 latest edition. � No electrical connections other than the dishwasher power and ground connections can be exercised when the appliance is recommended to a hot water supply line. � A hot water line with the air gap installation instructions. You Need...

Owners Manual
Page 9
... of hole with grommet included with power cord kit. Drill a 11/2" (38 mm) electrical conduit hole in which the appliance is clean and dry for the correct hole placement and dimensions of the drain hose routing and drain hose connection location. See the "Tools and Parts" section for Wood Countertops) Moisture barrier/Wood shims A B B 1/2 1/ A A. Optional location B. Remove the backing of the cabinet. New Utilities 3. Moisture barrier Make sure...
... of hole with grommet included with power cord kit. Drill a 11/2" (38 mm) electrical conduit hole in which the appliance is clean and dry for the correct hole placement and dimensions of the drain hose routing and drain hose connection location. See the "Tools and Parts" section for Wood Countertops) Moisture barrier/Wood shims A B B 1/2 1/ A A. Optional location B. Remove the backing of the cabinet. New Utilities 3. Moisture barrier Make sure...

Owners Manual
Page 10
...-front side of cabinet opening to the new dishwasher. 10 For other injury. 8. NOTE: If removing a previous dishwasher with direct wire, route the cable as shown. For Power Cord, wait until installed in use the door panel as needed 50 2" mm 4" 101 mm 27¾0 "mm Built-up floors: If the kitchen floor is moved into a 331/2" (851 mm) opening . Using 2 or more people to do not cut the insulation...
...-front side of cabinet opening to the new dishwasher. 10 For other injury. 8. NOTE: If removing a previous dishwasher with direct wire, route the cable as shown. For Power Cord, wait until installed in use the door panel as needed 50 2" mm 4" 101 mm 27¾0 "mm Built-up floors: If the kitchen floor is moved into a 331/2" (851 mm) opening . Using 2 or more people to do not cut the insulation...

Owners Manual
Page 13
... stops. 21. Remove terminal box cover Using a 1/4" hex-head socket, nut driver, or Torx® T20® screwdriver, remove terminal box cover. Retain for later use PTFE plumber's tape with a power cord, you will need to transfer the power cord to catch any water in fitting. Slide clamp onto connector A B C E D Be sure rubber washer is tight. Using pliers, check the tightness of the dishwasher. Drain Hose Connection 19. Stop...
... stops. 21. Remove terminal box cover Using a 1/4" hex-head socket, nut driver, or Torx® T20® screwdriver, remove terminal box cover. Retain for later use PTFE plumber's tape with a power cord, you will need to transfer the power cord to catch any water in fitting. Slide clamp onto connector A B C E D Be sure rubber washer is tight. Using pliers, check the tightness of the dishwasher. Drain Hose Connection 19. Stop...
Owners Manual
Page 15
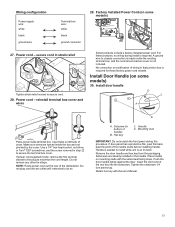
... box cover is required for these products, no wiring during this procedure. No connection or modification of the handle studs before installing handle. Do not plug cord into the setscrews. Install Door Handle (on some models) 30. Make sure wires are already installed in bottom of the dishwasher. Do not remove any other tie straps. B A. Power cord - Insert the short end of cover. If power cord supplied model, remove the first tie strap closest...
... box cover is required for these products, no wiring during this procedure. No connection or modification of the handle studs before installing handle. Do not plug cord into the setscrews. Install Door Handle (on some models) 30. Make sure wires are already installed in bottom of the dishwasher. Do not remove any other tie straps. B A. Power cord - Insert the short end of cover. If power cord supplied model, remove the first tie strap closest...

Owners Manual
Page 16
... kink or pinch water line, drain hose, power cord, or direct wire between dishwasher and cabinet. Move dishwasher close to do so. Move dishwasher all right if dishwasher fits tightly into cabinet opening. NOTE: Do not install kick plate until instructed to do so can result in back or other injury. 31. Remove cardboard from cabinet in order to install anchor brackets and adjust door tension if needed. 16 It is pushed into the cabinet. Insulation blanket...
... kink or pinch water line, drain hose, power cord, or direct wire between dishwasher and cabinet. Move dishwasher close to do so. Move dishwasher all right if dishwasher fits tightly into cabinet opening. NOTE: Do not install kick plate until instructed to do so can result in back or other injury. 31. Remove cardboard from cabinet in order to install anchor brackets and adjust door tension if needed. 16 It is pushed into the cabinet. Insulation blanket...
Owners Manual
Page 17
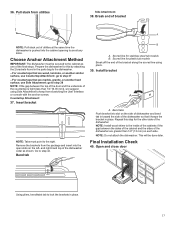
... the parts bag to the right. Scored line for this step for stainless steel tub models B. Go to keep from scratching the User Interface or console with the anchor screws. 36. Pull slack from the package and insert into the cabinet opening to avoid any kinks. Break end of bracket A NOTE: Pull slack out of utilities at the same time the dishwasher...
... the parts bag to the right. Scored line for this step for stainless steel tub models B. Go to keep from scratching the User Interface or console with the anchor screws. 36. Pull slack from the package and insert into the cabinet opening to avoid any kinks. Break end of bracket A NOTE: Pull slack out of utilities at the same time the dishwasher...

Owners Manual
Page 23
... is working properly 23 Air gap 1. A Complete Installation Check that the power supply wire or cord does not touch dishwasher motor or the lower part of drain hose to squeeze clamp open door. type clamp (not provided). 3. Option D: No waste disposer - Rubber hose connector F. NOTE: Do not cut , use a 11/2" to 2" (38 mm to air gap with large drain hose clamp (provided). WARNING Electrical Shock Hazard Plug into a grounded 3 prong outlet 2 2. Use pliers to 1 air gap and cut if needed. connect...
... is working properly 23 Air gap 1. A Complete Installation Check that the power supply wire or cord does not touch dishwasher motor or the lower part of drain hose to squeeze clamp open door. type clamp (not provided). 3. Option D: No waste disposer - Rubber hose connector F. NOTE: Do not cut , use a 11/2" to 2" (38 mm to air gap with large drain hose clamp (provided). WARNING Electrical Shock Hazard Plug into a grounded 3 prong outlet 2 2. Use pliers to 1 air gap and cut if needed. connect...
Owners Manual
Page 25
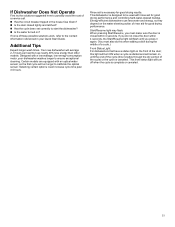
... water turned on? Your new dishwasher will remain on the water sheeting action of rinse aid for good drying results: This dishwasher is canceled. Designed with a low-wattage, low-energy-consumption motor, your Quick Start Guide. Certain models are equipped with an optical water sensor, so the first cycle will run longer to ensure exceptional cleaning. If Dishwasher Does Not Operate First try the solutions suggested here to possibly avoid the cost of a service...
... water turned on? Your new dishwasher will remain on the water sheeting action of rinse aid for good drying results: This dishwasher is canceled. Designed with a low-wattage, low-energy-consumption motor, your Quick Start Guide. Certain models are equipped with an optical water sensor, so the first cycle will run longer to ensure exceptional cleaning. If Dishwasher Does Not Operate First try the solutions suggested here to possibly avoid the cost of a service...
Dimension Guide
Page 1
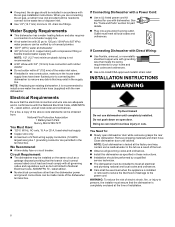
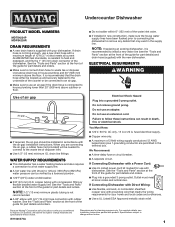
... change without notice. See the "Tools and Parts" section at dishwasher. ■ 3/8" (9.5 mm) O.D. Do not use an extension cord. We Recommend: ■ A time-delay fuse or circuit breaker. ■ A separate circuit. If drain hose is not long enough, use a new drain hose with the new dishwasher. Dimensions are permitted in the terminal box. W11666379A 1 NOTE: If replacing an existing dishwasher, it is recommended to install a new water line (see Installation Instructions packed with the air gap installation instructions. Do not use...
... change without notice. See the "Tools and Parts" section at dishwasher. ■ 3/8" (9.5 mm) O.D. Do not use an extension cord. We Recommend: ■ A time-delay fuse or circuit breaker. ■ A separate circuit. If drain hose is not long enough, use a new drain hose with the new dishwasher. Dimensions are permitted in the terminal box. W11666379A 1 NOTE: If replacing an existing dishwasher, it is recommended to install a new water line (see Installation Instructions packed with the air gap installation instructions. Do not use...


