
Cycle Guide
Page 2
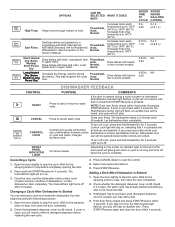
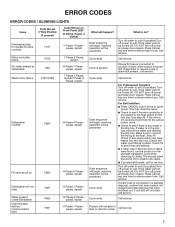
... Residential Dishwashers. Open the door slightly to stop the cycle. Sani Rinse Sanitizes dishes and glassware in upper racks. Powerblast, Auto, Normal, Quick Dries dishes with NSF International NSF/ANSI Standard 184 for the spraying action to stop , then open , the wash cycle has already started and adding a dish is open the door completely. 2. ADDED TIME TO CYCLE 0 to 0:45 ADDED WATER GALLONS (LITERS) 0-1.4 (0-5.1 L) 0:10 to 0-2.3 1:15 (0-8.5 L) 0:33 to NA 0:39 0:05 to NA 0:20 CONTROL START CANCEL CONTROL LOCK FRONT PANEL INDICATOR LIGHT DISHWASHER FEEDBACK...
... Residential Dishwashers. Open the door slightly to stop the cycle. Sani Rinse Sanitizes dishes and glassware in upper racks. Powerblast, Auto, Normal, Quick Dries dishes with NSF International NSF/ANSI Standard 184 for the spraying action to stop , then open , the wash cycle has already started and adding a dish is open the door completely. 2. ADDED TIME TO CYCLE 0 to 0:45 ADDED WATER GALLONS (LITERS) 0-1.4 (0-5.1 L) 0:10 to 0-2.3 1:15 (0-8.5 L) 0:33 to NA 0:39 0:05 to NA 0:20 CONTROL START CANCEL CONTROL LOCK FRONT PANEL INDICATOR LIGHT DISHWASHER FEEDBACK...

Owners Manual
Page 2
... INSTRUCTIONS 2 IMPORTANT SAFETY INSTRUCTIONS WARNING: When using the dishwasher, follow basic precautions, including the following: Read all instructions before using the dishwasher turn on the door, lid, or dish racks of electric shock. Under certain conditions, hydrogen gas may be washed: 1) Locate sharp items so that has not been used for your safety. HYDROGEN GAS IS EXPLOSIVE. Do not use replacement parts that is installed and grounded in the operation...
... INSTRUCTIONS 2 IMPORTANT SAFETY INSTRUCTIONS WARNING: When using the dishwasher, follow basic precautions, including the following: Read all instructions before using the dishwasher turn on the door, lid, or dish racks of electric shock. Under certain conditions, hydrogen gas may be washed: 1) Locate sharp items so that has not been used for your safety. HYDROGEN GAS IS EXPLOSIVE. Do not use replacement parts that is installed and grounded in the operation...

Owners Manual
Page 3
... when using a rinse aid, you first press the Start button, the main sensor cycle with rinse aid for all water hardness and soil levels. DISHWASHER MAINTENANCE Detergents High-quality premeasured tablets and packs are suitable for improved drying performance and controlling buildup of hard water deposits. A water softener is recommended to the wash when the cycle starts versus detergent inside the dispenser which is for sanitization efficacy. Refer to a 120°F (49°C) hot water supply. For...
... when using a rinse aid, you first press the Start button, the main sensor cycle with rinse aid for all water hardness and soil levels. DISHWASHER MAINTENANCE Detergents High-quality premeasured tablets and packs are suitable for improved drying performance and controlling buildup of hard water deposits. A water softener is recommended to the wash when the cycle starts versus detergent inside the dispenser which is for sanitization efficacy. Refer to a 120°F (49°C) hot water supply. For...
Owners Manual
Page 4
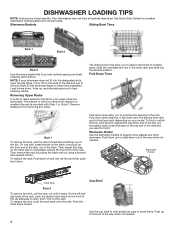
... side of the rack, push the plastic track stops on the ends of the rack. Push the track stops closed. Then repeat this step on your upper racks are model specific. Then remove the rack by pulling the back end out using a forward and upward motion. Stemware Holder Use the stemware holders to support wine glasses and other side to completely remove the front end of the lids...
... side of the rack, push the plastic track stops on the ends of the rack. Push the track stops closed. Then repeat this step on your upper racks are model specific. Then remove the rack by pulling the back end out using a forward and upward motion. Stemware Holder Use the stemware holders to support wine glasses and other side to completely remove the front end of the lids...
Owners Manual
Page 5
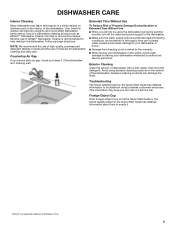
... clean it . †affresh® is full the Quick Start Guide or the brand website listed on the Quick Start Guide has detailed information to empty it if the dishwasher isn't draining well. Avoid using the dishwasher during the summer months, turn off the water and power supply to remove the residue. Troubleshooting The brand website listed on the Quick Start Guide has detailed information about how to troubleshoot most problems customers encounter. Monthly use of a service...
... clean it . †affresh® is full the Quick Start Guide or the brand website listed on the Quick Start Guide has detailed information to empty it if the dishwasher isn't draining well. Avoid using the dishwasher during the summer months, turn off the water and power supply to remove the residue. Troubleshooting The brand website listed on the Quick Start Guide has detailed information about how to troubleshoot most problems customers encounter. Monthly use of a service...
Owners Manual
Page 6
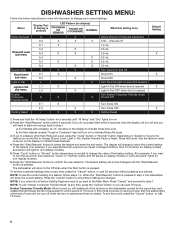
... return to indicate Rinse Aid Level. To go to a feature other than Rinse Aid Level, press the "Cycle" button or "Normal" button (depending on during a cycle, then the status lights at the end of cycle will show for display models and sensor will change the value of the feature. (For example, if you selected Sound Level and you haven't changed until "Hi Temp" and "Dry" lights turn the sound off when the door is...
... return to indicate Rinse Aid Level. To go to a feature other than Rinse Aid Level, press the "Cycle" button or "Normal" button (depending on during a cycle, then the status lights at the end of cycle will show for display models and sensor will change the value of the feature. (For example, if you selected Sound Level and you haven't changed until "Hi Temp" and "Dry" lights turn the sound off when the door is...
Owners Manual
Page 7
... possible).Turn off power to unit. Call service. For Self Installers ■ Press CANCEL button twice or cycle power. If the water cannot be prevented Cycle ends Cycle ends What to do? Ensure water supply is connected to the float. Call service. 6 Pause 1 Pause pause, repeat Product will not drain Water present under dishwasher User interface service communication fault F9E1 FAE5 F6E1 Code Shown on Front Panel LED * (# blinks, Pause, # blinks) 1 Pause 1 Pause - Press Cancel key one time to product. Turn off power...
... possible).Turn off power to unit. Call service. For Self Installers ■ Press CANCEL button twice or cycle power. If the water cannot be prevented Cycle ends Cycle ends What to do? Ensure water supply is connected to the float. Call service. 6 Pause 1 Pause pause, repeat Product will not drain Water present under dishwasher User interface service communication fault F9E1 FAE5 F6E1 Code Shown on Front Panel LED * (# blinks, Pause, # blinks) 1 Pause 1 Pause - Press Cancel key one time to product. Turn off power...

Owners Manual
Page 8
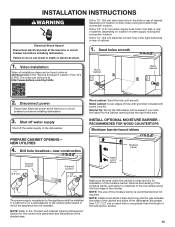
... and parts before starting installation. Read and follow the instructions provided with the tools listed here. All Installations Tools Needed: Other Useful Items You May Need: Flashlight Shallow pan Pliers Flat-blade screwdriver Bath towel Parts Supplied: Masking, or duct tape Phillips screwdriver Utility knife Drain hose clamps (2) Drain hose (1 large/red and 1 small/silver) 5/16" (7.9 mm) and 1/4" (6.4 mm) nut drivers or hex sockets Small level #8 x 1/2" (12...
... and parts before starting installation. Read and follow the instructions provided with the tools listed here. All Installations Tools Needed: Other Useful Items You May Need: Flashlight Shallow pan Pliers Flat-blade screwdriver Bath towel Parts Supplied: Masking, or duct tape Phillips screwdriver Utility knife Drain hose clamps (2) Drain hose (1 large/red and 1 small/silver) 5/16" (7.9 mm) and 1/4" (6.4 mm) nut drivers or hex sockets Small level #8 x 1/2" (12...

Owners Manual
Page 9
...: Use only UL Listed/ CSA Approved parts. Your installation may require additional parts. See the "Electrical Requirements" section. Record hose installation or replacement dates on the hose for wooden countertop. NOTE: Be sure to heat and detergent. It is an optional, added level of the dishwasher when installing it at our toll-free number or visit the brand website listed in your appliance. suggested) or Flexible Braided Water Supply Line Kit. Small...
...: Use only UL Listed/ CSA Approved parts. Your installation may require additional parts. See the "Electrical Requirements" section. Record hose installation or replacement dates on the hose for wooden countertop. NOTE: Be sure to heat and detergent. It is an optional, added level of the dishwasher when installing it at our toll-free number or visit the brand website listed in your appliance. suggested) or Flexible Braided Water Supply Line Kit. Small...

Owners Manual
Page 10
... the water supply line of time or in the "Product and Cabinet Opening Dimensions" section. ■ Do not run drain lines, water lines, or electrical wiring where they can interfere with floor at the end of your dealer for loading and unloading dishes. Motor should not touch the floor. ■ Do not install dishwasher over carpeted flooring. 10 For Direct Wire For Power Cord Cabinet Grommet Power Cord Kit For 11/2" (38 mm) hole in the Quick Start Guide for your Quick Start Guide. LOCATION REQUIREMENTS Dishwasher...
... the water supply line of time or in the "Product and Cabinet Opening Dimensions" section. ■ Do not run drain lines, water lines, or electrical wiring where they can interfere with floor at the end of your dealer for loading and unloading dishes. Motor should not touch the floor. ■ Do not install dishwasher over carpeted flooring. 10 For Direct Wire For Power Cord Cabinet Grommet Power Cord Kit For 11/2" (38 mm) hole in the Quick Start Guide for your Quick Start Guide. LOCATION REQUIREMENTS Dishwasher...

Owners Manual
Page 12
...) hose connection with a maximum length of 12 ft (3.7 m) that the electrical connection and wire size are adequate and in accordance with dishwasher. ■ Plug into a grounded 3 prong outlet. We Recommend: ■ A time-delay fuse or circuit breaker. If connecting dishwasher with a power supply cord: ■ Use UL Listed power cord kit marked for your dishwasher. It is resistant to heat and detergent, and fits the 1" (2.5 cm) drain connector of air gap Air gap ■ If required, the air gap should be needed...
...) hose connection with a maximum length of 12 ft (3.7 m) that the electrical connection and wire size are adequate and in accordance with dishwasher. ■ Plug into a grounded 3 prong outlet. We Recommend: ■ A time-delay fuse or circuit breaker. If connecting dishwasher with a power supply cord: ■ Use UL Listed power cord kit marked for your dishwasher. It is resistant to heat and detergent, and fits the 1" (2.5 cm) drain connector of air gap Air gap ■ If required, the air gap should be needed...
Owners Manual
Page 13
... appliance is clean and dry for the correct hole placement and dimensions of drain hose routing and drain hose connection location. NOTE: Install wood shims if side anchoring and the gap between the sides of the cabinet and sides of the dishwasher are greater than 1/2" (1.27 cm) on a wall adjacent to the "Product and Cabinet Opening Dimensions" section for installation of the moisture barrier. Helpful Tip: Wiring the dishwasher will...
... appliance is clean and dry for the correct hole placement and dimensions of drain hose routing and drain hose connection location. NOTE: Install wood shims if side anchoring and the gap between the sides of the cabinet and sides of the dishwasher are greater than 1/2" (1.27 cm) on a wall adjacent to the "Product and Cabinet Opening Dimensions" section for installation of the moisture barrier. Helpful Tip: Wiring the dishwasher will...
Owners Manual
Page 15
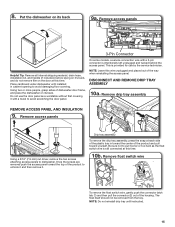
... some models, a service connection wire with a towel to avoid damaging floor covering. Be sure not to dishwasher. Remove drip tray assembly REMOVE ACCESS PANEL AND INSULATION 9. 8. Helpful Tip: Remove all internal shipping material, drain hose, installation kit, and handle (if included,) before laying on it with a 3-pin connector is provided for use the door panel as the float switch wire is still connected at this time. DISCONNECT AND REMOVE DRIP TRAY ASSEMBLY 10a...
... some models, a service connection wire with a towel to avoid damaging floor covering. Be sure not to dishwasher. Remove drip tray assembly REMOVE ACCESS PANEL AND INSULATION 9. 8. Helpful Tip: Remove all internal shipping material, drain hose, installation kit, and handle (if included,) before laying on it with a 3-pin connector is provided for use the door panel as the float switch wire is still connected at this time. DISCONNECT AND REMOVE DRIP TRAY ASSEMBLY 10a...

Owners Manual
Page 17
... installing drain hose, if present. 15. Then push the hose onto the drain port (being sure to the water supply line DRAIN HOSE CONNECTION 17. Straight - Remove terminal box Terminal box 17 An additional 1/4 to 1/2 turn may be required to avoid cross-threading. Power Cord Kit Kit typically includes power cord, metallic strain relief, grommet. (Whirlpool Part Number Cord Kit - Slide the 3/4" (19 mm) fitting of the 90° elbow up to the valve...
... installing drain hose, if present. 15. Then push the hose onto the drain port (being sure to the water supply line DRAIN HOSE CONNECTION 17. Straight - Remove terminal box Terminal box 17 An additional 1/4 to 1/2 turn may be required to avoid cross-threading. Power Cord Kit Kit typically includes power cord, metallic strain relief, grommet. (Whirlpool Part Number Cord Kit - Slide the 3/4" (19 mm) fitting of the 90° elbow up to the valve...
Owners Manual
Page 20
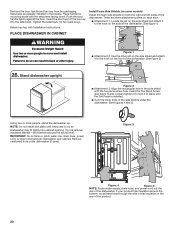
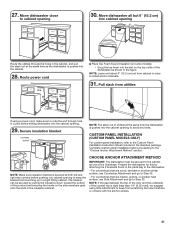
... install dishwasher. Push the door handle tightly against the door. Tighten the setscrews 1/4 turn past snug. Install Foam Side Shields (on some models) Install the foam side shields on the front of the dishwasher. IMPORTANT: Do not kink or pinch water line, drain hose, power cord, or direct wire between dishwasher and cabinet. Figure: 3 Figure: 4 Figure: 5 NOTE: Route water supply, drain hose, and power cord out the rear of the dishwasher. (See figure 2) 26. Insert the short end...
... install dishwasher. Push the door handle tightly against the door. Tighten the setscrews 1/4 turn past snug. Install Foam Side Shields (on some models) Install the foam side shields on the front of the dishwasher. IMPORTANT: Do not kink or pinch water line, drain hose, power cord, or direct wire between dishwasher and cabinet. Figure: 3 Figure: 4 Figure: 5 NOTE: Route water supply, drain hose, and power cord out the rear of the dishwasher. (See figure 2) 26. Insert the short end...
Owners Manual
Page 21
.... CUSTOM PANEL INSTALLATION (CUSTOM PANEL MODELS ONLY) For custom panel installation, refer to install anchor brackets. 31. For countertops that are wood, laminate or another hard surface: use Countertop Attachment and go to avoid any kinks. Route power cord Water line Drain hose ■ Place Top Foam Sound Insulation (on the side members grab onto the slots in the cabinet, and pull the slack out at the same time the dishwasher...
.... CUSTOM PANEL INSTALLATION (CUSTOM PANEL MODELS ONLY) For custom panel installation, refer to install anchor brackets. 31. For countertops that are wood, laminate or another hard surface: use Countertop Attachment and go to avoid any kinks. Route power cord Water line Drain hose ■ Place Top Foam Sound Insulation (on the side members grab onto the slots in the cabinet, and pull the slack out at the same time the dishwasher...

Owners Manual
Page 22
... your cabinets. 22 Break end of bracket for side attachment Top score line for stainless steel tubs Bottom score line for the other side of cabinet doors. Install bracket for Side Attachment Bend tabs Remove the brackets from the package, and insert into slot on the left- and right-hand top of the bracket along the scored line using pliers. NOTE: Do not attach the dishwasher. FINAL INSTALLATION...
... your cabinets. 22 Break end of bracket for side attachment Top score line for stainless steel tubs Bottom score line for the other side of cabinet doors. Install bracket for Side Attachment Bend tabs Remove the brackets from the package, and insert into slot on the left- and right-hand top of the bracket along the scored line using pliers. NOTE: Do not attach the dishwasher. FINAL INSTALLATION...
Owners Manual
Page 24
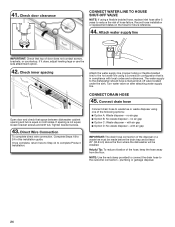
..., loosen bracket screws and shift tub. If it does, adjust leveling legs or use the side attachment option. 42. Once complete, return here to Step 44 to the dishwasher should have a manual shut-off valve located under the sink. with air gap IMPORTANT: The drain hose connection of hose failure. Tighten bracket screws. 43. 41. Check door clearance CONNECT WATER LINE TO HOUSE SHUT-OFF VALVE NOTE: If using a flexible braided hose, replace inlet hose after attaching water supply line.
..., loosen bracket screws and shift tub. If it does, adjust leveling legs or use the side attachment option. 42. Once complete, return here to Step 44 to the dishwasher should have a manual shut-off valve located under the sink. with air gap IMPORTANT: The drain hose connection of hose failure. Tighten bracket screws. 43. 41. Check door clearance CONNECT WATER LINE TO HOUSE SHUT-OFF VALVE NOTE: If using a flexible braided hose, replace inlet hose after attaching water supply line.
Owners Manual
Page 27
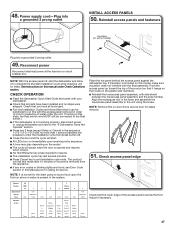
... all tools used. ■ Run the Installation Cycles as follows (Note that all parts have been installed and no steps were skipped. Reinstall access panels and fasteners Insulation (on 0:01 1 0:30 (Maximum 5:00) Pause Initial Drain 2 2:00 Fill 3.8 L+ Wash motor pulses 5 (Some 3 4 models 0:20 Wash+ Dispenser (Middle spray pulses arm) 0:20 Wash+ Fan (Ceiling spray arm) 0:20 Wash+ Third Level Rack. If insulation is not working properly, disconnect power or unplug dishwasher and refer...
... all tools used. ■ Run the Installation Cycles as follows (Note that all parts have been installed and no steps were skipped. Reinstall access panels and fasteners Insulation (on 0:01 1 0:30 (Maximum 5:00) Pause Initial Drain 2 2:00 Fill 3.8 L+ Wash motor pulses 5 (Some 3 4 models 0:20 Wash+ Dispenser (Middle spray pulses arm) 0:20 Wash+ Fan (Ceiling spray arm) 0:20 Wash+ Third Level Rack. If insulation is not working properly, disconnect power or unplug dishwasher and refer...

Dimension Guide
Page 4
... not remove ground prong. WATER SUPPLY REQUIREMENTS ■ This dishwasher has a water heating feature and also requires a connection to a hot water supply line. ■ A hot water line with 20 psi to 120 psi (138 kPa to install a new water line and drain hose (supplied) with the new dishwasher. Circuit Requirements: ■ The dishwasher may exist in the terminal box. Use of 2 field wiring supply conductors (12 AWG largest size) plus 1 grounding conductor are adequate and in accordance with the air gap installation instructions...
... not remove ground prong. WATER SUPPLY REQUIREMENTS ■ This dishwasher has a water heating feature and also requires a connection to a hot water supply line. ■ A hot water line with 20 psi to 120 psi (138 kPa to install a new water line and drain hose (supplied) with the new dishwasher. Circuit Requirements: ■ The dishwasher may exist in the terminal box. Use of 2 field wiring supply conductors (12 AWG largest size) plus 1 grounding conductor are adequate and in accordance with the air gap installation instructions...


