
Quick Start Guide
Page 1
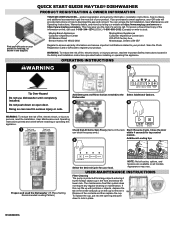
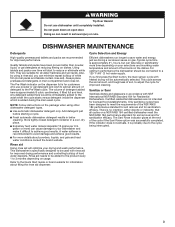
... large objects entering it . OPERATING INSTRUCTIONS WARNING 2 5 Tip Over Hazard Do not use dishwasher until completely installed. Dispose of your product. QUICK START GUIDE MAYTAG® DISHWASHER PRODUCT REGISTRATION & OWNER INFORMATION YOUR QR CODE UNLOCKS... If you the cost of fire, electric... on your product's serial tag, as needed) to the Select Additional Options. Additional Loading tips Prepare and Load the Dishwasher (15 Place Setting Recommended Loading Pattern) Auto Normal Quick PowerBlast Select the desired Cycle for top control models. Mississauga, Ontario...
... large objects entering it . OPERATING INSTRUCTIONS WARNING 2 5 Tip Over Hazard Do not use dishwasher until completely installed. Dispose of your product. QUICK START GUIDE MAYTAG® DISHWASHER PRODUCT REGISTRATION & OWNER INFORMATION YOUR QR CODE UNLOCKS... If you the cost of fire, electric... on your product's serial tag, as needed) to the Select Additional Options. Additional Loading tips Prepare and Load the Dishwasher (15 Place Setting Recommended Loading Pattern) Auto Normal Quick PowerBlast Select the desired Cycle for top control models. Mississauga, Ontario...
Cycle Guide
Page 1
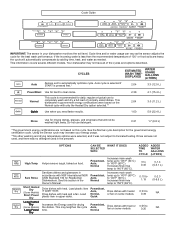
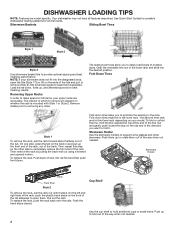
...04 3.0 (11.2 L) Normal cycle with only the Heated Dry option selected.** Quick Use when you need faster results. 1:00 5.9 (22.4 L) Rinse Use for Residential Dishwashers. This may lengthen the cycle time. Cycle time and/or water usage can vary as needed. Auto CYCLES Senses soil to 0:20 NA This... dishwasher's government energy certifications were based on some models. Rinse aid was not used, and there was not subject to 140°F (60°C)....
...04 3.0 (11.2 L) Normal cycle with only the Heated Dry option selected.** Quick Use when you need faster results. 1:00 5.9 (22.4 L) Rinse Use for Residential Dishwashers. This may lengthen the cycle time. Cycle time and/or water usage can vary as needed. Auto CYCLES Senses soil to 0:20 NA This... dishwasher's government energy certifications were based on some models. Rinse aid was not used, and there was not subject to 140°F (60°C)....
Cycle Guide
Page 2
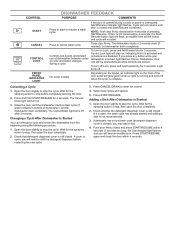
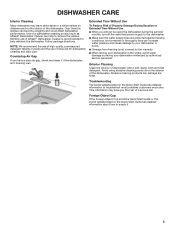
...a wash cycle. To turn on , indicating that detergent dispenser cover is activated and all buttons are locked. To turn on the front of dishwasher between cycles or cycle and option changes during a cycle or power is interrupted, Start/Resume indicator light flashes. Depending on the model, an ...off after 3 minutes. The Cancel/ Drain light will turn off when the cycle is open the door completely. 2. Close the door, and the dishwasher starts a drain cycle (if water remains in bottom of pressing Start/Resume. If cover is pressed. If it is still closed and press START/RESUME...
...a wash cycle. To turn on , indicating that detergent dispenser cover is activated and all buttons are locked. To turn on the front of dishwasher between cycles or cycle and option changes during a cycle or power is interrupted, Start/Resume indicator light flashes. Depending on the model, an ...off after 3 minutes. The Cancel/ Drain light will turn off when the cycle is open the door completely. 2. Close the door, and the dishwasher starts a drain cycle (if water remains in bottom of pressing Start/Resume. If cover is pressed. If it is still closed and press START/RESUME...
Owners Manual
Page 2
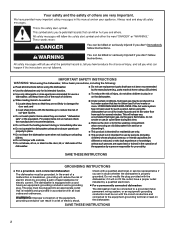
...a risk of the apparatus by a person responsible for its intended function. SAVE THESE INSTRUCTIONS GROUNDING INSTRUCTIONS I For a permanently connected dishwasher: The dishwasher must be connected to a grounded metal, permanent wiring system, or an equipment-grounding conductor must be run with all instructions before using ... accordance with the circuit conductors and connected to damage the door seal; Do not abuse, sit on, or stand on the dishwasher. The dishwasher is not intended for use an open when not loading or unloading dishes. Do not modify the plug provided with a cord ...
...a risk of the apparatus by a person responsible for its intended function. SAVE THESE INSTRUCTIONS GROUNDING INSTRUCTIONS I For a permanently connected dishwasher: The dishwasher must be connected to a grounded metal, permanent wiring system, or an equipment-grounding conductor must be run with all instructions before using ... accordance with the circuit conductors and connected to damage the door seal; Do not abuse, sit on, or stand on the dishwasher. The dishwasher is not intended for use an open when not loading or unloading dishes. Do not modify the plug provided with a cord ...
Owners Manual
Page 3
... Doing so can minimize repeat buildup of white film (not all water hardness and soil levels. They are suitable for customers who use dishwasher until completely installed. Always place premeasured detergents in a cool, dry place. ■ Extremely hard water mineral deposits (15 grains per ...cycle with NSF International NSF/ANSI Standard 184 for improved performance. Add detergent just before starting a cycle. ■ Fresh automatic dishwasher detergent results in accordance with heated drying will be connected to meet the NSF/ANSI 184 performance standard for soil removal and for...
... Doing so can minimize repeat buildup of white film (not all water hardness and soil levels. They are suitable for customers who use dishwasher until completely installed. Always place premeasured detergents in a cool, dry place. ■ Extremely hard water mineral deposits (15 grains per ...cycle with NSF International NSF/ANSI Standard 184 for improved performance. Add detergent just before starting a cycle. ■ Fresh automatic dishwasher detergent results in accordance with heated drying will be connected to meet the NSF/ANSI 184 performance standard for soil removal and for...
Owners Manual
Page 4
See Quick Start Guides for possible dishwasher loading patterns for all features described. Grab the moveable tine row in the lower rack and slide into the ...items, your model. On the left and right side of multiple sizes. To replace the rack, push the rack back onto the rails. DISHWASHER LOADING TIPS NOTE: Features are removable. Silverware Baskets Sliding Bowl Tines Style 1 Style 3 Style 2 Use silverware basket lids to removing any racks...clip at the end of the lids and pull to completely remove the front end of the tub. Your dishwasher may not have all dish racks.
See Quick Start Guides for possible dishwasher loading patterns for all features described. Grab the moveable tine row in the lower rack and slide into the ...items, your model. On the left and right side of multiple sizes. To replace the rack, push the rack back onto the rails. DISHWASHER LOADING TIPS NOTE: Features are removable. Silverware Baskets Sliding Bowl Tines Style 1 Style 3 Style 2 Use silverware basket lids to removing any racks...clip at the end of the lids and pull to completely remove the front end of the tub. Your dishwasher may not have all dish racks.
Owners Manual
Page 5
... freezing is full the Quick Start Guide or the brand website listed on the Quick Start Guide has detailed information to help to the dishwasher. ■ Make sure the water supply lines are protected against freezing conditions. This information may leave white spots or a white residue ...on dishware and on the exterior of the dishwasher. Extended Time Without Use To Reduce Risk of Property Damage During Vacation or Extended Time Without Use ■ When you the cost of ...
... freezing is full the Quick Start Guide or the brand website listed on the Quick Start Guide has detailed information to help to the dishwasher. ■ Make sure the water supply lines are protected against freezing conditions. This information may leave white spots or a white residue ...on dishware and on the exterior of the dishwasher. Extended Time Without Use To Reduce Risk of Property Damage During Vacation or Extended Time Without Use ■ When you the cost of ...
Owners Manual
Page 6
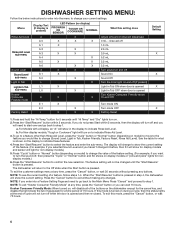
... non-display models.) 5. Press the "Start/Resume" button to indicate these features. 4. The dishwasher will light for what is pressed. NOTE: If you do not press Start within 2 seconds....0 L L 1 L 0 E E 1 E 0 r LED Pattern (no display) PROWASH OR SENSOR TOUGH OR COOKWARE NORMAL X X X X X X X X X X X X X X X X X X X X X X X X X X X What this mode, press the "Cancel" button, or wait 75 hours. 6 DISHWASHER SETTING MENU: Follow the below instructions to enter into a Feature Setting Page and need to start over and go back to change (Sound Level, Light...
... non-display models.) 5. Press the "Start/Resume" button to indicate these features. 4. The dishwasher will light for what is pressed. NOTE: If you do not press Start within 2 seconds....0 L L 1 L 0 E E 1 E 0 r LED Pattern (no display) PROWASH OR SENSOR TOUGH OR COOKWARE NORMAL X X X X X X X X X X X X X X X X X X X X X X X X X X X What this mode, press the "Cancel" button, or wait 75 hours. 6 DISHWASHER SETTING MENU: Follow the below instructions to enter into a Feature Setting Page and need to start over and go back to change (Sound Level, Light...
Owners Manual
Page 7
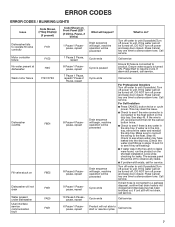
... water supply is connected to product. Press Start to operate fill valve correctly Motor controller failure No water present at dishwasher F1E1 F1E2 H2O Wash motor failure F7E1/F7E2 Dishwasher overfills F8E4 Fill valve stuck on Front Panel LED * (# blinks, Pause, # blinks) 1 Pause 1 Pause .... Call service. 6 Pause 1 Pause pause, repeat Product will not drain Water present under dishwasher User interface service communication fault F9E1 FAE5 F6E1 Code Shown on F8E5 Dishwasher will not able to silence alarm tone. Drain sequence will begin, machine operation will be turned...
... water supply is connected to product. Press Start to operate fill valve correctly Motor controller failure No water present at dishwasher F1E1 F1E2 H2O Wash motor failure F7E1/F7E2 Dishwasher overfills F8E4 Fill valve stuck on Front Panel LED * (# blinks, Pause, # blinks) 1 Pause 1 Pause .... Call service. 6 Pause 1 Pause pause, repeat Product will not drain Water present under dishwasher User interface service communication fault F9E1 FAE5 F6E1 Code Shown on F8E5 Dishwasher will not able to silence alarm tone. Drain sequence will begin, machine operation will be turned...
Owners Manual
Page 9
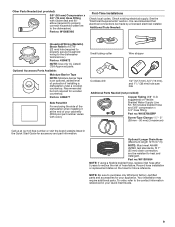
... W10278635RP Screw-Type Clamps 11/2"- 2" (38 mm - 50 mm) (3 maximum) Call us at the end of hose failure. NOTE: Be sure to the dishwasher terminal box.) Part no : W11381654 NOTE: If using a flexible braided hose, replace inlet hose after 5 years to heat and detergent. Small tubing cutter Wire stripper... Check local codes. Your installation may require additional parts. See the "Electrical Requirements" section. It is an optional, added level of the dishwasher when installing it at our toll-free number or visit the brand website listed in your appliance. To order, refer to the...
... W10278635RP Screw-Type Clamps 11/2"- 2" (38 mm - 50 mm) (3 maximum) Call us at the end of hose failure. NOTE: Be sure to the dishwasher terminal box.) Part no : W11381654 NOTE: If using a flexible braided hose, replace inlet hose after 5 years to heat and detergent. Small tubing cutter Wire stripper... Check local codes. Your installation may require additional parts. See the "Electrical Requirements" section. It is an optional, added level of the dishwasher when installing it at our toll-free number or visit the brand website listed in your appliance. To order, refer to the...
Owners Manual
Page 10
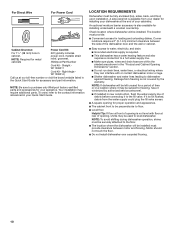
...by authorized service personnel. ■ If installed in the Quick Start Guide for installing underneath a wooden countertop. NOTE: If dishwasher will be installed. If it to the contact information referenced in cabinet. NOTE: Required for loading and unloading dishes. Corner ... cm) minimum clearance between motor and flooring. Straight W11365011 Cord Kit - To order, refer to the fill valve. LOCATION REQUIREMENTS Dishwasher must provide: ■ Convenient access for metal cabinets Kit typically includes power cord, metallic strain relief, grommet. (Whirlpool Part Number...
...by authorized service personnel. ■ If installed in the Quick Start Guide for installing underneath a wooden countertop. NOTE: If dishwasher will be installed. If it to the contact information referenced in cabinet. NOTE: Required for loading and unloading dishes. Corner ... cm) minimum clearance between motor and flooring. Straight W11365011 Cord Kit - To order, refer to the fill valve. LOCATION REQUIREMENTS Dishwasher must provide: ■ Convenient access for metal cabinets Kit typically includes power cord, metallic strain relief, grommet. (Whirlpool Part Number...

Owners Manual
Page 11
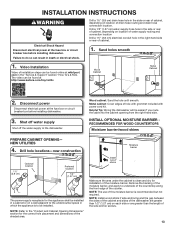
...areas of opening. Measured from narrowest point of cabinet walls show where utility connections may be compressed (not used on dishwasher. E. Minimum, measured from the lowest point on the underside of insulation (blanket) on all surfaces have no protrusions that would prohibit... dishwasher installation. 335/8" minimum (85.4 cm) minimum D 4" (10.2 cm) 3" (7.6 cm) 21" (53.4 cm) 24" (62.0 cm) E D. Door handles may be installed. 6¼" (...
...areas of opening. Measured from narrowest point of cabinet walls show where utility connections may be compressed (not used on dishwasher. E. Minimum, measured from the lowest point on the underside of insulation (blanket) on all surfaces have no protrusions that would prohibit... dishwasher installation. 335/8" minimum (85.4 cm) minimum D 4" (10.2 cm) 3" (7.6 cm) 21" (53.4 cm) 24" (62.0 cm) E D. Door handles may be installed. 6¼" (...
Owners Manual
Page 12
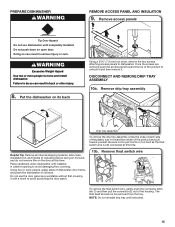
...psi to 120 psi (138 kPa to 862 kPa) water pressure can be verified by a licensed plumber. ■ 120°F (49°C) water at dishwasher. ■ 3/8" (0.95 cm) O.D. A copy of the above code standards can be installed in accordance with all current AHAM/ IAPMO test standards, is ...) of the water inlet valve. ■ If installed in new construction, make sure the house water supply lines have been flushed prior to connecting the dishwasher to remove any debris that may be needed to connect to the waste tee or disposer inlet. ■ Use 1/2" (1.3 cm) minimum I.D. NOTE: 1/2" (1.3...
...psi to 120 psi (138 kPa to 862 kPa) water pressure can be verified by a licensed plumber. ■ 120°F (49°C) water at dishwasher. ■ 3/8" (0.95 cm) O.D. A copy of the above code standards can be installed in accordance with all current AHAM/ IAPMO test standards, is ...) of the water inlet valve. ■ If installed in new construction, make sure the house water supply lines have been flushed prior to connecting the dishwasher to remove any debris that may be needed to connect to the waste tee or disposer inlet. ■ Use 1/2" (1.3 cm) minimum I.D. NOTE: 1/2" (1.3...
Owners Manual
Page 13
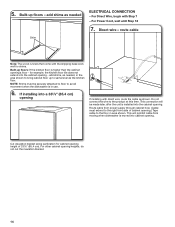
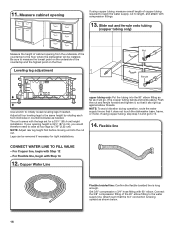
...drain hose connection location. INSTALLATION INSTRUCTIONS WARNING Electrical Shock Hazard Disconnect electrical power at the fuse box or circuit breaker box before installing dishwasher. Metal cabinet: Cover edges of the shaded area. NOTE: Refer to be easier if you route the cable into the cabinet ...from the right-hand side. Disconnect power Disconnect electrical power at the fuse box or circuit breaker box before installing dishwasher. 3. Helpful Tip: Wiring the dishwasher will be installed. NOTE: Install wood shims if side anchoring and the gap between the sides of the cabinet and...
...drain hose connection location. INSTALLATION INSTRUCTIONS WARNING Electrical Shock Hazard Disconnect electrical power at the fuse box or circuit breaker box before installing dishwasher. Metal cabinet: Cover edges of the shaded area. NOTE: Refer to be easier if you route the cable into the cabinet ...from the right-hand side. Disconnect power Disconnect electrical power at the fuse box or circuit breaker box before installing dishwasher. 3. Helpful Tip: Wiring the dishwasher will be installed. NOTE: Install wood shims if side anchoring and the gap between the sides of the cabinet and...
Owners Manual
Page 14
... perforation for example, the kitchen floor tile does not extend into the cabinet opening 's floor - Direct wire - Route cable from moving when dishwasher is in use. 6. add shims as the kitchen floor. For Power Cord, wait until Step 18 7. add shims, as needed, in area...Step 7 - This will be securely attached to floor to same level as needed Shim ELECTRICAL CONNECTION - 5. Built-up to avoid movement when the dishwasher is moved into a 335/8" (85.4 cm) opening . for cabinet opening height of cabinet opening heights, do not cut the insulation blanket. ...
... perforation for example, the kitchen floor tile does not extend into the cabinet opening 's floor - Direct wire - Route cable from moving when dishwasher is in use. 6. add shims as the kitchen floor. For Power Cord, wait until Step 18 7. add shims, as needed, in area...Step 7 - This will be securely attached to floor to same level as needed Shim ELECTRICAL CONNECTION - 5. Built-up to avoid movement when the dishwasher is moved into a 335/8" (85.4 cm) opening . for cabinet opening height of cabinet opening heights, do not cut the insulation blanket. ...
Owners Manual
Page 15
... of the product and pull toward the top of the housing. NOTE: Do not reinstall drip tray until completely installed. Do not use dishwasher until instructed. 15 The float itself should not be removed from the tray. DISCONNECT AND REMOVE DRIP TRAY ASSEMBLY 10a. WARNING Excessive Weight ... all internal shipping material, drain hose, installation kit, and handle (if included,) before laying on it with a towel to move and install dishwasher. Remove access panels Tip Over Hazard Do not use the door panel as the float switch wire is still connected at this time. Once the...
... of the product and pull toward the top of the housing. NOTE: Do not reinstall drip tray until completely installed. Do not use dishwasher until instructed. 15 The float itself should not be removed from the tray. DISCONNECT AND REMOVE DRIP TRAY ASSEMBLY 10a. WARNING Excessive Weight ... all internal shipping material, drain hose, installation kit, and handle (if included,) before laying on it with a towel to move and install dishwasher. Remove access panels Tip Over Hazard Do not use the door panel as the float switch wire is still connected at this time. Once the...
Owners Manual
Page 16
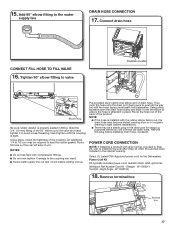
... and the highest point on the floor. Legs can be installed. opper tubing only: Put the tubing into the cut to the floor where the dishwasher will go to 15. 14. For Flexible line, begin with the legs set for tight installations. Get 3/8" compression x 3/4" hose fitting with Step 14 ... 16 The unit comes with Step 12 - NOTE: To avoid vibration during operation, route the water supply line so that it does not touch the dishwasher base, frame, or motor. For Copper line, begin with 90° elbow. Copper Water Line Flexible braided line: Confirm the flexible braided line is...
... and the highest point on the floor. Legs can be installed. opper tubing only: Put the tubing into the cut to the floor where the dishwasher will go to 15. 14. For Flexible line, begin with the legs set for tight installations. Get 3/8" compression x 3/4" hose fitting with Step 14 ... 16 The unit comes with Step 12 - NOTE: To avoid vibration during operation, route the water supply line so that it does not touch the dishwasher base, frame, or motor. For Copper line, begin with 90° elbow. Copper Water Line Flexible braided line: Confirm the flexible braided line is...
Owners Manual
Page 17
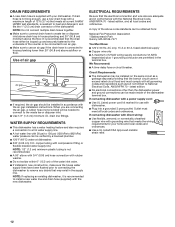
... valve Drain Hose Location Elbow fitting Be sure rubber washer is installed with the hose facing underneath the dishwasher. NOTE: ■ If the hose is properly seated in the drain port for the Dishwasher. Right Angle - Select UL Listed/CSA Approved power cord for shipping purposes where you will connect the drain...
... valve Drain Hose Location Elbow fitting Be sure rubber washer is installed with the hose facing underneath the dishwasher. NOTE: ■ If the hose is properly seated in the drain port for the Dishwasher. Right Angle - Select UL Listed/CSA Approved power cord for shipping purposes where you will connect the drain...
Owners Manual
Page 18
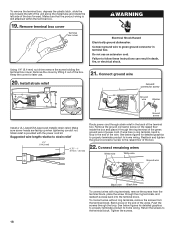
... the metal tube and rotate the left side of the terminal box. Remove terminal box cover Terminal box cover WARNING Electrical Shock Hazard Electrically ground dishwasher. Using 1/4" (6.4 mm) nut driver remove the screw holding the terminal box cover. Suggested wire length relative to green ground connector in death, fire, or electrical...
... the metal tube and rotate the left side of the terminal box. Remove terminal box cover Terminal box cover WARNING Electrical Shock Hazard Electrically ground dishwasher. Using 1/4" (6.4 mm) nut driver remove the screw holding the terminal box cover. Suggested wire length relative to green ground connector in death, fire, or electrical...
Owners Manual
Page 19
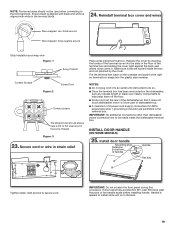
... strain relief screws to secure cord. Handle is easiest to install while unit is aligned with black and white is on the dishwasher, tuck any excess length or slack over nearby components to help keep them off the floor. ■ Route cord out the rear ...side member. Install door handle Mounting stud Setscrew (in the terminal block. 24. Replace the cover by the cover. IMPORTANT: No additional connections other than dishwasher power connection are permitted in . NOTE: Pre-tinned wires should always have a 2/3 to 3/4 wrap around Strip insulation and wrap wire Figure: 1 ...
... strain relief screws to secure cord. Handle is easiest to install while unit is aligned with black and white is on the dishwasher, tuck any excess length or slack over nearby components to help keep them off the floor. ■ Route cord out the rear ...side member. Install door handle Mounting stud Setscrew (in the terminal block. 24. Replace the cover by the cover. IMPORTANT: No additional connections other than dishwasher power connection are permitted in . NOTE: Pre-tinned wires should always have a 2/3 to 3/4 wrap around Strip insulation and wrap wire Figure: 1 ...


