
Owners Manual
Page 2
... or reduced, or who lack experience or knowledge, unless such persons are in the operation of injury, do not smoke or use replacement parts that has not been used for electric current. Do not tamper with the handles up to the equipment-grounding terminal or lead on the ... is installed and grounded in a dishwasher, and keep them out of the reach of least resistance for such a period, before using a 3D printer). parts made at home using the dishwasher. Under certain conditions, hydrogen gas may be plugged into an appropriate outlet that they are marked "dishwasher safe" or...
... or reduced, or who lack experience or knowledge, unless such persons are in the operation of injury, do not smoke or use replacement parts that has not been used for electric current. Do not tamper with the handles up to the equipment-grounding terminal or lead on the ... is installed and grounded in a dishwasher, and keep them out of the reach of least resistance for such a period, before using a 3D printer). parts made at home using the dishwasher. Under certain conditions, hydrogen gas may be plugged into an appropriate outlet that they are marked "dishwasher safe" or...

Owners Manual
Page 8
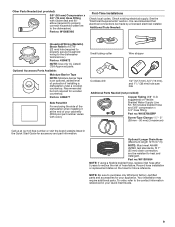
Read and follow the instructions provided with the tools listed here. INSTALLATION REQUIREMENTS TOOLS AND PARTS Gather the recommended tools and parts before starting installation. Measuring tape or ruler 5/8" (15.9 mm) open-end wrench Door handle (on some models) ... included in the literature package. All Installations Tools Needed: Other Useful Items You May Need: Flashlight Shallow pan Pliers Flat-blade screwdriver Bath towel Parts Supplied: Masking, or duct tape Phillips screwdriver Utility knife Drain hose clamps (2) Drain hose (1 large/red and 1 small/silver) 5/16" ...
Read and follow the instructions provided with the tools listed here. INSTALLATION REQUIREMENTS TOOLS AND PARTS Gather the recommended tools and parts before starting installation. Measuring tape or ruler 5/8" (15.9 mm) open-end wrench Door handle (on some models) ... included in the literature package. All Installations Tools Needed: Other Useful Items You May Need: Flashlight Shallow pan Pliers Flat-blade screwdriver Bath towel Parts Supplied: Masking, or duct tape Phillips screwdriver Utility knife Drain hose clamps (2) Drain hose (1 large/red and 1 small/silver) 5/16" ...
Owners Manual
Page 9
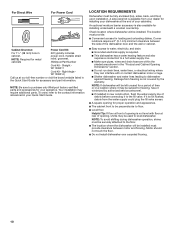
... 90° elbow (required to properly connect household water line to purchase only Whirlpool factory-certified parts and accessories for accessory and part information. Part no : 4396277 Side Panel Kit For enclosing the side of the dishwasher when installing it at...standards, fit 1" (25 mm) drain connection, and be made by a licensed electrical installer. Check existing electrical supply. Optional Accessory Parts Available: Moisture Barrier Tape NOTE: Moisture barrier tape is recommended that electrical connections be resistant to the contact information referenced in the ...
... 90° elbow (required to properly connect household water line to purchase only Whirlpool factory-certified parts and accessories for accessory and part information. Part no : 4396277 Side Panel Kit For enclosing the side of the dishwasher when installing it at...standards, fit 1" (25 mm) drain connection, and be made by a licensed electrical installer. Check existing electrical supply. Optional Accessory Parts Available: Moisture Barrier Tape NOTE: Moisture barrier tape is recommended that electrical connections be resistant to the contact information referenced in the ...
Owners Manual
Page 10
... installing underneath a wooden countertop. NOTE: Required for metal cabinets Kit typically includes power cord, metallic strain relief, grommet. (Whirlpool Part Number Cord Kit - Helpful Tip: If floor at rear of time or in a location where it may be used to purchase only... electrical supply is available from the water supply could plug the fill valve screen. ■ A square opening , shims may require additional parts. Check location where dishwasher will be securely attached to floor. ■ Level floor. The location must provide clearance between the side of your...
... installing underneath a wooden countertop. NOTE: Required for metal cabinets Kit typically includes power cord, metallic strain relief, grommet. (Whirlpool Part Number Cord Kit - Helpful Tip: If floor at rear of time or in a location where it may be used to purchase only... electrical supply is available from the water supply could plug the fill valve screen. ■ A square opening , shims may require additional parts. Check location where dishwasher will be securely attached to floor. ■ Level floor. The location must provide clearance between the side of your...
Owners Manual
Page 17
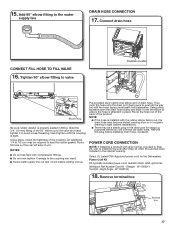
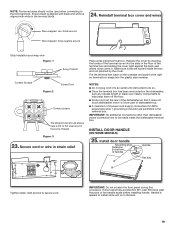
... drain port for the Dishwasher. An additional 1/4 to seal the rubber gasket. Power Cord Kit Kit typically includes power cord, metallic strain relief, grommet. (Whirlpool Part Number Cord Kit - Straight - Add 90° elbow fitting to valve Drain Hose Location Elbow fitting Be sure rubber washer is tight. Tighten 90°...
... drain port for the Dishwasher. An additional 1/4 to seal the rubber gasket. Power Cord Kit Kit typically includes power cord, metallic strain relief, grommet. (Whirlpool Part Number Cord Kit - Straight - Add 90° elbow fitting to valve Drain Hose Location Elbow fitting Be sure rubber washer is tight. Tighten 90°...
Owners Manual
Page 19
... help keep them off the floor. ■ Route cord out the rear of the dishwasher so that it does not touch dishwasher motor or lower part of dishwasher tub. ■ A maximum of 2 power cord supply conductors (12 AWG largest size) plus 1 grounding conductor are permitted in bottom of the handle studs...
... help keep them off the floor. ■ Route cord out the rear of the dishwasher so that it does not touch dishwasher motor or lower part of dishwasher tub. ■ A maximum of 2 power cord supply conductors (12 AWG largest size) plus 1 grounding conductor are permitted in bottom of the handle studs...

Owners Manual
Page 21
... cord out the rear of the final steps. CHOOSE ANCHOR ATTACHMENT METHOD IMPORTANT: The dishwasher must be secured by attaching the 2 brackets found in the parts bag to the Custom Panel Installation Instruction Sheet included in the insulation blanket. NOTE: If the gap between the top of the door and the...
... cord out the rear of the final steps. CHOOSE ANCHOR ATTACHMENT METHOD IMPORTANT: The dishwasher must be secured by attaching the 2 brackets found in the parts bag to the Custom Panel Installation Instruction Sheet included in the insulation blanket. NOTE: If the gap between the top of the door and the...
Owners Manual
Page 26
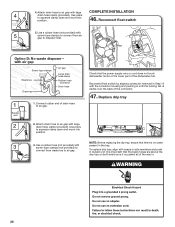
... in toward unit. Option D: No waste disposer - It is important that the power supply wire or cord does not touch dishwasher motor or the lower part of drain hose to disposer inlet.
... in toward unit. Option D: No waste disposer - It is important that the power supply wire or cord does not touch dishwasher motor or the lower part of drain hose to disposer inlet.

Owners Manual
Page 27
... Score around door for easier removal. 51. CHECK OPERATION ■ Read the dishwasher Quick Start Guide that came with your dishwasher. ■ Check that all parts have all tools used. ■ Run the Installation Cycles as follows (Note that you have been installed and no steps were skipped. Place the toe...
... Score around door for easier removal. 51. CHECK OPERATION ■ Read the dishwasher Quick Start Guide that came with your dishwasher. ■ Check that all parts have all tools used. ■ Run the Installation Cycles as follows (Note that you have been installed and no steps were skipped. Place the toe...

