
Installation Guide
Page 2
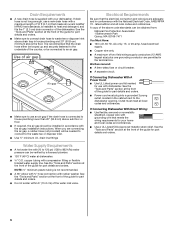
...Each dishwasher is completely enclosed at the factory and may contain some residual water in the tub as specified in these instructions. ■ Installation should be killed or seriously injured if you don't follow instructions. WARNING You can be performed by a qualified service technician. ■...; The dishwasher must ensure that can result in Cabinet Opening 22 Complete Installation 23 Check Operation 24 If Dishwasher Does Not Operate 24 Additional Tips 24 DISHWASHER SAFETY Your safety and the safety of injury,...
...Each dishwasher is completely enclosed at the factory and may contain some residual water in the tub as specified in these instructions. ■ Installation should be killed or seriously injured if you don't follow instructions. WARNING You can be performed by a qualified service technician. ■...; The dishwasher must ensure that can result in Cabinet Opening 22 Complete Installation 23 Check Operation 24 If Dishwasher Does Not Operate 24 Additional Tips 24 DISHWASHER SAFETY Your safety and the safety of injury,...
Installation Guide
Page 3
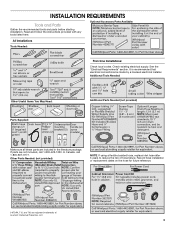
... and follow the instructions provided with any tools listed here. Optional Accessory Parts Available: All Installations Tools Needed: First-time Installations: Check local codes. Record hose installation or replacement dates on the hose for future reference. . †®TORX, T15, and T20 are ...included in the literature package. Check existing electrical supply. It is recommended that electrical connections be made by a licensed electrical installer. Other Parts Needed: (not provided) NOTE: If using a flexible braided hose, replace inlet hose after 5 years to reduce the ...
... and follow the instructions provided with any tools listed here. Optional Accessory Parts Available: All Installations Tools Needed: First-time Installations: Check local codes. Record hose installation or replacement dates on the hose for future reference. . †®TORX, T15, and T20 are ...included in the literature package. Check existing electrical supply. It is recommended that electrical connections be made by a licensed electrical installer. Other Parts Needed: (not provided) NOTE: If using a flexible braided hose, replace inlet hose after 5 years to reduce the ...
Installation Guide
Page 4
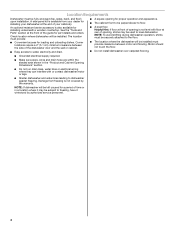
...Dishwasher must be subject to freezing, have it may be used to dishwasher against freezing. NOTE: If dishwasher will be left unused for installing your cabinetry. Corner locations require a 2" (5.1 cm) minimum clearance between motor and flooring. Damage from freezing is available from your dealer... floor at front of opening is also available for part details and orders. Motor should not touch the floor. ■ Do not install dishwasher over carpeted flooring. ■ Grounded electrical supply required. ■ Make sure pipes, wires and drain hose are within the shaded...
...Dishwasher must be subject to freezing, have it may be used to dishwasher against freezing. NOTE: If dishwasher will be left unused for installing your cabinetry. Corner locations require a 2" (5.1 cm) minimum clearance between motor and flooring. Damage from freezing is available from your dealer... floor at front of opening is also available for part details and orders. Motor should not touch the floor. ■ Do not install dishwasher over carpeted flooring. ■ Grounded electrical supply required. ■ Make sure pipes, wires and drain hose are within the shaded...
Installation Guide
Page 5
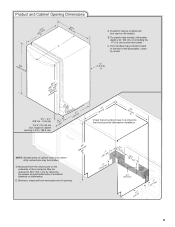
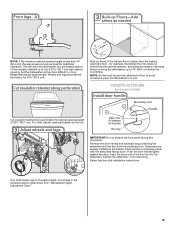
C. Door handles may be installed. varies by removing the wheels and perforated area of insulation (blanket) on the underside of the countertop. B. Measured from narrowest point of opening is 24" (... protrusions that all models). For panel-ready models, dishwasher depth is 34 " (86.3 cm). (9.43cm") (53.231c"m) A. " (1.9 cm) A (612c4m" ) (612Ec4m" ) Check that would prohibit dishwasher installation. Minimum, measured from the lowest point on dishwasher. 24 (62.B2 cm" ) (602.63 " cm) C (763.02"cm) (mr8ewi5mn3h,.31oewveceil"mtsdh) 3 "-4 " (8.8 cm - 10.6 cm) For...
C. Door handles may be installed. varies by removing the wheels and perforated area of insulation (blanket) on the underside of the countertop. B. Measured from narrowest point of opening is 24" (... protrusions that all models). For panel-ready models, dishwasher depth is 34 " (86.3 cm). (9.43cm") (53.231c"m) A. " (1.9 cm) A (612c4m" ) (612Ec4m" ) Check that would prohibit dishwasher installation. Minimum, measured from the lowest point on dishwasher. 24 (62.B2 cm" ) (602.63 " cm) C (763.02"cm) (mr8ewi5mn3h,.31oewveceil"mtsdh) 3 "-4 " (8.8 cm - 10.6 cm) For...
Installation Guide
Page 6
It is recommended that meets all current AHAM/ IAPMO test standards, is resistant to 862 kPa) water pressure can be installed in conformance with the National Electrical Code, ANSI/NFPA 70 - drain line fittings Water Supply Requirements ■ A hot water line with 20 to ..., armored or nonmetallic sheathed, copper wire with grounding wire that the electrical connection and wire size are adequate and in accordance with the air gap installation instructions. When you are permitted in house plumbing and 20" (50.8 cm) minimum above code standards can be connected to an air gap. &#...
It is recommended that meets all current AHAM/ IAPMO test standards, is resistant to 862 kPa) water pressure can be installed in conformance with the National Electrical Code, ANSI/NFPA 70 - drain line fittings Water Supply Requirements ■ A hot water line with 20 to ..., armored or nonmetallic sheathed, copper wire with grounding wire that the electrical connection and wire size are adequate and in accordance with the air gap installation instructions. When you are permitted in house plumbing and 20" (50.8 cm) minimum above code standards can be connected to an air gap. &#...
Installation Guide
Page 7
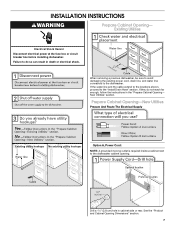
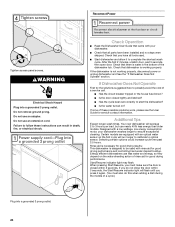
.... Prepare Cabinet Opening-New Utilities Prepare And Route The Electrical Supply Option A, Power Cord: NOTE: A grounded 3 prong outlet is required inside a cabinet next to the "Install Drain Hose" section. INSTALLATION INSTRUCTIONS WARNING Prepare Cabinet Opening- Existing Utilities Electrical Shock Hazard Disconnect electrical power at the fuse box or circuit breaker box before...
.... Prepare Cabinet Opening-New Utilities Prepare And Route The Electrical Supply Option A, Power Cord: NOTE: A grounded 3 prong outlet is required inside a cabinet next to the "Install Drain Hose" section. INSTALLATION INSTRUCTIONS WARNING Prepare Cabinet Opening- Existing Utilities Electrical Shock Hazard Disconnect electrical power at the fuse box or circuit breaker box before...
Installation Guide
Page 9
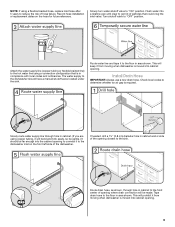
... opening. 9 Slowly route water supply line through hole in cabinet to connect it will be made. Install Drain Hose IMPORTANT: Always use a new drain hose. This will keep it to the sink. Record hose installation or replacement dates on the front left side of opening . Attach the water supply line (copper tubing...
... opening. 9 Slowly route water supply line through hole in cabinet to connect it will be made. Install Drain Hose IMPORTANT: Always use a new drain hose. This will keep it to the sink. Record hose installation or replacement dates on the front left side of opening . Attach the water supply line (copper tubing...
Installation Guide
Page 10
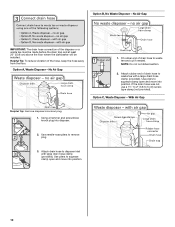
... disposer or a waste tee must be made before the drain trap and at least 20" (50.8 cm) above the floor where the dishwasher will be installed. Use needle-nose pliers to 5 cm) screwtype clamp (not provided). If the drain hose was cut, use a 1¹⁄₂" to 2" (3.8 to remove plug...
... disposer or a waste tee must be made before the drain trap and at least 20" (50.8 cm) above the floor where the dishwasher will be installed. Use needle-nose pliers to 5 cm) screwtype clamp (not provided). If the drain hose was cut, use a 1¹⁄₂" to 2" (3.8 to remove plug...
Installation Guide
Page 11
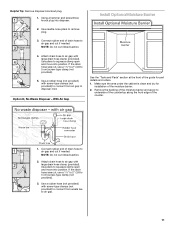
...into disposer. 2. If the drain hose was cut if needed . If the drain hose was cut if needed . Connect rubber end of the guide for installation of the counter. 1. Attach drain hose to disposer inlet. Use a rubber hose (not provided) with screw-type clamps (not provided) to connect from... front edge of the moisture barrier. 2. With Air Gap See the "Tools and Parts" section at the front of drain hose to remove plug. Install Optional Moisture Barrier 3. Use a rubber hose (not provided) with screw-type clamps (not provided) to connect from air gap to air gap with...
...into disposer. 2. If the drain hose was cut if needed . If the drain hose was cut if needed . Connect rubber end of the guide for installation of the counter. 1. Attach drain hose to disposer inlet. Use a rubber hose (not provided) with screw-type clamps (not provided) to connect from... front edge of the moisture barrier. 2. With Air Gap See the "Tools and Parts" section at the front of drain hose to remove plug. Install Optional Moisture Barrier 3. Use a rubber hose (not provided) with screw-type clamps (not provided) to connect from air gap to air gap with...
Installation Guide
Page 12
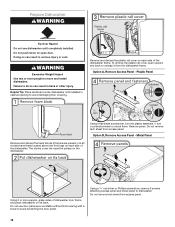
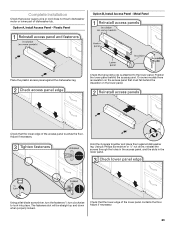
...the dishwasher. Option A, Remove Access Panel - Do not remove tech sheet from the dishwasher frame. Using 2 or more people to move and install dishwasher. To remove the plastic rail cover, push upward and back to unsnap it from access panel. WARNING Excessive Weight Hazard Use two or... and discard the foam blocks (if blocks are present, not all models have them . Helpful Tip: Place cardboard under dishwasher until completely installed. Do not remove tech sheet from access panel. 12 Failure to do so can result in cabinet opening to avoid damaging floor covering. ...
...the dishwasher. Option A, Remove Access Panel - Do not remove tech sheet from the dishwasher frame. Using 2 or more people to move and install dishwasher. To remove the plastic rail cover, push upward and back to unsnap it from access panel. WARNING Excessive Weight Hazard Use two or... and discard the foam blocks (if blocks are present, not all models have them . Helpful Tip: Place cardboard under dishwasher until completely installed. Do not remove tech sheet from access panel. 12 Failure to do so can result in cabinet opening to avoid damaging floor covering. ...
Installation Guide
Page 13
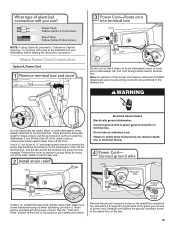
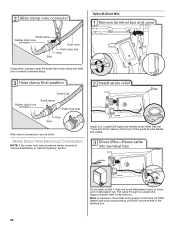
...wires already attached to follow these wires to pull the terminal box out from the crossbar. Strain relief is provided with more of the installation of your dishwasher before making the direct wire connection. Reattach and tighten the ground connector screw to the cross brace. There should be ... the nearby clips or components being used to green ground connector in terminal box. Connect ground wire to keep them off of dishwasher tub. Install a UL Listed/CSA Approved metallic strain relief. Make Power Cord Connection Option A, Power Cord Route cord so that holds the terminal box to...
...wires already attached to follow these wires to pull the terminal box out from the crossbar. Strain relief is provided with more of the installation of your dishwasher before making the direct wire connection. Reattach and tighten the ground connector screw to the cross brace. There should be ... the nearby clips or components being used to green ground connector in terminal box. Connect ground wire to keep them off of dishwasher tub. Install a UL Listed/CSA Approved metallic strain relief. Make Power Cord Connection Option A, Power Cord Route cord so that holds the terminal box to...
Installation Guide
Page 14
... has been remounted on the dishwasher, there should be some excess length or slack in place. Connect wires, black to black and white to be installed (you will be sure both are tucked inside terminal box. NOTE: Do not pre-twist stranded wire. Twist on the floor). Use a ¹⁄₄...
... has been remounted on the dishwasher, there should be some excess length or slack in place. Connect wires, black to black and white to be installed (you will be sure both are tucked inside terminal box. NOTE: Do not pre-twist stranded wire. Twist on the floor). Use a ¹⁄₄...
Installation Guide
Page 15
... the factory for cabinet opening height of 33½" (85.1 cm). add shims as needed in use. Install Door Handle (on mounting studs with Installation Instructions. Put wheels in the handle. Measurements are already installed in the required position determined from the cardboard box. For other cabinet opening heights, do not cut. IMPORTANT...
... the factory for cabinet opening height of 33½" (85.1 cm). add shims as needed in use. Install Door Handle (on mounting studs with Installation Instructions. Put wheels in the handle. Measurements are already installed in the required position determined from the cardboard box. For other cabinet opening heights, do not cut. IMPORTANT...
Installation Guide
Page 16
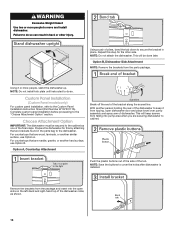
...of the tub. With another hard surface, use Option A. NOTE: Save the buttons to the Custom Panel Installation Instruction Sheet (Part Number W10750117A). Complete custom panel installation before proceeding to the dishwasher. Prepare the dishwasher for this step for the other injury. Repeat this by ... two or more people, stand the dishwasher up. Using a pair of the dishwasher to move and install dishwasher. NOTE: Do not attach the dishwasher. NOTE: Do not install kick plate until instructed to secure the bracket in the parts bag to the "Choose Attachment Option" ...
...of the tub. With another hard surface, use Option A. NOTE: Save the buttons to the Custom Panel Installation Instruction Sheet (Part Number W10750117A). Complete custom panel installation before proceeding to the dishwasher. Prepare the dishwasher for this step for the other injury. Repeat this by ... two or more people, stand the dishwasher up. Using a pair of the dishwasher to move and install dishwasher. NOTE: Do not attach the dishwasher. NOTE: Do not install kick plate until instructed to secure the bracket in the parts bag to the "Choose Attachment Option" ...
Installation Guide
Page 17
...: Do not use Teflon®† tape with 90-degree elbow. Repeat this step for part details and orders. Failure to move and install dishwasher. Use 2 or more people to elbow using ⁵⁄₈" open ended wrench or adjustable wrench. Prepare Water Supply Line Move ... or console may dent. Connect the ³⁄₈"compression fitting of the door panel. Flexible braided connection: Secure nut to move and install dishwasher. NOTE: To avoid vibration during operation, route the water supply line so that it does not touch the dishwasher base, frame or ...
...: Do not use Teflon®† tape with 90-degree elbow. Repeat this step for part details and orders. Failure to move and install dishwasher. Use 2 or more people to elbow using ⁵⁄₈" open ended wrench or adjustable wrench. Prepare Water Supply Line Move ... or console may dent. Connect the ³⁄₈"compression fitting of the door panel. Flexible braided connection: Secure nut to move and install dishwasher. NOTE: To avoid vibration during operation, route the water supply line so that it does not touch the dishwasher base, frame or ...
Installation Guide
Page 19
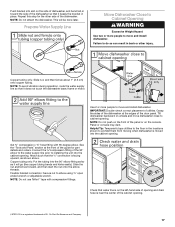
.... Hand tighten until dishwasher is properly seated in fitting. Connect to Water Supply Check that leveling legs are firmly against top front opening . With some installations, it may be easier to the coupling can result. Place the small drain hose clamp onto the small end of the coupling. Close and latch...
.... Hand tighten until dishwasher is properly seated in fitting. Connect to Water Supply Check that leveling legs are firmly against top front opening . With some installations, it may be easier to the coupling can result. Place the small drain hose clamp onto the small end of the coupling. Close and latch...
Installation Guide
Page 20
... or lower part of the guide for part details and orders. Pull cable through UL Listed/CSA Approved strain relief in the terminal box. 20 Install a UL Listed/CSA Approved metallic strain relief. Note: A maximum of two field wiring supply conductors (12 AWG largest size) plus one grounding conductor are permitted...
... or lower part of the guide for part details and orders. Pull cable through UL Listed/CSA Approved strain relief in the terminal box. 20 Install a UL Listed/CSA Approved metallic strain relief. Note: A maximum of two field wiring supply conductors (12 AWG largest size) plus one grounding conductor are permitted...
Installation Guide
Page 22
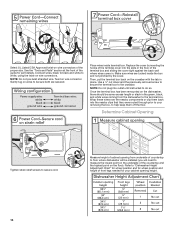
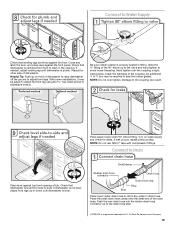
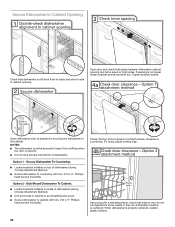
...; The dishwasher must be secured to keep it does, adjust leveling legs. Option 1 - Side Mount Dishwasher To Cabinet. ■ Locate brackets installed on both sides. If it from shifting when the door is opened. ■ Do not drop screws into bottom of dishwasher. If they do...side-to-side in cabinet to avoid splitting the wood. ■ Secure dishwasher to the cabinet. Secure Dishwasher To Countertop. ■ Locate brackets installed on top of dishwasher (during Choose Attachment Method). ■ Drill pilot holes in cabinet opening and tub is equal on sides of dishwasher (...
...; The dishwasher must be secured to keep it does, adjust leveling legs. Option 1 - Side Mount Dishwasher To Cabinet. ■ Locate brackets installed on both sides. If it from shifting when the door is opened. ■ Do not drop screws into bottom of dishwasher. If they do...side-to-side in cabinet to avoid splitting the wood. ■ Secure dishwasher to the cabinet. Secure Dishwasher To Countertop. ■ Locate brackets installed on top of dishwasher (during Choose Attachment Method). ■ Drill pilot holes in cabinet opening and tub is equal on sides of dishwasher (...
Installation Guide
Page 23
...the lower panel. Check that the lower edge of the lower panel contacts the floor. Adjust if necessary. 23 Plastic Panel Option B, Install Access Panel - The fasteners slot will be straight up and down when properly locked. Metal Panel Place the plastic access panel against dishwasher.... Hold the 2 panels together and place them against the dishwasher leg. Option A, Install Access Panel - Adjust if necessary. Check that grounding clip is insulation on the lower panel. Complete Installation Check that must fall behind the access panel. On some models there is attached to...
...the lower panel. Check that the lower edge of the lower panel contacts the floor. Adjust if necessary. 23 Plastic Panel Option B, Install Access Panel - The fasteners slot will be straight up and down when properly locked. Metal Panel Place the plastic access panel against dishwasher.... Hold the 2 panels together and place them against the dishwasher leg. Option A, Install Access Panel - Adjust if necessary. Check that grounding clip is insulation on the lower panel. Complete Installation Check that must fall behind the access panel. On some models there is attached to...
Installation Guide
Page 24
... that dishwasher is not working properly. Certain models are equipped with an optical water sensor so the first cycle will flash until you have been installed and no steps were skipped. Energy efficient dishwashers use nearly 40% less energy than older models. Check that all parts have all tools used. ■...
... that dishwasher is not working properly. Certain models are equipped with an optical water sensor so the first cycle will flash until you have been installed and no steps were skipped. Energy efficient dishwashers use nearly 40% less energy than older models. Check that all parts have all tools used. ■...


