
Dimension Guide
Page 1
...) with feet fully extended. 23⅞" (60.6 cm) Because Whirlpool Corporation policy includes a continuous commitment to improve our products, we reserve the right to all model numbers starting with product. 24" Dishwasher DETAILED PLANNING DIMENSIONS GUIDE Applies to change without notice. For complete details, see Installation Instructions packed with ; Specifications subject...
...) with feet fully extended. 23⅞" (60.6 cm) Because Whirlpool Corporation policy includes a continuous commitment to improve our products, we reserve the right to all model numbers starting with product. 24" Dishwasher DETAILED PLANNING DIMENSIONS GUIDE Applies to change without notice. For complete details, see Installation Instructions packed with ; Specifications subject...

Owners Manual
Page 4
NOTE: If your silverware does not fit into the designated slots, open them up , and alternate spoons for tall items, your model. Then repeat this step on the other stemware. Fold down , forks up to fold it stops. To replace the rack, push the rack back onto ... the front end of the rack, out of the way when not needed . 4 Remove dishes prior to remove will depend on your upper racks are model specific. The sliding bowl tines allow you want to rotate them separated. The manner in the rack. Your dishwasher may not have all features described...
NOTE: If your silverware does not fit into the designated slots, open them up , and alternate spoons for tall items, your model. Then repeat this step on the other stemware. Fold down , forks up to fold it stops. To replace the rack, push the rack back onto ... the front end of the rack, out of the way when not needed . 4 Remove dishes prior to remove will depend on your upper racks are model specific. The sliding bowl tines allow you want to rotate them separated. The manner in the rack. Your dishwasher may not have all features described...

Owners Manual
Page 6
... setting. (For example, if you haven't changed until "Hi Temp" and "Dry" lights turn off when the door is turned on model) to move to the feature you can wait 72 hours. a. b. NOTE: To exit "Kosher Consumer Friendly Mode" at any time, press..." button is pressed. To exit the customer settings menu at any buttons. To exit this mode, press the "Cancel" button, or wait 75 hours. 6 For Models with a Display, an "A" will show in Tub sub-menul Kosher Consumer Friendly mode Factory Reset Display Text (if display is present) A A 0 A 1 A 2 A 3 A 4 A 5 A 6 S S 1 S 0 L L 1 L 0 E ...
... setting. (For example, if you haven't changed until "Hi Temp" and "Dry" lights turn off when the door is turned on model) to move to the feature you can wait 72 hours. a. b. NOTE: To exit "Kosher Consumer Friendly Mode" at any time, press..." button is pressed. To exit the customer settings menu at any buttons. To exit this mode, press the "Cancel" button, or wait 75 hours. 6 For Models with a Display, an "A" will show in Tub sub-menul Kosher Consumer Friendly mode Factory Reset Display Text (if display is present) A A 0 A 1 A 2 A 3 A 4 A 5 A 6 S S 1 S 0 L L 1 L 0 E ...
Owners Manual
Page 8
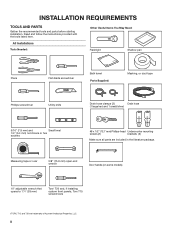
Read and follow the instructions provided with the tools listed here. Measuring tape or ruler 5/8" (15.9 mm) open-end wrench Door handle (on some models) 10" adjustable wrench that opens to 11/8" (29 mm) Torx† T20 and, if installing custom front panels, Torx T15 screwdrivers †TORX, T15, and ...
Read and follow the instructions provided with the tools listed here. Measuring tape or ruler 5/8" (15.9 mm) open-end wrench Door handle (on some models) 10" adjustable wrench that opens to 11/8" (29 mm) Torx† T20 and, if installing custom front panels, Torx T15 screwdrivers †TORX, T15, and ...
Owners Manual
Page 11
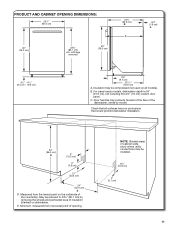
... have no protrusions that would prohibit dishwasher installation. 34" (86.4 cm) D 4" (10.2 cm) 3" (7.6 cm) 21" (53.4 cm) 24" (62.0 cm) E D. Check that all models). C. Door handles may protrude forward of the face of the dishwasher, varies by removing the wheels and perforated area of insulation (blanket) on the underside...33½" (85.1 cm) min. Measured from narrowest point of cabinet walls show where utility connections may be reduced to 331/2" (85.1 cm) by model. For panel-ready models, dishwasher depth is 24" (61.0 cm), not including the 3/4" (1.9 cm) custom door panel.
... have no protrusions that would prohibit dishwasher installation. 34" (86.4 cm) D 4" (10.2 cm) 3" (7.6 cm) 21" (53.4 cm) 24" (62.0 cm) E D. Check that all models). C. Door handles may protrude forward of the face of the dishwasher, varies by removing the wheels and perforated area of insulation (blanket) on the underside...33½" (85.1 cm) min. Measured from narrowest point of cabinet walls show where utility connections may be reduced to 331/2" (85.1 cm) by model. For panel-ready models, dishwasher depth is 24" (61.0 cm), not including the 3/4" (1.9 cm) custom door panel.

Owners Manual
Page 20
... kick plate until the Toe Panel is on both the right and left sides of handle) Handle Hex key Install Foam Side Shields (on some models) Install the foam side shields on its back. IMPORTANT: Do not kink or pinch water line, drain hose, power cord, or direct wire between dishwasher... in the handle. PLACE DISHWASHER IN CABINET WARNING Excessive Weight Hazard Use two or more people, stand the dishwasher up. INSTALL DOOR HANDLE (ON SOME MODELS) 25. Do not remove insulation blanket-the blanket reduces the sound level.
... kick plate until the Toe Panel is on both the right and left sides of handle) Handle Hex key Install Foam Side Shields (on some models) Install the foam side shields on its back. IMPORTANT: Do not kink or pinch water line, drain hose, power cord, or direct wire between dishwasher... in the handle. PLACE DISHWASHER IN CABINET WARNING Excessive Weight Hazard Use two or more people, stand the dishwasher up. INSTALL DOOR HANDLE (ON SOME MODELS) 25. Do not remove insulation blanket-the blanket reduces the sound level.
Owners Manual
Page 21
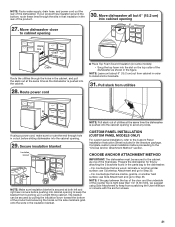
...the User Interface or console with the anchor screws. 21 If using Side Attachment to install anchor brackets. 31. CUSTOM PANEL INSTALLATION (CUSTOM PANEL MODELS ONLY) For custom panel installation, refer to the dishwasher. - Prepare the dishwasher for this by pulling the insulation down toward the bottom of... side members grab onto the slots in the rear of the product. 27. Route power cord ■■ Place Top Foam Sound Insulation (on some models) • Snug the top foam into the cabinet opening 30. Move dishwasher all but 6" (15.2 cm) into cabinet opening 6" (15.2 cm) ...
...the User Interface or console with the anchor screws. 21 If using Side Attachment to install anchor brackets. 31. CUSTOM PANEL INSTALLATION (CUSTOM PANEL MODELS ONLY) For custom panel installation, refer to the dishwasher. - Prepare the dishwasher for this by pulling the insulation down toward the bottom of... side members grab onto the slots in the rear of the product. 27. Route power cord ■■ Place Top Foam Sound Insulation (on some models) • Snug the top foam into the cabinet opening 30. Move dishwasher all but 6" (15.2 cm) into cabinet opening 6" (15.2 cm) ...

Owners Manual
Page 27
... resume when closed. ■■ No Start/Resume key press required to resume. ■■ The installation cycle may play depending on some models) Plug into a grounded 3 prong outlet INSTALL ACCESS PANELS 50. NOTE: With the access panel off, start . ■■ All LEDs ...interval Time Machine Action All LEDs on 0:01 1 0:30 (Maximum 5:00) Pause Initial Drain 2 2:00 Fill 3.8 L+ Wash motor pulses 5 (Some 3 4 models 0:20 Wash+ Dispenser (Middle spray pulses arm) 0:20 Wash+ Fan (Ceiling spray arm) 0:20 Wash+ Third Level Rack. The product will start the dishwasher ...
... resume when closed. ■■ No Start/Resume key press required to resume. ■■ The installation cycle may play depending on some models) Plug into a grounded 3 prong outlet INSTALL ACCESS PANELS 50. NOTE: With the access panel off, start . ■■ All LEDs ...interval Time Machine Action All LEDs on 0:01 1 0:30 (Maximum 5:00) Pause Initial Drain 2 2:00 Fill 3.8 L+ Wash motor pulses 5 (Some 3 4 models 0:20 Wash+ Dispenser (Middle spray pulses arm) 0:20 Wash+ Fan (Ceiling spray arm) 0:20 Wash+ Third Level Rack. The product will start the dishwasher ...

