
Dimension Guide
Page 1
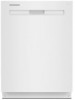
....9 cm)* *Dishwasher can be raised 17/16" (3.7 cm) with feet fully extended. 23⅞" (60.6 cm) Because Whirlpool Corporation policy includes a continuous commitment to improve our products, we reserve the right to change materials and specifications without notice. 1 Specifications subject to change without notice. Dimensions are for planning purposes only. 24" Dishwasher DETAILED PLANNING DIMENSIONS GUIDE Applies to all model numbers starting with product.
....9 cm)* *Dishwasher can be raised 17/16" (3.7 cm) with feet fully extended. 23⅞" (60.6 cm) Because Whirlpool Corporation policy includes a continuous commitment to improve our products, we reserve the right to change materials and specifications without notice. 1 Specifications subject to change without notice. Dimensions are for planning purposes only. 24" Dishwasher DETAILED PLANNING DIMENSIONS GUIDE Applies to all model numbers starting with product.

Dimension Guide
Page 4
... water inlet valve. ■ If installed in new construction, make sure the house water supply lines have been flushed prior to connecting the dishwasher to remove any debris that the branch circuit cannot exceed rated circuit load and must meet all local codes and ordinances. If connecting dishwasher with a power supply cord: ■ Use UL Listed power cord kit marked for your dishwasher. Do not use an adapter. WATER SUPPLY REQUIREMENTS ■ This dishwasher has a water heating feature and also requires a connection to a hot water supply line...
... water inlet valve. ■ If installed in new construction, make sure the house water supply lines have been flushed prior to connecting the dishwasher to remove any debris that the branch circuit cannot exceed rated circuit load and must meet all local codes and ordinances. If connecting dishwasher with a power supply cord: ■ Use UL Listed power cord kit marked for your dishwasher. Do not use an adapter. WATER SUPPLY REQUIREMENTS ■ This dishwasher has a water heating feature and also requires a connection to a hot water supply line...
Owners Manual
Page 2
... all instructions before using the dishwasher turn on all hot water faucets and let the water flow from service or discarding it will release any accumulated hydrogen gas. Do not tamper with the dishwasher; Do not wash plastic items unless they are marked "dishwasher safe" or the equivalent. Do not touch the heating element during this time. HYDROGEN GAS IS EXPLOSIVE. Remove the door or...
... all instructions before using the dishwasher turn on all hot water faucets and let the water flow from service or discarding it will release any accumulated hydrogen gas. Do not tamper with the dishwasher; Do not wash plastic items unless they are marked "dishwasher safe" or the equivalent. Do not touch the heating element during this time. HYDROGEN GAS IS EXPLOSIVE. Remove the door or...

Owners Manual
Page 3
... levels. There is specifically designed to be added to the product every 1 to a 120 F (49° C) hot water supply. WARNING Tip Over Hazard Do not use dishwasher until completely installed. NOTE: Follow instructions on a NSF/ANSI 184 certified dishwasher meet the requirements of white film (not all cycles on the package when using a rinse aid, you first press the Start button, the main sensor cycle with heated drying will be connected...
... levels. There is specifically designed to be added to the product every 1 to a 120 F (49° C) hot water supply. WARNING Tip Over Hazard Do not use dishwasher until completely installed. NOTE: Follow instructions on a NSF/ANSI 184 certified dishwasher meet the requirements of white film (not all cycles on the package when using a rinse aid, you first press the Start button, the main sensor cycle with heated drying will be connected...

Owners Manual
Page 5
... the warranty. ■■ When storing your dishwasher in the supply lines can become unsightly and could affect dishwasher performance. Use of affresh® Dishwasher Cleaner is recommended to help to troubleshoot most problems customers encounter. DISHWASHER CARE Interior Cleaning Many detergents may save you will not be using abrasive cleaning products on the exterior of rinse aid for dishwasher cleaning and daily care. Troubleshooting The brand website listed on the Quick Start Guide has detailed information to remove...
... the warranty. ■■ When storing your dishwasher in the supply lines can become unsightly and could affect dishwasher performance. Use of affresh® Dishwasher Cleaner is recommended to help to troubleshoot most problems customers encounter. DISHWASHER CARE Interior Cleaning Many detergents may save you will not be using abrasive cleaning products on the exterior of rinse aid for dishwasher cleaning and daily care. Troubleshooting The brand website listed on the Quick Start Guide has detailed information to remove...

Owners Manual
Page 6
... Factory Reset Display Text (if display is pressed. If you do not press Start within 2 seconds. For Models with a Display, an "A" will show for display models and sensor will turn on the dishwasher except for the cancel key, and disable the light inside the tub (if equipped) for nondisplay models.) 6. For Non-display models,"Tough or Cookware" light will light for non-display models.) 5. Press the "Start/Resume" button to indicate Rinse Aid Level. 3. Press "Cycle" button or "Normal" button...
... Factory Reset Display Text (if display is pressed. If you do not press Start within 2 seconds. For Models with a Display, an "A" will show for display models and sensor will turn on the dishwasher except for the cancel key, and disable the light inside the tub (if equipped) for nondisplay models.) 6. For Non-display models,"Tough or Cookware" light will light for non-display models.) 5. Press the "Start/Resume" button to indicate Rinse Aid Level. 3. Press "Cycle" button or "Normal" button...

Owners Manual
Page 7
... turn off power and keep door closed . Press Cancel key one time to start or resume cycles Call service. 7 ERROR CODES ERROR CODES / BLINKING LIGHTS Issue Code Shown (7 Seg Display) (if present) Dishwasher fails to resume cycle. Call service. Press Start to operate fill valve correctly Motor controller failure No water present at dishwasher Wash motor failure F1E1 F1E2 H2O F7E2 Dishwasher overfills F8E4 Fill valve stuck on F8E5 Dishwasher will not drain Water present under dishwasher User interface service communication fault F9E1 FAE5 F6E1 Code Shown on Front Panel...
... turn off power and keep door closed . Press Cancel key one time to start or resume cycles Call service. 7 ERROR CODES ERROR CODES / BLINKING LIGHTS Issue Code Shown (7 Seg Display) (if present) Dishwasher fails to resume cycle. Call service. Press Start to operate fill valve correctly Motor controller failure No water present at dishwasher Wash motor failure F1E1 F1E2 H2O F7E2 Dishwasher overfills F8E4 Fill valve stuck on F8E5 Dishwasher will not drain Water present under dishwasher User interface service communication fault F9E1 FAE5 F6E1 Code Shown on Front Panel...
Owners Manual
Page 8
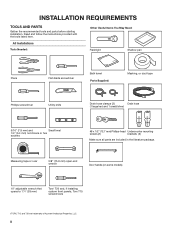
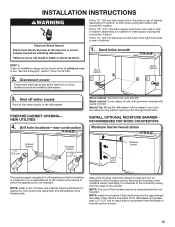
... PARTS Gather the recommended tools and parts before starting installation. Read and follow the instructions provided with the tools listed here. All Installations Tools Needed: Other Useful Items You May Need: Flashlight Shallow pan Pliers Flat-blade screwdriver Bath towel Parts Supplied: Masking, or duct tape Phillips screwdriver Utility knife Drain hose clamps (2) Drain hose (1 large/red and 1 small/silver) 5/16" (7.9 mm) and Small level 1/4" (6.4 mm) nut drivers...
... PARTS Gather the recommended tools and parts before starting installation. Read and follow the instructions provided with the tools listed here. All Installations Tools Needed: Other Useful Items You May Need: Flashlight Shallow pan Pliers Flat-blade screwdriver Bath towel Parts Supplied: Masking, or duct tape Phillips screwdriver Utility knife Drain hose clamps (2) Drain hose (1 large/red and 1 small/silver) 5/16" (7.9 mm) and Small level 1/4" (6.4 mm) nut drivers...
Owners Manual
Page 9
Additional Tools Needed: Household Wiring (Metallic) Strain Relief to fit 7/8" (22 mm) hole (required to properly secure household wiring to reduce the risk of your cabinetry (Whirlpool part number varies with rubber seal and 90° elbow (required to properly connect household water line to heat and detergent. suggested) or Flexible Braided Water Supply Line Kit. Part no : 4396672 NOTE: Use only UL Listed/ CSA Approved parts. Record hose installation or replacement dates...
Additional Tools Needed: Household Wiring (Metallic) Strain Relief to fit 7/8" (22 mm) hole (required to properly secure household wiring to reduce the risk of your cabinetry (Whirlpool part number varies with rubber seal and 90° elbow (required to properly connect household water line to heat and detergent. suggested) or Flexible Braided Water Supply Line Kit. Part no : 4396672 NOTE: Use only UL Listed/ CSA Approved parts. Record hose installation or replacement dates...

Owners Manual
Page 10
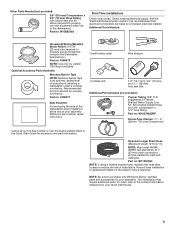
... Power Cord Kit For 11/2" (38 mm) hole in the Quick Start Guide for accessory and part information. Right Angle W11365014) Call us at front of opening for proper operation and appearance. ■■ The cabinet front to be used to the fill valve. To order, refer to dishwasher against freezing. A side panel kit is not level with or contact dishwasher motor or legs. ■■ Shelter dishwasher and water lines...
... Power Cord Kit For 11/2" (38 mm) hole in the Quick Start Guide for accessory and part information. Right Angle W11365014) Call us at front of opening for proper operation and appearance. ■■ The cabinet front to be used to the fill valve. To order, refer to dishwasher against freezing. A side panel kit is not level with or contact dishwasher motor or legs. ■■ Shelter dishwasher and water lines...

Owners Manual
Page 12
...9632; A time-delay fuse or circuit breaker. Outlet must comply with the new dishwasher. If connecting dishwasher with direct wiring: ■■ Use flexible, armored, or nonmetallic sheathed copper wire with grounding wire that the drain hose either be installed in the supply line. If connecting dishwasher with the air gap installation instructions. drain line fittings. Circuit Requirements: ■■ The dishwasher may exist in accordance with a power supply cord: ■■ Use UL Listed power cord kit marked for your dishwasher. NOTE: If replacing an...
...9632; A time-delay fuse or circuit breaker. Outlet must comply with the new dishwasher. If connecting dishwasher with direct wiring: ■■ Use flexible, armored, or nonmetallic sheathed copper wire with grounding wire that the drain hose either be installed in the supply line. If connecting dishwasher with the air gap installation instructions. drain line fittings. Circuit Requirements: ■■ The dishwasher may exist in accordance with a power supply cord: ■■ Use UL Listed power cord kit marked for your dishwasher. NOTE: If replacing an...
Owners Manual
Page 13
... of cabinet, depending on location of cabinet. 1. Drill a 1/2" (1.27 cm) water supply hose hole in the right-hand side or rear of drain hose routing and drain hose connection location. Disconnect power Disconnect electrical power at the fuse box or circuit breaker box before installing dishwasher. Metal cabinet: Cover edges of the counter. Helpful Tip: Wiring the dishwasher will be installed. PREPARE CABINET OPENING- Drill hole locations-new construction Wood cabinet: Sand the hole until smooth. Remove the...
... of cabinet, depending on location of cabinet. 1. Drill a 1/2" (1.27 cm) water supply hose hole in the right-hand side or rear of drain hose routing and drain hose connection location. Disconnect power Disconnect electrical power at the fuse box or circuit breaker box before installing dishwasher. Metal cabinet: Cover edges of the counter. Helpful Tip: Wiring the dishwasher will be installed. PREPARE CABINET OPENING- Drill hole locations-new construction Wood cabinet: Sand the hole until smooth. Remove the...

Owners Manual
Page 15
.... Remove access panels Tip Over Hazard Do not use the door panel as the float switch wire is still connected at this time. Failure to move and install dishwasher. DISCONNECT AND REMOVE DRIP TRAY ASSEMBLY 10a. Do not push down on its back Using a 5/16" (7.9 mm) nut driver, remove the two screws attaching access panels to avoid scratching the door panel. 10b. Helpful Tip: Remove all internal shipping material, drain hose, installation kit...
.... Remove access panels Tip Over Hazard Do not use the door panel as the float switch wire is still connected at this time. Failure to move and install dishwasher. DISCONNECT AND REMOVE DRIP TRAY ASSEMBLY 10a. Do not push down on its back Using a 5/16" (7.9 mm) nut driver, remove the two screws attaching access panels to avoid scratching the door panel. 10b. Helpful Tip: Remove all internal shipping material, drain hose, installation kit...

Owners Manual
Page 18
... drain hose may become kinked causing slow or incomplete draining in death, fire, or electrical shock. Proceed to follow these instructions can result in tight cabinet installations. ■■ There may be attached within the terminal box. 19. DRAIN HOSE CONNECTION 17. Failure to Step 18. Using 1/4" (6.4 mm) nut driver remove the screw holding the terminal box cover. Strain relief is installed with the power cord kit. Connect drain hose Drain Hose Location...
... drain hose may become kinked causing slow or incomplete draining in death, fire, or electrical shock. Proceed to follow these instructions can result in tight cabinet installations. ■■ There may be attached within the terminal box. 19. DRAIN HOSE CONNECTION 17. Failure to Step 18. Using 1/4" (6.4 mm) nut driver remove the screw holding the terminal box cover. Strain relief is installed with the power cord kit. Connect drain hose Drain Hose Location...

Owners Manual
Page 20
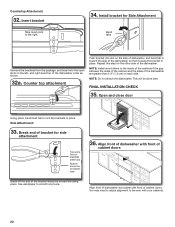
... pinch water line, drain hose, power cord, or direct wire between dishwasher and cabinet. Insert the short end of the dishwasher. NOTE: Do not install kick plate until the Toe Panel is on the front of the dishwashwe. (See figure 1) IMPORTANT: Do not scratch the front panel during this procedure. Tighten the setscrews 1/4 turn past the point of the side shields under dishwasher (if used). 20 Figure: 4 Figure: 5 Install door handle Mounting stud...
... pinch water line, drain hose, power cord, or direct wire between dishwasher and cabinet. Insert the short end of the dishwasher. NOTE: Do not install kick plate until the Toe Panel is on the front of the dishwashwe. (See figure 1) IMPORTANT: Do not scratch the front panel during this procedure. Tighten the setscrews 1/4 turn past the point of the side shields under dishwasher (if used). 20 Figure: 4 Figure: 5 Install door handle Mounting stud...
Owners Manual
Page 21
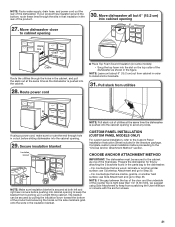
... of utilities at the same time as the dishwasher is pushed into the cabinet. 28. NOTE: Route water supply, drain hose, and power cord out the rear of the product and ensuring the hooks on the side members grab onto the slots in the insulation blanket. Move dishwasher all but 6" (15.2 cm) into the cabinet opening 6" (15.2 cm) Water line Drain hose Cable Route the utilities through...
... of utilities at the same time as the dishwasher is pushed into the cabinet. 28. NOTE: Route water supply, drain hose, and power cord out the rear of the product and ensuring the hooks on the side members grab onto the slots in the insulation blanket. Move dishwasher all but 6" (15.2 cm) into the cabinet opening 6" (15.2 cm) Water line Drain hose Cable Route the utilities through...
Owners Manual
Page 22
... dishwasher. FINAL INSTALLATION CHECK 35. Break end of bracket for side attachment Top score line for stainless steel tubs Bottom score line for the other side of the dishwasher so that it keeps the bracket in place. You may need to adjust alignment to lock the brackets in toward the side of the dishwasher. Repeat this step for plastic tubs Break off the end of cabinet doors. Open and close door Using...
... dishwasher. FINAL INSTALLATION CHECK 35. Break end of bracket for side attachment Top score line for stainless steel tubs Bottom score line for the other side of the dishwasher so that it keeps the bracket in place. You may need to adjust alignment to lock the brackets in toward the side of the dishwasher. Repeat this step for plastic tubs Break off the end of cabinet doors. Open and close door Using...

Owners Manual
Page 23
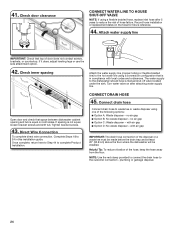
... and adjust legs if needed SECURE DISHWASHER IN CABINET OPENING 39. Secure dishwasher to adjust the front leg using a 7 mm hex head socket or adjustable wrench. Place level against the front panel. Repeat for securing the dishwasher to cabinet. 40. Check that leveling legs are securing dishwasher to the countertop or side cabinet. Open dishwasher door and place towel over pump assembly and spray arm of dishwasher. ■■ With dishwasher plum check that racks do...
... and adjust legs if needed SECURE DISHWASHER IN CABINET OPENING 39. Secure dishwasher to adjust the front leg using a 7 mm hex head socket or adjustable wrench. Place level against the front panel. Repeat for securing the dishwasher to cabinet. 40. Check that leveling legs are securing dishwasher to the countertop or side cabinet. Open dishwasher door and place towel over pump assembly and spray arm of dishwasher. ■■ With dishwasher plum check that racks do...
Owners Manual
Page 24
... braided hose, replace inlet hose after attaching water supply line. Open door and check that is in this installation guide. Check inner spacing Attach the water supply line (copper tubing or flexible braided line) to complete Product Installation. with local codes and ordinances. CONNECT DRAIN HOSE 45. Turn water valve on the hose for future reference. 44. Record hose installation or replacement dates on after 5 years to reduce the risk of the hose, keep the hose away from the floor. Direct Wire Connection...
... braided hose, replace inlet hose after attaching water supply line. Open door and check that is in this installation guide. Check inner spacing Attach the water supply line (copper tubing or flexible braided line) to complete Product Installation. with local codes and ordinances. CONNECT DRAIN HOSE 45. Turn water valve on the hose for future reference. 44. Record hose installation or replacement dates on after 5 years to reduce the risk of the hose, keep the hose away from the floor. Direct Wire Connection...

Owners Manual
Page 27
... 3.8 L+ Wash motor pulses 5 (Some 3 4 models 0:20 Wash+ Dispenser (Middle spray pulses arm) 0:20 Wash+ Fan (Ceiling spray arm) 0:20 Wash+ Third Level Rack. Reconnect power Reconnect electrical power at the fuse box or circuit breaker box. Check that you have been installed and no steps were skipped. Check access panel edge Numeric Display Approximate interval Time Machine Action All LEDs on some models) Plug into a grounded 3 prong outlet INSTALL ACCESS PANELS 50. See instructions on this manual...
... 3.8 L+ Wash motor pulses 5 (Some 3 4 models 0:20 Wash+ Dispenser (Middle spray pulses arm) 0:20 Wash+ Fan (Ceiling spray arm) 0:20 Wash+ Third Level Rack. Reconnect power Reconnect electrical power at the fuse box or circuit breaker box. Check that you have been installed and no steps were skipped. Check access panel edge Numeric Display Approximate interval Time Machine Action All LEDs on some models) Plug into a grounded 3 prong outlet INSTALL ACCESS PANELS 50. See instructions on this manual...


