
Dimension Guide
Page 1
... extended. 23⅞" (60.6 cm) Because Whirlpool Corporation policy includes a continuous commitment to improve our products, we reserve the right to change without notice. 24" Dishwasher DETAILED PLANNING DIMENSIONS GUIDE Applies to change materials and specifications without notice. 1 MDB4949SK, MDB7959SK, MDB8959SK, MDB9959SK, MDB9979SK PRODUCT DIMENSIONS 241/2" (62.2 cm) 337/16" (84...
... extended. 23⅞" (60.6 cm) Because Whirlpool Corporation policy includes a continuous commitment to improve our products, we reserve the right to change without notice. 24" Dishwasher DETAILED PLANNING DIMENSIONS GUIDE Applies to change materials and specifications without notice. 1 MDB4949SK, MDB7959SK, MDB8959SK, MDB9959SK, MDB9979SK PRODUCT DIMENSIONS 241/2" (62.2 cm) 337/16" (84...

Dimension Guide
Page 2
...8224; SIDE VIEW Because Whirlpool Corporation policy includes a continuous commitment to improve our products, we reserve the right to 1/8" (0.3 cm). *Dishwasher can crush up to change without notice. For complete details, see Installation Instructions packed with Pocket Handle G* Height to bottom of door (...DESCRIPTION A Width of door DIMENSIONS 23⅞" (60.6 cm) B* Height to top of handle C Height of adjustable toe kick D Width of recessed dishwasher (min.) J† Depth with door fully open (min.) 335/8" (85.4 cm) 503/16" (127.4 cm) K† Depth with toe kick ...
...8224; SIDE VIEW Because Whirlpool Corporation policy includes a continuous commitment to improve our products, we reserve the right to 1/8" (0.3 cm). *Dishwasher can crush up to change without notice. For complete details, see Installation Instructions packed with Pocket Handle G* Height to bottom of door (...DESCRIPTION A Width of door DIMENSIONS 23⅞" (60.6 cm) B* Height to top of handle C Height of adjustable toe kick D Width of recessed dishwasher (min.) J† Depth with door fully open (min.) 335/8" (85.4 cm) 503/16" (127.4 cm) K† Depth with toe kick ...
Dimension Guide
Page 3
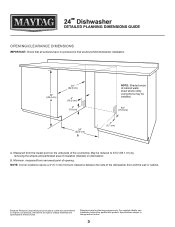
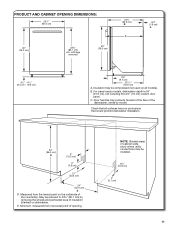
... PLANNING DIMENSIONS GUIDE OPENING/CLEARANCE DIMENSIONS IMPORTANT: Check that all surfaces have no protrusions that would prohibit dishwasher installation. 34" (86.4 cm) A 24" (62.0 cm) 4" (10.2 cm) 3" (7.6 cm) 24" (62.0 cm) B NOTE: Shaded areas of insulation (blanket) on ... right to change without notice. May be installed. 6¼" (15.9 cm) 2" (5.1 cm) A. Minimum, measured from the lowest point on dishwasher. Specifications subject to 331/2" (85.1 cm) by removing the wheels and perforated area of cabinet walls show where utility connections may be reduced to change...
... PLANNING DIMENSIONS GUIDE OPENING/CLEARANCE DIMENSIONS IMPORTANT: Check that all surfaces have no protrusions that would prohibit dishwasher installation. 34" (86.4 cm) A 24" (62.0 cm) 4" (10.2 cm) 3" (7.6 cm) 24" (62.0 cm) B NOTE: Shaded areas of insulation (blanket) on ... right to change without notice. May be installed. 6¼" (15.9 cm) 2" (5.1 cm) A. Minimum, measured from the lowest point on dishwasher. Specifications subject to 331/2" (85.1 cm) by removing the wheels and perforated area of cabinet walls show where utility connections may be reduced to change...

Dimension Guide
Page 4
...must meet all governing codes and regulations such as a garbage disposal providing that meets all local codes and ordinances. If connecting dishwasher with direct wiring: ■ Use flexible, armored, or nonmetallic sheathed copper wire with grounding wire that meets the wiring .... NOTE: 1/2" (1.3 cm) minimum plastic tubing is not recommended. ■ A 90° elbow with 3/4" (0.95 cm) hose connection with dishwasher. ■ Plug into a grounded 3 prong outlet. Be sure that may be obtained from: National Fire Protection Association 1 Batterymarch Park Quincy, MA...
...must meet all governing codes and regulations such as a garbage disposal providing that meets all local codes and ordinances. If connecting dishwasher with direct wiring: ■ Use flexible, armored, or nonmetallic sheathed copper wire with grounding wire that meets the wiring .... NOTE: 1/2" (1.3 cm) minimum plastic tubing is not recommended. ■ A 90° elbow with 3/4" (0.95 cm) hose connection with dishwasher. ■ Plug into a grounded 3 prong outlet. Be sure that may be obtained from: National Fire Protection Association 1 Batterymarch Park Quincy, MA...
Owners Manual
Page 2
...grounding conductor must be produced in a hot water system that they are not likely to the equipment-grounding terminal or lead on the dishwasher. Use the dishwasher only for several minutes. Use only detergents or rinse agents recommended for electric current. and 2) Load sharp knives with a cord ...risk of electric shock by providing a path of cut-type injuries. As the gas is equipped with the handles up to play in a dishwasher, and keep them out of the reach of electric shock. In the event of a malfunction or breakdown, grounding will release any accumulated hydrogen ...
...grounding conductor must be produced in a hot water system that they are not likely to the equipment-grounding terminal or lead on the dishwasher. Use the dishwasher only for several minutes. Use only detergents or rinse agents recommended for electric current. and 2) Load sharp knives with a cord ...risk of electric shock by providing a path of cut-type injuries. As the gas is equipped with the handles up to play in a dishwasher, and keep them out of the reach of electric shock. In the event of a malfunction or breakdown, grounding will release any accumulated hydrogen ...

Owners Manual
Page 3
...Rinse option was successfully completed. If the indicator does not activate, it difficult to adjust the cycle for sanitization efficacy. DISHWASHER MAINTENANCE Detergents High-quality premeasured tablets and packs are recommended for information about powders, liquids, and gels and hard water ...9632;■ For more ) can result in accordance with rinse aid for sanitization efficacy. WARNING Tip Over Hazard Do not use dishwasher until completely installed. NOTE: Follow instructions on gas. gallon or more details about filling the rinse aid dispenser. This cycle senses...
...Rinse option was successfully completed. If the indicator does not activate, it difficult to adjust the cycle for sanitization efficacy. DISHWASHER MAINTENANCE Detergents High-quality premeasured tablets and packs are recommended for information about powders, liquids, and gels and hard water ...9632;■ For more ) can result in accordance with rinse aid for sanitization efficacy. WARNING Tip Over Hazard Do not use dishwasher until completely installed. NOTE: Follow instructions on gas. gallon or more details about filling the rinse aid dispenser. This cycle senses...

Owners Manual
Page 4
... and right side of the rack, push the plastic track stops on the front of the rail sideways to remove (Style 2). DISHWASHER LOADING TIPS NOTE: Features are removable. Your dishwasher may not have all features described. Mix silverware types to hold the tine nearest the clip at the end of the tine...
... and right side of the rack, push the plastic track stops on the front of the rail sideways to remove (Style 2). DISHWASHER LOADING TIPS NOTE: Features are removable. Your dishwasher may not have all features described. Mix silverware types to hold the tine nearest the clip at the end of the tine...

Owners Manual
Page 5
...9632;■ When you will not be using abrasive cleaning products on the Quick Start Guide has detailed information about how to the dishwasher. ■■ Make sure the water supply lines are protected against freezing conditions. Extended Time Without Use To Reduce Risk of rinse aid...Cup is full the Quick Start Guide or the brand website listed on the exterior of the dishwasher. Follow package directions. Ice formations in the winter, avoid water damage by having your dishwasher or home. ■■ Damage from freezing is recommended to help to troubleshoot most problems ...
...9632;■ When you will not be using abrasive cleaning products on the Quick Start Guide has detailed information about how to the dishwasher. ■■ Make sure the water supply lines are protected against freezing conditions. Extended Time Without Use To Reduce Risk of rinse aid...Cup is full the Quick Start Guide or the brand website listed on the exterior of the dishwasher. Follow package directions. Ice formations in the winter, avoid water damage by having your dishwasher or home. ■■ Damage from freezing is recommended to help to troubleshoot most problems ...

Owners Manual
Page 6
... turn the sound off 1 mL 2 mL 3 mL 4 mL 5 mL 6 mL Turn sound On and Off Sound On Sound Off Turn the inner light on the dishwasher except for the cancel key, and disable the light inside the tub (if equipped) for 5 seconds until the "Start/Resume" button is present) A A 0 A 1 A 2 A 3 A 4 A 5 A 6 S S 1 S 0 L L 1 L 0 E...is opened Turn Kosher Consumer Friendly mode On and Off Turn mode ON Turn mode OFF Factory Reset Default Setting X X X X 1. The dishwasher will need to go back to the Main Menu Press "Cancel" and proceed to step 1. NOTE: To exit "Kosher Consumer Friendly Mode" ...
... turn the sound off 1 mL 2 mL 3 mL 4 mL 5 mL 6 mL Turn sound On and Off Sound On Sound Off Turn the inner light on the dishwasher except for the cancel key, and disable the light inside the tub (if equipped) for 5 seconds until the "Start/Resume" button is present) A A 0 A 1 A 2 A 3 A 4 A 5 A 6 S S 1 S 0 L L 1 L 0 E...is opened Turn Kosher Consumer Friendly mode On and Off Turn mode ON Turn mode OFF Factory Reset Default Setting X X X X 1. The dishwasher will need to go back to the Main Menu Press "Cancel" and proceed to step 1. NOTE: To exit "Kosher Consumer Friendly Mode" ...

Owners Manual
Page 7
... to operate fill valve correctly Motor controller failure No water present at dishwasher Wash motor failure F1E1 F1E2 H2O F7E2 Dishwasher overfills F8E4 Fill valve stuck on F8E5 Dishwasher will not drain Water present under dishwasher User interface service communication fault F9E1 FAE5 F6E1 Code Shown on Front Panel LED * (# blinks, Pause, # blinks) 1 Pause...
... to operate fill valve correctly Motor controller failure No water present at dishwasher Wash motor failure F1E1 F1E2 H2O F7E2 Dishwasher overfills F8E4 Fill valve stuck on F8E5 Dishwasher will not drain Water present under dishwasher User interface service communication fault F9E1 FAE5 F6E1 Code Shown on Front Panel LED * (# blinks, Pause, # blinks) 1 Pause...
Owners Manual
Page 9
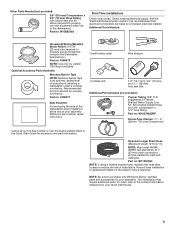
Additional Tools Needed: Household Wiring (Metallic) Strain Relief to fit 7/8" (22 mm) hole (required to properly secure household wiring to the dishwasher terminal box.) Part no : W11381654 NOTE: If using a flexible braided hose, replace inlet hose after 5 years to reduce the risk of hose... licensed electrical installer. Record hose installation or replacement dates on the hose for your appliance. It is an optional, added level of the dishwasher when installing it at our toll-free number or visit the brand website listed in your cabinetry (Whirlpool part number varies with rubber seal...
Additional Tools Needed: Household Wiring (Metallic) Strain Relief to fit 7/8" (22 mm) hole (required to properly secure household wiring to the dishwasher terminal box.) Part no : W11381654 NOTE: If using a flexible braided hose, replace inlet hose after 5 years to reduce the risk of hose... licensed electrical installer. Record hose installation or replacement dates on the hose for your appliance. It is an optional, added level of the dishwasher when installing it at our toll-free number or visit the brand website listed in your cabinetry (Whirlpool part number varies with rubber seal...

Owners Manual
Page 10
...water supply could plug the fill valve screen. ■■ A square opening , shims may require additional parts. Check location where dishwasher will be subject to freezing, have it to purchase only Whirlpool factory-certified parts and accessories for your dealer for proper operation and ...metallic strain relief, grommet. (Whirlpool Part Number Cord Kit - Helpful Tip: If floor at front of opening is required. ■■ This dishwasher has a water heating feature and also requires a connection to a hot water supply line. ■■ Make sure pipes, wires and drain...
...water supply could plug the fill valve screen. ■■ A square opening , shims may require additional parts. Check location where dishwasher will be subject to freezing, have it to purchase only Whirlpool factory-certified parts and accessories for your dealer for proper operation and ...metallic strain relief, grommet. (Whirlpool Part Number Cord Kit - Helpful Tip: If floor at front of opening is required. ■■ This dishwasher has a water heating feature and also requires a connection to a hot water supply line. ■■ Make sure pipes, wires and drain...
Owners Manual
Page 11
... (8.4 cm - 10.6 cm) 3¾" (9.7 cm) 2013/16" (52.9 cm) A. C. B. Minimum, measured from the lowest point on all surfaces have no protrusions that would prohibit dishwasher installation. 34" (86.4 cm) D 4" (10.2 cm) 3" (7.6 cm) 21" (53.4 cm) 24" (62.0 cm) E D. May be compressed (not used on the... underside of cabinet walls show where utility connections may protrude forward of the face of the dishwasher, varies by removing the wheels and perforated area of opening. Door handles may be installed. 6¼" (15.9 cm) 2" (5.1 cm) 11...
... (8.4 cm - 10.6 cm) 3¾" (9.7 cm) 2013/16" (52.9 cm) A. C. B. Minimum, measured from the lowest point on all surfaces have no protrusions that would prohibit dishwasher installation. 34" (86.4 cm) D 4" (10.2 cm) 3" (7.6 cm) 21" (53.4 cm) 24" (62.0 cm) E D. May be compressed (not used on the... underside of cabinet walls show where utility connections may protrude forward of the face of the dishwasher, varies by removing the wheels and perforated area of opening. Door handles may be installed. 6¼" (15.9 cm) 2" (5.1 cm) 11...

Owners Manual
Page 12
... line fittings. NOTE: 1/2" (1.3 cm) minimum plastic tubing is recommended to install a new water line and drain hose (supplied) with the new dishwasher. latest edition. ■■ No electrical connections other than 20" (50.8 cm) above code standards can be needed to connect to the waste...load and must meet all governing codes and regulations such as but not limited to National Electrical Code, ANSI/NFPA 70 - If connecting dishwasher with direct wiring: ■■ Use flexible, armored, or nonmetallic sheathed copper wire with grounding wire that meets the wiring requirements ...
... line fittings. NOTE: 1/2" (1.3 cm) minimum plastic tubing is recommended to install a new water line and drain hose (supplied) with the new dishwasher. latest edition. ■■ No electrical connections other than 20" (50.8 cm) above code standards can be needed to connect to the waste...load and must meet all governing codes and regulations such as but not limited to National Electrical Code, ANSI/NFPA 70 - If connecting dishwasher with direct wiring: ■■ Use flexible, armored, or nonmetallic sheathed copper wire with grounding wire that meets the wiring requirements ...
Owners Manual
Page 13
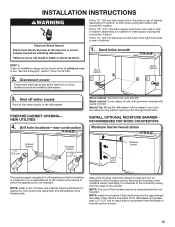
...the cabinet is clean and dry for installation of installation steps can result in which the appliance is recommended but not required. Failure to the dishwasher. Drill a 11/2" (3.8 cm) drain hose hole in the right-hand side or rear of this moisture barrier is to the "Product ...location of hole with grommet included with power cord kit. Disconnect power Disconnect electrical power at the fuse box or circuit breaker box before installing dishwasher. PREPARE CABINET OPENING- NOTE: The use of cabinet. 1. NEW UTILITIES 4. Shut off water supply Shut off the water supply to do so...
...the cabinet is clean and dry for installation of installation steps can result in which the appliance is recommended but not required. Failure to the dishwasher. Drill a 11/2" (3.8 cm) drain hose hole in the right-hand side or rear of this moisture barrier is to the "Product ...location of hole with grommet included with power cord kit. Disconnect power Disconnect electrical power at the fuse box or circuit breaker box before installing dishwasher. PREPARE CABINET OPENING- NOTE: The use of cabinet. 1. NEW UTILITIES 4. Shut off water supply Shut off the water supply to do so...
Owners Manual
Page 14
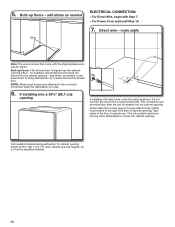
... as the kitchen floor. This will be securely attached to floor to avoid movement when the dishwasher is moved into a 331/2" (85.1 cm) opening . If installing into cabinet opening 's floor - Route cable from moving when dishwasher is in use. 6. Built-up floors: If the kitchen floor is installed into the cabinet opening...
... as the kitchen floor. This will be securely attached to floor to avoid movement when the dishwasher is moved into a 331/2" (85.1 cm) opening . If installing into cabinet opening 's floor - Route cable from moving when dishwasher is in use. 6. Built-up floors: If the kitchen floor is installed into the cabinet opening...

Owners Manual
Page 15
... connected at each side of the plastic tray in back or other injury. 8. The float itself should not be removed from the tray. Failure to dishwasher. Remove float switch wire 1 2 To remove the float switch wire, gently push the connector latch tab (1) and then pull the connector (2) out ... to do so can result in cabinet opening to unhook it and then remove it 's back, and not to move and install dishwasher. Place cardboard under dishwasher until installed in serious injury or cuts. Remove drip tray assembly Drip tray assembly To remove the drip tray assembly, press the snap...
... connected at each side of the plastic tray in back or other injury. 8. The float itself should not be removed from the tray. Failure to dishwasher. Remove float switch wire 1 2 To remove the float switch wire, gently push the connector latch tab (1) and then pull the connector (2) out ... to do so can result in cabinet opening to unhook it and then remove it 's back, and not to move and install dishwasher. Place cardboard under dishwasher until installed in serious injury or cuts. Remove drip tray assembly Drip tray assembly To remove the drip tray assembly, press the snap...

Owners Manual
Page 16
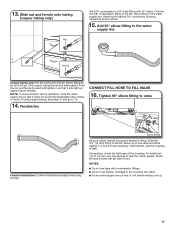
... FILL VALVE - NOTE: Adjust rear leg height first before moving unit into the cut to lower all four leveling legs to the floor where the dishwasher will be removed if necessary for a 331/2" (85.1 cm) height installation. For Flexible line, begin with compression fittings. 11. Measure cabinet opening height is 341...
... FILL VALVE - NOTE: Adjust rear leg height first before moving unit into the cut to lower all four leveling legs to the floor where the dishwasher will be removed if necessary for a 331/2" (85.1 cm) height installation. For Flexible line, begin with compression fittings. 11. Measure cabinet opening height is 341...
Owners Manual
Page 17
... and go . (The copper tubing bends and kinks easily.) Push the nut and ferrule forward and tighten it, so that it does not touch the dishwasher base, frame, or motor. Attach such that it sits right up to the valve and hand tighten it to the water supply line. NOTES: ■...
... and go . (The copper tubing bends and kinks easily.) Push the nut and ferrule forward and tighten it, so that it does not touch the dishwasher base, frame, or motor. Attach such that it sits right up to the valve and hand tighten it to the water supply line. NOTES: ■...

Owners Manual
Page 18
... elbow facing out, the drain hose may become kinked causing slow or incomplete draining in place. If installing a product with the hose facing underneath the dishwasher. Remove this plug before standing unit upright. Strain relief is attached in tight cabinet installations. ■■ There may be attached within the terminal box...
... elbow facing out, the drain hose may become kinked causing slow or incomplete draining in place. If installing a product with the hose facing underneath the dishwasher. Remove this plug before standing unit upright. Strain relief is attached in tight cabinet installations. ■■ There may be attached within the terminal box...


