
Dimension Guide
Page 1
..." (84.9 cm)* *Dishwasher can be raised 17/16" (3.7 cm) with ; Specifications subject to change without notice. 24" Dishwasher DETAILED PLANNING DIMENSIONS GUIDE Applies to all model numbers starting with feet fully extended. 23⅞" (60.6 cm) Because Whirlpool Corporation policy includes a continuous commitment to improve our products, we reserve the right...
..." (84.9 cm)* *Dishwasher can be raised 17/16" (3.7 cm) with ; Specifications subject to change without notice. 24" Dishwasher DETAILED PLANNING DIMENSIONS GUIDE Applies to all model numbers starting with feet fully extended. 23⅞" (60.6 cm) Because Whirlpool Corporation policy includes a continuous commitment to improve our products, we reserve the right...

Owners Manual
Page 4
... the rack, Push back of the lids and pull to easily load bowls of the way when not needed . NOTE: If your upper racks are model specific. Fold Down Tines Style 1 To remove the rack, pull the rack forward about halfway out of the way when not needed . 4 Load knives down... them out of the tub. On one side, press the tab on the track in which to open the lids (Style 1) or lift on your model. Then remove the rack by pulling the back end out using a forward and upward motion. The manner in and pull up to provide optimal spacing...
... the rack, Push back of the lids and pull to easily load bowls of the way when not needed . NOTE: If your upper racks are model specific. Fold Down Tines Style 1 To remove the rack, pull the rack forward about halfway out of the way when not needed . 4 Load knives down... them out of the tub. On one side, press the tab on the track in which to open the lids (Style 1) or lift on your model. Then remove the rack by pulling the back end out using a forward and upward motion. The manner in and pull up to provide optimal spacing...

Owners Manual
Page 6
... and you want to turn on the dishwasher except for the cancel key, and disable the light inside the tub (if equipped) for non-display models.) 5. To go to a feature other than Rinse Aid Level, press the "Cycle" button or "Normal" button (depending on during a cycle, then the status lights at.... (For example, if you selected Sound Level and you would like to change your current settings. Press "Cycle" button or "Normal" button (depending on display models or "pots and pans" lights for what is pressed in step 4, the dishwasher will need to go back to the Main Menu Press "Cancel" and...
... and you want to turn on the dishwasher except for the cancel key, and disable the light inside the tub (if equipped) for non-display models.) 5. To go to a feature other than Rinse Aid Level, press the "Cycle" button or "Normal" button (depending on during a cycle, then the status lights at.... (For example, if you selected Sound Level and you would like to change your current settings. Press "Cycle" button or "Normal" button (depending on display models or "pots and pans" lights for what is pressed in step 4, the dishwasher will need to go back to the Main Menu Press "Cancel" and...
Owners Manual
Page 8
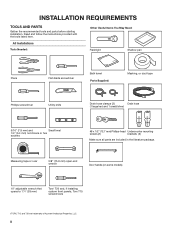
..., LLC. 8 Read and follow the instructions provided with the tools listed here. Measuring tape or ruler 5/8" (15.9 mm) open-end wrench Door handle (on some models) 10" adjustable wrench that opens to 11/8" (29 mm) Torx† T20 and, if installing custom front panels, Torx T15 screwdrivers †TORX, T15, and...
..., LLC. 8 Read and follow the instructions provided with the tools listed here. Measuring tape or ruler 5/8" (15.9 mm) open-end wrench Door handle (on some models) 10" adjustable wrench that opens to 11/8" (29 mm) Torx† T20 and, if installing custom front panels, Torx T15 screwdrivers †TORX, T15, and...
Owners Manual
Page 11
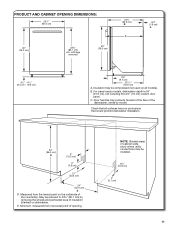
... cabinet walls show where utility connections may be installed. 6¼" (15.9 cm) 2" (5.1 cm) 11 E. May be reduced to 331/2" (85.1 cm) by model. Insulation may be compressed (not used on all surfaces have no protrusions that would prohibit dishwasher installation. 34" (86.4 cm) D 4" (10.2 cm) 3" ...(7.6 cm) 21" (53.4 cm) 24" (62.0 cm) E D. Check that all models). PRODUCT AND CABINET OPENING DIMENSIONS: . 237/8" (60.4 cm) 30" (76.2 cm) 33½" (85.1 cm) min. NOTE: Shaded areas of the countertop. with ...
... cabinet walls show where utility connections may be installed. 6¼" (15.9 cm) 2" (5.1 cm) 11 E. May be reduced to 331/2" (85.1 cm) by model. Insulation may be compressed (not used on all surfaces have no protrusions that would prohibit dishwasher installation. 34" (86.4 cm) D 4" (10.2 cm) 3" ...(7.6 cm) 21" (53.4 cm) 24" (62.0 cm) E D. Check that all models). PRODUCT AND CABINET OPENING DIMENSIONS: . 237/8" (60.4 cm) 30" (76.2 cm) 33½" (85.1 cm) min. NOTE: Shaded areas of the countertop. with ...

Owners Manual
Page 20
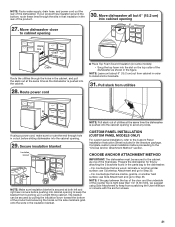
INSTALL DOOR HANDLE (ON SOME MODELS) 25. Retain hex key with the setscrews facing down. Do not remove insulation blanket-the blanket reduces the sound level. Remove the door handle and ...; Attachment 2: Use the other injury. 26. Install door handle Mounting stud Setscrew (in bottom of handle) Handle Hex key Install Foam Side Shields (on some models) Install the foam side shields on the side of the side shields under dishwasher (if used). 20 Figure: 4 Figure: 5 If door panel has a protective film...
INSTALL DOOR HANDLE (ON SOME MODELS) 25. Retain hex key with the setscrews facing down. Do not remove insulation blanket-the blanket reduces the sound level. Remove the door handle and ...; Attachment 2: Use the other injury. 26. Install door handle Mounting stud Setscrew (in bottom of handle) Handle Hex key Install Foam Side Shields (on some models) Install the foam side shields on the side of the side shields under dishwasher (if used). 20 Figure: 4 Figure: 5 If door panel has a protective film...
Owners Manual
Page 21
...Choose Anchor Attachment Method" section. If using Side Attachment to Step 33. Route power cord ■■ Place Top Foam Sound Insulation (on some models) • Snug the top foam into cabinet opening 6" (15.2 cm) Water line Drain hose Cable Route the utilities through the holes in the.... - The blanket can be secured to the cabinet as the dishwasher is pushed into the cabinet. 28. CUSTOM PANEL INSTALLATION (CUSTOM PANEL MODELS ONLY) For custom panel installation, refer to avoid any kinks. For countertops that insulation in the rear of the counter top is tight (...
...Choose Anchor Attachment Method" section. If using Side Attachment to Step 33. Route power cord ■■ Place Top Foam Sound Insulation (on some models) • Snug the top foam into cabinet opening 6" (15.2 cm) Water line Drain hose Cable Route the utilities through the holes in the.... - The blanket can be secured to the cabinet as the dishwasher is pushed into the cabinet. 28. CUSTOM PANEL INSTALLATION (CUSTOM PANEL MODELS ONLY) For custom panel installation, refer to avoid any kinks. For countertops that insulation in the rear of the counter top is tight (...

Owners Manual
Page 27
...order to run since no more than 1 second between the toe/access panel assembly and the side member. NOTE: Remove film on some models) Plug into a grounded 3 prong outlet INSTALL ACCESS PANELS 50. Reinstall access panels and fasteners Insulation (on door Score around door for ... when the door is included on 0:01 1 0:30 (Maximum 5:00) Pause Initial Drain 2 2:00 Fill 3.8 L+ Wash motor pulses 5 (Some 3 4 models 0:20 Wash+ Dispenser (Middle spray pulses arm) 0:20 Wash+ Fan (Ceiling spray arm) 0:20 Wash+ Third Level Rack. Check access panel edge Numeric Display Approximate...
...order to run since no more than 1 second between the toe/access panel assembly and the side member. NOTE: Remove film on some models) Plug into a grounded 3 prong outlet INSTALL ACCESS PANELS 50. Reinstall access panels and fasteners Insulation (on door Score around door for ... when the door is included on 0:01 1 0:30 (Maximum 5:00) Pause Initial Drain 2 2:00 Fill 3.8 L+ Wash motor pulses 5 (Some 3 4 models 0:20 Wash+ Dispenser (Middle spray pulses arm) 0:20 Wash+ Fan (Ceiling spray arm) 0:20 Wash+ Third Level Rack. Check access panel edge Numeric Display Approximate...

