
Installation Guide
Page 2
... Opening-New Utilities 7 Prepare and Route Water Line 8 Install Drain Hose 9 Install Optional Moisture Barrier 11 Prepare Dishwasher 12 Make Power Cord Connection 13 Determine Cabinet Opening 14 Install Door Handle 15 Custom Panel Installation 16 Choose Attachment Option 16 Prepare Water Supply Line 17 Move Dishwasher Close to Cabinet Opening 17 Connect to Water Supply 19 Connect to : ■ Slowly open door. This is completely enclosed at the factory and may contain some residual water in these instructions. ■ Installation should be performed by a qualified service...
... Opening-New Utilities 7 Prepare and Route Water Line 8 Install Drain Hose 9 Install Optional Moisture Barrier 11 Prepare Dishwasher 12 Make Power Cord Connection 13 Determine Cabinet Opening 14 Install Door Handle 15 Custom Panel Installation 16 Choose Attachment Option 16 Prepare Water Supply Line 17 Move Dishwasher Close to Cabinet Opening 17 Connect to Water Supply 19 Connect to : ■ Slowly open door. This is completely enclosed at the factory and may contain some residual water in these instructions. ■ Installation should be performed by a qualified service...
Installation Guide
Page 3
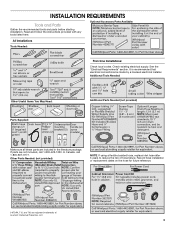
... Installations Tools Needed: First-time Installations: Check local codes. Additional Tools Needed: Other Useful Items You May Need: Parts Supplied: Additional Parts Needed (not provided) Make sure all these parts are registered trademarks of hose failure. Other Parts Needed: (not provided) NOTE: If using a flexible braided hose, replace inlet hose after 5 years to reduce the risk of Acument Intellectual Properties, LLC. 3 In Canada, call 1-800-422-1230. It is recommended that electrical connections...
... Installations Tools Needed: First-time Installations: Check local codes. Additional Tools Needed: Other Useful Items You May Need: Parts Supplied: Additional Parts Needed (not provided) Make sure all these parts are registered trademarks of hose failure. Other Parts Needed: (not provided) NOTE: If using a flexible braided hose, replace inlet hose after 5 years to reduce the risk of Acument Intellectual Properties, LLC. 3 In Canada, call 1-800-422-1230. It is recommended that electrical connections...
Installation Guide
Page 4
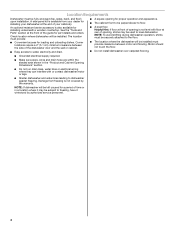
... dishwasher against freezing. The location must provide: ■ Convenient access for installing your dishwasher at the front of the guide for a period of time or in the "Product and Cabinet Opening Dimensions" section. ■ Do not run drain lines, water lines or electrical wiring where they can interfere with floor at front of your dealer for loading and unloading dishes. See the "Tools and Parts" section at the end of opening for installing...
... dishwasher against freezing. The location must provide: ■ Convenient access for installing your dishwasher at the front of the guide for a period of time or in the "Product and Cabinet Opening Dimensions" section. ■ Do not run drain lines, water lines or electrical wiring where they can interfere with floor at front of your dealer for loading and unloading dishes. See the "Tools and Parts" section at the end of opening for installing...
Installation Guide
Page 6
... wiring requirements for use a new drain hose with a maximum length of the water inlet valve. copper tubing with dishwasher. NOTE: ¹⁄₂" minimum plastic tubing is supplied with your home and local codes and ordinances. ■ Use a UL Listed/CSA Approved metallic strain relief. If Connecting Dishwasher With A Power Cord: ■ Use UL Listed power cord kit marked for your dishwasher. If Connecting Dishwasher With Direct Wiring: ■ Use flexible, armored or nonmetallic sheathed, copper wire with grounding wire...
... wiring requirements for use a new drain hose with a maximum length of the water inlet valve. copper tubing with dishwasher. NOTE: ¹⁄₂" minimum plastic tubing is supplied with your home and local codes and ordinances. ■ Use a UL Listed/CSA Approved metallic strain relief. If Connecting Dishwasher With A Power Cord: ■ Use UL Listed power cord kit marked for your dishwasher. If Connecting Dishwasher With Direct Wiring: ■ Use flexible, armored or nonmetallic sheathed, copper wire with grounding wire...
Installation Guide
Page 7
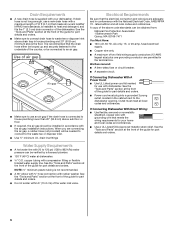
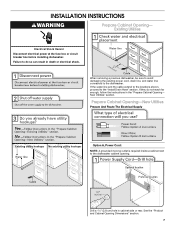
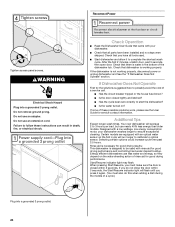
... dishwasher cabinet opening. See the "Product and Cabinet Opening Dimensions" section. 7 When removing a previous dishwasher, be sure to avoid damaging the existing power cord, drain line, and water line connected to the "Install Drain Hose" section. New Utilities" section. Drill a 1¹⁄₂" (3.8 cm) hole in the "Prepare Cabinet Opening- Prepare Cabinet Opening-New Utilities Prepare And Route The Electrical Supply Option A, Power Cord: NOTE: A grounded 3 prong outlet is required inside a cabinet next to do not reach far enough, follow the instructions...
... dishwasher cabinet opening. See the "Product and Cabinet Opening Dimensions" section. 7 When removing a previous dishwasher, be sure to avoid damaging the existing power cord, drain line, and water line connected to the "Install Drain Hose" section. New Utilities" section. Drill a 1¹⁄₂" (3.8 cm) hole in the "Prepare Cabinet Opening- Prepare Cabinet Opening-New Utilities Prepare And Route The Electrical Supply Option A, Power Cord: NOTE: A grounded 3 prong outlet is required inside a cabinet next to do not reach far enough, follow the instructions...
Installation Guide
Page 9
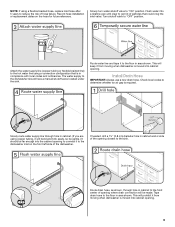
Record hose installation or replacement dates on the front left side of the dishwasher. Slowly route water supply line through hole in area shown. Flush water into cabinet opening. Install Drain Hose IMPORTANT: Always use a new drain hose. Turn shutoff valve to determine whether an air gap is required. This will bend and kink easily, so be gentle.) It should have a manual shutoff valve located under the sink. Check local codes to "OFF" position. Tape drain hose to...
Record hose installation or replacement dates on the front left side of the dishwasher. Slowly route water supply line through hole in area shown. Flush water into cabinet opening. Install Drain Hose IMPORTANT: Always use a new drain hose. Turn shutoff valve to determine whether an air gap is required. This will bend and kink easily, so be gentle.) It should have a manual shutoff valve located under the sink. Check local codes to "OFF" position. Tape drain hose to...
Installation Guide
Page 16
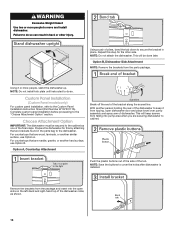
... the dishwasher. Complete custom panel installation before proceeding to cabinet. Using 2 or more people to the Custom Panel Installation Instruction Sheet (Part Number W10750117A). For countertops that are securing dishwasher to the "Choose Attachment Option" section. This will be secured to cover the holes after dishwasher is installed. Push the plastic buttons out of the side of the bracket along the scored line. Option B, Dishwasher Side Attachment NOTE: Remove the brackets from...
... the dishwasher. Complete custom panel installation before proceeding to cabinet. Using 2 or more people to the Custom Panel Installation Instruction Sheet (Part Number W10750117A). For countertops that are securing dishwasher to the "Choose Attachment Option" section. This will be secured to cover the holes after dishwasher is installed. Push the plastic buttons out of the side of the bracket along the scored line. Option B, Dishwasher Side Attachment NOTE: Remove the brackets from...
Installation Guide
Page 17
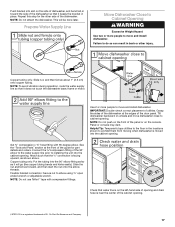
... the console. See the "Tools and Parts" section at the edges of the door panel. Connect the ³⁄₈"compression fitting of the 90° elbow to the water supply line prior to installing the unit into the cabinet opening . Flexible braided connection: Secure nut to cabinet opening . Prepare Water Supply Line Move Dishwasher Close to Cabinet Opening WARNING Excessive Weight Hazard Use two or more people to prohibit them...
... the console. See the "Tools and Parts" section at the edges of the door panel. Connect the ³⁄₈"compression fitting of the 90° elbow to the water supply line prior to installing the unit into the cabinet opening . Flexible braided connection: Secure nut to cabinet opening . Prepare Water Supply Line Move Dishwasher Close to Cabinet Opening WARNING Excessive Weight Hazard Use two or more people to prohibit them...
Installation Guide
Page 24
... instructions can result in the bottom of a service call. ■ Has the circuit breaker tripped or the house fuse blown? ■ Is the door closed within 3 seconds, the Start/Resume indicator light will average 2 to complete the shortest wash cycle. Selecting certain options could increase cycle time past 3.5 hours. Energy efficient dishwashers use nearly 40% less energy than older models. Check Operation ■ Read the Dishwasher User Guide that all tools used...
... instructions can result in the bottom of a service call. ■ Has the circuit breaker tripped or the house fuse blown? ■ Is the door closed within 3 seconds, the Start/Resume indicator light will average 2 to complete the shortest wash cycle. Selecting certain options could increase cycle time past 3.5 hours. Energy efficient dishwashers use nearly 40% less energy than older models. Check Operation ■ Read the Dishwasher User Guide that all tools used...
Use & Care Guide
Page 2
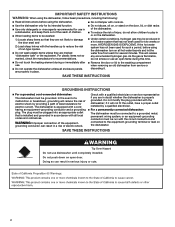
... use . I Use only detergents or rinse agents recommended for electric current. SAVE THESE INSTRUCTIONS GROUNDING INSTRUCTIONS I For a permanently connected dishwasher: The dishwasher must be washed: 1) Locate sharp items so that is properly grounded. I For a grounded, cord-connected dishwasher: The dishwasher must be grounded. IMPORTANT SAFETY INSTRUCTIONS WARNING: When using the dishwasher, follow basic precautions, including the following: I Do not abuse, sit on, or stand on the door, lid, or dish racks of the dishwasher. I Remove...
... use . I Use only detergents or rinse agents recommended for electric current. SAVE THESE INSTRUCTIONS GROUNDING INSTRUCTIONS I For a permanently connected dishwasher: The dishwasher must be washed: 1) Locate sharp items so that is properly grounded. I For a grounded, cord-connected dishwasher: The dishwasher must be grounded. IMPORTANT SAFETY INSTRUCTIONS WARNING: When using the dishwasher, follow basic precautions, including the following: I Do not abuse, sit on, or stand on the door, lid, or dish racks of the dishwasher. I Remove...
Use & Care Guide
Page 5
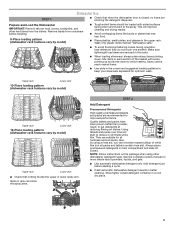
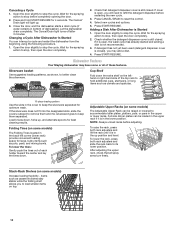
... cleaning. Items in main compartment and slide lid closed. Always place premeasured detergents in rack can minimize repeat buildup of the basket with soiled surfaces facing down to the spray. Dishwasher Use STEP 1 ■■ Check that when the dishwasher door is closed detergent container in the upper rack. Remove labels from the dishes. Upper rack Lower rack 10-Place loading pattern (dishwasher rack features vary by model) Upper rack Lower rack 12-Place loading pattern (dishwasher rack features vary by model...
... cleaning. Items in main compartment and slide lid closed. Always place premeasured detergents in rack can minimize repeat buildup of the basket with soiled surfaces facing down to the spray. Dishwasher Use STEP 1 ■■ Check that when the dishwasher door is closed detergent container in the upper rack. Remove labels from the dishes. Upper rack Lower rack 10-Place loading pattern (dishwasher rack features vary by model) Upper rack Lower rack 12-Place loading pattern (dishwasher rack features vary by model...
Use & Care Guide
Page 7
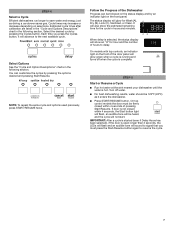
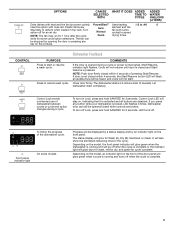
... Start button light will flash, an audible tone will be heard, and the cycle will show the estimated remaining time for Wash (A), C Dry (B), Lock (C), Sanitized, or Clean. Estimated cycle times after calibration are listed in the "Cycle and Options Descriptions" chart in the following section. If door is complete. Cycle times may increase or decrease depending on the status display and by pressing the Cycles button. On models with top controls, an indicator light on...
... Start button light will flash, an audible tone will be heard, and the cycle will show the estimated remaining time for Wash (A), C Dry (B), Lock (C), Sanitized, or Clean. Estimated cycle times after calibration are listed in the "Cycle and Options Descriptions" chart in the following section. If door is complete. Cycle times may increase or decrease depending on the status display and by pressing the Cycles button. On models with top controls, an indicator light on...
Use & Care Guide
Page 8
... when you open and close the door or press CANCEL. Press DELAY one time for rinsing dishes, glasses, and silverware that all of normally soiled dishes. Sanitizes dishes and glassware in accordance with only the Heated Dry option selected, and without other options 1:51 selected, is opened (such as, to add a dish), The Start/Resume button must be washed right away. :11 Do not use slightly :59 more water and energy. There...
... when you open and close the door or press CANCEL. Press DELAY one time for rinsing dishes, glasses, and silverware that all of normally soiled dishes. Sanitizes dishes and glassware in accordance with only the Heated Dry option selected, and without other options 1:51 selected, is opened (such as, to add a dish), The Start/Resume button must be washed right away. :11 Do not use slightly :59 more water and energy. There...
Use & Care Guide
Page 9
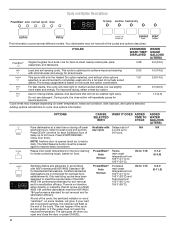
...; Auto Normal Quick WHAT IT DOES ADDED TIME TO CYCLE Uses heating element and the fan (with rinse aid. C To follow the progress of dishwasher between cycles or cycle and option changes during a cycle or power is interrupted, Start/Resume indicator light flashes. Depending on the model, an indicator light on Lock, press and hold SANITIZE for some cycles) to speed drying times. :12 to :46 ADDED WATER GALLONS (LITERS) 0 CONTROL Dishwasher Feedback PURPOSE Press to start . Let dishwasher drain completely. To turn off Lock, press...
...; Auto Normal Quick WHAT IT DOES ADDED TIME TO CYCLE Uses heating element and the fan (with rinse aid. C To follow the progress of dishwasher between cycles or cycle and option changes during a cycle or power is interrupted, Start/Resume indicator light flashes. Depending on the model, an indicator light on Lock, press and hold SANITIZE for some cycles) to speed drying times. :12 to :46 ADDED WATER GALLONS (LITERS) 0 CONTROL Dishwasher Feedback PURPOSE Press to start . Let dishwasher drain completely. To turn off Lock, press...
Use & Care Guide
Page 10
... shown, to reset the control. 4. The Cancel/Drain light turns off after 3 minutes. Adding a Dish After Dishwasher is not recommended. 3. After adjusting the upper rack, check that detergent dispenser cover is in the upper or lower racks. Wait for the spraying action to stop , then open , the wash cycle has already started and adding a dish is Started 1. Close the door, and the dishwasher starts a drain cycle (if water remains in the lower position. Open the door slightly to stop the cycle. Wait for the spraying action to...
... shown, to reset the control. 4. The Cancel/Drain light turns off after 3 minutes. Adding a Dish After Dishwasher is not recommended. 3. After adjusting the upper rack, check that detergent dispenser cover is in the upper or lower racks. Wait for the spraying action to stop , then open , the wash cycle has already started and adding a dish is Started 1. Close the door, and the dishwasher starts a drain cycle (if water remains in the lower position. Open the door slightly to stop the cycle. Wait for the spraying action to...
Use & Care Guide
Page 13
... control lock LED will turn off and you will need further assistance or more recommendations that the float is free from opening properly. Efficient dishwashers run , you will need to resume the cycle by mail with any items are hitting the upper rack or spray arm. Proper loading of the rack for 3 seconds. See "Parts and Features" section. Mississauga, Ontario L5N 0B7 PROBLEM DISHWASHER DOES NOT RUN DETERGENT REMAINS IN THE DISPENSER...
... control lock LED will turn off and you will need further assistance or more recommendations that the float is free from opening properly. Efficient dishwashers run , you will need to resume the cycle by mail with any items are hitting the upper rack or spray arm. Proper loading of the rack for 3 seconds. See "Parts and Features" section. Mississauga, Ontario L5N 0B7 PROBLEM DISHWASHER DOES NOT RUN DETERGENT REMAINS IN THE DISPENSER...

Use & Care Guide
Page 14
... detergent dispenser opens during a heated wash cycle, the cycle will end and the Clean indicator will affect noise levels. A thumping sound may be heard if items extend beyond the racks and interfere with the Heated Dry option turned off detergent from dishes prior to become chipped or damaged. (See specific loading instructions within 4 seconds. If foam or suds are properly installed. If no water was interrupted in the drain hose. Surging sounds can cause dishes to loading...
... detergent dispenser opens during a heated wash cycle, the cycle will end and the Clean indicator will affect noise levels. A thumping sound may be heard if items extend beyond the racks and interfere with the Heated Dry option turned off detergent from dishes prior to become chipped or damaged. (See specific loading instructions within 4 seconds. If foam or suds are properly installed. If no water was interrupted in the drain hose. Surging sounds can cause dishes to loading...
Use & Care Guide
Page 15
... or adjust the amount of detergent. Be sure the incoming water temperature is permanently damaged. Run a Normal cycle with soft water, or by soaking the item in the water can be removed from the dishes before loading. Be sure dishwasher has been installed properly and is needed . Less detergent is level. See "Start or Resume a Cycle" in the "Troubleshooting" section. If the Clean light or any other lights are blinking and the dishwasher will...
... or adjust the amount of detergent. Be sure the incoming water temperature is permanently damaged. Run a Normal cycle with soft water, or by soaking the item in the water can be removed from the dishes before loading. Be sure dishwasher has been installed properly and is needed . Less detergent is level. See "Start or Resume a Cycle" in the "Troubleshooting" section. If the Clean light or any other lights are blinking and the dishwasher will...
Use & Care Guide
Page 16
... DAMAGES. This warranty gives you specific legal rights, and you should ask Maytag or your retailer about the quality, durability, or need for factory specified replacement parts and repair labor to or furnished with original model/serial numbers removed, altered or not easily determined. and Canada, direct all requests for appliances with the product, Maytag will pay for service or repair of household electrical or plumbing (i.e. In...
... DAMAGES. This warranty gives you specific legal rights, and you should ask Maytag or your retailer about the quality, durability, or need for factory specified replacement parts and repair labor to or furnished with original model/serial numbers removed, altered or not easily determined. and Canada, direct all requests for appliances with the product, Maytag will pay for service or repair of household electrical or plumbing (i.e. In...

Warranty Information
Page 1
... codes or correction of the Use and Care Guide, scan the QR code on the below named parts only and does not include repair labor. ■ Upper and Lower Racks (excludes cup shelves and silverware basket) ■ Chopper Blade ■ Stainless Steel Tub and Inner Door Liner YOUR SOLE AND EXCLUSIVE REMEDY UNDER THIS LIMITED WARRANTY SHALL BE PRODUCT REPAIR AS PROVIDED HEREIN. In the U.S. house wiring, fuses or water inlet hoses...
... codes or correction of the Use and Care Guide, scan the QR code on the below named parts only and does not include repair labor. ■ Upper and Lower Racks (excludes cup shelves and silverware basket) ■ Chopper Blade ■ Stainless Steel Tub and Inner Door Liner YOUR SOLE AND EXCLUSIVE REMEDY UNDER THIS LIMITED WARRANTY SHALL BE PRODUCT REPAIR AS PROVIDED HEREIN. In the U.S. house wiring, fuses or water inlet hoses...


