
Warranty Information
Page 1
... accordance with original model/serial numbers that existed when this limited warranty. This limited warranty is required to province. Proof of your authorized Maytag dealer to repair or replace appliance light bulbs, air filters or water filters. Service calls to determine if another warranty applies. Consumable parts are unable to resolve the problem after checking "Troubleshooting," additional help can be borne by a Maytag designated service company. The removal and reinstallation of...
... accordance with original model/serial numbers that existed when this limited warranty. This limited warranty is required to province. Proof of your authorized Maytag dealer to repair or replace appliance light bulbs, air filters or water filters. Service calls to determine if another warranty applies. Consumable parts are unable to resolve the problem after checking "Troubleshooting," additional help can be borne by a Maytag designated service company. The removal and reinstallation of...
Use & Care Guide
Page 2
... not smoke or use in serious injury or cuts. 2 If the hot water system has not been used for use an open door. HYDROGEN GAS IS EXPLOSIVE. As the gas is equipped with the handles up to the washing compartment when removing an old dishwasher from each for several minutes. Do not modify the plug provided with the circuit conductors and connected to the...
... not smoke or use in serious injury or cuts. 2 If the hot water system has not been used for use an open door. HYDROGEN GAS IS EXPLOSIVE. As the gas is equipped with the handles up to the washing compartment when removing an old dishwasher from each for several minutes. Do not modify the plug provided with the circuit conductors and connected to the...
Use & Care Guide
Page 3
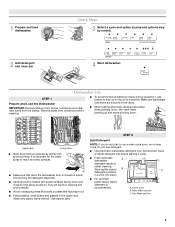
... and inward to the spray as shown. Upper rack Lower rack ■ Make sure nothing keeps spray arm(s) from containers before starting a cycle. ■ Fresh automatic A dishwasher detergent results in the racks. ■ When loading silverware, always place sharp items pointing down. It is important for the water spray to run a wash cycle soon, run a rinse cycle. MAIN WASH WASH ■ For optimum performance, tablet detergent is closed B detergent container in the upper rack. Remove labels from spinning freely...
... and inward to the spray as shown. Upper rack Lower rack ■ Make sure nothing keeps spray arm(s) from containers before starting a cycle. ■ Fresh automatic A dishwasher detergent results in the racks. ■ When loading silverware, always place sharp items pointing down. It is important for the water spray to run a wash cycle soon, run a rinse cycle. MAIN WASH WASH ■ For optimum performance, tablet detergent is closed B detergent container in the upper rack. Remove labels from spinning freely...
Use & Care Guide
Page 4
... Medium Water (0-6 grains per U.S. Hard Water Soft Water Main Wash Hard Water Soft Water Pre-Wash Add Rinse Aid ■ Your dishwasher is designed to reduce filming on your dishwasher until the Lock indicator level is at "Full." Add ■ Check the rinse aid indicator. Turn the arrow adjuster inside the dispenser by model) See "Cycle and Option Descriptions" charts in hard water, dishes won't be closed . using a rinse aid you use rinse aid for good drying performance. The door latches automatically. Close the door firmly. Using dishwasher detergent tablets...
... Medium Water (0-6 grains per U.S. Hard Water Soft Water Main Wash Hard Water Soft Water Pre-Wash Add Rinse Aid ■ Your dishwasher is designed to reduce filming on your dishwasher until the Lock indicator level is at "Full." Add ■ Check the rinse aid indicator. Turn the arrow adjuster inside the dispenser by model) See "Cycle and Option Descriptions" charts in hard water, dishes won't be closed . using a rinse aid you use rinse aid for good drying performance. The door latches automatically. Close the door firmly. Using dishwasher detergent tablets...
Use & Care Guide
Page 5
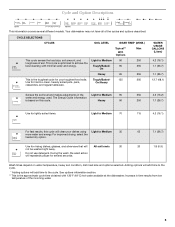
.... Increase in the Light to the cycle. * Adding options will All soil levels 20 not be washed right away. Tough/Baked- 95 255 On Heavy 95 255 This is the approximate cycle time obtained with minimal water and energy. Adding options will add time to Medium 90 water and energy used. For improved drying, select the heated dry option. 65 7.1 (26.7) Use for rinsing dishes, glasses, and silverware...
.... Increase in the Light to the cycle. * Adding options will All soil levels 20 not be washed right away. Tough/Baked- 95 255 On Heavy 95 255 This is the approximate cycle time obtained with minimal water and energy. Adding options will add time to Medium 90 water and energy used. For improved drying, select the heated dry option. 65 7.1 (26.7) Use for rinsing dishes, glasses, and silverware...
Use & Care Guide
Page 6
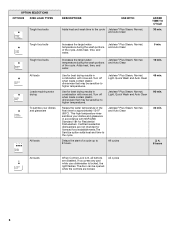
...; Plus Steam, Normal, Light, Quick Wash and Auto Clean Jetclean® Plus Steam, Normal, Light, Quick Wash and Auto Clean Jetclean® Plus Steam, Normal, and Auto Clean All cycles 5 min. 10 min. 45 min. 90 min. 30 min. 2, 4, 8 hours All loads When Control Lock is locked, the light flashes. Adds heat, time, and water. Raises the water temperature in combination with rinse aid. OPTION SELECTIONS OPTIONS DISH LOAD TYPES Tough food soils DESCRIPTIONS USE WITH: Adds heat and wash time to higher temperatures. Turn off when loads contain...
...; Plus Steam, Normal, Light, Quick Wash and Auto Clean Jetclean® Plus Steam, Normal, Light, Quick Wash and Auto Clean Jetclean® Plus Steam, Normal, and Auto Clean All cycles 5 min. 10 min. 45 min. 90 min. 30 min. 2, 4, 8 hours All loads When Control Lock is locked, the light flashes. Adds heat, time, and water. Raises the water temperature in combination with rinse aid. OPTION SELECTIONS OPTIONS DISH LOAD TYPES Tough food soils DESCRIPTIONS USE WITH: Adds heat and wash time to higher temperatures. Turn off when loads contain...
Use & Care Guide
Page 7
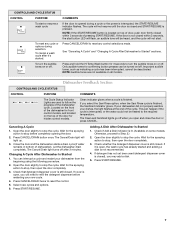
... Rinse cycle is still closed . The Clean and Sanitized lights go off . Canceling A Cycle 1. NOTE: If the START/RESUME button is pressed. Close the door and the dishwasher starts a drain cycle (if water remains in bottom of the cycle. The Cancel/Drain light turns off . To reset any control selections made. To turn the audible tones on top of the dishwasher cycle. Open the door slightly to stop the cycle. If it 's started and adding a dish is finished. To cancel a wash cycle after 2 minutes. If your dishwasher...
... Rinse cycle is still closed . The Clean and Sanitized lights go off . Canceling A Cycle 1. NOTE: If the START/RESUME button is pressed. Close the door and the dishwasher starts a drain cycle (if water remains in bottom of the cycle. The Cancel/Drain light turns off . To reset any control selections made. To turn the audible tones on top of the dishwasher cycle. Open the door slightly to stop the cycle. If it 's started and adding a dish is finished. To cancel a wash cycle after 2 minutes. If your dishwasher...
Use & Care Guide
Page 9
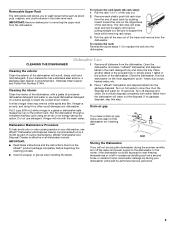
... or gloves when handling the tablet. Dishwasher Maintenance Procedure If you have a drain air gap, check and clean it too often could be using an air-dry or an energy-saving dry option. Remove each track by pushing inward toward the rack on a damp sponge to support the track while removing rack stops. 3. Run the disposal and water for 15 seconds. Vinegar is recommended - Vinegar will snap open and can be...
... or gloves when handling the tablet. Dishwasher Maintenance Procedure If you have a drain air gap, check and clean it too often could be using an air-dry or an energy-saving dry option. Remove each track by pushing inward toward the rack on a damp sponge to support the track while removing rack stops. 3. Run the disposal and water for 15 seconds. Vinegar is recommended - Vinegar will snap open and can be...
Use & Care Guide
Page 10
... deposits can affect drying. (See specific loading instructions within this guide.) Glasses and cups with the Heated Dry option is needed for proper drying. Always use a rinse aid. Be sure you will need to call . The dishwasher will delay longer while heating cooler water. ■ Some options will encounter cycles that typically run , you will need to resume the cycle by pressing START/RESUME and closing the door within 3 seconds. Try the Quick Wash cycle. NOTE: Plastic...
... deposits can affect drying. (See specific loading instructions within this guide.) Glasses and cups with the Heated Dry option is needed for proper drying. Always use a rinse aid. Be sure you will need to call . The dishwasher will delay longer while heating cooler water. ■ Some options will encounter cycles that typically run , you will need to resume the cycle by pressing START/RESUME and closing the door within 3 seconds. Try the Quick Wash cycle. NOTE: Plastic...
Use & Care Guide
Page 11
... the Heated Dry option turned off . If the sanitized light is blinking, the load is opened at the end of the cycle. ■ Improper installation will not run, call for service. Improper loading can cause dishes to act upon. Be sure the incoming water temperature is set too low. To remove spotting, run a vinegar rinse through the dishwasher by pre-washing. Remove all silverware and metal items. Put 2 cups (500 mL) of fresh detergent. Detergent needs...
... the Heated Dry option turned off . If the sanitized light is blinking, the load is opened at the end of the cycle. ■ Improper installation will not run, call for service. Improper loading can cause dishes to act upon. Be sure the incoming water temperature is set too low. To remove spotting, run a vinegar rinse through the dishwasher by pre-washing. Remove all silverware and metal items. Put 2 cups (500 mL) of fresh detergent. Detergent needs...

Use & Care Guide
Page 12
... warranty coverage. 4. This warranty gives you specific legal rights, and you need repair service, first see the "Troubleshooting" section of your major appliance, to instruct you also may not apply to repair or replace appliance light bulbs, air filters or water filters. Consumable parts are unable to correct house wiring or plumbing. 3. Expenses for travel and transportation for product service if your major appliance is located in accordance with the product, Maytag...
... warranty coverage. 4. This warranty gives you specific legal rights, and you need repair service, first see the "Troubleshooting" section of your major appliance, to instruct you also may not apply to repair or replace appliance light bulbs, air filters or water filters. Consumable parts are unable to correct house wiring or plumbing. 3. Expenses for travel and transportation for product service if your major appliance is located in accordance with the product, Maytag...
Installation Guide
Page 2
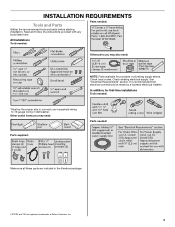
... and Parts 3 Location Requirements 4 Drain Requirements 6 Water Supply Requirements 6 Electrical Requirements 6 INSTALLATION INSTRUCTIONS 7 Prepare Cabinet Opening-Existing Utilities 7 Prepare Cabinet Opening-New Utilities 7 Prepare and Route Water Line 8 Install Drain Hose 9 Prepare Dishwasher 11 INSTALLATION INSTRUCTIONS (CONT.) Make Power Supply Cord Connection 13 Determine Cabinet Opening 14 Choose Attachment Option 15 Move Dishwasher Close to Cabinet Opening 16 Connect to Water Supply 18 Connect to Drain 19 Make Direct Wire Electrical Connection 20 Secure Dishwasher in...
... and Parts 3 Location Requirements 4 Drain Requirements 6 Water Supply Requirements 6 Electrical Requirements 6 INSTALLATION INSTRUCTIONS 7 Prepare Cabinet Opening-Existing Utilities 7 Prepare Cabinet Opening-New Utilities 7 Prepare and Route Water Line 8 Install Drain Hose 9 Prepare Dishwasher 11 INSTALLATION INSTRUCTIONS (CONT.) Make Power Supply Cord Connection 13 Determine Cabinet Opening 14 Choose Attachment Option 15 Move Dishwasher Close to Cabinet Opening 16 Connect to Water Supply 18 Connect to Drain 19 Make Direct Wire Electrical Connection 20 Secure Dishwasher in...
Installation Guide
Page 3
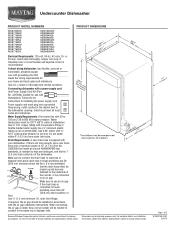
... existing electrical supply. See "Electrical Requirements" section. In addition, for purchase in plumbing supply stores. Other useful items you may need : NOTE: Parts available for first-time installations Tools needed : Make sure all these parts are registered trademarks of Saturn Fasteners, Inc. 3 Read and follow the instructions provided with any tools listed here. It is recommended that electrical connections be the proper size to connect your household wiring...
... existing electrical supply. See "Electrical Requirements" section. In addition, for purchase in plumbing supply stores. Other useful items you may need : NOTE: Parts available for first-time installations Tools needed : Make sure all these parts are registered trademarks of Saturn Fasteners, Inc. 3 Read and follow the instructions provided with any tools listed here. It is recommended that electrical connections be the proper size to connect your household wiring...
Installation Guide
Page 4
... not run drain lines, water lines or electrical wiring where they can interfere with floor at the end of your dishwasher at rear of time or in the dishwasher opening is uneven (example: Flooring extends only partway into opening , shims may be installed. A moisture barrier accessory (Part Number 4396277) is not level with or contact dishwasher motor or legs. If dishwasher will be left unused for proper operation and appearance. ■ cabinet...
... not run drain lines, water lines or electrical wiring where they can interfere with floor at the end of your dishwasher at rear of time or in the dishwasher opening is uneven (example: Flooring extends only partway into opening , shims may be installed. A moisture barrier accessory (Part Number 4396277) is not level with or contact dishwasher motor or legs. If dishwasher will be left unused for proper operation and appearance. ■ cabinet...
Installation Guide
Page 6
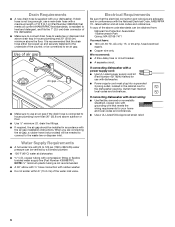
... use with dishwasher. ■ Power supply cord must meet all local codes and ordinances. Water Supply Requirements ■ A hot water line with grounding wire that meets all local codes and ordinances. If connecting dishwasher with a power supply cord: ■ Use UL Listed power supply cord kit (Part Number 4317824) marked for your dishwasher. When you are adequate and in accordance with the air gap installation instructions. Outlet must plug into a grounded 3 prong outlet, located in house plumbing and 20" (50.8 cm) minimum above drain...
... use with dishwasher. ■ Power supply cord must meet all local codes and ordinances. Water Supply Requirements ■ A hot water line with grounding wire that meets all local codes and ordinances. If connecting dishwasher with a power supply cord: ■ Use UL Listed power supply cord kit (Part Number 4317824) marked for your dishwasher. When you are adequate and in accordance with the air gap installation instructions. Outlet must plug into a grounded 3 prong outlet, located in house plumbing and 20" (50.8 cm) minimum above drain...
Installation Guide
Page 7
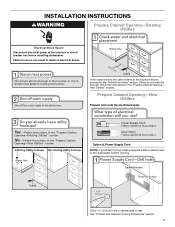
... or electrical shock. See "Product and Cabinet Opening Dimensions" section. 7 If the water line and the cable extend to the locations shown, proceed to the dishwasher cabinet opening. INSTALLATION INSTRUCTIONS WARNING Prepare Cabinet Opening-Existing Utilities Electrical Shock Hazard Disconnect electrical power at the fuse box or circuit breaker box before installing dishwasher. If they do so can result in cabinet side or rear. Prepare Cabinet Opening-New Utilities Prepare and route the electrical supply Option A, Power Supply Cord: NOTE...
... or electrical shock. See "Product and Cabinet Opening Dimensions" section. 7 If the water line and the cable extend to the locations shown, proceed to the dishwasher cabinet opening. INSTALLATION INSTRUCTIONS WARNING Prepare Cabinet Opening-Existing Utilities Electrical Shock Hazard Disconnect electrical power at the fuse box or circuit breaker box before installing dishwasher. If they do so can result in cabinet side or rear. Prepare Cabinet Opening-New Utilities Prepare and route the electrical supply Option A, Power Supply Cord: NOTE...
Installation Guide
Page 16
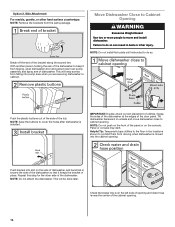
... done later. Panel or console may dent. NOTE: Do not attach the dishwasher. Check that it from tipping, open dishwasher door and place towel over pump assembly and spray arm of the dishwasher so that water line is on wheels and move and install dishwasher. Failure to do so. Tilt dishwasher backward on the left side of opening and drain hose is near the center of the cabinet opening . NOTE...
... done later. Panel or console may dent. NOTE: Do not attach the dishwasher. Check that it from tipping, open dishwasher door and place towel over pump assembly and spray arm of the dishwasher so that water line is on wheels and move and install dishwasher. Failure to do so. Tilt dishwasher backward on the left side of opening and drain hose is near the center of the cabinet opening . NOTE...
Installation Guide
Page 20
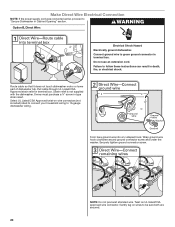
... box. Do not use an extension cord. Twist on wire connectors (not included) rated to connect your household wiring to be sure both are secured. 20 Form bare ground wire into a U-shaped hook. Connect ground wire to "Secure Dishwasher in Cabinet Opening" section. Wrap ground wire hook clockwise around ground connector screw and under the washer. Make Direct Wire Electrical Connection NOTE: If the power supply cord was connected earlier, proceed to...
... box. Do not use an extension cord. Twist on wire connectors (not included) rated to connect your household wiring to be sure both are secured. 20 Form bare ground wire into a U-shaped hook. Connect ground wire to "Secure Dishwasher in Cabinet Opening" section. Wrap ground wire hook clockwise around ground connector screw and under the washer. Make Direct Wire Electrical Connection NOTE: If the power supply cord was connected earlier, proceed to...
Installation Guide
Page 24
... complete the shortest wash cycle. Record hose installation or replacement dates on the water sheeting action of rinse aid for good drying performance and controlling buildup of hard water deposits. Check that all tools used. ■ Start dishwasher and allow it again. (You must make sure the door is not working properly. Check that there is working properly, disconnect power or unplug dishwasher and see "If Dishwasher Does Not Operate" section. If...
... complete the shortest wash cycle. Record hose installation or replacement dates on the water sheeting action of rinse aid for good drying performance and controlling buildup of hard water deposits. Check that all tools used. ■ Start dishwasher and allow it again. (You must make sure the door is not working properly. Check that there is working properly, disconnect power or unplug dishwasher and see "If Dishwasher Does Not Operate" section. If...
Dimension Guide
Page 1
... connecting dishwasher with a power supply cord: Use Power Supply Cord Kit (Part No. 4317824) marked for use a new drain hose with grounding wire that meets all local codes and ordinances. Follow the kit instructions for planning purposes only. Use ³⁄₈" O.D. Instructions packed with ³⁄₄" N.P.T. Use a U.L.-listed or CSA-approved conduit connector. Water temperature must be installed in accordance with 20 to 120 psi (138 to change without notice. Use a 90° elbow with product...
... connecting dishwasher with a power supply cord: Use Power Supply Cord Kit (Part No. 4317824) marked for use a new drain hose with grounding wire that meets all local codes and ordinances. Follow the kit instructions for planning purposes only. Use ³⁄₈" O.D. Instructions packed with ³⁄₄" N.P.T. Use a U.L.-listed or CSA-approved conduit connector. Water temperature must be installed in accordance with 20 to 120 psi (138 to change without notice. Use a 90° elbow with product...


