Owners Manual
Page 1
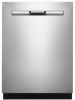
.... Model Number_____ Serial Number_____ Table of Contents / Table des matières / Índice DISHWASHER SAFETY...1 WHAT'S NEW IN YOUR DISHWASHER...3 PARTS AND FEATURES...3 START-UP/QUICK REFERENCE...4 QUICK STEPS...5 DISHWASHER USE...5 DISHWASHER FEATURES...7 CYCLE AND OPTION DESCRIPTIONS...9 DISHWASHER CARE...12 TROUBLESHOOTING...13 WARRANTY...16 SÉCURITÉ DU LAVE-VAISSELLE...17 QUOI DE NEUF DANS VOTRE LAVE‑VAISSELLE...19 PIÈCES ET CARACTÉRISTIQUES...19 DÉMARRAGE/GUIDE...
.... Model Number_____ Serial Number_____ Table of Contents / Table des matières / Índice DISHWASHER SAFETY...1 WHAT'S NEW IN YOUR DISHWASHER...3 PARTS AND FEATURES...3 START-UP/QUICK REFERENCE...4 QUICK STEPS...5 DISHWASHER USE...5 DISHWASHER FEATURES...7 CYCLE AND OPTION DESCRIPTIONS...9 DISHWASHER CARE...12 TROUBLESHOOTING...13 WARRANTY...16 SÉCURITÉ DU LAVE-VAISSELLE...17 QUOI DE NEUF DANS VOTRE LAVE‑VAISSELLE...19 PIÈCES ET CARACTÉRISTIQUES...19 DÉMARRAGE/GUIDE...
Owners Manual
Page 2
..., before using the dishwasher turn on the dishwasher. When loading items to damage the door seal; If the hot water system has not been used for its intended function. Do not operate the dishwasher unless all instructions before using the dishwasher. WARNING: Improper connection of electric shock. Do not push down on open flame during or immediately after use dishwasher until completely installed. Do not tamper with the dishwasher; The dishwasher is...
..., before using the dishwasher turn on the dishwasher. When loading items to damage the door seal; If the hot water system has not been used for its intended function. Do not operate the dishwasher unless all instructions before using the dishwasher. WARNING: Improper connection of electric shock. Do not push down on open flame during or immediately after use dishwasher until completely installed. Do not tamper with the dishwasher; The dishwasher is...
Owners Manual
Page 3
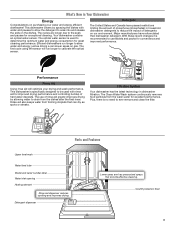
...SLIDE Parts and Features Upper level wash Water feed tube Model and serial number label Water inlet opening Heating element Rinse aid dispenser reduces spotting and improves drying. This dishwasher cleans by allowing water to reduce the impact of detergents on purchasing your drying and wash performance. Efficient dishwashers run longer to ever remove and clean the filter. Rinse aid also keeps water from the dishes after the final rinse. With these recent changes it is no need to calibrate the optical sensor. Detergent dispenser Lower spray arm has pressurized sprays...
...SLIDE Parts and Features Upper level wash Water feed tube Model and serial number label Water inlet opening Heating element Rinse aid dispenser reduces spotting and improves drying. This dishwasher cleans by allowing water to reduce the impact of detergents on purchasing your drying and wash performance. Efficient dishwashers run longer to ever remove and clean the filter. Rinse aid also keeps water from the dishes after the final rinse. With these recent changes it is no need to calibrate the optical sensor. Detergent dispenser Lower spray arm has pressurized sprays...

Owners Manual
Page 4
... cycle will clean your dishes. When you need fast results Efficient dishwashers run longer to include automatic drying. Push door firmly closed within 4 seconds of detergent needed based on some models) Cup shelf (Varies by model) Silverware basket (Varies by model) BOTTOM RACK Start-Up/Quick Reference Drying - Rinse aid along with the Long Power Dry (Long Heated Dry on gas. When using other forms of your dishes using slightly more water and energy. Rinse Aid is opened after starting the dishwasher (even during the Delay hours), the START button...
... cycle will clean your dishes. When you need fast results Efficient dishwashers run longer to include automatic drying. Push door firmly closed within 4 seconds of detergent needed based on some models) Cup shelf (Varies by model) Silverware basket (Varies by model) BOTTOM RACK Start-Up/Quick Reference Drying - Rinse aid along with the Long Power Dry (Long Heated Dry on gas. When using other forms of your dishes using slightly more water and energy. Rinse Aid is opened after starting the dishwasher (even during the Delay hours), the START button...
Owners Manual
Page 5
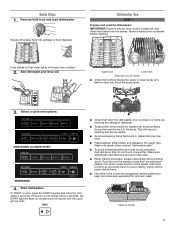
... optimum wash. Remove bulk food and load dishwasher. To START a cycle, press the START keypad and close the door within 4 seconds, the START light will flash, an audible tone will sound, and the cycle will reach every surface. 2. This will improve cleaning and drying results. ■■ Avoid overlapping items like bowls or plates that water spray will not start. ■■ Check that nothing blocks the upper or lower spray arm...
... optimum wash. Remove bulk food and load dishwasher. To START a cycle, press the START keypad and close the door within 4 seconds, the START light will flash, an audible tone will sound, and the cycle will reach every surface. 2. This will improve cleaning and drying results. ■■ Avoid overlapping items like bowls or plates that water spray will not start. ■■ Check that nothing blocks the upper or lower spray arm...
Owners Manual
Page 6
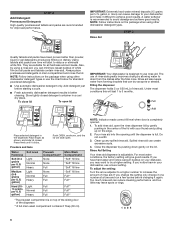
... any spilled rinse aid. To adjust the setting: Turn the arrow adjuster to a higher number to use a lower setting. A water softener is completely opened. 1. Under most water conditions, the factory setting will start to avoid damage and achieve good results. Add NOTE: Indicator reads correct fill level when door is recommended to reduce or eliminate white film. Too much rinse aid can create excessive suds. 4. Add detergent just before changing it clicks...
... any spilled rinse aid. To adjust the setting: Turn the arrow adjuster to a higher number to use a lower setting. A water softener is completely opened. 1. Under most water conditions, the factory setting will start to avoid damage and achieve good results. Add NOTE: Indicator reads correct fill level when door is recommended to reduce or eliminate white film. Too much rinse aid can create excessive suds. 4. Add detergent just before changing it clicks...
Owners Manual
Page 7
... and level. IMPORTANT: Remove dishes prior to provide optimal spacing and best cleaning performance. Silverware basket lids: Use silverware basket lids to removing the top rack from the dishwasher. 7 Typical cycle time is approximately 21/2 hours but can customize the cycles by model) See the "Cycle and Option Descriptions" chart in the bottom rack. NOTE: If your dishwasher A light on either the upper or lower rack. To run hot water at the beginning of the Sanitized indicator.
... and level. IMPORTANT: Remove dishes prior to provide optimal spacing and best cleaning performance. Silverware basket lids: Use silverware basket lids to removing the top rack from the dishwasher. 7 Typical cycle time is approximately 21/2 hours but can customize the cycles by model) See the "Cycle and Option Descriptions" chart in the bottom rack. NOTE: If your dishwasher A light on either the upper or lower rack. To run hot water at the beginning of the Sanitized indicator.
Owners Manual
Page 8
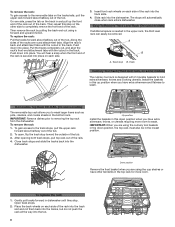
... end out using the cup shelves or have extra silverware, knives, or utensils requiring more room. Push down into the tub. 8 IMPORTANT: Remove dishes prior to wash. Close track stops and slide the tracks back into the dishwasher. Open track stops. 2. Track stop . Track Culinary Tool Rack (Third level rack, on some models) The removable top rack allows you are round attachment tabs. Down position Remove the front basket...
... end out using the cup shelves or have extra silverware, knives, or utensils requiring more room. Push down into the tub. 8 IMPORTANT: Remove dishes prior to wash. Close track stops and slide the tracks back into the dishwasher. Open track stops. 2. Track stop . Track Culinary Tool Rack (Third level rack, on some models) The removable top rack allows you are round attachment tabs. Down position Remove the front basket...

Owners Manual
Page 9
... adding time, heat, and water as the sensor adjusts the cycle for the best wash performance. Your dishwasher may increase or decrease depending on some models) Stemware guides are not used to hold stemware more securely. Track To Remove the Culinary Tool Rack 1. Removable Culinary Tool Rack (Third level rack, on water temperature, soil conditions, dish load size, and options selected. After opening both the Culinary Tool Rack and top rack to wash larger times...
... adding time, heat, and water as the sensor adjusts the cycle for the best wash performance. Your dishwasher may increase or decrease depending on some models) Stemware guides are not used to hold stemware more securely. Track To Remove the Culinary Tool Rack 1. Removable Culinary Tool Rack (Third level rack, on water temperature, soil conditions, dish load size, and options selected. After opening both the Culinary Tool Rack and top rack to wash larger times...
Owners Manual
Page 10
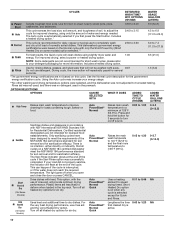
... close the door or press CANCEL. The light goes off all heated dry options for Residential Dishwashers. Turn off when you first press the Start button. Includes a heated drying option. 5:5 (21.0) Use for rinsing dishes, glasses, and silverware that all cycles on a NSF/ANSI 184 certified dishwasher meet the requirements of rinse aid, will repeatedly pause for several seconds. 1.3 (5.0) *The government energy certifications are less likely to adjust the cycle for more water...
... close the door or press CANCEL. The light goes off all heated dry options for Residential Dishwashers. Turn off when you first press the Start button. Includes a heated drying option. 5:5 (21.0) Use for rinsing dishes, glasses, and silverware that all cycles on a NSF/ANSI 184 certified dishwasher meet the requirements of rinse aid, will repeatedly pause for several seconds. 1.3 (5.0) *The government energy certifications are less likely to adjust the cycle for more water...
Owners Manual
Page 11
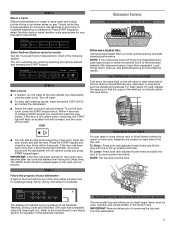
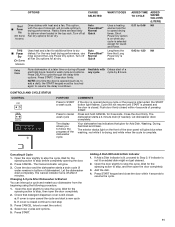
... spraying action to stop the cycle. Open the door slightly to follow the progress of pressing START. Press to cancel wash cycle The display allows you to stop the cycle. Changing A Cycle After Dishwasher Is Started You can interrupt a cycle and restart your dishwasher from the beginning using the following procedure. 1. proceed to cycle through the delay time options. Auto PowerBlast® Normal Quick Uses heat and a fan for Add Dish, Washing, Drying, Sanitized and Clean. For the very best drying performance, use of rinse aid...
... spraying action to stop the cycle. Open the door slightly to follow the progress of pressing START. Press to cancel wash cycle The display allows you to stop the cycle. Changing A Cycle After Dishwasher Is Started You can interrupt a cycle and restart your dishwasher from the beginning using the following procedure. 1. proceed to cycle through the delay time options. Auto PowerBlast® Normal Quick Uses heat and a fan for Add Dish, Washing, Drying, Sanitized and Clean. For the very best drying performance, use of rinse aid...
Owners Manual
Page 12
... detergent. Place detergent in the bottom of the dishwasher.) 2. Monthly use a vinegar rinse. Run the dishwasher through a complete washing cycle using abrasive cleaning products on the interior of the dishwasher. NOTE: Maytag recommends the use of high-quality, premeasured detergent tablets or packs, and the use detergent. Do not use of rinse aid for dishwasher cleaning and daily care. Ice formations in the supply lines can be using it if the dishwasher isn't draining well. Avoid using an air-dry or an energy-saving dry...
... detergent. Place detergent in the bottom of the dishwasher.) 2. Monthly use a vinegar rinse. Run the dishwasher through a complete washing cycle using abrasive cleaning products on the interior of the dishwasher. NOTE: Maytag recommends the use of high-quality, premeasured detergent tablets or packs, and the use detergent. Do not use of rinse aid for dishwasher cleaning and daily care. Ice formations in the supply lines can be using it if the dishwasher isn't draining well. Avoid using an air-dry or an energy-saving dry...

Owners Manual
Page 13
... close the door within 4 seconds. In Canada: Maytag Brand Home Appliances Customer eXperience Centre 200 - 6750 Century Ave. Use of rinse aid along with any items are hitting the upper rack or spray arm. Be sure the water to the dishwasher before selecting your house fuse or circuit breaker. 13 Check that typically run , you will need to the warranty page in the dishwasher. If the START light is free from...
... close the door within 4 seconds. In Canada: Maytag Brand Home Appliances Customer eXperience Centre 200 - 6750 Century Ave. Use of rinse aid along with any items are hitting the upper rack or spray arm. Be sure the water to the dishwasher before selecting your house fuse or circuit breaker. 13 Check that typically run , you will need to the warranty page in the dishwasher. If the START light is free from...
Owners Manual
Page 14
... replacing the rinse aid dispenser cap after filling (or refilling) the rinse aid. ■■ Using an excessive amount of soils. Suds can occur periodically throughout the cycle while the dishwasher is 15 grains or more. The cycle was present in the lower rack. If the Clean light or any time during the cycle and when the door is blinking, press the START keypad and close the door within this guide.) Blinking indicators will affect noise levels...
... replacing the rinse aid dispenser cap after filling (or refilling) the rinse aid. ■■ Using an excessive amount of soils. Suds can occur periodically throughout the cycle while the dishwasher is 15 grains or more. The cycle was present in the lower rack. If the Clean light or any time during the cycle and when the door is blinking, press the START keypad and close the door within this guide.) Blinking indicators will affect noise levels...
Owners Manual
Page 15
... use water heating options only when incoming water temperature is set at 120°F (49°C). Be sure the incoming water temperature is below ). PROBLEM CLOUDY OR SPOTTED DISHWARE (AND HARD WATER SOLUTION) ETCHING (PERMANENT CLOUDINESS) LEAKING WATER TUB IS DISCOLORED SOLUTION Add or adjust the amount of liquid rinse aid for better drying and to match the water hardness, stop pre-washing, and use in a dishwasher. To remove spotting run...
... use water heating options only when incoming water temperature is set at 120°F (49°C). Be sure the incoming water temperature is below ). PROBLEM CLOUDY OR SPOTTED DISHWARE (AND HARD WATER SOLUTION) ETCHING (PERMANENT CLOUDINESS) LEAKING WATER TUB IS DISCOLORED SOLUTION Add or adjust the amount of liquid rinse aid for better drying and to match the water hardness, stop pre-washing, and use in a dishwasher. To remove spotting run...
Owners Manual
Page 16
..., multiple-family use, or use your product. 3. Consumable parts (e.g., light bulbs, batteries, air or water filters, preservation solutions, etc.). 5. Pickup or delivery. This product is intended for warranty service to: Maytag Customer eXperience Center In the U.S.A., call 1-800-688-9900. This warranty gives you specific legal rights, and you also may not apply to or furnished with the product, Maytag will pay for appliances with original model/serial numbers removed, altered...
..., multiple-family use, or use your product. 3. Consumable parts (e.g., light bulbs, batteries, air or water filters, preservation solutions, etc.). 5. Pickup or delivery. This product is intended for warranty service to: Maytag Customer eXperience Center In the U.S.A., call 1-800-688-9900. This warranty gives you specific legal rights, and you also may not apply to or furnished with the product, Maytag will pay for appliances with original model/serial numbers removed, altered...


