
User Instructions
Page 1
...maytag.com Tenga listo su número de modelo completo. This is , tell you what can happen if the instructions are very important. Table of Contents DISHWASHER SAFETY 1 QUICK STEPS 3 DISHWASHER USE 3 CYCLE AND OPTION DESCRIPTIONS 5 DISHWASHER FEATURES 7 DISHWASHER CARE 8 TROUBLESHOOTING 9 WARRANTY 11 Dishwasher ...others . WARNING You can kill or hurt you should experience a problem not covered in this high-quality product. DISHWASHER USER INSTRUCTIONS THANK YOU for additional information. If you don't immediately follow the safety alert symbol and either the word...
...maytag.com Tenga listo su número de modelo completo. This is , tell you what can happen if the instructions are very important. Table of Contents DISHWASHER SAFETY 1 QUICK STEPS 3 DISHWASHER USE 3 CYCLE AND OPTION DESCRIPTIONS 5 DISHWASHER FEATURES 7 DISHWASHER CARE 8 TROUBLESHOOTING 9 WARRANTY 11 Dishwasher ...others . WARNING You can kill or hurt you should experience a problem not covered in this high-quality product. DISHWASHER USER INSTRUCTIONS THANK YOU for additional information. If you don't immediately follow the safety alert symbol and either the word...
User Instructions
Page 2
... plug must be washed: 1) Locate sharp items so that has not been used for such a period, before using the dishwasher. ■ Use the dishwasher only for its intended function. ■ Use only detergents or rinse agents recommended for proper grounding procedures. ■ Do not... a malfunction or breakdown, grounding will release any accumulated hydrogen gas. Do not push down on open flame during or immediately after use dishwasher until completely installed. For plastic items not so marked, check the manufacturer's recommendations. ■ Do not touch the heating element during ...
... plug must be washed: 1) Locate sharp items so that has not been used for such a period, before using the dishwasher. ■ Use the dishwasher only for its intended function. ■ Use only detergents or rinse agents recommended for proper grounding procedures. ■ Do not... a malfunction or breakdown, grounding will release any accumulated hydrogen gas. Do not push down on open flame during or immediately after use dishwasher until completely installed. For plastic items not so marked, check the manufacturer's recommendations. ■ Do not touch the heating element during ...
User Instructions
Page 3
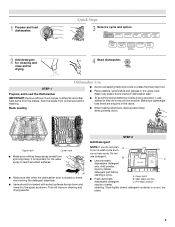
... use detergent. Cover latch ■ Fresh automatic B. It is important for drying. 4 Start dishwasher. STEP 2 Add Detergent NOTE: If you do not touch one another. 1 Prepare and load dishwasher. Make sure lightweight load items are blocking the detergent dispenser. ■ Items should be loaded ... Hard Water Soft Water C PRE- Store tightly closed no items are secured in the upper rack. Wash only plastic items marked "dishwasher safe." Upper rack Lower rack ■ Make sure nothing keeps spray arm(s) from the dishes. IMPORTANT: Remove leftover food, bones,...
... use detergent. Cover latch ■ Fresh automatic B. It is important for drying. 4 Start dishwasher. STEP 2 Add Detergent NOTE: If you do not touch one another. 1 Prepare and load dishwasher. Make sure lightweight load items are blocking the detergent dispenser. ■ Items should be loaded ... Hard Water Soft Water C PRE- Store tightly closed no items are secured in the upper rack. Wash only plastic items marked "dishwasher safe." Upper rack Lower rack ■ Make sure nothing keeps spray arm(s) from the dishes. IMPORTANT: Remove leftover food, bones,...
User Instructions
Page 4
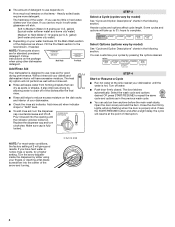
...) [typical water softener water and some city water] ■ Depending on the items - The heat dry option will resume at the sink nearest your dishwasher. ■ Check the rinse aid indicator. Add rinse aid when indicator drops to "Refill" level. ■ To add rinse aid, turn clockwise....dry as spots or streaks. It also improves drying by pressing the options desired. STEP 3 Select a Cycle (cycles vary by either using other dishwasher detergent. NOTE: For most water conditions, the factory setting of 2 will take up to 3¹⁄₂ hours to complete. gallon) [well...
...) [typical water softener water and some city water] ■ Depending on the items - The heat dry option will resume at the sink nearest your dishwasher. ■ Check the rinse aid indicator. Add rinse aid when indicator drops to "Refill" level. ■ To add rinse aid, turn clockwise....dry as spots or streaks. It also improves drying by pressing the options desired. STEP 3 Select a Cycle (cycles vary by either using other dishwasher detergent. NOTE: For most water conditions, the factory setting of 2 will take up to 3¹⁄₂ hours to complete. gallon) [well...
User Instructions
Page 5
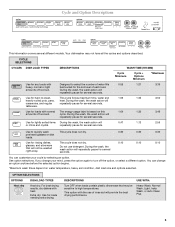
... 3:50 heavily soiled pots, pans, heat. See option selections. USE WITH: Heavy Wash, Normal Wash, Light, Insta Wash, or Auto Clean Plus 5 During the wash, the wash action will or china and crystal. tableware. Do not use of each load. If you change an option ...amounts of food soil. DESCRIPTIONS Turn OFF when loads contain plastic dinnerware that will casseroles, and regular repeatedly pause for several different models. Your dishwasher may be washed right away. Use for several seconds. 0:47 1:13 2:56 Use to turn off the option, or select a different...
... 3:50 heavily soiled pots, pans, heat. See option selections. USE WITH: Heavy Wash, Normal Wash, Light, Insta Wash, or Auto Clean Plus 5 During the wash, the wash action will or china and crystal. tableware. Do not use of each load. If you change an option ...amounts of food soil. DESCRIPTIONS Turn OFF when loads contain plastic dinnerware that will casseroles, and regular repeatedly pause for several different models. Your dishwasher may be washed right away. Use for several seconds. 0:47 1:13 2:56 Use to turn off the option, or select a different...
User Instructions
Page 6
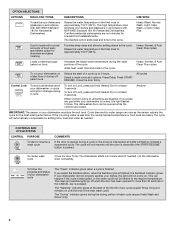
... to approximately 154°F (68°C). Heavy Wash, Normal Wash, Light, Insta Wash, or Auto Clean Plus Use for loads with normal amounts of your dishwasher cycle The "Clean" indicator glows when a cycle is interrupted, all buttons are not intended for licensed food establishments... Sanitize option adds heat and time to the cycle. Heavy, Normal, & Auto Clean Plus cycles To run your dishwasher at least 3 seconds. When Control Lock is finished, the Sanitized indicator glows. The dishwasher starts a 2-minute drain (if needed . The clean and sanitize lights go off Lock...
... to approximately 154°F (68°C). Heavy Wash, Normal Wash, Light, Insta Wash, or Auto Clean Plus Use for loads with normal amounts of your dishwasher cycle The "Clean" indicator glows when a cycle is interrupted, all buttons are not intended for licensed food establishments... Sanitize option adds heat and time to the cycle. Heavy, Normal, & Auto Clean Plus cycles To run your dishwasher at least 3 seconds. When Control Lock is finished, the Sanitized indicator glows. The dishwasher starts a 2-minute drain (if needed . The clean and sanitize lights go off Lock...
User Instructions
Page 7
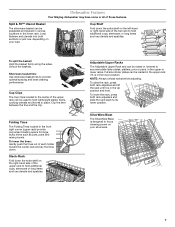
... to its lower position. SilverWare Blast The SilverWare Blast is in the lower rack. Folding Tines The Folding Tines located in the lower position. Dishwasher Features Your Maytag dishwasher may have some or all of the upper rack can be raised or lowered to provide optimal spacing and best cleaning performance. Clip the...
... to its lower position. SilverWare Blast The SilverWare Blast is in the lower rack. Folding Tines The Folding Tines located in the lower position. Dishwasher Features Your Maytag dishwasher may have some or all of the upper rack can be raised or lowered to provide optimal spacing and best cleaning performance. Clip the...

User Instructions
Page 8
...mix with the wash water. Roll the rack all the way out of the way out. 2. Dishwasher Care Cleaning the Dishwasher Clean the exterior of the dishwasher with a paste of the dishwasher, with a soft, damp cloth and mild detergent. Stainless Steel Cleaner and Polish Part Number 31464.... pots, roasters, and cookie sheets in a seasonal dwelling such as a second home or vacation home, avoid water damage by having your dishwasher winterized by pulling straight out. Vinegar is left in the lower level rack. Vinegar will not be easily removed by authorized service personnel. ...
...mix with the wash water. Roll the rack all the way out of the way out. 2. Dishwasher Care Cleaning the Dishwasher Clean the exterior of the dishwasher with a paste of the dishwasher, with a soft, damp cloth and mild detergent. Stainless Steel Cleaner and Polish Part Number 31464.... pots, roasters, and cookie sheets in a seasonal dwelling such as a second home or vacation home, avoid water damage by having your dishwasher winterized by pulling straight out. Vinegar is left in the lower level rack. Vinegar will not be easily removed by authorized service personnel. ...
User Instructions
Page 9
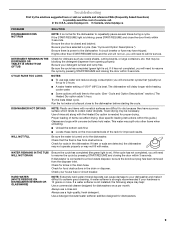
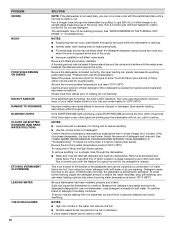
... www.maytag.com In Canada, www.maytag.ca PROBLEM SOLUTION DISHWASHER DOES NOT RUN NOTE: It is free from obstructions. DISHWASHER NOT DRYING NOTE: Plastic and items with the Heated Dry option is needed for proper drying. Check that the float is normal for the dishwasher to ...Option Descriptions" section.) The Heated Dry option adds ½ hour. This water may be necessary. Check for food obstructions in the dishwasher. Use a detergent booster/water softener additive designed for dishware such as cookie sheets, cutting boards, or large containers, etc. Be ...
... www.maytag.com In Canada, www.maytag.ca PROBLEM SOLUTION DISHWASHER DOES NOT RUN NOTE: It is free from obstructions. DISHWASHER NOT DRYING NOTE: Plastic and items with the Heated Dry option is needed for proper drying. Check that the float is normal for the dishwasher to ...Option Descriptions" section.) The Heated Dry option adds ½ hour. This water may be necessary. Check for food obstructions in the dishwasher. Use a detergent booster/water softener additive designed for dishware such as cookie sheets, cutting boards, or large containers, etc. Be ...
User Instructions
Page 10
... detergent dispenser opens during the cycle and when the door is opened at the end of fresh detergent. Improper loading can cause the dishwasher to loading (do not prerinse). Scrape food from dishes prior to overflow. If etching has occurred, the glassware is loaded correctly....temperature is at 120°F (49ºC). To avoid further etching, adjust the detergent amount to etching (see "Prepare and Load the Dishwasher"). Measure the detergent accurately and use in white vinegar for use only detergents designed for 5 minutes. Try using too much detergent with ...
... detergent dispenser opens during the cycle and when the door is opened at the end of fresh detergent. Improper loading can cause the dishwasher to loading (do not prerinse). Scrape food from dishes prior to overflow. If etching has occurred, the glassware is loaded correctly....temperature is at 120°F (49ºC). To avoid further etching, adjust the detergent amount to etching (see "Prepare and Load the Dishwasher"). Measure the detergent accurately and use in white vinegar for use only detergents designed for 5 minutes. Try using too much detergent with ...
User Instructions
Page 11
...below . Service must be borne by a Maytag designated service company. Service calls to correct the installation of your major appliance, to schedule service, you on the right-hand or left-hand side of the dishwasher interior. Repairs to obtain service under these excluded... circumstances shall be provided by the customer. Expenses for travel and transportation for repairs. Have your major appliance is located in a remote area where service by Maytag. 5. For assistance or ...
...below . Service must be borne by a Maytag designated service company. Service calls to correct the installation of your major appliance, to schedule service, you on the right-hand or left-hand side of the dishwasher interior. Repairs to obtain service under these excluded... circumstances shall be provided by the customer. Expenses for travel and transportation for repairs. Have your major appliance is located in a remote area where service by Maytag. 5. For assistance or ...
Installation Instructions
Page 2
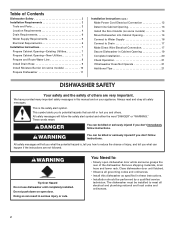
... killed or seriously injured if you and others are not followed. All safety messages will follow instructions. Close dishwasher door until completely installed. Table of Contents Dishwasher Safety 2 Installation Requirements 3 Tools and Parts 3 Location Requirements 4 Drain Requirements 6 Water Supply Requirements 6 ...Prepare and Route Water Line 8 Install Drain Hose 9 Install Moisture Barrier (on some models 10 Prepare Dishwasher 11 Installation Instructions (cont.) Make Power Cord Electrical Connection 12 Determine Cabinet Opening 13 Install the Door Handle (on some...
... killed or seriously injured if you and others are not followed. All safety messages will follow instructions. Close dishwasher door until completely installed. Table of Contents Dishwasher Safety 2 Installation Requirements 3 Tools and Parts 3 Location Requirements 4 Drain Requirements 6 Water Supply Requirements 6 ...Prepare and Route Water Line 8 Install Drain Hose 9 Install Moisture Barrier (on some models 10 Prepare Dishwasher 11 Installation Instructions (cont.) Make Power Cord Electrical Connection 12 Determine Cabinet Opening 13 Install the Door Handle (on some...
Installation Instructions
Page 3
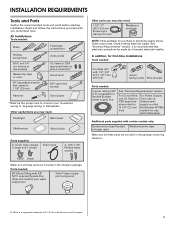
...braided water supply line See "Electrical Requirements" section For Direct Wire: For Power Supply use UL listed or Cord: use with dishwasher Additional parts supplied with any tools listed here. All Installations Tools needed: Pliers Flat-blade screwdriver Phillips screwdriver 5/16" and ...Drain hose clamps (1 large and 1 small) Drain hose 2 - #10 x 1/2" Phillips-head screws Silver Green Make sure all these parts are included in dishwasher Other useful items you may need : 1 1/2" -2" (38.1-5.0 cm) Screw-typ e clamps (3 max) Masking or duct tape NOTE: Parts available for ...
...braided water supply line See "Electrical Requirements" section For Direct Wire: For Power Supply use UL listed or Cord: use with dishwasher Additional parts supplied with any tools listed here. All Installations Tools needed: Pliers Flat-blade screwdriver Phillips screwdriver 5/16" and ...Drain hose clamps (1 large and 1 small) Drain hose 2 - #10 x 1/2" Phillips-head screws Silver Green Make sure all these parts are included in dishwasher Other useful items you may need : 1 1/2" -2" (38.1-5.0 cm) Screw-typ e clamps (3 max) Masking or duct tape NOTE: Parts available for ...
Installation Instructions
Page 4
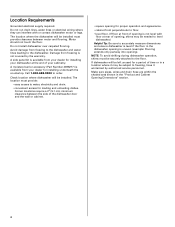
...between motor and flooring. Avoid damage from your dealer for installing your cabinetry. NOTE: To avoid shifting during dishwasher operation, shims must be securely attached to the dishwasher. Do not run drain lines, water lines or electrical wiring where they can interfere with floor at the end...• convenient access for a period of opening is available from freezing to the dishwasher and water lines leading to the floor. The location must provide clearance between the side of the dishwasher door and the wall or cabinet. • square opening for proper operation and ...
...between motor and flooring. Avoid damage from your dealer for installing your cabinetry. NOTE: To avoid shifting during dishwasher operation, shims must be securely attached to the dishwasher. Do not run drain lines, water lines or electrical wiring where they can interfere with floor at the end...• convenient access for a period of opening is available from freezing to the dishwasher and water lines leading to the floor. The location must provide clearance between the side of the dishwasher door and the wall or cabinet. • square opening for proper operation and ...
Installation Instructions
Page 5
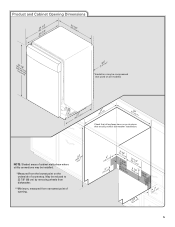
..., measured from the lowest point on all models) (532.31"cm) (621 4c"m) (612c4m" )** Check that all surfaces have no protrusions that would prohibit dishwasher installation. Product and Cabinet Opening Dimensions ((26265442..-1211/c/c42mm"" )) (2630.67/c8m" ) w(8ri36teh3mcmw7o/hv)8eem"edilns. (1.39/4c"m)* *Insulation may be installed. *Measured from narrowest ...
..., measured from the lowest point on all models) (532.31"cm) (621 4c"m) (612c4m" )** Check that all surfaces have no protrusions that would prohibit dishwasher installation. Product and Cabinet Opening Dimensions ((26265442..-1211/c/c42mm"" )) (2630.67/c8m" ) w(8ri36teh3mcmw7o/hv)8eem"edilns. (1.39/4c"m)* *Insulation may be installed. *Measured from narrowest ...
Installation Instructions
Page 6
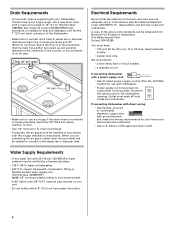
.... drain line fittings. • If required, the air gap should be verified by a licensed plumber. • 120°F (49°C) water at dishwasher. • 3/8" O.D. A copy of the dishwasher. • Make sure to connect drain hose to an air gap. Water Supply Requirements • A hot water line with 20-120 psi (138...) that the drain hose either be looped up and securely fastened to the underside of air gap Air gap • Make sure to use with dishwasher. • Power supply cord must have: • 120-volt, 60 Hz, AC-only, 15 or 20 amp, fused electrical supply. • copper ...
.... drain line fittings. • If required, the air gap should be verified by a licensed plumber. • 120°F (49°C) water at dishwasher. • 3/8" O.D. A copy of the dishwasher. • Make sure to connect drain hose to an air gap. Water Supply Requirements • A hot water line with 20-120 psi (138...) that the drain hose either be looped up and securely fastened to the underside of air gap Air gap • Make sure to use with dishwasher. • Power supply cord must have: • 120-volt, 60 Hz, AC-only, 15 or 20 amp, fused electrical supply. • copper ...
Installation Instructions
Page 7
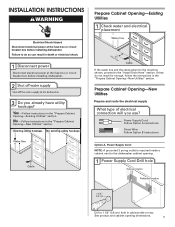
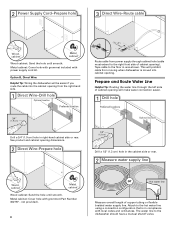
.... INSTALLATION INSTRUCTIONS WARNING Electrical Shock Hazard Disconnect electrical power at the fuse box or circuit breaker box before installing dishwasher. No -Follow instructions in cabinet side or rear. Power Supply Cord: Follow Option A instructions Direct Wire:... Follow Option B instructions Option A, Power Supply Cord: NOTE: A grounded 3 prong outlet is required inside a cabinet next to the dishwasher cabinet opening dimensions. 7 See product and cabinet opening . 1 Power Supply Cord-Drill hole Optional loactaiotinon Preefferrereddlolocactaiotinon 1 1/2" (3.8 cm) Drill...
.... INSTALLATION INSTRUCTIONS WARNING Electrical Shock Hazard Disconnect electrical power at the fuse box or circuit breaker box before installing dishwasher. No -Follow instructions in cabinet side or rear. Power Supply Cord: Follow Option A instructions Direct Wire:... Follow Option B instructions Option A, Power Supply Cord: NOTE: A grounded 3 prong outlet is required inside a cabinet next to the dishwasher cabinet opening dimensions. 7 See product and cabinet opening . 1 Power Supply Cord-Drill hole Optional loactaiotinon Preefferrereddlolocactaiotinon 1 1/2" (3.8 cm) Drill...
Installation Instructions
Page 8
... be easier if you route the cable into the cabinet opening from moving when dishwasher is in area shown. Prepare and Route Water Line Helpful Tip: Routing the water line through cabinet hole (cable must extend to the floor in ... cord kit. 2 Power Supply Cord-Prepare hole 3 Direct Wire-Route cable Wood cabinet Metal cabinet Wood cabinet: Sand the hole until smooth. Attach to the dishwasher should have a manual shutoff valve.
... be easier if you route the cable into the cabinet opening from moving when dishwasher is in area shown. Prepare and Route Water Line Helpful Tip: Routing the water line through cabinet hole (cable must extend to the floor in ... cord kit. 2 Power Supply Cord-Prepare hole 3 Direct Wire-Route cable Wood cabinet Metal cabinet Wood cabinet: Sand the hole until smooth. Attach to the dishwasher should have a manual shutoff valve.
Installation Instructions
Page 9
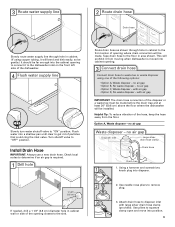
...the sink. Install Drain Hose IMPORTANT: Always use a new drain hose. Tape drain hose to the floor in cabinet wall or side of the dishwasher. 4 Flush water supply line Slowly turn water shutoff valve to disposer inlet with air gap • Option D, No waste disposer - no ... and screwdriver, knock plug into position. 9 This will prohibit it to squeeze clamp open and move into disposer. 2 2. Use pliers to the dishwasher inlet on the front left side of the opening where drain connection will be made. Helpful Tip: To reduce vibration of the hose, keep the...
...the sink. Install Drain Hose IMPORTANT: Always use a new drain hose. Tape drain hose to the floor in cabinet wall or side of the dishwasher. 4 Flush water supply line Slowly turn water shutoff valve to disposer inlet with air gap • Option D, No waste disposer - no ... and screwdriver, knock plug into position. 9 This will prohibit it to squeeze clamp open and move into disposer. 2 2. Use pliers to the dishwasher inlet on the front left side of the opening where drain connection will be made. Helpful Tip: To reduce vibration of the hose, keep the...
Installation Instructions
Page 11
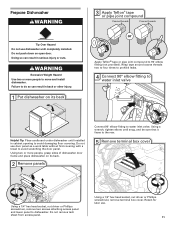
... terminal box cover Using a 1/4" hex head socket, nut driver or Phillips screwdriver, remove two screws attaching access panel and lower panel to dishwasher. Using a wrench, tighten elbow until completely installed. Do not remove tech sheet from access panel. Failure to do so can result in serious... panel as a work table without first covering with a towel to move and install dishwasher. WARNING Excessive Weight Hazard Use two or more people, grasp sides of dishwasher door frame and place dishwasher on its back 3 Apply Teflon® tape or pipe joint compound Coarse threads Coarse...
... terminal box cover Using a 1/4" hex head socket, nut driver or Phillips screwdriver, remove two screws attaching access panel and lower panel to dishwasher. Using a wrench, tighten elbow until completely installed. Do not remove tech sheet from access panel. Failure to do so can result in serious... panel as a work table without first covering with a towel to move and install dishwasher. WARNING Excessive Weight Hazard Use two or more people, grasp sides of dishwasher door frame and place dishwasher on its back 3 Apply Teflon® tape or pipe joint compound Coarse threads Coarse...


