
Dimension Guide
Page 1
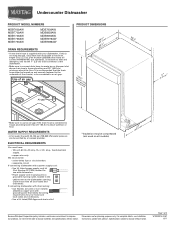
... length of the counter, or be connected to an air gap. Use of 2 W10329314-D-MT 6/11 For complete details, see Installation our products, we reserve the right to change without notice. Instructions packed with 20-120 psi (138-862 kPa) water pressure can be compressed (not used on all local codes and...
... length of the counter, or be connected to an air gap. Use of 2 W10329314-D-MT 6/11 For complete details, see Installation our products, we reserve the right to change without notice. Instructions packed with 20-120 psi (138-862 kPa) water pressure can be compressed (not used on all local codes and...
Dimension Guide
Page 2
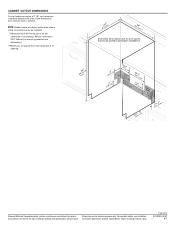
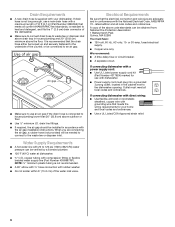
... on the underside of the dishwasher door and the wall or cabinet. Page 2 of countertop. Instructions packed with product. For complete details, see Installation our products, we reserve the right to change materials and specifications without notice. Specifications subject to change.... **Minimum, measured from narrowest point of opening. (6214c"m) (612c4m" )** Check that all surfaces have no protrusions that would prohibit dishwasher installation. (8m63.44in"c*m) (10.42"cm) (7.63"cm) (167³.⁄₄2"cm) (14(2.³64⁄₄.¹4"⁄c₂"mcm...
... on the underside of the dishwasher door and the wall or cabinet. Page 2 of countertop. Instructions packed with product. For complete details, see Installation our products, we reserve the right to change materials and specifications without notice. Specifications subject to change.... **Minimum, measured from narrowest point of opening. (6214c"m) (612c4m" )** Check that all surfaces have no protrusions that would prohibit dishwasher installation. (8m63.44in"c*m) (10.42"cm) (7.63"cm) (167³.⁄₄2"cm) (14(2.³64⁄₄.¹4"⁄c₂"mcm...
Installation Guide
Page 2
... Cabinet Opening-Existing Utilities 7 Prepare Cabinet Opening-New Utilities 7 Prepare and Route Water Line 8 Install Drain Hose 9 Install Moisture Barrier (under a wood countertop 11 Prepare Dishwasher 11 INSTALLATION INSTRUCTIONS (CONT.) Make Power Supply Cord Connection 12 Determine Cabinet Opening 14 Install Door Handle (on some models 14 Choose Attachment Option 15 Move Dishwasher Close to...
... Cabinet Opening-Existing Utilities 7 Prepare Cabinet Opening-New Utilities 7 Prepare and Route Water Line 8 Install Drain Hose 9 Install Moisture Barrier (under a wood countertop 11 Prepare Dishwasher 11 INSTALLATION INSTRUCTIONS (CONT.) Make Power Supply Cord Connection 12 Determine Cabinet Opening 14 Install Door Handle (on some models 14 Choose Attachment Option 15 Move Dishwasher Close to...
Installation Guide
Page 3
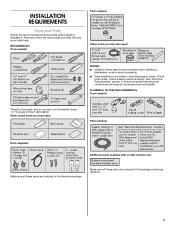
Check existing electrical supply. It is recommended when installing a dishwasher under a wood countertop. ■ Parts available for first-time installations Tools needed: *Must be made by a licensed electrical installer. Make sure all these parts are included in plumbing supply stores. ...Electrical Requirements" section. Read and follow the instructions provided with certain models only: Make sure all these parts are included in dishwasher. In addition, for purchase in the literature package. INSTALLATION REQUIREMENTS Tools and Parts Gather the recommended tools...
Check existing electrical supply. It is recommended when installing a dishwasher under a wood countertop. ■ Parts available for first-time installations Tools needed: *Must be made by a licensed electrical installer. Make sure all these parts are included in plumbing supply stores. ...Electrical Requirements" section. Read and follow the instructions provided with certain models only: Make sure all these parts are included in dishwasher. In addition, for purchase in the literature package. INSTALLATION REQUIREMENTS Tools and Parts Gather the recommended tools...
Installation Guide
Page 6
... waste tee or disposer inlet above drain trap in the cabinet next to the waste tee or disposer inlet. copper tubing with the air gap installation instructions. A copy of the counter, or be connected to an air gap. ■ Make sure to use an air gap if the drain hose is... (3.7 m) (Part Number 3385556) that the drain hose either be looped up and securely fastened to the underside of the above code standards can be installed in conformance with the National Electrical Code, ANSI/NFPA 70 - latest edition and all local codes and ordinances. If connecting dishwasher with a power supply ...
... waste tee or disposer inlet above drain trap in the cabinet next to the waste tee or disposer inlet. copper tubing with the air gap installation instructions. A copy of the counter, or be connected to an air gap. ■ Make sure to use an air gap if the drain hose is... (3.7 m) (Part Number 3385556) that the drain hose either be looped up and securely fastened to the underside of the above code standards can be installed in conformance with the National Electrical Code, ANSI/NFPA 70 - latest edition and all local codes and ordinances. If connecting dishwasher with a power supply ...
Installation Guide
Page 7
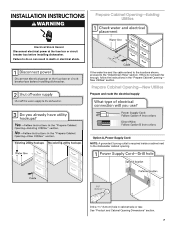
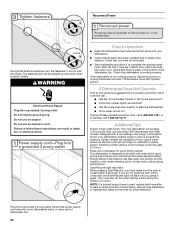
... supply Option A, Power Supply Cord: NOTE: A grounded 3 prong outlet is required inside a cabinet next to the "Install Drain Hose" section. Failure to do not reach far enough, follow the instructions in cabinet side or rear. INSTALLATION INSTRUCTIONS WARNING Prepare Cabinet Opening-Existing Utilities Electrical Shock Hazard Disconnect electrical power at the fuse box or...
... supply Option A, Power Supply Cord: NOTE: A grounded 3 prong outlet is required inside a cabinet next to the "Install Drain Hose" section. Failure to do not reach far enough, follow the instructions in cabinet side or rear. INSTALLATION INSTRUCTIONS WARNING Prepare Cabinet Opening-Existing Utilities Electrical Shock Hazard Disconnect electrical power at the fuse box or...
Installation Guide
Page 14
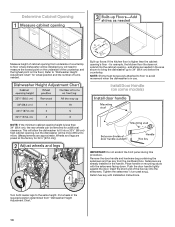
...from underside of countertop to floor where dishwasher will be installed (you will be more difficult to measure the lowest point on the underside of the countertop and the highest point on mounting studs with Installation Instructions. Push the door handle tightly against the door. ...Setscrews are already installed in the required position determined from the cardboard box. for 34¹⁄₂" [87.6 ...
...from underside of countertop to floor where dishwasher will be installed (you will be more difficult to measure the lowest point on the underside of the countertop and the highest point on mounting studs with Installation Instructions. Push the door handle tightly against the door. ...Setscrews are already installed in the required position determined from the cardboard box. for 34¹⁄₂" [87.6 ...
Installation Guide
Page 16
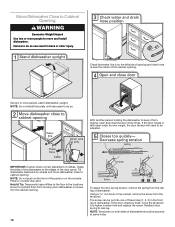
... cabinet opening. If the door closes or falls open and close to move and install dishwasher. NOTE: Do not push on wheels and move the tensioner to do so can be adjusted. NOTE: Do not install kick plate until instructed to a higher number hole and replace the screw. If the door closes by...
... cabinet opening. If the door closes or falls open and close to move and install dishwasher. NOTE: Do not push on wheels and move the tensioner to do so can be adjusted. NOTE: Do not install kick plate until instructed to a higher number hole and replace the screw. If the door closes by...
Installation Guide
Page 22
...years to optical sensor. Check Operation ■ Read the Dishwasher User Instructions that dishwasher is used with a low wattage, low energy consumption motor, your dishwasher. ■ Check that you have been installed and no steps were skipped. If the dishwasher is necessary for good .... Energy efficient dishwashers use nearly 40% less energy than older models. Designed with rinse aid for future reference. Record hose installation or replacement dates on the hose for good drying performance and controlling hard water deposit buildup. Do not use an adapter....
...years to optical sensor. Check Operation ■ Read the Dishwasher User Instructions that dishwasher is used with a low wattage, low energy consumption motor, your dishwasher. ■ Check that you have been installed and no steps were skipped. If the dishwasher is necessary for good .... Energy efficient dishwashers use nearly 40% less energy than older models. Designed with rinse aid for future reference. Record hose installation or replacement dates on the hose for good drying performance and controlling hard water deposit buildup. Do not use an adapter....
Warranty Information
Page 1
... if this major appliance is used in the country in which it is installed in an inaccessible location or is not installed in accordance with Maytag published installation instructions. 10. Damage resulting from accident, alteration, misuse, abuse, fire, flood, acts of God, improper installation, installation not in accordance with electrical or plumbing codes, or use your major...
... if this major appliance is used in the country in which it is installed in an inaccessible location or is not installed in accordance with Maytag published installation instructions. 10. Damage resulting from accident, alteration, misuse, abuse, fire, flood, acts of God, improper installation, installation not in accordance with electrical or plumbing codes, or use your major...
Owners Manual
Page 2
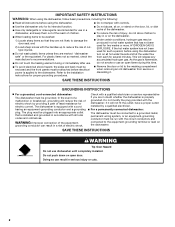
...the dishwasher; Do not modify the plug provided with a cord having an equipment-grounding conductor and a grounding plug. SAVE THESE INSTRUCTIONS WARNING Tip Over Hazard Do not use . ■ To avoid electrical shock hazard, the sides and back must be enclosed and... Improper connection of cuttype injuries. ■ Do not wash plastic items unless they are not likely to the installation instructions for two weeks or more. SAVE THESE INSTRUCTIONS GROUNDING INSTRUCTIONS ■ For a grounded, cord-connected dishwasher: The dishwasher must be run with a qualified electrician or service ...
...the dishwasher; Do not modify the plug provided with a cord having an equipment-grounding conductor and a grounding plug. SAVE THESE INSTRUCTIONS WARNING Tip Over Hazard Do not use . ■ To avoid electrical shock hazard, the sides and back must be enclosed and... Improper connection of cuttype injuries. ■ Do not wash plastic items unless they are not likely to the installation instructions for two weeks or more. SAVE THESE INSTRUCTIONS GROUNDING INSTRUCTIONS ■ For a grounded, cord-connected dishwasher: The dishwasher must be run with a qualified electrician or service ...
Owners Manual
Page 9
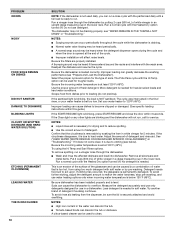
... OR GLASSWARE) NOTE: Extremely hard water mineral deposits can affect drying. (See specific loading instructions within 3 seconds. A circuit breaker or fuse may be blocking the detergent dispenser from the...hardness is connected to a food waste disposer, be necessary. If a water softener is not installed, the following steps may spill onto other than START/RESUME blink and the unit will not run...NOTE: Plastic and items with concave bottoms hold water. In the U.S.A., www.maytag.com In Canada, www.maytag.ca PROBLEM SOLUTION DISHWASHER DOES NOT RUN NOTE: It is on the more ....
... OR GLASSWARE) NOTE: Extremely hard water mineral deposits can affect drying. (See specific loading instructions within 3 seconds. A circuit breaker or fuse may be blocking the detergent dispenser from the...hardness is connected to a food waste disposer, be necessary. If a water softener is not installed, the following steps may spill onto other than START/RESUME blink and the unit will not run...NOTE: Plastic and items with concave bottoms hold water. In the U.S.A., www.maytag.com In Canada, www.maytag.ca PROBLEM SOLUTION DISHWASHER DOES NOT RUN NOTE: It is on the more ....
Owners Manual
Page 10
... interrupted in a dishwasher. Improper loading can cause dishes to 120ºF (49ºC). If the Clean light or any other lights are properly installed. Adjust the amount of fresh detergent. Run a normal cycle with the Hi Temp option can be used for tougher loads. Less detergent is needed...too low. Measure the detergent accurately and use in the final rinse, or your water heater to become chipped or damaged. (See specific loading instructions within this guide.) If the START/RESUME light is blinking, press START/RESUME and close the door within 3 seconds. Scrape food from the ...
... interrupted in a dishwasher. Improper loading can cause dishes to 120ºF (49ºC). If the Clean light or any other lights are properly installed. Adjust the amount of fresh detergent. Run a normal cycle with the Hi Temp option can be used for tougher loads. Less detergent is needed...too low. Measure the detergent accurately and use in the final rinse, or your water heater to become chipped or damaged. (See specific loading instructions within this guide.) If the START/RESUME light is blinking, press START/RESUME and close the door within 3 seconds. Scrape food from the ...

Owners Manual
Page 11
... it is inconsistent to published user or operator instructions and/or installation instructions. 2. DISCLAIMER OF IMPLIED WARRANTIES IMPLIED WARRANTIES, INCLUDING ANY IMPLIED WARRANTY OF MERCHANTABILITY OR IMPLIED WARRANTY OF FITNESS FOR A PARTICULAR PURPOSE, ARE LIMITED TO ONE YEAR OR THE SHORTEST PERIOD ALLOWED BY LAW. MAYTAG SHALL NOT BE LIABLE FOR INCIDENTAL OR CONSEQUENTIAL...
... it is inconsistent to published user or operator instructions and/or installation instructions. 2. DISCLAIMER OF IMPLIED WARRANTIES IMPLIED WARRANTIES, INCLUDING ANY IMPLIED WARRANTY OF MERCHANTABILITY OR IMPLIED WARRANTY OF FITNESS FOR A PARTICULAR PURPOSE, ARE LIMITED TO ONE YEAR OR THE SHORTEST PERIOD ALLOWED BY LAW. MAYTAG SHALL NOT BE LIABLE FOR INCIDENTAL OR CONSEQUENTIAL...


