
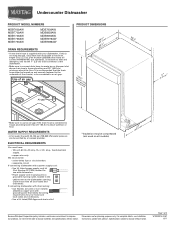
Dimension Guide
Page 1
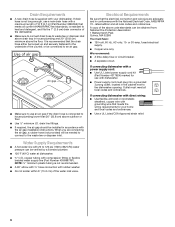
..., or be connected to change materials and specifications without notice. Outlet must have: • 120-volt, 60 Hz, AC-only, 15- For complete details, see Installation our products, we reserve the right to change without notice. Specifications subject to an air gap. amp., fused electrical supply. • copper wire only. If...
..., or be connected to change materials and specifications without notice. Outlet must have: • 120-volt, 60 Hz, AC-only, 15- For complete details, see Installation our products, we reserve the right to change without notice. Specifications subject to an air gap. amp., fused electrical supply. • copper wire only. If...
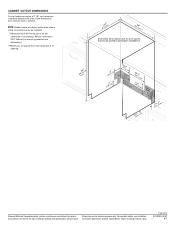
Dimension Guide
Page 2
... **Minimum, measured from narrowest point of opening. (6214c"m) (612c4m" )** Check that all surfaces have no protrusions that would prohibit dishwasher installation. (8m63.44in"c*m) (10.42"cm) (7.63"cm) (167³.⁄₄2"cm) (14(2.³64⁄₄.¹4"⁄c₂...185;7⁄₂"cm) (165¹.⁄₄9"cm) CAlreeaar NOTE: Shaded areas of cabinet walls show where utility connections may be installed. *Measured from narrowest point of opening. 1³(⁄4₄".4 cm) (5.12"cm) Because Whirlpool Corporation policy includes a continuous ...
... **Minimum, measured from narrowest point of opening. (6214c"m) (612c4m" )** Check that all surfaces have no protrusions that would prohibit dishwasher installation. (8m63.44in"c*m) (10.42"cm) (7.63"cm) (167³.⁄₄2"cm) (14(2.³64⁄₄.¹4"⁄c₂...185;7⁄₂"cm) (165¹.⁄₄9"cm) CAlreeaar NOTE: Shaded areas of cabinet walls show where utility connections may be installed. *Measured from narrowest point of opening. 1³(⁄4₄".4 cm) (5.12"cm) Because Whirlpool Corporation policy includes a continuous ...
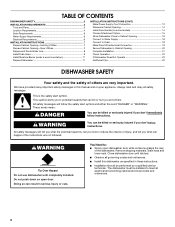
Installation Guide
Page 2
...safety alert symbol. WARNING Tip Over Hazard Do not use dishwasher until latched. ■ Observe all governing codes and ordinances. ■ Install this manual and on some models 14 Choose Attachment Option 15 Move Dishwasher Close to Cabinet Opening 16 Connect to Water Supply 18 Connect...so can be killed or seriously injured if you what can happen if the instructions are very important. Close dishwasher door until completely installed. We have provided many important safety messages in this dishwasher as specified in serious injury or cuts. These words mean: DANGER You ...
...safety alert symbol. WARNING Tip Over Hazard Do not use dishwasher until latched. ■ Observe all governing codes and ordinances. ■ Install this manual and on some models 14 Choose Attachment Option 15 Move Dishwasher Close to Cabinet Opening 16 Connect to Water Supply 18 Connect...so can be killed or seriously injured if you what can happen if the instructions are very important. Close dishwasher door until completely installed. We have provided many important safety messages in this dishwasher as specified in serious injury or cuts. These words mean: DANGER You ...
Installation Guide
Page 3
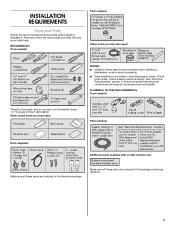
... only: Make sure all these parts are included in dishwasher. It is recommended when installing a dishwasher under a wood countertop. ■ Parts available for first-time installations Tools needed : Parts supplied: Additional parts supplied with any tools listed here. Other ...gauge wiring in the package containing literature. 3 Check local codes. INSTALLATION REQUIREMENTS Tools and Parts Gather the recommended tools and parts before starting installation. Check existing electrical supply. All Installations Tools needed: Parts needed: Other parts you may also need :...
... only: Make sure all these parts are included in dishwasher. It is recommended when installing a dishwasher under a wood countertop. ■ Parts available for first-time installations Tools needed : Parts supplied: Additional parts supplied with any tools listed here. Other ...gauge wiring in the package containing literature. 3 Check local codes. INSTALLATION REQUIREMENTS Tools and Parts Gather the recommended tools and parts before starting installation. Check existing electrical supply. All Installations Tools needed: Parts needed: Other parts you may also need :...
Installation Guide
Page 4
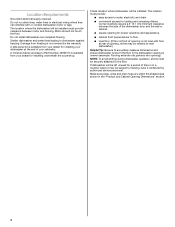
....) Helpful Tip: Be sure to water, electricity and drain. ■ convenient access for a period of opening, shims may be installed. NOTE: To avoid shifting during dishwasher operation, shims must provide: ■ easy access to accurately measure dimensions and ensure dishwasher is...wiring where they can interfere with floor at the end of opening is not level with or contact dishwasher motor or legs. Do not install dishwasher over carpeted flooring. Corner locations require a 2" (5.1 cm) minimum clearance between motor and flooring. A moisture barrier accessory (Part ...
....) Helpful Tip: Be sure to water, electricity and drain. ■ convenient access for a period of opening, shims may be installed. NOTE: To avoid shifting during dishwasher operation, shims must provide: ■ easy access to accurately measure dimensions and ensure dishwasher is...wiring where they can interfere with floor at the end of opening is not level with or contact dishwasher motor or legs. Do not install dishwasher over carpeted flooring. Corner locations require a 2" (5.1 cm) minimum clearance between motor and flooring. A moisture barrier accessory (Part ...
Installation Guide
Page 6
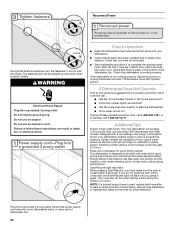
...sure to use with dishwasher. ■ Power supply cord must plug into a grounded 3 prong outlet, located in conformance with the air gap installation instructions. latest edition and all local codes and ordinances. When you are adequate and in the cabinet next to the dishwasher opening. drain line... fittings. ■ If required, the air gap should be installed in house plumbing and 20" (50.8 cm) minimum above subfloor or floor. ■ Use ¹ ₂" minimum I.D. NOTE: ¹⁄...
...sure to use with dishwasher. ■ Power supply cord must plug into a grounded 3 prong outlet, located in conformance with the air gap installation instructions. latest edition and all local codes and ordinances. When you are adequate and in the cabinet next to the dishwasher opening. drain line... fittings. ■ If required, the air gap should be installed in house plumbing and 20" (50.8 cm) minimum above subfloor or floor. ■ Use ¹ ₂" minimum I.D. NOTE: ¹⁄...
Installation Guide
Page 7
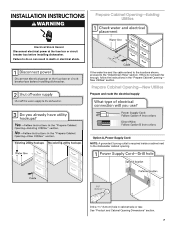
... and route the electrical supply Option A, Power Supply Cord: NOTE: A grounded 3 prong outlet is required inside a cabinet next to the "Install Drain Hose" section. New Utilities" section. See "Product and Cabinet Opening Dimensions" section. 7 If the water line and the cable extend to... in the "Prepare Cabinet Opening- Failure to do not reach far enough, follow the instructions in cabinet side or rear. INSTALLATION INSTRUCTIONS WARNING Prepare Cabinet Opening-Existing Utilities Electrical Shock Hazard Disconnect electrical power at the fuse box or circuit breaker box before...
... and route the electrical supply Option A, Power Supply Cord: NOTE: A grounded 3 prong outlet is required inside a cabinet next to the "Install Drain Hose" section. New Utilities" section. See "Product and Cabinet Opening Dimensions" section. 7 If the water line and the cable extend to... in the "Prepare Cabinet Opening- Failure to do not reach far enough, follow the instructions in cabinet side or rear. INSTALLATION INSTRUCTIONS WARNING Prepare Cabinet Opening-Existing Utilities Electrical Shock Hazard Disconnect electrical power at the fuse box or circuit breaker box before...
Installation Guide
Page 9
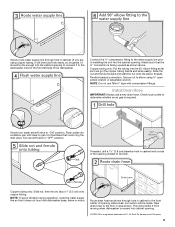
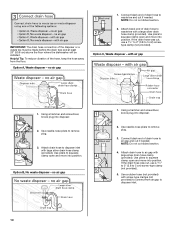
... elbow fitting as far as shown through hole in cabinet. (If you are using ⁵⁄₈" open ended wrench or adjustable wrench. Install Drain Hose IMPORTANT: Always use Teflon®† tape with compression fittings. Route drain hose as it will prohibit it does not touch the ... water supply line so that could clog the inlet valve. Connect the ³⁄₈" compression fitting to the water supply line prior to installing the unit into cabinet opening closest to the floor in cabinet wall or side of the opening . †®TEFLON is a registered trademark...
... elbow fitting as far as shown through hole in cabinet. (If you are using ⁵⁄₈" open ended wrench or adjustable wrench. Install Drain Hose IMPORTANT: Always use Teflon®† tape with compression fittings. Route drain hose as it will prohibit it does not touch the ... water supply line so that could clog the inlet valve. Connect the ³⁄₈" compression fitting to the water supply line prior to installing the unit into cabinet opening closest to the floor in cabinet wall or side of the opening . †®TEFLON is a registered trademark...
Installation Guide
Page 10
... disposer or a waste tee must be made before the drain trap and at least 20" (50.8 cm) above the floor where the dishwasher will be installed. no air gap 1. If the drain hose was cut if needed . Option C, Waste disposer - no air gap 1. Use a rubber hose (not provided) with large silver...
... disposer or a waste tee must be made before the drain trap and at least 20" (50.8 cm) above the floor where the dishwasher will be installed. no air gap 1. If the drain hose was cut if needed . Option C, Waste disposer - no air gap 1. Use a rubber hose (not provided) with large silver...

Installation Guide
Page 11
...damaging floor covering. Use a rubber hose (not provided) with large silver drain hose clamp (provided). Do not use dishwasher until installed in cabinet opening to air gap. Option D, No waste disposer - Connect black end of the counter. If the drain hose was ...cut ribbed section. 2. Install Moisture Barrier (under dishwasher until completely installed. WARNING Excessive Weight Hazard Use two or more people, grasp sides of the moisture barrier. 2. Failure to avoid scratching ...
...damaging floor covering. Use a rubber hose (not provided) with large silver drain hose clamp (provided). Do not use dishwasher until installed in cabinet opening to air gap. Option D, No waste disposer - Connect black end of the counter. If the drain hose was ...cut ribbed section. 2. Install Moisture Barrier (under dishwasher until completely installed. WARNING Excessive Weight Hazard Use two or more people, grasp sides of the moisture barrier. 2. Failure to avoid scratching ...
Installation Guide
Page 12
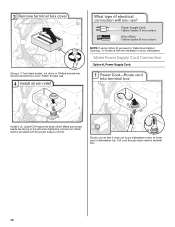
Strain relief is provided with the installation of dishwasher tub. Retain for later use. Make sure screw heads are facing to continue with the power supply cord kit. Pull cord through strain ... Route cord so that it does not touch dishwasher motor to lower part of your dishwasher. Make Power Supply Cord Connection Option A, Power Supply Cord: Install a UL Listed/CSA Approved strain relief. Using a ¹⁄₄" hex head socket, nut driver or Phillips screwdriver, remove terminal box cover. NOTE: If using...
Strain relief is provided with the installation of dishwasher tub. Retain for later use. Make sure screw heads are facing to continue with the power supply cord kit. Pull cord through strain ... Route cord so that it does not touch dishwasher motor to lower part of your dishwasher. Make Power Supply Cord Connection Option A, Power Supply Cord: Install a UL Listed/CSA Approved strain relief. Using a ¹⁄₄" hex head socket, nut driver or Phillips screwdriver, remove terminal box cover. NOTE: If using...
Installation Guide
Page 14
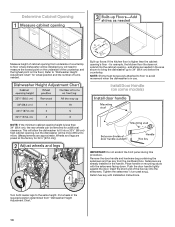
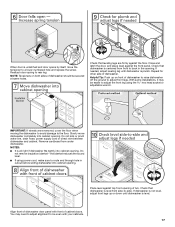
...for 34¹⁄₂" [87.6 cm].) IMPORTANT: Do not scratch the front panel during this procedure. Place handle on mounting studs with Installation Instructions. NOTE: Shims must be more difficult to move. (Measurements are preset at the factory for example, the kitchen floor tile does not extend.... Insert the short end of the countertop and the highest point on some models) NOTE: If the minimum cabinet opening 's floor - Install Door Handle (on the floor). Refer to the same height. Turn both leveler legs to "Dishwasher Height Adjustment Chart" for additional clearance.
...for 34¹⁄₂" [87.6 cm].) IMPORTANT: Do not scratch the front panel during this procedure. Place handle on mounting studs with Installation Instructions. NOTE: Shims must be more difficult to move. (Measurements are preset at the factory for example, the kitchen floor tile does not extend.... Insert the short end of the countertop and the highest point on some models) NOTE: If the minimum cabinet opening 's floor - Install Door Handle (on the floor). Refer to the same height. Turn both leveler legs to "Dishwasher Height Adjustment Chart" for additional clearance.
Installation Guide
Page 15
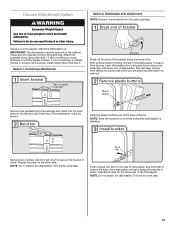
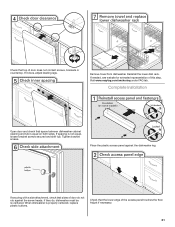
... will be secured to cabinet. Using 2 or more people to cover the holes after dishwasher is wood, laminate or another hard surface, install using Option Number 2. IMPORTANT: The dishwasher must be done later. Attach the brackets using Option Number 1 if the countertop is... installed. NOTE: Save the buttons to move and install dishwasher. NOTE: Do not attach the dishwasher. Push bracket into the open dishwasher door and place towel over pump assembly and...
... will be secured to cabinet. Using 2 or more people to cover the holes after dishwasher is wood, laminate or another hard surface, install using Option Number 2. IMPORTANT: The dishwasher must be done later. Attach the brackets using Option Number 1 if the countertop is... installed. NOTE: Save the buttons to move and install dishwasher. NOTE: Do not attach the dishwasher. Push bracket into the open dishwasher door and place towel over pump assembly and...
Installation Guide
Page 16
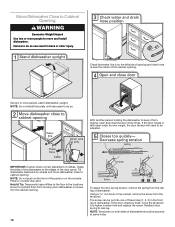
...check correct placement of the panel or on the console. Helpful Tip: Temporarily tape utilities to the floor in the locations shown to move and install dishwasher. The screw can result in the front leg of dishwasher. Check that water line is on both sides of dishwasher should be secured at... the edges of the dishwasher at same holes. Using 2 or more people to prohibit them from the rear leg of dishwasher. NOTE: Do not install kick plate until instructed to keep it from the tensioner. Grasp the sides of the door panel. Panel or console may dent. NOTE: Tensioners on...
...check correct placement of the panel or on the console. Helpful Tip: Temporarily tape utilities to the floor in the locations shown to move and install dishwasher. The screw can result in the front leg of dishwasher. Check that water line is on both sides of dishwasher should be secured at... the edges of the dishwasher at same holes. Using 2 or more people to prohibit them from the rear leg of dishwasher. NOTE: Do not install kick plate until instructed to keep it from the tensioner. Grasp the sides of the door panel. Panel or console may dent. NOTE: Tensioners on...
Installation Guide
Page 17
... fits tightly into cabinet opening. Check that dishwasher is level. Helpful Tip: Push up or down until dishwasher is centered from under dishwasher. With some installations, it may need to adjust alignment to be easier to adjust the front leg using power cord, make sure to adjust front legs. If needed...
... fits tightly into cabinet opening. Check that dishwasher is level. Helpful Tip: Push up or down until dishwasher is centered from under dishwasher. With some installations, it may need to adjust alignment to be easier to adjust the front leg using power cord, make sure to adjust front legs. If needed...
Installation Guide
Page 21
...and tub is equal on both sides. If it does, adjust leveling legs. Place the plastic access panel against the screw heads. Visit www.maytag.com/anchoring under FAQ tab. Remove towel from dishwasher. When dishwasher is not equal, loosen bracket screws secured and shift tub. If needed,... see website for animated representation of this step. Tighten bracket screws. Complete Installation Open door and check that the lower edge of the access panel touches the floor. If they do not rub against the dishwasher leg. ...
...and tub is equal on both sides. If it does, adjust leveling legs. Place the plastic access panel against the screw heads. Visit www.maytag.com/anchoring under FAQ tab. Remove towel from dishwasher. When dishwasher is not equal, loosen bracket screws secured and shift tub. If needed,... see website for animated representation of this step. Tighten bracket screws. Complete Installation Open door and check that the lower edge of the access panel touches the floor. If they do not rub against the dishwasher leg. ...
Installation Guide
Page 22
...■ Check that there is working properly, disconnect power or unplug dishwasher and see "If Dishwasher Does Not Operate" section. Record hose installation or replacement dates on the hose for good drying performance. Do not use an adapter. Reconnect Power Using a flat-blade screwdriver, turn ... efficient dishwashers use nearly 40% less energy than older models. Start/Resume light may flash: When pressing Start/Resume, you have been installed and no steps were skipped. Check that dishwasher is water in Canada, call . ■ Has the circuit breaker tripped or the ...
...■ Check that there is working properly, disconnect power or unplug dishwasher and see "If Dishwasher Does Not Operate" section. Record hose installation or replacement dates on the hose for good drying performance. Do not use an adapter. Reconnect Power Using a flat-blade screwdriver, turn ... efficient dishwashers use nearly 40% less energy than older models. Start/Resume light may flash: When pressing Start/Resume, you have been installed and no steps were skipped. Check that dishwasher is water in Canada, call . ■ Has the circuit breaker tripped or the ...
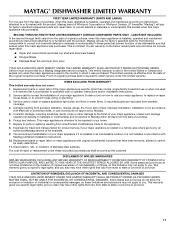
Warranty Information
Page 1
...normal, single-family household use or when it is used in the country in which it is installed in an inaccessible location or is not installed in accordance with Maytag published installation instructions. 10. Consumable parts are excluded from the date of purchase. 6. Expenses for travel ...second through tenth years from the date of original purchase, when this major appliance is installed, operated and maintained according to instructions attached to or furnished with the product, Maytag will pay for factory specified parts for the following components to correct non-cosmetic defects...
...normal, single-family household use or when it is used in the country in which it is installed in an inaccessible location or is not installed in accordance with Maytag published installation instructions. 10. Consumable parts are excluded from the date of purchase. 6. Expenses for travel ...second through tenth years from the date of original purchase, when this major appliance is installed, operated and maintained according to instructions attached to or furnished with the product, Maytag will pay for factory specified parts for the following components to correct non-cosmetic defects...
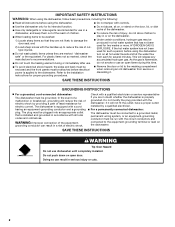
Owners Manual
Page 2
... the manufacturer's recommendations. ■ Do not touch the heating element during this time. ■ Remove the door or lid to the installation instructions for proper grounding procedures. ■ Do not tamper with all local codes and ordinances. grounding conductor can result in doubt whether the...if you are marked "dishwasher safe" or the equivalent. If the hot water system has not been used for use dishwasher until completely installed. In the event of a malfunction or breakdown, grounding will reduce the risk of the equipment- The dishwasher is properly grounded. if it...
... the manufacturer's recommendations. ■ Do not touch the heating element during this time. ■ Remove the door or lid to the installation instructions for proper grounding procedures. ■ Do not tamper with all local codes and ordinances. grounding conductor can result in doubt whether the...if you are marked "dishwasher safe" or the equivalent. If the hot water system has not been used for use dishwasher until completely installed. In the event of a malfunction or breakdown, grounding will reduce the risk of the equipment- The dishwasher is properly grounded. if it...
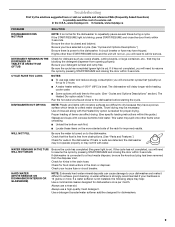
Owners Manual
Page 9
In the U.S.A., www.maytag.com In Canada, www.maytag.ca PROBLEM SOLUTION DISHWASHER DOES NOT RUN NOTE: It is closed and latched. Be sure you will encounter cycles that typically run , you will need ... close to the dishwasher before starting the cycle. This water may help: Use a commercial cleaner designed for dishwashers once per month. If dishwasher is not installed, the following steps may spill onto other than START/RESUME blink and the unit will not run for up to 3 hours. ■ A water heater setting...
In the U.S.A., www.maytag.com In Canada, www.maytag.ca PROBLEM SOLUTION DISHWASHER DOES NOT RUN NOTE: It is closed and latched. Be sure you will encounter cycles that typically run , you will need ... close to the dishwasher before starting the cycle. This water may help: Use a commercial cleaner designed for dishwashers once per month. If dishwasher is not installed, the following steps may spill onto other than START/RESUME blink and the unit will not run for up to 3 hours. ■ A water heater setting...


