
Warranty Information
Page 1
... to instructions attached to or furnished with the product, Maytag brand of Whirlpool Corporation or Whirlpool Canada, LP (hereafter "Maytag") will pay for factory specified replacement parts and repair labor to province. Repairs to parts or systems resulting from the date of original purchase, ...when this major appliance is installed, operated and maintained according to instructions attached to or furnished with the product, Maytag will pay for factory specified parts for other rights that existed when this major appliance was purchased. The removal and reinstallation of the Use &...
... to instructions attached to or furnished with the product, Maytag brand of Whirlpool Corporation or Whirlpool Canada, LP (hereafter "Maytag") will pay for factory specified replacement parts and repair labor to province. Repairs to parts or systems resulting from the date of original purchase, ...when this major appliance is installed, operated and maintained according to instructions attached to or furnished with the product, Maytag will pay for factory specified parts for other rights that existed when this major appliance was purchased. The removal and reinstallation of the Use &...
Use & Care Guide
Page 9
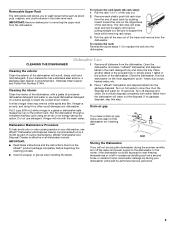
...turn off disposal and water. Roll the rack ¹⁄₃ to support the track while removing rack stops. 3. Stainless Steel Cleaner and Polish Part Number 31464. Run the disposal and water for 15 seconds. Drain air gap Put 2 cups (500 mL) white vinegar in a seasonal dwelling such...or odor-causing residue in the main detergent tray and close the tray. IMPORTANT: Remove dishes prior to wash larger items such as part of powdered dishwasher detergent and water or use liquid dishwasher detergent on hot water to clean the cooled-down interior. 1. Roll the...
...turn off disposal and water. Roll the rack ¹⁄₃ to support the track while removing rack stops. 3. Stainless Steel Cleaner and Polish Part Number 31464. Run the disposal and water for 15 seconds. Drain air gap Put 2 cups (500 mL) white vinegar in a seasonal dwelling such...or odor-causing residue in the main detergent tray and close the tray. IMPORTANT: Remove dishes prior to wash larger items such as part of powdered dishwasher detergent and water or use liquid dishwasher detergent on hot water to clean the cooled-down interior. 1. Roll the...
Use & Care Guide
Page 10
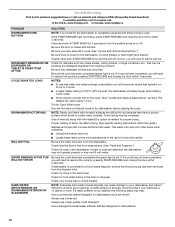
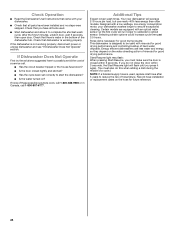
In the U.S.A., www.maytag.com In Canada, www.maytag.ca PROBLEM DISHWASHER DOES NOT RUN DETERGENT REMAINS IN THE DISPENSER OR TABLET IS ON BOTTOM OF TUB CYCLE RUNS TOO LONG DISHWASHER NOT DRYING ... Heated Dry option is needed for dishware such as cookie sheets, cutting boards, or large containers, etc., that the float is free from obstructions. (See "Parts and Features.") Check for up to 3 hours. ■ A water heater setting of 120°F (49ºC) is connected to a food waste disposer, be necessary. WATER...
In the U.S.A., www.maytag.com In Canada, www.maytag.ca PROBLEM DISHWASHER DOES NOT RUN DETERGENT REMAINS IN THE DISPENSER OR TABLET IS ON BOTTOM OF TUB CYCLE RUNS TOO LONG DISHWASHER NOT DRYING ... Heated Dry option is needed for dishware such as cookie sheets, cutting boards, or large containers, etc., that the float is free from obstructions. (See "Parts and Features.") Check for up to 3 hours. ■ A water heater setting of 120°F (49ºC) is connected to a food waste disposer, be necessary. WATER...

Use & Care Guide
Page 12
... to instructions attached to or furnished with the product, Maytag will pay for factory specified parts for factory specified replacement parts and repair labor to obtain service under these parts that prevent function of stainless steel surfaces. MAYTAG® DISHWASHER LIMITED WARRANTY FIRST YEAR LIMITED WARRANTY (PARTS AND LABOR) For one year from accident, alteration, misuse...
... to instructions attached to or furnished with the product, Maytag will pay for factory specified parts for factory specified replacement parts and repair labor to obtain service under these parts that prevent function of stainless steel surfaces. MAYTAG® DISHWASHER LIMITED WARRANTY FIRST YEAR LIMITED WARRANTY (PARTS AND LABOR) For one year from accident, alteration, misuse...
Installation Guide
Page 2
... the rear of others . Care shall be exercised when the appliance is the safety alert symbol. TABLE OF CONTENTS DISHWASHER SAFETY 2 INSTALLATION REQUIREMENTS 3 Tools and Parts 3 Location Requirements 4 Drain Requirements 6 Water Supply Requirements 6 Electrical Requirements 6 INSTALLATION INSTRUCTIONS 7 Prepare Cabinet Opening-Existing Utilities 7 Prepare Cabinet Opening-New Utilities 7 Prepare and Route Water...
... the rear of others . Care shall be exercised when the appliance is the safety alert symbol. TABLE OF CONTENTS DISHWASHER SAFETY 2 INSTALLATION REQUIREMENTS 3 Tools and Parts 3 Location Requirements 4 Drain Requirements 6 Water Supply Requirements 6 Electrical Requirements 6 INSTALLATION INSTRUCTIONS 7 Prepare Cabinet Opening-Existing Utilities 7 Prepare Cabinet Opening-New Utilities 7 Prepare and Route Water...
Installation Guide
Page 3
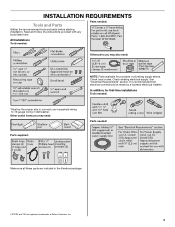
... tools listed here. See "Electrical Requirements" section. Check existing electrical supply. In addition, for purchase in plumbing supply stores. Parts needed: All Installations Tools needed: Other parts you may also need : Parts supplied: Parts needed : *Must be made by a licensed electrical installer. It is recommended that electrical connections be the proper size to connect...
... tools listed here. See "Electrical Requirements" section. Check existing electrical supply. In addition, for purchase in plumbing supply stores. Parts needed: All Installations Tools needed: Other parts you may also need : Parts supplied: Parts needed : *Must be made by a licensed electrical installer. It is recommended that electrical connections be the proper size to connect...
Installation Guide
Page 4
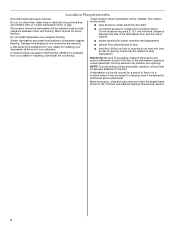
.... The location where the dishwasher will be subject to accurately measure dimensions and ensure dishwasher is not covered by authorized service personnel. A moisture barrier accessory (Part Number 4396277) is uneven (example: Flooring extends only partway into opening , shims may be installed. If dishwasher will be needed to level dishwasher.) Helpful Tip...
.... The location where the dishwasher will be subject to accurately measure dimensions and ensure dishwasher is not covered by authorized service personnel. A moisture barrier accessory (Part Number 4396277) is uneven (example: Flooring extends only partway into opening , shims may be installed. If dishwasher will be needed to level dishwasher.) Helpful Tip...
Installation Guide
Page 6
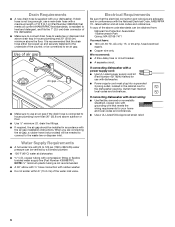
... or circuit breaker. ■ A separate circuit. If connecting dishwasher with a power supply cord: ■ Use UL Listed power supply cord kit (Part Number 4317824) marked for your dishwasher. A copy of the water inlet valve. Outlet must have: ■ 120-volt, 60 Hz, AC-only,.... ■ Copper wire only. Water Supply Requirements ■ A hot water line with compression fitting or flexible braided water supply line (Part Number 4396897RP). If connecting dishwasher with direct wiring: ■ Use flexible, armored or nonmetallic sheathed, copper wire with rubber washer. ■...
... or circuit breaker. ■ A separate circuit. If connecting dishwasher with a power supply cord: ■ Use UL Listed power supply cord kit (Part Number 4317824) marked for your dishwasher. A copy of the water inlet valve. Outlet must have: ■ 120-volt, 60 Hz, AC-only,.... ■ Copper wire only. Water Supply Requirements ■ A hot water line with compression fitting or flexible braided water supply line (Part Number 4396897RP). If connecting dishwasher with direct wiring: ■ Use flexible, armored or nonmetallic sheathed, copper wire with rubber washer. ■...
Installation Guide
Page 8
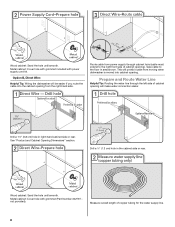
... (cable must extend to the floor in area shown. Route cable from the right-hand side. Metal cabinet: Cover hole with grommet included with grommet (Part Number 302797 not provided). Wood cabinet: Sand the hole until smooth. Drill a ¹⁄₂" (1.3 cm) hole in right-hand cabinet side or rear. Tape...
... (cable must extend to the floor in area shown. Route cable from the right-hand side. Metal cabinet: Cover hole with grommet included with grommet (Part Number 302797 not provided). Wood cabinet: Sand the hole until smooth. Drill a ¹⁄₂" (1.3 cm) hole in right-hand cabinet side or rear. Tape...
Installation Guide
Page 13
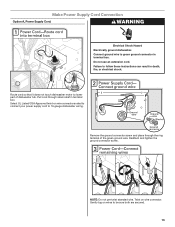
... through the ring terminal of dishwasher tub. Select UL Listed/CSA Approved twist-on wire connectors rated to connect your power supply cord to lower part of the green ground wire. Do not use an extension cord. NOTE: Do not pre-twist stranded wire. Twist on wires to be sure both...
... through the ring terminal of dishwasher tub. Select UL Listed/CSA Approved twist-on wire connectors rated to connect your power supply cord to lower part of the green ground wire. Do not use an extension cord. NOTE: Do not pre-twist stranded wire. Twist on wires to be sure both...
Installation Guide
Page 15
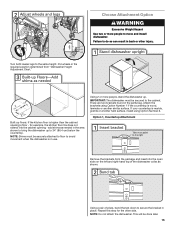
... can result in use. Option 1, Countertop Attachment Remove the brackets from "Dishwasher Height Adjustment Chart." Using a pair of the dishwasher collar as needed in the parts bag. for the other injury. Choose Attachment Option WARNING Excessive Weight Hazard Use two or more people, stand the dishwasher up.
... can result in use. Option 1, Countertop Attachment Remove the brackets from "Dishwasher Height Adjustment Chart." Using a pair of the dishwasher collar as needed in the parts bag. for the other injury. Choose Attachment Option WARNING Excessive Weight Hazard Use two or more people, stand the dishwasher up.
Installation Guide
Page 16
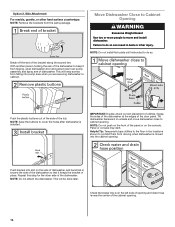
... locations shown to cabinet. Tilt dishwasher backward on the side of the cabinet opening . NOTE: Do not attach the dishwasher. Check that it from the parts package. Grasp the sides of the dishwasher at the edges of the tub. NOTE: Do not push on the front of the panel or on...
... locations shown to cabinet. Tilt dishwasher backward on the side of the cabinet opening . NOTE: Do not attach the dishwasher. Check that it from the parts package. Grasp the sides of the dishwasher at the edges of the tub. NOTE: Do not push on the front of the panel or on...
Installation Guide
Page 20
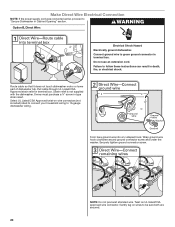
... shock. Securely tighten ground connector screw. Form bare ground wire into a U-shaped hook. Route cable so that it does not touch dishwasher motor or lower part of dishwasher tub. Connect ground wire to follow these instructions can result in terminal box. Select UL Listed/CSA Approved twist-on UL listed/CSA...
... shock. Securely tighten ground connector screw. Form bare ground wire into a U-shaped hook. Route cable so that it does not touch dishwasher motor or lower part of dishwasher tub. Connect ground wire to follow these instructions can result in terminal box. Select UL Listed/CSA Approved twist-on UL listed/CSA...
Installation Guide
Page 23
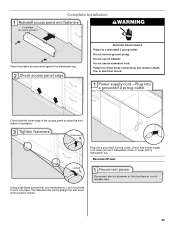
... up and down when properly locked. 23 Do not use an extension cord. Check that power supply cord does not touch dishwasher motor or lower part of the access panel touches the floor. Adjust if necessary. Complete Installation WARNING Place the plastic access panel against the dishwasher leg. Reconnect Power Using...
... up and down when properly locked. 23 Do not use an extension cord. Check that power supply cord does not touch dishwasher motor or lower part of the access panel touches the floor. Adjust if necessary. Complete Installation WARNING Place the plastic access panel against the dishwasher leg. Reconnect Power Using...
Installation Guide
Page 24
... 1-800-688-9900 or in the bottom of the dishwasher tub. Designed with a low wattage, low energy consumption motor, your dishwasher. ■ Check that all parts have all tools used. ■ Start dishwasher and allow it again. (You must make sure the door is used with rinse aid for good drying...
... 1-800-688-9900 or in the bottom of the dishwasher tub. Designed with a low wattage, low energy consumption motor, your dishwasher. ■ Check that all parts have all tools used. ■ Start dishwasher and allow it again. (You must make sure the door is used with rinse aid for good drying...
Dimension Guide
Page 1
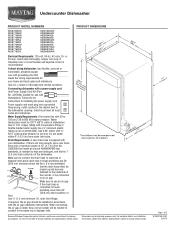
... (1.3 cm) minimum I.D. If required, the air gap should be connected to the waste tee or disposer inlet. Page 1 of 12' (3.7 m) (Part No. 3385556) that meets all local codes and ordinances. Outlet must be needed to connect to an air gap. Do not solder within 6" (15... psi (138 to improve Dimensions are for use a new drain hose with a power supply cord: Use Power Supply Cord Kit (Part No. 4317824) marked for planning purposes only. Undercounter Dishwasher PRODUCT MODEL NUMBERS MDB7609AW MDB7709AW MDB7749AW MDB7749BW MDB7749SA MDB7749SB MDB7759AW MDB7759SA MDB7760AW MDB7760SA ...
... (1.3 cm) minimum I.D. If required, the air gap should be connected to the waste tee or disposer inlet. Page 1 of 12' (3.7 m) (Part No. 3385556) that meets all local codes and ordinances. Outlet must be needed to connect to an air gap. Do not solder within 6" (15... psi (138 to improve Dimensions are for use a new drain hose with a power supply cord: Use Power Supply Cord Kit (Part No. 4317824) marked for planning purposes only. Undercounter Dishwasher PRODUCT MODEL NUMBERS MDB7609AW MDB7709AW MDB7749AW MDB7749BW MDB7749SA MDB7749SB MDB7759AW MDB7759SA MDB7760AW MDB7760SA ...

