
Warranty Information
Page 1
...original purchase date is required to obtain service under these excluded circumstances shall be easily determined. 11. MAYTAG® DISHWASHER LIMITED WARRANTY FIRST YEAR LIMITED WARRANTY (PARTS AND LABOR) For one year from the date of purchase, when this major appliance is installed, ...operated and maintained according to instructions attached to or furnished with the product, Maytag brand of Whirlpool Corporation or Whirlpool Canada, LP (hereafter "Maytag") will pay for factory specified replacement parts and repair labor to correct defects in materials or workmanship that existed when...
...original purchase date is required to obtain service under these excluded circumstances shall be easily determined. 11. MAYTAG® DISHWASHER LIMITED WARRANTY FIRST YEAR LIMITED WARRANTY (PARTS AND LABOR) For one year from the date of purchase, when this major appliance is installed, ...operated and maintained according to instructions attached to or furnished with the product, Maytag brand of Whirlpool Corporation or Whirlpool Canada, LP (hereafter "Maytag") will pay for factory specified replacement parts and repair labor to correct defects in materials or workmanship that existed when...
Use & Care Guide
Page 9
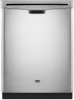
... seconds. Vinegar will clean out the disposal. The rack stop from the dishwasher will mix with water. Stainless Steel Cleaner and Polish Part Number 31464. Close the dishwasher. Place 1 affresh® dishwasher and disposal tablet into the dishwasher. Do not flush disposal completely with..., with a soft, damp cloth and mild detergent. Removable Upper Rack The removable rack allows you to wash larger items such as part of powdered dishwasher detergent and water or use detergent. A white vinegar rinse may remove white spots and film. Run the dishwasher through...
... seconds. Vinegar will clean out the disposal. The rack stop from the dishwasher will mix with water. Stainless Steel Cleaner and Polish Part Number 31464. Close the dishwasher. Place 1 affresh® dishwasher and disposal tablet into the dishwasher. Do not flush disposal completely with..., with a soft, damp cloth and mild detergent. Removable Upper Rack The removable rack allows you to wash larger items such as part of powdered dishwasher detergent and water or use detergent. A white vinegar rinse may remove white spots and film. Run the dishwasher through...
Use & Care Guide
Page 10
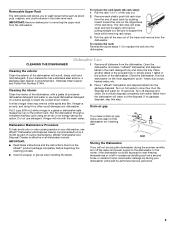
... Questions) to possibly avoid the cost of rinse aid along with the Heated Dry option is best. In the U.S.A., www.maytag.com In Canada, www.maytag.ca PROBLEM DISHWASHER DOES NOT RUN DETERGENT REMAINS IN THE DISPENSER OR TABLET IS ON BOTTOM OF TUB CYCLE RUNS TOO LONG DISHWASHER... help: Use a commercial cleaner designed for suds in the drain or disposer. Check that may be blocking the detergent dispenser from obstructions. (See "Parts and Features.") Check for dishwashers once per month. If foam or suds are difficult to the cycle. (See "Cycles and Options Descriptions" section.) ...
... Questions) to possibly avoid the cost of rinse aid along with the Heated Dry option is best. In the U.S.A., www.maytag.com In Canada, www.maytag.ca PROBLEM DISHWASHER DOES NOT RUN DETERGENT REMAINS IN THE DISPENSER OR TABLET IS ON BOTTOM OF TUB CYCLE RUNS TOO LONG DISHWASHER... help: Use a commercial cleaner designed for suds in the drain or disposer. Check that may be blocking the detergent dispenser from obstructions. (See "Parts and Features.") Check for dishwashers once per month. If foam or suds are difficult to the cycle. (See "Cycles and Options Descriptions" section.) ...

Use & Care Guide
Page 12
...to the appliance. 8. This is installed, operated and maintained according to instructions attached to or furnished with the product, Maytag will pay for factory specified parts for the following components to correct non-cosmetic defects in materials or workmanship in a remote area where service by an authorized...PROVIDED HEREIN. In Canada, call 1-800-688-9900. Service must be found by checking the "Assistance or Service" section or by Maytag. 5. Replacement parts or repair labor if this major appliance is used for other damage to the finish of your home. 7. Service calls to correct the...
...to the appliance. 8. This is installed, operated and maintained according to instructions attached to or furnished with the product, Maytag will pay for factory specified parts for the following components to correct non-cosmetic defects in materials or workmanship in a remote area where service by an authorized...PROVIDED HEREIN. In Canada, call 1-800-688-9900. Service must be found by checking the "Assistance or Service" section or by Maytag. 5. Replacement parts or repair labor if this major appliance is used for other damage to the finish of your home. 7. Service calls to correct the...
Installation Guide
Page 2
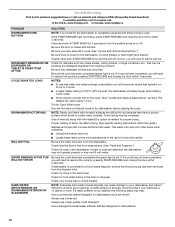
... "WARNING." The dishwasher must be performed by a qualified service technician. Close dishwasher door until completely installed. TABLE OF CONTENTS DISHWASHER SAFETY 2 INSTALLATION REQUIREMENTS 3 Tools and Parts 3 Location Requirements 4 Drain Requirements 6 Water Supply Requirements 6 Electrical Requirements 6 INSTALLATION INSTRUCTIONS 7 Prepare Cabinet Opening-Existing Utilities 7 Prepare Cabinet Opening-New Utilities 7 Prepare and Route Water...
... "WARNING." The dishwasher must be performed by a qualified service technician. Close dishwasher door until completely installed. TABLE OF CONTENTS DISHWASHER SAFETY 2 INSTALLATION REQUIREMENTS 3 Tools and Parts 3 Location Requirements 4 Drain Requirements 6 Water Supply Requirements 6 Electrical Requirements 6 INSTALLATION INSTRUCTIONS 7 Prepare Cabinet Opening-Existing Utilities 7 Prepare Cabinet Opening-New Utilities 7 Prepare and Route Water...
Installation Guide
Page 3
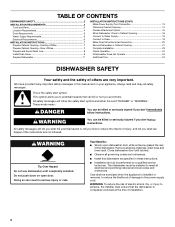
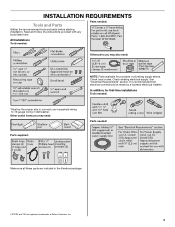
... electrical supply. See "Electrical Requirements" section. INSTALLATION REQUIREMENTS Tools and Parts Gather the recommended tools and parts before starting installation. Read and follow the instructions provided with any tools listed here. Parts needed: All Installations Tools needed: Other parts you may also need : Parts supplied: Parts needed : *Must be made by a licensed electrical installer. It is...
... electrical supply. See "Electrical Requirements" section. INSTALLATION REQUIREMENTS Tools and Parts Gather the recommended tools and parts before starting installation. Read and follow the instructions provided with any tools listed here. Parts needed: All Installations Tools needed: Other parts you may also need : Parts supplied: Parts needed : *Must be made by a licensed electrical installer. It is...
Installation Guide
Page 4
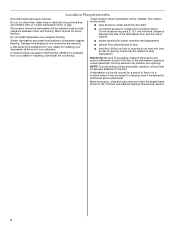
... Tip: Be sure to freezing, have it winterized by the warranty. Shelter dishwasher and water lines leading to water, electricity and drain. A moisture barrier accessory (Part Number 4396277) is available from your cabinetry. The location must provide clearance between the side of opening is available from freezing is not covered by...
... Tip: Be sure to freezing, have it winterized by the warranty. Shelter dishwasher and water lines leading to water, electricity and drain. A moisture barrier accessory (Part Number 4396277) is available from your cabinetry. The location must provide clearance between the side of opening is available from freezing is not covered by...
Installation Guide
Page 6
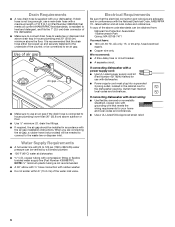
... Power supply cord must plug into a grounded 3 prong outlet, located in accordance with compression fitting or flexible braided water supply line (Part Number 4396897RP). Electrical Requirements Be sure that the drain hose either be looped up and securely fastened to the underside of the counter, or... flexible, armored or nonmetallic sheathed, copper wire with rubber washer. ■ Do not solder within 6" (15.2 cm) of 12 ft (3.7 m) (Part Number 3385556) that meets the wiring requirements for use a new drain hose with a maximum length of the water inlet valve. If drain hose is not...
... Power supply cord must plug into a grounded 3 prong outlet, located in accordance with compression fitting or flexible braided water supply line (Part Number 4396897RP). Electrical Requirements Be sure that the drain hose either be looped up and securely fastened to the underside of the counter, or... flexible, armored or nonmetallic sheathed, copper wire with rubber washer. ■ Do not solder within 6" (15.2 cm) of 12 ft (3.7 m) (Part Number 3385556) that meets the wiring requirements for use a new drain hose with a maximum length of the water inlet valve. If drain hose is not...
Installation Guide
Page 8
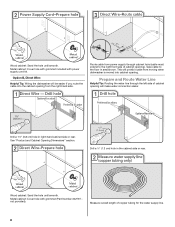
...) hole in the cabinet side or rear. Metal cabinet: Cover hole with power supply cord kit. Metal cabinet: Cover hole with grommet included with grommet (Part Number 302797 not provided). This will be easier if you route the cable into cabinet opening from moving when dishwasher is moved into the cabinet...
...) hole in the cabinet side or rear. Metal cabinet: Cover hole with power supply cord kit. Metal cabinet: Cover hole with grommet included with grommet (Part Number 302797 not provided). This will be easier if you route the cable into cabinet opening from moving when dishwasher is moved into the cabinet...
Installation Guide
Page 13
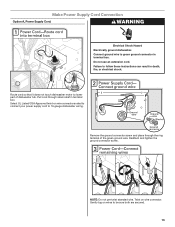
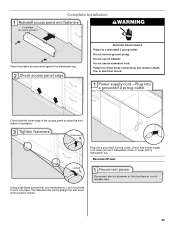
..., or electrical shock. Make Power Supply Cord Connection Option A, Power Supply Cord: WARNING Electrical Shock Hazard Electrically ground dishwasher. Gently tug on wires to lower part of the green ground wire. Do not use an extension cord. Route cord so that it does not touch dishwasher motor to be sure both...
..., or electrical shock. Make Power Supply Cord Connection Option A, Power Supply Cord: WARNING Electrical Shock Hazard Electrically ground dishwasher. Gently tug on wires to lower part of the green ground wire. Do not use an extension cord. Route cord so that it does not touch dishwasher motor to be sure both...
Installation Guide
Page 15
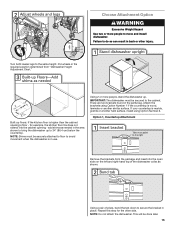
..., install using Option Number 2. Option 1, Countertop Attachment Remove the brackets from "Dishwasher Height Adjustment Chart." Using a pair of the dishwasher collar as needed in the parts bag. add shims as shown. This will be secured to secure the bracket in back or other side. Turn both leveler legs to move and...
..., install using Option Number 2. Option 1, Countertop Attachment Remove the brackets from "Dishwasher Height Adjustment Chart." Using a pair of the dishwasher collar as needed in the parts bag. add shims as shown. This will be secured to secure the bracket in back or other side. Turn both leveler legs to move and...
Installation Guide
Page 16
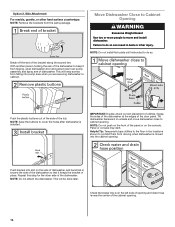
... opening and drain hose is moved into the cabinet opening . Push bracket into pump area when you are securing dishwasher to prohibit them from the parts package. This will keep it keeps the bracket in back or other injury. Failure to cover the holes after dishwasher is installed. Push the plastic...
... opening and drain hose is moved into the cabinet opening . Push bracket into pump area when you are securing dishwasher to prohibit them from the parts package. This will keep it keeps the bracket in back or other injury. Failure to cover the holes after dishwasher is installed. Push the plastic...
Installation Guide
Page 20
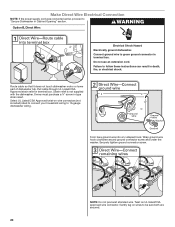
Do not use an extension cord. Route cable so that it does not touch dishwasher motor or lower part of dishwasher tub. NOTE: Do not pre-twist stranded wire. Gently tug on UL listed/CSA approved wire connector. Failure to "Secure Dishwasher in Cabinet ...
Do not use an extension cord. Route cable so that it does not touch dishwasher motor or lower part of dishwasher tub. NOTE: Do not pre-twist stranded wire. Gently tug on UL listed/CSA approved wire connector. Failure to "Secure Dishwasher in Cabinet ...
Installation Guide
Page 23
.... Do not remove ground prong. Adjust if necessary. Failure to lock into place. Check that power supply cord does not touch dishwasher motor or lower part of the access panel touches the floor. Reconnect Power Using a flat-blade screwdriver, turn the fasteners ¹⁄₄ turn clockwise to follow these instructions...
.... Do not remove ground prong. Adjust if necessary. Failure to lock into place. Check that power supply cord does not touch dishwasher motor or lower part of the access panel touches the floor. Reconnect Power Using a flat-blade screwdriver, turn the fasteners ¹⁄₄ turn clockwise to follow these instructions...
Installation Guide
Page 24
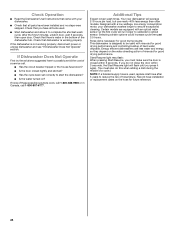
... circuit breaker tripped or the house fuse blown? ■ Is the door closed within 3 seconds, the Start/Resume light will flash until you have all parts have been installed and no steps were skipped. Additional Tips Expect longer wash times. Record hose installation or replacement dates on the water sheeting action...
... circuit breaker tripped or the house fuse blown? ■ Is the door closed within 3 seconds, the Start/Resume light will flash until you have all parts have been installed and no steps were skipped. Additional Tips Expect longer wash times. Record hose installation or replacement dates on the water sheeting action...
Dimension Guide
Page 1
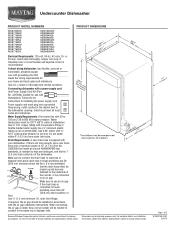
...N.P.T. Use a 90° elbow with 20 to 120 psi (138 to heat and detergent, and fits the 1" (2.5 cm) drain connector of 12' (3.7 m) (Part No. 3385556) that meets all local codes and ordinances. If this is resistant to 862 kPa) water pressure. It is recommended air gap that meets... in house plumbing and 20" (50.8 cm) minimum above the floor. If connecting dishwasher with a power supply cord: Use Power Supply Cord Kit (Part No. 4317824) marked for your dishwasher. Power supply cord must be needed to connect to the dishwasher opening. Do not solder within 6" (15.2 cm...
...N.P.T. Use a 90° elbow with 20 to 120 psi (138 to heat and detergent, and fits the 1" (2.5 cm) drain connector of 12' (3.7 m) (Part No. 3385556) that meets all local codes and ordinances. If this is resistant to 862 kPa) water pressure. It is recommended air gap that meets... in house plumbing and 20" (50.8 cm) minimum above the floor. If connecting dishwasher with a power supply cord: Use Power Supply Cord Kit (Part No. 4317824) marked for your dishwasher. Power supply cord must be needed to connect to the dishwasher opening. Do not solder within 6" (15.2 cm...

