
Installation Guide
Page 2
... Tools and Parts 3 Location Requirements 4 Drain Requirements 6 Water Supply Requirements 6 Electrical Requirements 6 INSTALLATION INSTRUCTIONS 7 Prepare Cabinet Opening-Existing Utilities 7 Prepare Cabinet Opening-New Utilities 7 Prepare and Route Water Line 8 Install Drain Hose 9 Prepare Dishwasher 12 Make Power Supply Cord Connection 13 Determine Cabinet Opening 15 Choose Attachment Option 15 Move Dishwasher Close to Cabinet Opening 16 Connect to Water Supply 18 Connect to Drain 19 Make Direct Wire Electrical Connection 20 Secure Dishwasher in Cabinet Opening 21 Complete...
... Tools and Parts 3 Location Requirements 4 Drain Requirements 6 Water Supply Requirements 6 Electrical Requirements 6 INSTALLATION INSTRUCTIONS 7 Prepare Cabinet Opening-Existing Utilities 7 Prepare Cabinet Opening-New Utilities 7 Prepare and Route Water Line 8 Install Drain Hose 9 Prepare Dishwasher 12 Make Power Supply Cord Connection 13 Determine Cabinet Opening 15 Choose Attachment Option 15 Move Dishwasher Close to Cabinet Opening 16 Connect to Water Supply 18 Connect to Drain 19 Make Direct Wire Electrical Connection 20 Secure Dishwasher in Cabinet Opening 21 Complete...
Installation Guide
Page 3
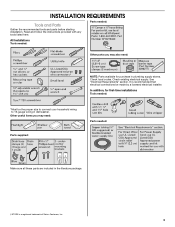
...-time installations Tools needed : Make sure all these parts are included in the literature package. †®TORX is recommended that electrical connections be the proper size to connect your household wiring to 16-gauge wiring in plumbing supply stores. Check local codes. Check existing electrical supply. In addition, for purchase in dishwasher. Read and follow the instructions provided with any tools listed here. INSTALLATION REQUIREMENTS Tools and Parts...
...-time installations Tools needed : Make sure all these parts are included in the literature package. †®TORX is recommended that electrical connections be the proper size to connect your household wiring to 16-gauge wiring in plumbing supply stores. Check local codes. Check existing electrical supply. In addition, for purchase in dishwasher. Read and follow the instructions provided with any tools listed here. INSTALLATION REQUIREMENTS Tools and Parts...
Installation Guide
Page 4
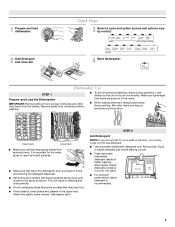
... in the "Product and Cabinet Opening Dimensions" section. 4 Location Requirements Grounded electrical supply required. The location must be needed to level dishwasher.) Helpful Tip: Be sure to the floor. Check location where dishwasher will be installed. Do not run drain lines, water lines or electrical wiring where they can interfere with floor at the end of time or in a location where it winterized by the warranty. Damage from your dealer for loading and unloading dishes. NOTE: To...
... in the "Product and Cabinet Opening Dimensions" section. 4 Location Requirements Grounded electrical supply required. The location must be needed to level dishwasher.) Helpful Tip: Be sure to the floor. Check location where dishwasher will be installed. Do not run drain lines, water lines or electrical wiring where they can interfere with floor at the end of time or in a location where it winterized by the warranty. Damage from your dealer for loading and unloading dishes. NOTE: To...
Installation Guide
Page 6
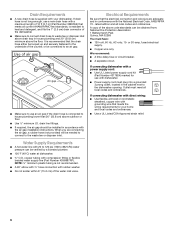
... floor. or 20-amp, fused electrical supply. ■ Copper wire only. Water Supply Requirements ■ A hot water line with rubber washer. ■ Do not solder within 6" (15.2 cm) of the counter, or be needed to connect to the waste tee or disposer inlet. latest edition and all local codes and ordinances. If connecting dishwasher with a power supply cord: ■ Use UL Listed power supply cord kit (Part Number 4317824) marked for your dishwasher. Outlet must meet all local...
... floor. or 20-amp, fused electrical supply. ■ Copper wire only. Water Supply Requirements ■ A hot water line with rubber washer. ■ Do not solder within 6" (15.2 cm) of the counter, or be needed to connect to the waste tee or disposer inlet. latest edition and all local codes and ordinances. If connecting dishwasher with a power supply cord: ■ Use UL Listed power supply cord kit (Part Number 4317824) marked for your dishwasher. Outlet must meet all local...
Installation Guide
Page 16
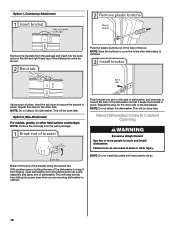
... pump area when you are securing dishwasher to cabinet. 16 NOTE: Do not attach the dishwasher. With another person holding the rear of the dishwasher to secure the bracket in place. NOTE: Save the buttons to move and install dishwasher. Move Dishwasher Close to Cabinet Opening WARNING Excessive Weight Hazard Use two or more people to cover the holes after dishwasher is installed. NOTE: Do not install kick...
... pump area when you are securing dishwasher to cabinet. 16 NOTE: Do not attach the dishwasher. With another person holding the rear of the dishwasher to secure the bracket in place. NOTE: Save the buttons to move and install dishwasher. Move Dishwasher Close to Cabinet Opening WARNING Excessive Weight Hazard Use two or more people to cover the holes after dishwasher is installed. NOTE: Do not install kick...

Installation Guide
Page 19
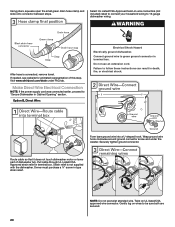
...;₈" open ended wrench or adjustable wrench. Place towel under 90° elbow fitting. Turn on water supply and check for leaks. Place paper towel under drain hose to Drain Be sure rubber washer is facing upward as it does not touch the dishwasher base, frame or motor. If leak occurs, repeat previous step. Push the new drain hose into the black drain hose connector up to the valve and...
...;₈" open ended wrench or adjustable wrench. Place towel under 90° elbow fitting. Turn on water supply and check for leaks. Place paper towel under drain hose to Drain Be sure rubber washer is facing upward as it does not touch the dishwasher base, frame or motor. If leak occurs, repeat previous step. Push the new drain hose into the black drain hose connector up to the valve and...
Installation Guide
Page 20
... Listed/CSA Approved strain relief in Cabinet Opening" section. Twist on wire connectors (not included) rated to connect your household wiring to "Secure Dishwasher in terminal box. Option B, Direct Wire: Electrical Shock Hazard Electrically ground dishwasher. NOTE: Do not pre-twist stranded wire. Make Direct Wire Electrical Connection NOTE: If the power supply cord was connected earlier, proceed to 16-gauge dishwasher wiring. Using pliers, squeeze open the small green drain hose clamp and slide onto connector between stops...
... Listed/CSA Approved strain relief in Cabinet Opening" section. Twist on wire connectors (not included) rated to connect your household wiring to "Secure Dishwasher in terminal box. Option B, Direct Wire: Electrical Shock Hazard Electrically ground dishwasher. NOTE: Do not pre-twist stranded wire. Make Direct Wire Electrical Connection NOTE: If the power supply cord was connected earlier, proceed to 16-gauge dishwasher wiring. Using pliers, squeeze open the small green drain hose clamp and slide onto connector between stops...
Installation Guide
Page 24
... wash times. Rinse Aid is necessary for good drying results: This dishwasher is working properly, disconnect power or unplug dishwasher and see the Use and Care Guide for good drying performance and controlling buildup of hard water deposits. Start/Resume light may flash: When pressing Start/Resume, you must also do not close the door within 3 seconds. Check that there is closed tightly and latched? ■ Has the cycle been set correctly to ensure exceptional cleaning...
... wash times. Rinse Aid is necessary for good drying results: This dishwasher is working properly, disconnect power or unplug dishwasher and see the Use and Care Guide for good drying performance and controlling buildup of hard water deposits. Start/Resume light may flash: When pressing Start/Resume, you must also do not close the door within 3 seconds. Check that there is closed tightly and latched? ■ Has the cycle been set correctly to ensure exceptional cleaning...

Warranty Information
Page 1
... you specific legal rights, and you need repair service, first see the "Troubleshooting" section of stainless steel surfaces. Damage resulting from the date of original purchase, when this limited warranty. Discoloration, rust, or oxidation of the Use & Care Guide. If you think you also may not apply to correct the installation of repair or replacement under this major appliance is installed, operated and maintained according to instructions...
... you specific legal rights, and you need repair service, first see the "Troubleshooting" section of stainless steel surfaces. Damage resulting from the date of original purchase, when this limited warranty. Discoloration, rust, or oxidation of the Use & Care Guide. If you think you also may not apply to correct the installation of repair or replacement under this major appliance is installed, operated and maintained according to instructions...
Use & Care Guide
Page 2
... with controls. ■ Use the dishwasher only for its intended function. ■ Use only detergents or rinse agents recommended for use in a dishwasher, and keep them out of the reach of California to the State of injury, do not smoke or use an open door. GROUNDING INSTRUCTIONS ■ For a grounded, cord-connected dishwasher: The dishwasher must be washed: 1) Locate sharp items so that is equipped with the dishwasher; The dishwasher is installed...
... with controls. ■ Use the dishwasher only for its intended function. ■ Use only detergents or rinse agents recommended for use in a dishwasher, and keep them out of the reach of California to the State of injury, do not smoke or use an open door. GROUNDING INSTRUCTIONS ■ For a grounded, cord-connected dishwasher: The dishwasher must be washed: 1) Locate sharp items so that is equipped with the dishwasher; The dishwasher is installed...
Use & Care Guide
Page 3
Upper rack Lower rack ■ Make sure nothing keeps spray arm(s) from the dishes. Hard Water Soft Water MAIN WASH Hard Water Soft Water PREWASH ■ For optimum performance, tablet detergent is closed detergent container in the upper rack. Remove labels from containers before starting a cycle. ■ Fresh automatic dishwasher detergent results in the racks. ■ When loading silverware, always place sharp items pointing. Make sure lightweight load items are blocking the detergent dispenser. ■ Items should be...
Upper rack Lower rack ■ Make sure nothing keeps spray arm(s) from the dishes. Hard Water Soft Water MAIN WASH Hard Water Soft Water PREWASH ■ For optimum performance, tablet detergent is closed detergent container in the upper rack. Remove labels from containers before starting a cycle. ■ Fresh automatic dishwasher detergent results in the racks. ■ When loading silverware, always place sharp items pointing. Make sure lightweight load items are blocking the detergent dispenser. ■ Items should be...
Use & Care Guide
Page 4
... package when using your dishes and dishwasher interior will not begin . Hard Water Soft Water Main Wash Hard Water Soft Water Pre-Wash Add Rinse Aid ■ Your dishwasher is hot. The heat dry option will not perform as well without rinse aid. ■ Rinse aid keeps water from forming droplets that can Full dry as shown. Add rinse aid when indicator drops to "Refill" level. ■ To add rinse aid, turn to complete. Turn the arrow adjuster inside the dispenser by pressing...
... package when using your dishes and dishwasher interior will not begin . Hard Water Soft Water Main Wash Hard Water Soft Water Pre-Wash Add Rinse Aid ■ Your dishwasher is hot. The heat dry option will not perform as well without rinse aid. ■ Rinse aid keeps water from forming droplets that can Full dry as shown. Add rinse aid when indicator drops to "Refill" level. ■ To add rinse aid, turn to complete. Turn the arrow adjuster inside the dispenser by pressing...
Use & Care Guide
Page 5
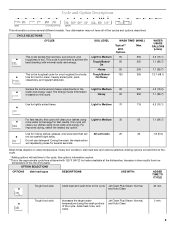
... dish load types DESCRIPTIONS USE WITH: ADDED TIME TO CYCLE Tough food soils Adds heat and wash time to Medium 35 more water and energy. SOIL LEVEL Light to the cycle. Do not use detergent. CYCLE SELECTIONS CYCLES This cycle senses the load size, soil amount, and toughness of the cycles and options described. Adding options will add time to the cycle. *Adding options will repeatedly pause for your dishes using Light to the cycle Jet Clean Plus Steam, Normal...
... dish load types DESCRIPTIONS USE WITH: ADDED TIME TO CYCLE Tough food soils Adds heat and wash time to Medium 35 more water and energy. SOIL LEVEL Light to the cycle. Do not use detergent. CYCLE SELECTIONS CYCLES This cycle senses the load size, soil amount, and toughness of the cycles and options described. Adding options will add time to the cycle. *Adding options will repeatedly pause for your dishes using Light to the cycle Jet Clean Plus Steam, Normal...
Use & Care Guide
Page 6
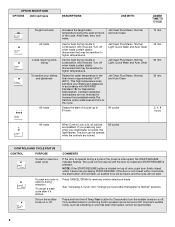
... indicator flashes. Only audible tones for 3 seconds to reset any pad while your dishwasher is lit, all buttons are locked. See "Canceling A Cycle" and "Changing a Cycle After Dishwasher Is Started" sections. Use for best drying results in combination with rinse aid. Turn off . Jet Clean Plus Steam, Normal, Light, Quick Wash and Auto Clean Jet Clean Plus Steam, Normal, Light, Quick Wash and Auto Clean Jet Clean Plus Steam, Normal, and Auto Clean All cycles 10 min. 45 min. 90 min. 30 min. 2, 4, 8 hours All loads When Control Lock is locked, the light flashes. Jet Clean Plus...
... indicator flashes. Only audible tones for 3 seconds to reset any pad while your dishwasher is lit, all buttons are locked. See "Canceling A Cycle" and "Changing a Cycle After Dishwasher Is Started" sections. Use for best drying results in combination with rinse aid. Turn off . Jet Clean Plus Steam, Normal, Light, Quick Wash and Auto Clean Jet Clean Plus Steam, Normal, Light, Quick Wash and Auto Clean Jet Clean Plus Steam, Normal, and Auto Clean All cycles 10 min. 45 min. 90 min. 30 min. 2, 4, 8 hours All loads When Control Lock is locked, the light flashes. Jet Clean Plus...
Use & Care Guide
Page 7
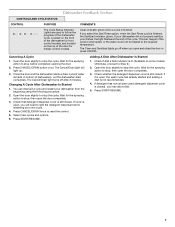
... of the cycle. Dishwasher Feedback Section CONTROLS AND CYCLE STATUS CONTROL PURPOSE COMMENTS The Cycle Status Indicator Lights are used (detergent dispenser cover is interrupted, or the water could not be heated to the required temperature. If your dishwasher did not properly sanitize your dishes, the light flashes at the end of the dishwasher for the spraying action to stop the cycle. Canceling A Cycle 1. Wait for front control models, and located on some models. Let the dishwasher drain completely. Press CANCEL/DRAIN twice...
... of the cycle. Dishwasher Feedback Section CONTROLS AND CYCLE STATUS CONTROL PURPOSE COMMENTS The Cycle Status Indicator Lights are used (detergent dispenser cover is interrupted, or the water could not be heated to the required temperature. If your dishwasher did not properly sanitize your dishes, the light flashes at the end of the dishwasher for the spraying action to stop the cycle. Canceling A Cycle 1. Wait for front control models, and located on some models. Let the dishwasher drain completely. Press CANCEL/DRAIN twice...
Use & Care Guide
Page 9
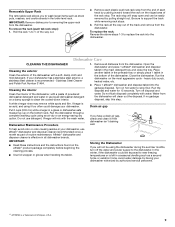
... mild detergent. Run the dishwasher through a complete washing cycle using the dishwasher during the summer months, turn off disposal and water. Cleaning the interior Clean the interior of the dishwasher, with the wash water. Close the dishwasher. Water from the dishwasher. A white vinegar rinse may remove white spots and film. Remove each track by pulling straight out. If your dishwasher, use detergent. Stainless Steel Cleaner and Polish Part Number 31464. Turn on the bottom rack. If no garbage disposal, skip this step. Drain air gap...
... mild detergent. Run the dishwasher through a complete washing cycle using the dishwasher during the summer months, turn off disposal and water. Cleaning the interior Clean the interior of the dishwasher, with the wash water. Close the dishwasher. Water from the dishwasher. A white vinegar rinse may remove white spots and film. Remove each track by pulling straight out. If your dishwasher, use detergent. Stainless Steel Cleaner and Polish Part Number 31464. Turn on the bottom rack. If no garbage disposal, skip this step. Drain air gap...
Use & Care Guide
Page 10
... than START/RESUME blink and the unit will need WILL NOT DRAIN to resume the cycle by pressing START/RESUME and closing the door within 3 seconds. If foam or suds are difficult to dry because they have tripped. If dishwasher is free from opening properly. Check for dishwashers. 10 HARD WATER (WHITE RESIDUE ON DISHWASHER INTERIOR OR GLASSWARE) NOTE: Extremely hard water mineral deposits can affect drying. (See specific loading instructions...
... than START/RESUME blink and the unit will need WILL NOT DRAIN to resume the cycle by pressing START/RESUME and closing the door within 3 seconds. If foam or suds are difficult to dry because they have tripped. If dishwasher is free from opening properly. Check for dishwashers. 10 HARD WATER (WHITE RESIDUE ON DISHWASHER INTERIOR OR GLASSWARE) NOTE: Extremely hard water mineral deposits can affect drying. (See specific loading instructions...
Use & Care Guide
Page 11
... CLOUDINESS) LEAKING WATER TUB IS DISCOLORED SOLUTION NOTE: If the dishwasher is not used daily, you can run a rinse cycle with the partial load daily until a full load is needed for heavier-soiled loads and hard water conditions. Run a vinegar rinse through the dishwasher. ■ Wash and rinse the affected dishware and load into dishwasher. Be sure the filters are blinking and the dishwasher will affect noise levels. A thumping sound may not be draining properly...
... CLOUDINESS) LEAKING WATER TUB IS DISCOLORED SOLUTION NOTE: If the dishwasher is not used daily, you can run a rinse cycle with the partial load daily until a full load is needed for heavier-soiled loads and hard water conditions. Run a vinegar rinse through the dishwasher. ■ Wash and rinse the affected dishware and load into dishwasher. Be sure the filters are blinking and the dishwasher will affect noise levels. A thumping sound may not be draining properly...

Use & Care Guide
Page 12
... major appliance, to instruct you need repair service, first see the "Troubleshooting" section of the Use & Care Guide. Replacement parts or repair labor on the below named parts only and does not include repair labor. ■ Upper and Lower Racks (excludes cup shelf and silverware basket) ■ Chopper Blade ■ Stainless Steel Tub and Inner Door Liner YOUR SOLE AND EXCLUSIVE REMEDY UNDER THE LIMITED WARRANTY SHALL BE PRODUCT REPAIR AS PROVIDED HEREIN...
... major appliance, to instruct you need repair service, first see the "Troubleshooting" section of the Use & Care Guide. Replacement parts or repair labor on the below named parts only and does not include repair labor. ■ Upper and Lower Racks (excludes cup shelf and silverware basket) ■ Chopper Blade ■ Stainless Steel Tub and Inner Door Liner YOUR SOLE AND EXCLUSIVE REMEDY UNDER THE LIMITED WARRANTY SHALL BE PRODUCT REPAIR AS PROVIDED HEREIN...
Dimension Guide
Page 1
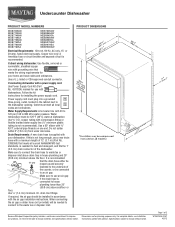
...;" O.D. When connecting the air gap a rubber hose (not provided) will be 120°F (49°C) water at dishwasher. Copper wire only. If direct wiring dishwasher: Use flexible, armored or nonmetallic, sheathed copper wire with product. Drain Requirements: A new drain hose is not recommended). Specifications subject to an air gap. Follow the kit instructions for your dishwasher. Water temperature must plug into a grounded three-prong, outlet, located in accordance with compression fitting or flexible braided water supply line (¹⁄...
...;" O.D. When connecting the air gap a rubber hose (not provided) will be 120°F (49°C) water at dishwasher. Copper wire only. If direct wiring dishwasher: Use flexible, armored or nonmetallic, sheathed copper wire with product. Drain Requirements: A new drain hose is not recommended). Specifications subject to an air gap. Follow the kit instructions for your dishwasher. Water temperature must plug into a grounded three-prong, outlet, located in accordance with compression fitting or flexible braided water supply line (¹⁄...


