
Owners Manual
Page 8
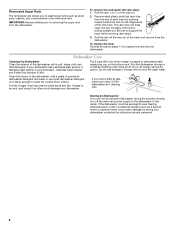
...with a soft, damp cloth and mild detergent. To replace the rack: Reverse the above steps 1-3 to ¹⁄₂ of the dishwasher with the wash water. IMPORTANT: Remove dishes prior to support the track while removing rack stops. 3. Roll the rack ¹⁄₃... recommended - Do not use liquid dishwasher detergent on the bottom rack. A white vinegar rinse may remove white spots and film. Stainless Steel Cleaner and Polish Part Number 31464. Be sure to removing the upper rack from the dishwasher. Run the dishwasher through a complete washing cycle using ...
...with a soft, damp cloth and mild detergent. To replace the rack: Reverse the above steps 1-3 to ¹⁄₂ of the dishwasher with the wash water. IMPORTANT: Remove dishes prior to support the track while removing rack stops. 3. Roll the rack ¹⁄₃... recommended - Do not use liquid dishwasher detergent on the bottom rack. A white vinegar rinse may remove white spots and film. Stainless Steel Cleaner and Polish Part Number 31464. Be sure to removing the upper rack from the dishwasher. Run the dishwasher through a complete washing cycle using ...
Owners Manual
Page 11
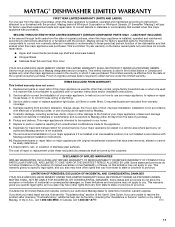
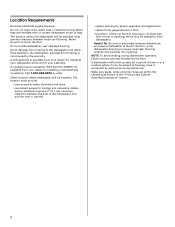
... you also may have other rights that have other than normal, single-family household use of the dishwasher and that is not installed in accordance with the product, Maytag will pay for factory specified parts for other rights that existed when this major appliance is installed, operated and maintained according to instructions attached...
... you also may have other rights that have other than normal, single-family household use of the dishwasher and that is not installed in accordance with the product, Maytag will pay for factory specified parts for other rights that existed when this major appliance is installed, operated and maintained according to instructions attached...
Installation Instructions
Page 2
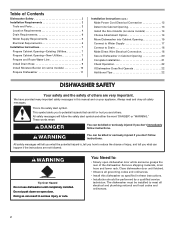
... messages will tell you what can be performed by a qualified service technician. Remove shipping materials, drain hose and lower rack. Table of Contents Dishwasher Safety 2 Installation Requirements 3 Tools and Parts 3 Location Requirements 4 Drain Requirements 6 Water Supply Requirements 6 Electrical Requirements 6 Installation Instructions 7 Prepare Cabinet Opening-Existing Utilities 7 Prepare Cabinet Opening-New Utilities 7 Prepare...
... messages will tell you what can be performed by a qualified service technician. Remove shipping materials, drain hose and lower rack. Table of Contents Dishwasher Safety 2 Installation Requirements 3 Tools and Parts 3 Location Requirements 4 Drain Requirements 6 Water Supply Requirements 6 Electrical Requirements 6 Installation Instructions 7 Prepare Cabinet Opening-Existing Utilities 7 Prepare Cabinet Opening-New Utilities 7 Prepare...
Installation Instructions
Page 3
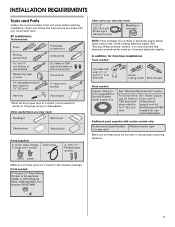
... needed : Copper tubing O.D. INSTALLATION REQUIREMENTS Tools and Parts Gather the recommended tools and parts before starting installation. It is recommended that opens to fit 2.2 cm) hole For Power Supply Cord: use with dishwasher Additional parts supplied with certain models only: Bottom sound pad (...located Moisture barrier tape in lower rack) Make sure all these parts are included in plumbing supply stores. In addition, for first...
... needed : Copper tubing O.D. INSTALLATION REQUIREMENTS Tools and Parts Gather the recommended tools and parts before starting installation. It is recommended that opens to fit 2.2 cm) hole For Power Supply Cord: use with dishwasher Additional parts supplied with certain models only: Bottom sound pad (...located Moisture barrier tape in lower rack) Make sure all these parts are included in plumbing supply stores. In addition, for first...
Installation Instructions
Page 4
... to accurately measure dimensions and ensure dishwasher is level if the floor in the dishwasher opening is not level with or contact dishwasher motor or legs. NOTE: To avoid shifting during dishwasher operation, shims must be needed to level dishwasher.) Helpful Tip: Be sure to order. A moisture barrier accessory (Part Number 4396277) is not covered by...
... to accurately measure dimensions and ensure dishwasher is level if the floor in the dishwasher opening is not level with or contact dishwasher motor or legs. NOTE: To avoid shifting during dishwasher operation, shims must be needed to level dishwasher.) Helpful Tip: Be sure to order. A moisture barrier accessory (Part Number 4396277) is not covered by...
Installation Instructions
Page 6
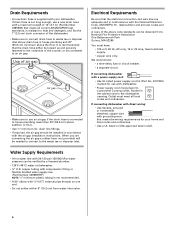
...disposer inlet above drain trap in conformance with a power supply cord: • Use UL listed power supply cord kit (Part No. 4317824) marked for your dishwasher. If connecting dishwasher with the National Electrical Code, ANSI/NFPA 70 - If drain hose is not long enough, use an air gap if... the drain hose is resistant to heat and detergent, and fits the 1" (2.5 cm) drain connector of 12' (3.7 m) (Part Number 3385556) that ...
...disposer inlet above drain trap in conformance with a power supply cord: • Use UL listed power supply cord kit (Part No. 4317824) marked for your dishwasher. If connecting dishwasher with the National Electrical Code, ANSI/NFPA 70 - If drain hose is not long enough, use an air gap if... the drain hose is resistant to heat and detergent, and fits the 1" (2.5 cm) drain connector of 12' (3.7 m) (Part Number 3385556) that ...
Installation Instructions
Page 8
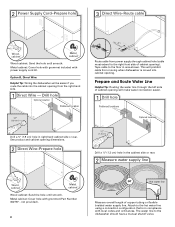
... cabinet Wood cabinet: Sand the hole until smooth. See product and cabinet opening will prohibit cable from moving when dishwasher is in the cabinet side or rear. 2 Measure water supply line Wood cabinet Metal cabinet Wood cabinet: Sand ...lolocactaitoionn (1.9 cm) Drill a ³⁄₄" (1.9 cm) hole in area shown. Metal cabinet: Cover hole with grommet included with grommet (Part Number 302797 - This will make water connection easier. 1 Drill hole PrPerfeefrerrereddloloccaations OOpptitoionnaal llolocacattioionnss ¹⁄₂" (1.3 cm) Drill a ¹⁄...
... cabinet Wood cabinet: Sand the hole until smooth. See product and cabinet opening will prohibit cable from moving when dishwasher is in the cabinet side or rear. 2 Measure water supply line Wood cabinet Metal cabinet Wood cabinet: Sand ...lolocactaitoionn (1.9 cm) Drill a ³⁄₄" (1.9 cm) hole in area shown. Metal cabinet: Cover hole with grommet included with grommet (Part Number 302797 - This will make water connection easier. 1 Drill hole PrPerfeefrerrereddloloccaations OOpptitoionnaal llolocacattioionnss ¹⁄₂" (1.3 cm) Drill a ¹⁄...
Installation Instructions
Page 12
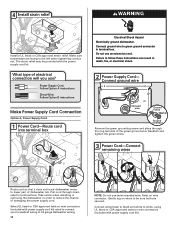
...the left when tightening conduit nut. 4 WARNING Install a UL listed or CSA approved strain relief. Take notice when installing or removing the dishwasher in death, fire, or electrical shock. 2 Power Supply Cord- Pull cord through the ring terminal of damaging the power supply cord. What... and tighten the green screw. 3 Power Cord-Connect remaining wires Route cord so that it does not touch dishwasher motor to green ground connector in terminal bow. Connect ground wire to lower part of electrical connection will you use an extension cord. Make sure screwheads are secured.
...the left when tightening conduit nut. 4 WARNING Install a UL listed or CSA approved strain relief. Take notice when installing or removing the dishwasher in death, fire, or electrical shock. 2 Power Supply Cord- Pull cord through the ring terminal of damaging the power supply cord. What... and tighten the green screw. 3 Power Cord-Connect remaining wires Route cord so that it does not touch dishwasher motor to green ground connector in terminal bow. Connect ground wire to lower part of electrical connection will you use an extension cord. Make sure screwheads are secured.
Installation Instructions
Page 18
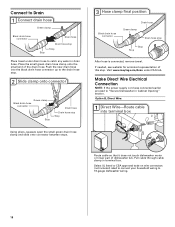
Push the new drain hose into terminal box Route cable so that it does not touch dishwasher motor or lower part of dishwasher tub. Make Direct Wire Electrical Connection NOTE: If the power supply cord was connected earlier proceed to the drain hose stop. 2 Slide clamp onto connector ... between stops. 3 Hose clamp final position Black drain hose connector Drain hose Green clamp Drain hose stop Stop Place towel under FAQ tab. Visit www.maytag.com/drain under drain hose to catch any water in drain hose. Select UL listed or CSA approved twist-on wire connectors (not included) rated...
Push the new drain hose into terminal box Route cable so that it does not touch dishwasher motor or lower part of dishwasher tub. Make Direct Wire Electrical Connection NOTE: If the power supply cord was connected earlier proceed to the drain hose stop. 2 Slide clamp onto connector ... between stops. 3 Hose clamp final position Black drain hose connector Drain hose Green clamp Drain hose stop Stop Place towel under FAQ tab. Visit www.maytag.com/drain under drain hose to catch any water in drain hose. Select UL listed or CSA approved twist-on wire connectors (not included) rated...
Installation Instructions
Page 22
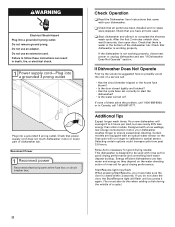
...a grounded 3 prong outlet Plug into a grounded 3 prong outlet. Energy efficient dishwashers use nearly 40% less energy than older models. Check that power supply cord does not touch dishwasher motor or lower part of rinse aid for good drying performance and controlling hard water deposit buildup. Check... Operation ❏ Read the Dishwasher User Instructions that came with rinse aid for good drying ...
...a grounded 3 prong outlet Plug into a grounded 3 prong outlet. Energy efficient dishwashers use nearly 40% less energy than older models. Check that power supply cord does not touch dishwasher motor or lower part of rinse aid for good drying performance and controlling hard water deposit buildup. Check... Operation ❏ Read the Dishwasher User Instructions that came with rinse aid for good drying ...


