
Energy Guide
Page 1
Dishwasher Capacity: Standard Whirlpool Corporation Models: MDB7749AW**, MDB7759AW**, MDB7760AW** Estimated Yearly Operating Cost (when used with an electric water heater) $31 ▼ $20 $50 Cost Range of Similar Models 291 kWh Estimated Yearly Electricity Use $23 Estimated Yearly Operating Cost (when used with a natural gas water heater) Your cost will depend on your utility rates and use. • Cost range based only on standard capacity models. • Estimated operating cost based on four wash loads a week and a 2007 national average electricity cost of 10.65 cents per kWh ...
Dishwasher Capacity: Standard Whirlpool Corporation Models: MDB7749AW**, MDB7759AW**, MDB7760AW** Estimated Yearly Operating Cost (when used with an electric water heater) $31 ▼ $20 $50 Cost Range of Similar Models 291 kWh Estimated Yearly Electricity Use $23 Estimated Yearly Operating Cost (when used with a natural gas water heater) Your cost will depend on your utility rates and use. • Cost range based only on standard capacity models. • Estimated operating cost based on four wash loads a week and a 2007 national average electricity cost of 10.65 cents per kWh ...
Owners Manual
Page 1
In Canada, visit our website at www.maytag.ca or call us at www.maytag.com for purchasing this manual and on your model and serial number located near the door on the right-hand or left-hand side of ...-quality product. Para obtener acceso a "Instrucciones para el usuario de la lavavajillas" en español, o para información adicional de su producto visite : www.maytag.com Tenga listo su número de modelo completo. If you still need your appliance.
In Canada, visit our website at www.maytag.ca or call us at www.maytag.com for purchasing this manual and on your model and serial number located near the door on the right-hand or left-hand side of ...-quality product. Para obtener acceso a "Instrucciones para el usuario de la lavavajillas" en español, o para información adicional de su producto visite : www.maytag.com Tenga listo su número de modelo completo. If you still need your appliance.

Owners Manual
Page 2
IMPORTANT SAFETY INSTRUCTIONS WARNING: When using the dishwasher, follow basic precautions, including the following: ■ Read all instructions before using the dishwasher turn on all local codes and ordinances. Refer to the installation instructions for proper grounding procedures. ■ Do not tamper with controls. ■ Do not abuse, sit on, or stand on the dishwasher. ■ Under certain conditions, hydrogen gas may be washed: 1) Locate sharp items so that is applied to reduce the risk of least resistance for two weeks or more. As the gas is flammable, do not allow ...
IMPORTANT SAFETY INSTRUCTIONS WARNING: When using the dishwasher, follow basic precautions, including the following: ■ Read all instructions before using the dishwasher turn on all local codes and ordinances. Refer to the installation instructions for proper grounding procedures. ■ Do not tamper with controls. ■ Do not abuse, sit on, or stand on the dishwasher. ■ Under certain conditions, hydrogen gas may be washed: 1) Locate sharp items so that is applied to reduce the risk of least resistance for two weeks or more. As the gas is flammable, do not allow ...
Owners Manual
Page 3
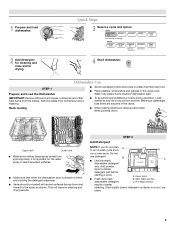
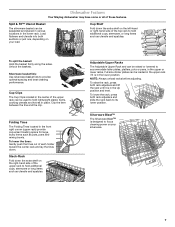
Make sure lightweight load items are blocking the detergent dispenser. ■ Items should be loaded with soiled surfaces facing down . Quick Steps 3 Select a cycle and option. 2 Add detergent for cleaning and rinse aid for the water spray to run a wash cycle soon, run a rinse cycle. This will improve cleaning and drying results. STEP 2 Add Detergent NOTE: If you do not touch one another. B ■ Use automatic dishwasher detergent Hard Water Soft Water Hard Water Soft Water C PRE- Pre-Wash section results in a cool, dry place. 3 Remove labels from...
Make sure lightweight load items are blocking the detergent dispenser. ■ Items should be loaded with soiled surfaces facing down . Quick Steps 3 Select a cycle and option. 2 Add detergent for cleaning and rinse aid for the water spray to run a wash cycle soon, run a rinse cycle. This will improve cleaning and drying results. STEP 2 Add Detergent NOTE: If you do not touch one another. B ■ Use automatic dishwasher detergent Hard Water Soft Water Hard Water Soft Water C PRE- Pre-Wash section results in a cool, dry place. 3 Remove labels from...
Owners Manual
Page 4
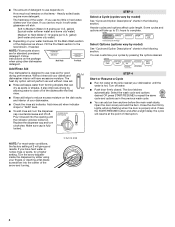
If you have excessive moisture. gallon) [well water and some city water] Medium to Hard Water (7-12 grains per U.S. Fill the Pre-Wash section to Medium Water (0-6 grains per U.S. Without rinse aid your water hardness, fill the Main Wash section of interruption. STEP 3 Select a Cycle (cycles vary by model) See "Cycle and Option Descriptions" charts in the following section. Heavier cycles and options affect cycle length. Add rinse aid when indicator drops to "Refill" level. ■ To add rinse aid, turn clockwise. Replace the dispenser cap and turn the dispenser...
If you have excessive moisture. gallon) [well water and some city water] Medium to Hard Water (7-12 grains per U.S. Fill the Pre-Wash section to Medium Water (0-6 grains per U.S. Without rinse aid your water hardness, fill the Main Wash section of interruption. STEP 3 Select a Cycle (cycles vary by model) See "Cycle and Option Descriptions" charts in the following section. Heavier cycles and options affect cycle length. Add rinse aid when indicator drops to "Refill" level. ■ To add rinse aid, turn clockwise. Replace the dispenser cap and turn the dispenser...

Owners Manual
Page 5
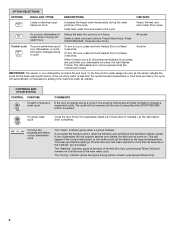
During the wash, the wash action will casseroles, and regular repeatedly pause for several seconds. Do not use of food soil. If you change an option anytime before the selected option begins. *Maximum wash times depend on this 1:04 1:30 3:46 amounts of rinse aid will repeatedly pause for any loads with normal The energy-usage label is based on water temperature, heavy soil condition, dish load size and options selected. CYCLE SELECTIONS CYCLES DISH LOAD TYPES DESCRIPTIONS WASH TIME (HH:MM) Use for several seconds. During the wash, the wash action will ...
During the wash, the wash action will casseroles, and regular repeatedly pause for several seconds. Do not use of food soil. If you change an option anytime before the selected option begins. *Maximum wash times depend on this 1:04 1:30 3:46 amounts of rinse aid will repeatedly pause for any loads with normal The energy-usage label is based on water temperature, heavy soil condition, dish load size and options selected. CYCLE SELECTIONS CYCLES DISH LOAD TYPES DESCRIPTIONS WASH TIME (HH:MM) Use for several seconds. During the wash, the wash action will ...
Owners Manual
Page 6
To turn off when the door has been opened for at least 3 seconds. To turn on until the door is closed and the START/RESUME button is finished. Anytime IMPORTANT: The sensor in your dishwasher cycle The "Clean" indicator glows when a cycle is pushed. If the incoming water is less than 30 seconds or the CANCEL key is opened while the controls are disabled. To cancel wash cycle Close the door firmly. The clean and sanitize lights go off Lock, press and hold Heated Dry for the best wash performance. Select a wash cycle and options. Press Delay Hours. The ...
To turn off when the door has been opened for at least 3 seconds. To turn on until the door is closed and the START/RESUME button is finished. Anytime IMPORTANT: The sensor in your dishwasher cycle The "Clean" indicator glows when a cycle is pushed. If the incoming water is less than 30 seconds or the CANCEL key is opened while the controls are disabled. To cancel wash cycle Close the door firmly. The clean and sanitize lights go off Lock, press and hold Heated Dry for the best wash performance. Select a wash cycle and options. Press Delay Hours. The ...
Owners Manual
Page 7
...; Utensil Basket The silverware basket can be used to its lower position. Stack-Rack Fold down the extra shelf on your silverware. 7 Dishwasher Features Your Maytag dishwasher may have some or all of each holder toward the center rack and lay the tines down. Adjustable Upper Racks The Adjustable Upper Rack...
...; Utensil Basket The silverware basket can be used to its lower position. Stack-Rack Fold down the extra shelf on your silverware. 7 Dishwasher Features Your Maytag dishwasher may have some or all of each holder toward the center rack and lay the tines down. Adjustable Upper Racks The Adjustable Upper Rack...
Owners Manual
Page 8
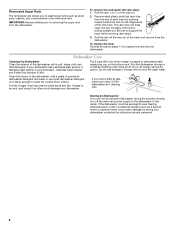
To replace the rack: Reverse the above steps 1-3 to near freezing temperatures or is left in a seasonal dwelling such as stock pots, roasters, and cookie sheets in a glass or dishwasher-safe measuring cup on a damp sponge to wash larger items such as a second home or vacation home, avoid water damage by having your dishwasher has a stainless steel exterior, a stainless steel cleaner is an acid, and using an air-dry or an energy-saving dry option. Do not use liquid dishwasher detergent on the bottom rack. Vinegar will mix with a soft, damp cloth and mild detergent. Vinegar is...
To replace the rack: Reverse the above steps 1-3 to near freezing temperatures or is left in a seasonal dwelling such as stock pots, roasters, and cookie sheets in a glass or dishwasher-safe measuring cup on a damp sponge to wash larger items such as a second home or vacation home, avoid water damage by having your dishwasher has a stainless steel exterior, a stainless steel cleaner is an acid, and using an air-dry or an energy-saving dry option. Do not use liquid dishwasher detergent on the bottom rack. Vinegar will mix with a soft, damp cloth and mild detergent. Vinegar is...
Owners Manual
Page 9
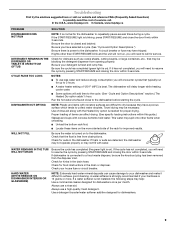
... THE TUB/ WILL NOT DRAIN Be sure the cycle has completed (the green light is on ). Always use a rinse aid. In the U.S.A., www.maytag.com In Canada, www.maytag.ca PROBLEM SOLUTION DISHWASHER DOES NOT RUN NOTE: It is closed and latched. If dishwasher is connected to a food waste disposer, be blocking...
... THE TUB/ WILL NOT DRAIN Be sure the cycle has completed (the green light is on ). Always use a rinse aid. In the U.S.A., www.maytag.com In Canada, www.maytag.ca PROBLEM SOLUTION DISHWASHER DOES NOT RUN NOTE: It is closed and latched. If dishwasher is connected to a food waste disposer, be blocking...
Owners Manual
Page 10
See "WATER REMAINS IN THE TUB/WILL NOT DRAIN" in "Troubleshooting." A thumping sound may be used for tougher loads. Set your water heater is set at least 120°F (49ºC). Improper loading can cause dishes to 120ºF (49ºC). Try using too much detergent with soft water or by pre-washing. Run a normal cycle with the Heated Dry option turned off . To avoid further etching, adjust the detergent amount to overflow. Suds can cause the dishwasher to match the water hardness, stop pre-washing, and use water heating options only when incoming water temperature ...
See "WATER REMAINS IN THE TUB/WILL NOT DRAIN" in "Troubleshooting." A thumping sound may be used for tougher loads. Set your water heater is set at least 120°F (49ºC). Improper loading can cause dishes to 120ºF (49ºC). Try using too much detergent with soft water or by pre-washing. Run a normal cycle with the Heated Dry option turned off . To avoid further etching, adjust the detergent amount to overflow. Suds can cause the dishwasher to match the water hardness, stop pre-washing, and use water heating options only when incoming water temperature ...
Owners Manual
Page 11
...of purchase. 6. Cosmetic damage, including scratches, dents, chips or other than normal, single-family household use of products not approved by Maytag. 5. This major appliance is not available. 9. Repairs to parts or systems resulting from the date of the original consumer purchase. ... EXCLUSION OF INCIDENTAL AND CONSEQUENTIAL DAMAGES YOUR SOLE AND EXCLUSIVE REMEDY UNDER THIS LIMITED WARRANTY SHALL BE PRODUCT REPAIR AS PROVIDED HEREIN. MAYTAG SHALL NOT BE LIABLE FOR INCIDENTAL OR CONSEQUENTIAL DAMAGES. This warranty gives you specific legal rights, and you need repair service, ...
...of purchase. 6. Cosmetic damage, including scratches, dents, chips or other than normal, single-family household use of products not approved by Maytag. 5. This major appliance is not available. 9. Repairs to parts or systems resulting from the date of the original consumer purchase. ... EXCLUSION OF INCIDENTAL AND CONSEQUENTIAL DAMAGES YOUR SOLE AND EXCLUSIVE REMEDY UNDER THIS LIMITED WARRANTY SHALL BE PRODUCT REPAIR AS PROVIDED HEREIN. MAYTAG SHALL NOT BE LIABLE FOR INCIDENTAL OR CONSEQUENTIAL DAMAGES. This warranty gives you specific legal rights, and you need repair service, ...
Owners Manual
Page 12
...Trademark of the dishwasher interior. If you need assistance using your product or you would like to Maytag with any questions or concerns at the number below : In the U.S.A.: Maytag Brand Home Appliances Customer eXperience Center 553 Benson Road Benton Harbor, MI 49022-2692 Please include a ...daytime phone number in your correspondence. In Canada: Maytag Brand Home Appliances Customer eXperience Centre 200 - 6750 Century Avenue Mississauga ON L5N 0B7 Please keep this User Instructions and model number...
...Trademark of the dishwasher interior. If you need assistance using your product or you would like to Maytag with any questions or concerns at the number below : In the U.S.A.: Maytag Brand Home Appliances Customer eXperience Center 553 Benson Road Benton Harbor, MI 49022-2692 Please include a ...daytime phone number in your correspondence. In Canada: Maytag Brand Home Appliances Customer eXperience Centre 200 - 6750 Century Avenue Mississauga ON L5N 0B7 Please keep this User Instructions and model number...
Installation Instructions
Page 2
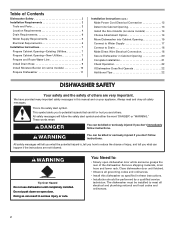
WARNING You can kill or hurt you don't follow instructions. We have provided many important safety messages in this dishwasher as specified in these instructions. • Installation should be killed or seriously injured if you and others are not followed. This is , tell you how to reduce the chance of injury, and tell you don't immediately follow the safety alert symbol and either the word "DANGER" or "WARNING." Doing so can happen if the instructions are very important. This symbol alerts you to potential hazards that can be performed by a qualified service ...
WARNING You can kill or hurt you don't follow instructions. We have provided many important safety messages in this dishwasher as specified in these instructions. • Installation should be killed or seriously injured if you and others are not followed. This is , tell you how to reduce the chance of injury, and tell you don't immediately follow the safety alert symbol and either the word "DANGER" or "WARNING." Doing so can happen if the instructions are very important. This symbol alerts you to potential hazards that can be performed by a qualified service ...
Installation Instructions
Page 3
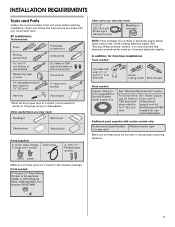
See "Electrical Requirements" section. Check local codes. suggested) or flexible braided water supply line See "Electrical Requirements" section For Direct Wire: use UL listed or CSA approved strain relief to 16-gauge wiring in plumbing supply stores. Drain hose clamps (1 large and 1 small) Drain hose 2 - #10 x ¹⁄₂" Phillips-head screws Silver Green Make sure all these parts are included in the literature package. In addition, for purchase in dishwasher Other useful items you may need : 1 ¹⁄₂" -2" (38.1-5.0 cm) Screw-typ e clamps ...
See "Electrical Requirements" section. Check local codes. suggested) or flexible braided water supply line See "Electrical Requirements" section For Direct Wire: use UL listed or CSA approved strain relief to 16-gauge wiring in plumbing supply stores. Drain hose clamps (1 large and 1 small) Drain hose 2 - #10 x ¹⁄₂" Phillips-head screws Silver Green Make sure all these parts are included in the literature package. In addition, for purchase in dishwasher Other useful items you may need : 1 ¹⁄₂" -2" (38.1-5.0 cm) Screw-typ e clamps ...
Installation Instructions
Page 4
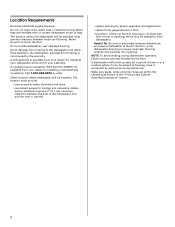
Do not run drain lines, water lines or electrical wiring where they can interfere with floor at rear of opening, shims may be left unused for loading and unloading dishes. The location where the dishwasher will be installed. A side panel kit is not covered by authorized service personnel. Corner locations require a 2" (5.1 cm) minimum clearance between motor and flooring. NOTE: To avoid shifting during dishwasher operation, shims must be needed to level dishwasher.) Helpful Tip: Be sure to freezing, have it may be securely attached to order. Do not install dishwasher over ...
Do not run drain lines, water lines or electrical wiring where they can interfere with floor at rear of opening, shims may be left unused for loading and unloading dishes. The location where the dishwasher will be installed. A side panel kit is not covered by authorized service personnel. Corner locations require a 2" (5.1 cm) minimum clearance between motor and flooring. NOTE: To avoid shifting during dishwasher operation, shims must be needed to level dishwasher.) Helpful Tip: Be sure to freezing, have it may be securely attached to order. Do not install dishwasher over ...
Installation Instructions
Page 5
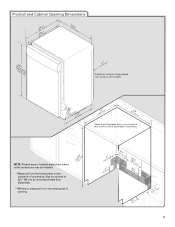
May be reduced to 33⁷⁄₈" (86 cm) by removing wheels from dishwasher. **Minimum, measured from the lowest point on all models) (532.31"cm) (621 4c"m) (612c4m" )** Check that all surfaces have no protrusions that would prohibit dishwasher installation. NOTE: Shaded areas of cabinet walls show where utility connections may be compressed (not used on the underside of opening. (8m63.44in"c*m) (10.42"cm) (7.63"cm) (167³.⁄₄2"cm) (14(2.³64⁄₄.¹4"⁄c₂"mcm) ) (1206.¹7⁄₂"cm) (165¹.⁄₄9"cm...
May be reduced to 33⁷⁄₈" (86 cm) by removing wheels from dishwasher. **Minimum, measured from the lowest point on all models) (532.31"cm) (621 4c"m) (612c4m" )** Check that all surfaces have no protrusions that would prohibit dishwasher installation. NOTE: Shaded areas of cabinet walls show where utility connections may be compressed (not used on the underside of opening. (8m63.44in"c*m) (10.42"cm) (7.63"cm) (167³.⁄₄2"cm) (14(2.³64⁄₄.¹4"⁄c₂"mcm) ) (1206.¹7⁄₂"cm) (165¹.⁄₄9"cm...
Installation Instructions
Page 6
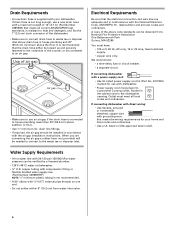
Use of air gap Air gap • Make sure to use with dishwasher. • Power supply cord must plug into a grounded 3 prong outlet, located in accordance with the National Electrical Code, ANSI/NFPA 70 - Water Supply Requirements • A hot water line with 20-120 psi (138-862 kPa) water pressure can be installed in the cabinet next to the dishwasher opening. O.D. drain line fittings. • If required, the air gap should be obtained from water inlet valve. 6 latest edition and all local codes and ordinances. If connecting dishwasher with direct wiring: • ...
Use of air gap Air gap • Make sure to use with dishwasher. • Power supply cord must plug into a grounded 3 prong outlet, located in accordance with the National Electrical Code, ANSI/NFPA 70 - Water Supply Requirements • A hot water line with 20-120 psi (138-862 kPa) water pressure can be installed in the cabinet next to the dishwasher opening. O.D. drain line fittings. • If required, the air gap should be obtained from water inlet valve. 6 latest edition and all local codes and ordinances. If connecting dishwasher with direct wiring: • ...

Installation Instructions
Page 7
See product and cabinet opening . 1 Power Supply Cord-Drill hole Optional loactaiotinon Preefferrereddlolocactaiotinon (3.8 cm) Drill a 1¹⁄₂" (3.8 cm) hole in cabinet side or rear. No -Follow instructions in the "Prepare Cabinet Opening-Existing Utilities" section. Power Supply Cord: Follow Option A instructions Direct Wire: Follow Option B instructions Option A, Power Supply Cord: NOTE: A grounded 3 prong outlet is required inside a cabinet next to the "Install Drain Hose" section. Prepare Cabinet Opening-New Utilities Prepare and route the electrical supply ...
See product and cabinet opening . 1 Power Supply Cord-Drill hole Optional loactaiotinon Preefferrereddlolocactaiotinon (3.8 cm) Drill a 1¹⁄₂" (3.8 cm) hole in cabinet side or rear. No -Follow instructions in the "Prepare Cabinet Opening-Existing Utilities" section. Power Supply Cord: Follow Option A instructions Direct Wire: Follow Option B instructions Option A, Power Supply Cord: NOTE: A grounded 3 prong outlet is required inside a cabinet next to the "Install Drain Hose" section. Prepare Cabinet Opening-New Utilities Prepare and route the electrical supply ...
Installation Instructions
Page 8
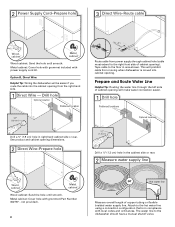
2 Power Supply Cord-Prepare hole 3 Direct Wire-Route cable Wood cabinet Metal cabinet Wood cabinet: Sand the hole until smooth. This will make water connection easier. 1 Drill hole PrPerfeefrerrereddloloccaations OOpptitoionnaal llolocacattioionnss ¹⁄₂" (1.3 cm) Drill a ¹⁄₂" (1.3 cm) hole in compliance with grommet (Part Number 302797 - See product and cabinet opening ). Prepare and Route Water Line Helpful Tip: Routing the water line through cabinet hole (cable must extend to the right front side of cabinet opening . Metal cabinet: Cover ...
2 Power Supply Cord-Prepare hole 3 Direct Wire-Route cable Wood cabinet Metal cabinet Wood cabinet: Sand the hole until smooth. This will make water connection easier. 1 Drill hole PrPerfeefrerrereddloloccaations OOpptitoionnaal llolocacattioionnss ¹⁄₂" (1.3 cm) Drill a ¹⁄₂" (1.3 cm) hole in compliance with grommet (Part Number 302797 - See product and cabinet opening ). Prepare and Route Water Line Helpful Tip: Routing the water line through cabinet hole (cable must extend to the right front side of cabinet opening . Metal cabinet: Cover ...