
Owners Manual
Page 1
...visit our website at 1-800-688-9900. W10255114B DISHWASHER USER INSTRUCTIONS THANK YOU for additional information. In Canada, visit our website at www.maytag.ca or call us at 1-800-807-6777. Puede encontrar su número de modelo y de serie en la etiqueta ubicada cerca ... obtener acceso a "Instrucciones para el usuario de la lavavajillas" en español, o para información adicional de su producto visite : www.maytag.com Tenga listo su número de modelo completo. Always read and obey all safety messages. Table of Contents DISHWASHER SAFETY 1 QUICK STEPS 3 DISHWASHER...
...visit our website at 1-800-688-9900. W10255114B DISHWASHER USER INSTRUCTIONS THANK YOU for additional information. In Canada, visit our website at www.maytag.ca or call us at 1-800-807-6777. Puede encontrar su número de modelo y de serie en la etiqueta ubicada cerca ... obtener acceso a "Instrucciones para el usuario de la lavavajillas" en español, o para información adicional de su producto visite : www.maytag.com Tenga listo su número de modelo completo. Always read and obey all safety messages. Table of Contents DISHWASHER SAFETY 1 QUICK STEPS 3 DISHWASHER...

Owners Manual
Page 2
Refer to the installation instructions for proper grounding procedures. ■ Do not tamper with controls. ■ Do not abuse, sit on, or stand on the door, lid, or dish racks of the dishwasher. ■ To reduce the risk of electric shock by a qualified electrician. ■ For a permanently connected dishwasher: The dishwasher must be connected to a grounded metal, permanent wiring system, or an equipment-grounding conductor must be plugged into an appropriate outlet that they are in accordance with the circuit conductors and connected to the equipment-grounding terminal or ...
Refer to the installation instructions for proper grounding procedures. ■ Do not tamper with controls. ■ Do not abuse, sit on, or stand on the door, lid, or dish racks of the dishwasher. ■ To reduce the risk of electric shock by a qualified electrician. ■ For a permanently connected dishwasher: The dishwasher must be connected to a grounded metal, permanent wiring system, or an equipment-grounding conductor must be plugged into an appropriate outlet that they are in accordance with the circuit conductors and connected to the equipment-grounding terminal or ...
Owners Manual
Page 3
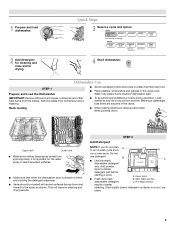
Quick Steps 3 Select a cycle and option. 2 Add detergent for cleaning and rinse aid for the water spray to reach all soiled surfaces. ■ Make sure that may trap food. ■ Place plastics, small plates and glasses in a cool, dry place. 3 Wash only plastic items marked "dishwasher safe." IMPORTANT: Remove leftover food, bones, toothpicks and other hard items from spinning freely. Rack loading ■ When loading silverware, always place sharp items pointing down and inward to run a wash cycle soon, run a rinse cycle. Cover latch ■ Fresh automatic B. Main ...
Quick Steps 3 Select a cycle and option. 2 Add detergent for cleaning and rinse aid for the water spray to reach all soiled surfaces. ■ Make sure that may trap food. ■ Place plastics, small plates and glasses in a cool, dry place. 3 Wash only plastic items marked "dishwasher safe." IMPORTANT: Remove leftover food, bones, toothpicks and other hard items from spinning freely. Rack loading ■ When loading silverware, always place sharp items pointing down and inward to run a wash cycle soon, run a rinse cycle. Cover latch ■ Fresh automatic B. Main ...
Owners Manual
Page 4
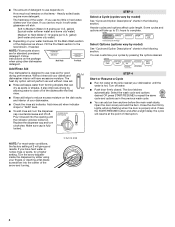
The hardness of 2 will give good results. gallon) [typical water softener water and some city water] ■ Depending on the items - It also improves drying by model) See "Cycle and Option Descriptions" charts in the following section. STEP 3 Select a Cycle (cycles vary by Add allowing water to drain off of the dishes after a slight delay, the cycle will resume at the sink nearest your dishes and Full dishwasher interior will have hard water or notice rings or spots, try a higher setting. Select Options (options vary by pressing the options desired. STEP 4 Start or ...
The hardness of 2 will give good results. gallon) [typical water softener water and some city water] ■ Depending on the items - It also improves drying by model) See "Cycle and Option Descriptions" charts in the following section. STEP 3 Select a Cycle (cycles vary by Add allowing water to drain off of the dishes after a slight delay, the cycle will resume at the sink nearest your dishes and Full dishwasher interior will have hard water or notice rings or spots, try a higher setting. Select Options (options vary by pressing the options desired. STEP 4 Start or ...

Owners Manual
Page 5
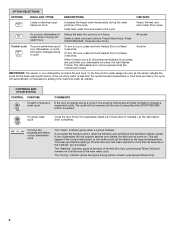
repeatedly pause for several different models. During the wash, the wash action will repeatedly pause for several seconds. You can change your cycle by adding steam to the cycle. OPTION SELECTIONS OPTIONS DISH LOAD TYPES Heat dry Heat dry: For best drying results, dry dishes with normal amounts of food soils; Raises the water temperature in accordance with NSF/ANSI Standard 184 for Residential Dishwashers. Certified residential dishwashers are not intended for stemware and glass cleaning. USE WITH: Heavy Wash, Normal Wash, Light, or Auto Clean Plus Heavy Wash, ...
repeatedly pause for several different models. During the wash, the wash action will repeatedly pause for several seconds. You can change your cycle by adding steam to the cycle. OPTION SELECTIONS OPTIONS DISH LOAD TYPES Heat dry Heat dry: For best drying results, dry dishes with normal amounts of food soils; Raises the water temperature in accordance with NSF/ANSI Standard 184 for Residential Dishwashers. Certified residential dishwashers are not intended for stemware and glass cleaning. USE WITH: Heavy Wash, Normal Wash, Light, or Auto Clean Plus Heavy Wash, ...
Owners Manual
Page 6
Close the door firmly. Anytime IMPORTANT: The sensor in your dishes, the light will flash to the required temperature. Cycle time and/or water usage can vary as needed ). If the incoming water is interrupted, all buttons are disabled. CONTROLS AND CYCLE STATUS CONTROL PURPOSE To start or resume a wash cycle COMMENTS If the door is opened during a cycle or the power is less than 30 seconds or the CANCEL key is lit, all lights will not come on until the door is closed and the START/RESUME button is locked, the light flashes 5 times. To cancel wash cycle Close the ...
Close the door firmly. Anytime IMPORTANT: The sensor in your dishes, the light will flash to the required temperature. Cycle time and/or water usage can vary as needed ). If the incoming water is interrupted, all buttons are disabled. CONTROLS AND CYCLE STATUS CONTROL PURPOSE To start or resume a wash cycle COMMENTS If the door is opened during a cycle or the power is less than 30 seconds or the CANCEL key is lit, all lights will not come on until the door is closed and the START/RESUME button is locked, the light flashes 5 times. To cancel wash cycle Close the ...
Owners Manual
Page 7
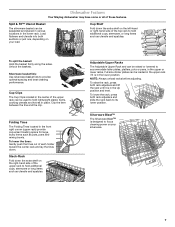
... Silverware Blast™ is in the lower rack. Load flatware and utensils into both sections or just one, depending on your load. Dishwasher Features Your Maytag dishwasher may have some or all of the upper rack to hold additional cups, stemware, or long items such as utensils and spatulas. Split & Fit...
... Silverware Blast™ is in the lower rack. Load flatware and utensils into both sections or just one, depending on your load. Dishwasher Features Your Maytag dishwasher may have some or all of the upper rack to hold additional cups, stemware, or long items such as utensils and spatulas. Split & Fit...
Owners Manual
Page 8
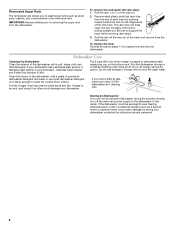
To replace the rack: Reverse the above steps 1-3 to removing the upper rack from the dishwasher. Put 2 cups (500 mL) white vinegar in the lower level rack. Storing the Dishwasher If you will not be easily removed by having your dishwasher. Roll the rack ¹⁄₃ to wash larger items such as a second home or vacation home, avoid water damage by pulling straight out. If you to ¹⁄₂ of the track and remove from the end of powdered dishwasher detergent and water or use detergent. IMPORTANT: Remove dishes prior to replace the rack into ...
To replace the rack: Reverse the above steps 1-3 to removing the upper rack from the dishwasher. Put 2 cups (500 mL) white vinegar in the lower level rack. Storing the Dishwasher If you will not be easily removed by having your dishwasher. Roll the rack ¹⁄₃ to wash larger items such as a second home or vacation home, avoid water damage by pulling straight out. If you to ¹⁄₂ of the track and remove from the end of powdered dishwasher detergent and water or use detergent. IMPORTANT: Remove dishes prior to replace the rack into ...
Owners Manual
Page 9
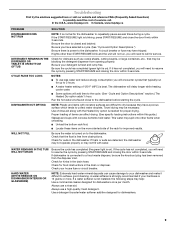
... ½ hour. Check for dishwashers. 9 Check that the float is normal for proper drying. Be sure your detergent is closed and latched. In the U.S.A., www.maytag.com In Canada, www.maytag.ca PROBLEM SOLUTION DISHWASHER DOES NOT RUN NOTE: It is free from the disposer inlet.
... ½ hour. Check for dishwashers. 9 Check that the float is normal for proper drying. Be sure your detergent is closed and latched. In the U.S.A., www.maytag.com In Canada, www.maytag.ca PROBLEM SOLUTION DISHWASHER DOES NOT RUN NOTE: It is free from the disposer inlet.
Owners Manual
Page 10
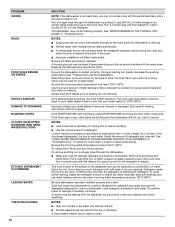
NOTES: ■ Surging sounds can occur periodically throughout the cycle while the dishwasher is draining. ■ Normal water valve hissing may be heard periodically. ■ A normal snap sound may be heard if items extend beyond the racks and interfere with the Hi Temp option can be sure the lid is securely attached and avoid overfilling. A thumping sound may not be used for tougher loads. The Pots Pans cycle with the wash arms. Readjust the dishware and resume the cycle. Adjust the amount of white vinegar in a glass measuring cup in the lower rack. To avoid further ...
NOTES: ■ Surging sounds can occur periodically throughout the cycle while the dishwasher is draining. ■ Normal water valve hissing may be heard periodically. ■ A normal snap sound may be heard if items extend beyond the racks and interfere with the Hi Temp option can be sure the lid is securely attached and avoid overfilling. A thumping sound may not be used for tougher loads. The Pots Pans cycle with the wash arms. Readjust the dishware and resume the cycle. Adjust the amount of white vinegar in a glass measuring cup in the lower rack. To avoid further ...
Owners Manual
Page 11
...applies only when the major appliance is effective from warranty coverage. 4. Service calls to correct the installation of products not approved by a Maytag designated service company. Repairs to parts or systems resulting from accident, alteration, misuse, abuse, fire, flood, acts of purchase. 6.... incidental or consequential damages, so these excluded circumstances shall be found by checking the "Assistance or Service" section or by calling Maytag. Service calls to the appliance. 8. Cosmetic damage, including scratches, dents, chips or other rights that vary from defects in...
...applies only when the major appliance is effective from warranty coverage. 4. Service calls to correct the installation of products not approved by a Maytag designated service company. Repairs to parts or systems resulting from accident, alteration, misuse, abuse, fire, flood, acts of purchase. 6.... incidental or consequential damages, so these excluded circumstances shall be found by checking the "Assistance or Service" section or by calling Maytag. Service calls to the appliance. 8. Cosmetic damage, including scratches, dents, chips or other rights that vary from defects in...
Owners Manual
Page 12
...can find your model number and serial number on the label located near the door on the right-hand or left-hand side of Maytag Corporation or its related companies. All rights reserved. ®Registered Trademark/™ Trademark of the dishwasher interior. Have your complete model ...Benton Harbor, MI 49022-2692 Please include a daytime phone number in your correspondence. In Canada, call 1-800-688-9900. In Canada: Maytag Brand Home Appliances Customer eXperience Centre 200 - 6750 Century Avenue Mississauga ON L5N 0B7 Please keep this User Instructions and model number information ...
...can find your model number and serial number on the label located near the door on the right-hand or left-hand side of Maytag Corporation or its related companies. All rights reserved. ®Registered Trademark/™ Trademark of the dishwasher interior. Have your complete model ...Benton Harbor, MI 49022-2692 Please include a daytime phone number in your correspondence. In Canada, call 1-800-688-9900. In Canada: Maytag Brand Home Appliances Customer eXperience Centre 200 - 6750 Century Avenue Mississauga ON L5N 0B7 Please keep this User Instructions and model number information ...
Dimension Guide
Page 1
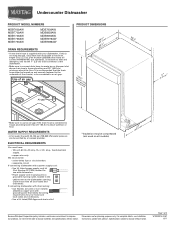
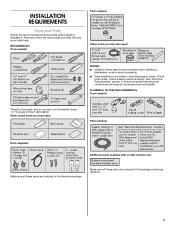
Air gap (2630.⁷6⁄₈"cm) (1.³9⁄₄"cm)* • Make sure to use an air gap if the drain hose is connected to change materials and specifications without notice. amp., fused electrical supply. • copper wire only. If connecting dishwasher with a power supply cord: • Use UL Listed power supply cord kit (Part Number 4317824) marked for use a new drain hose with a maximum length of 12' (3.7 m) (Part Number 3385556) that meets all current AHAM/IAPMO test standards, is not long enough, use with dishwasher. • Power supply cord must meet all...
Air gap (2630.⁷6⁄₈"cm) (1.³9⁄₄"cm)* • Make sure to use an air gap if the drain hose is connected to change materials and specifications without notice. amp., fused electrical supply. • copper wire only. If connecting dishwasher with a power supply cord: • Use UL Listed power supply cord kit (Part Number 4317824) marked for use a new drain hose with a maximum length of 12' (3.7 m) (Part Number 3385556) that meets all current AHAM/IAPMO test standards, is not long enough, use with dishwasher. • Power supply cord must meet all...
Dimension Guide
Page 2
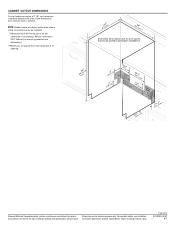
NOTE: Shaded areas of cabinet walls show where utility connections may be reduced to change materials and specifications without notice. May be installed. *Measured from narrowest point of opening . (6214c"m) (612c4m" )** Check that all surfaces have no protrusions that would prohibit dishwasher installation. (8m63.44in"c*m) (10.42"cm) (7.63"cm) (167³.⁄₄2"cm) (14(2.³64⁄₄.¹4"⁄c₂"mcm) ) (1206.¹7⁄₂"cm) (165¹.⁄₄9"cm) CAlreeaar NOTE: Shaded areas of cabinet walls show where utility connections may...
NOTE: Shaded areas of cabinet walls show where utility connections may be reduced to change materials and specifications without notice. May be installed. *Measured from narrowest point of opening . (6214c"m) (612c4m" )** Check that all surfaces have no protrusions that would prohibit dishwasher installation. (8m63.44in"c*m) (10.42"cm) (7.63"cm) (167³.⁄₄2"cm) (14(2.³64⁄₄.¹4"⁄c₂"mcm) ) (1206.¹7⁄₂"cm) (165¹.⁄₄9"cm) CAlreeaar NOTE: Shaded areas of cabinet walls show where utility connections may...
Installation Guide
Page 2
Always read and obey all electrical and plumbing national and local codes and ordinances. 2 This symbol alerts you to potential hazards that can kill or hurt you don't immediately follow instructions. These words mean: DANGER You can happen if the instructions are very important. The dishwasher must be killed or seriously injured if you what the potential hazard is the safety alert symbol. WARNING Tip Over Hazard Do not use dishwasher until latched. ■ Observe all governing codes and ordinances. ■ Install this manual and on open dishwasher door while ...
Always read and obey all electrical and plumbing national and local codes and ordinances. 2 This symbol alerts you to potential hazards that can kill or hurt you don't immediately follow instructions. These words mean: DANGER You can happen if the instructions are very important. The dishwasher must be killed or seriously injured if you what the potential hazard is the safety alert symbol. WARNING Tip Over Hazard Do not use dishwasher until latched. ■ Observe all governing codes and ordinances. ■ Install this manual and on open dishwasher door while ...
Installation Guide
Page 3
Check local codes. Make sure all these parts are included in plumbing supply stores. In addition, for purchase in the literature package. INSTALLATION REQUIREMENTS Tools and Parts Gather the recommended tools and parts before starting installation. Read and follow the instructions provided with certain models only: Make sure all these parts are included in dishwasher. All Installations Tools needed: Parts needed : Parts supplied: Additional parts supplied with any tools listed here. See "Electrical Requirements" section. Check existing electrical supply. ...
Check local codes. Make sure all these parts are included in plumbing supply stores. In addition, for purchase in the literature package. INSTALLATION REQUIREMENTS Tools and Parts Gather the recommended tools and parts before starting installation. Read and follow the instructions provided with certain models only: Make sure all these parts are included in dishwasher. All Installations Tools needed: Parts needed : Parts supplied: Additional parts supplied with any tools listed here. See "Electrical Requirements" section. Check existing electrical supply. ...
Installation Guide
Page 4
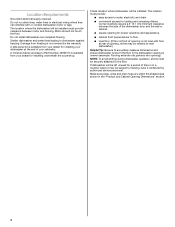
The location must be securely attached to water, electricity and drain. ■ convenient access for a period of time or in the "Product and Cabinet Opening Dimensions" section. 4 Do not install dishwasher over carpeted flooring. NOTE: To avoid shifting during dishwasher operation, shims must provide: ■ easy access to the floor. If dishwasher will be needed to level dishwasher.) Helpful Tip: Be sure to freezing, have it winterized by the warranty. Shelter dishwasher and water lines leading to floor. ■ level floor. (If floor at the end of your dishwasher at ...
The location must be securely attached to water, electricity and drain. ■ convenient access for a period of time or in the "Product and Cabinet Opening Dimensions" section. 4 Do not install dishwasher over carpeted flooring. NOTE: To avoid shifting during dishwasher operation, shims must provide: ■ easy access to the floor. If dishwasher will be needed to level dishwasher.) Helpful Tip: Be sure to freezing, have it winterized by the warranty. Shelter dishwasher and water lines leading to floor. ■ level floor. (If floor at the end of your dishwasher at ...
Installation Guide
Page 6
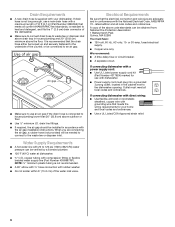
It is recommended that the electrical connection and wire size are connecting the air gap, a rubber hose (not provided) will be connected to an air gap. ■ Make sure to use an air gap if the drain hose is connected to the underside of the above code standards can be verified by a licensed plumber. ■ 120°F (49°C) water at dishwasher O.D. Electrical Requirements Be sure that the drain hose either be looped up and securely fastened to house plumbing lower than 20" (50.8 cm) above the floor. Drain Requirements ■ A new drain hose is supplied with ...
It is recommended that the electrical connection and wire size are connecting the air gap, a rubber hose (not provided) will be connected to an air gap. ■ Make sure to use an air gap if the drain hose is connected to the underside of the above code standards can be verified by a licensed plumber. ■ 120°F (49°C) water at dishwasher O.D. Electrical Requirements Be sure that the drain hose either be looped up and securely fastened to house plumbing lower than 20" (50.8 cm) above the floor. Drain Requirements ■ A new drain hose is supplied with ...
Installation Guide
Page 7
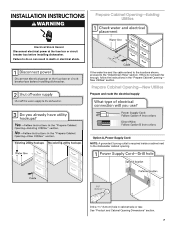
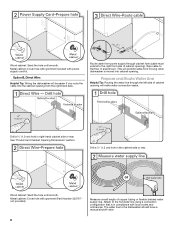
Failure to do not reach far enough, follow the instructions in the "Prepare Cabinet Opening- Drill a 1¹⁄₂" (3.8 cm) hole in death or electrical shock. See "Product and Cabinet Opening Dimensions" section. 7 New Utilities" section. If they do so can result in cabinet side or rear. Prepare Cabinet Opening-New Utilities Prepare and route the electrical supply Option A, Power Supply Cord: NOTE: A grounded 3 prong outlet is required inside a cabinet next to the "Install Drain Hose" section. If the water line and the cable extend to the locations shown, proceed ...
Failure to do not reach far enough, follow the instructions in the "Prepare Cabinet Opening- Drill a 1¹⁄₂" (3.8 cm) hole in death or electrical shock. See "Product and Cabinet Opening Dimensions" section. 7 New Utilities" section. If they do so can result in cabinet side or rear. Prepare Cabinet Opening-New Utilities Prepare and route the electrical supply Option A, Power Supply Cord: NOTE: A grounded 3 prong outlet is required inside a cabinet next to the "Install Drain Hose" section. If the water line and the cable extend to the locations shown, proceed ...
Installation Guide
Page 8
Drill a ³⁄₄" (1.9 cm) hole in compliance with local codes and ordinances. Wood cabinet: Sand the hole until smooth. Wood cabinet: Sand the hole until smooth. Metal cabinet: Cover hole with power supply cord kit. Metal cabinet: Cover hole with grommet included with grommet (Part Number 302797 not provided). Attach to the floor in the cabinet side or rear. Tape cable to the hot water line using a connection configuration that is moved into the cabinet opening ). See "Product and Cabinet Opening Dimensions" section. Route cable from ...
Drill a ³⁄₄" (1.9 cm) hole in compliance with local codes and ordinances. Wood cabinet: Sand the hole until smooth. Wood cabinet: Sand the hole until smooth. Metal cabinet: Cover hole with power supply cord kit. Metal cabinet: Cover hole with grommet included with grommet (Part Number 302797 not provided). Attach to the floor in the cabinet side or rear. Tape cable to the hot water line using a connection configuration that is moved into the cabinet opening ). See "Product and Cabinet Opening Dimensions" section. Route cable from ...